Acer Xplova X2 Smart Cycling Computer User Manual


Xplova X2
Smart Cycling Computer
User Manual
Meet your X2
1.1 Description of the screen and buttonsF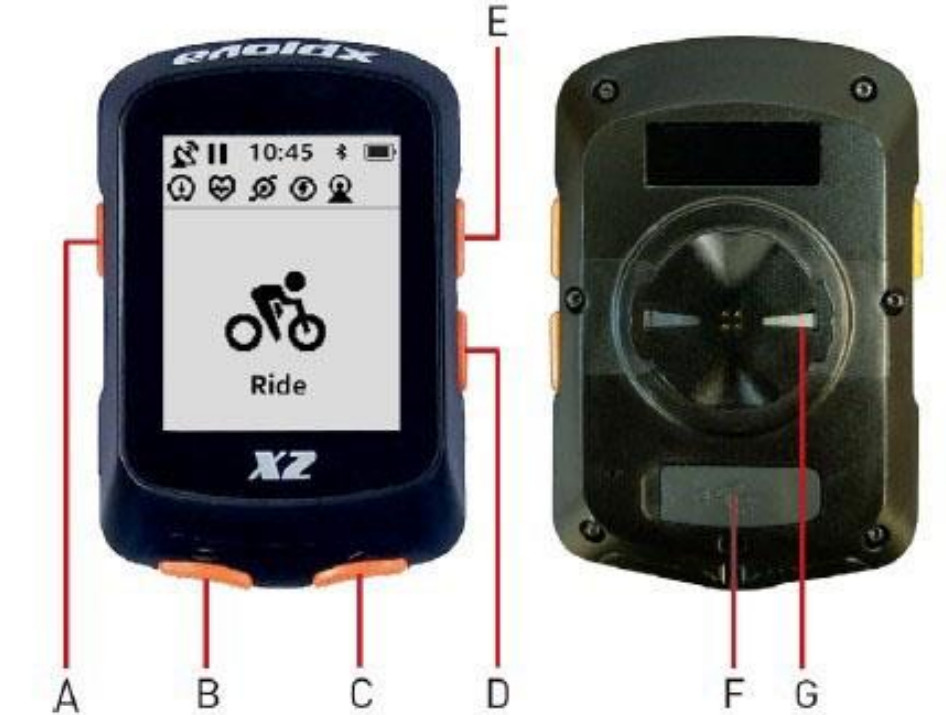

| ( A ) POWER button: Power on / Power off (Long press) Function setting /Save record/Discard record ( B ) Segment /Return /Cancel ( C ) Confirm/Enter/Start record /Pause record |
( D ) Scroll down ( E ) Scroll up ( F ) Micro USB port ( G ) Bike mount latch |
1.2 Installation instructions

- Hold the bike mount on top of the rubber pad evenly together ensuring they are aligned squarely to each other. Then place them on the bike handlebar.
- Loop an elastic band from one tab of the bike mount. Stretch the free end of the elastic band underneath the bike handlebar and up to the other tab. Ensure the bike mount stays in place securely.
- Align the latch on the back of X2 with the bike mount notch. Press downward slightly and turn X2 until it locks in place.
1.3 De-installation steps
- Rotate X2 counterclockwise until the latch no longer locks it.
- Remove X2 and keep it in a safe place.
1.4 Charging instructions
- Please use a standard DC 5V USB charger, which can fully charge the X2 cycling computer within 2 hours.
- Do not pull the USB waterproof cover excessively, or else the deformation of the waterproof cover will affect the waterproof and dustproof functions.
- After charging, please press down the USB waterproof cover to achieve the best waterproof and dustproof effect.
- Support power-on charging.
Basic settings
- Press the left button of X2 to turn on the cycling computer. Initial settings will be performed after the first boot. Please follow the instructions on the screen to perform initial set up [Language], [Distance Unit], [Height Unit], [Temperature Unit], [Time Format], and [Time Zone] in order.
- When setting each category, you can use the two buttons on the right to scroll up and down. After selecting, press the lower right button to set the next category.
- To modify the previous setting, press the lower-left button to return to the previous category.
Setting before riding

Tap the left button of X2 to enter the [Main Menu], here you can make more customized settings.
3.1 Setting page

- Enter X2【Settings】>【Page】. X2 defaults 3 pages of customized riding data pages (race challenge, road cruise, extreme endurance), 1 page of altimeter, 1 page of route guidance, and 1 page of training. You can set each page according to your personal needs.
- You can customize your pages through the two buttons on the right. After selecting, press the lower right button to enter the page, you can then set the pages [Data], [Sort], [Home], [Hide].
- The following explains how to set page data.

Step 1: After pressing the lower right button to enter [Data], you can select this by using the two buttons on the right The number of grids is displayed on the page (1-8 grids). After selecting, press the lower right button to set the data of each column.
Step 2: You can select the column to be set through the two buttons on the right. After selecting, press the lower right Press the key to set the data of the column.
Step 3: You can set each column according to your personal needs. During operation, press the lower-left button To return to the previous screen.
The following table lists all the data types and items that can be set for X2:
| Speed | Heart Rate | Power | |
| 1 Speed 2 Avg Speed 3 Max Speed 4 Lap Speed 5 Pre Lap Spd 6 Lap Max Spd |
1 Heart Rate 2 Avg HR 3 Max HR 4 Lap HR 5 Pre Lap HR 6 Lap Max HR 7 HR Zone 8 HR % 9 Avg HR % 10 Max HR % 11 Lap HR % 12 Pre Lap HR % |
1 Power 2 Avg Pwr 3 Max Pwr 4 Lap Pwr 5 Pre Lap Pwr 6 Lap Max Pwr 7 Pwr Zone 8 Pwr 3s 9 Pwr 10s 10 Pwr 30s |
11 Pwr % FTP 12 Pwr IF 13 Pwr NP 14 Pwr TSS 15 Watt/Kg 16 Pwr-Kilojoules17 Pwr Balance 18 TQ. Effect. 19 Ped.Smooth. |
| Cadence | |||
| 1 Cadence 2 Avg Cad 3 Max Cad 4 Lap Cad 5 Pre Lap Cad 6 Lap Max Cad | |||
| Distance | Elevation | Timer | |
| 1 Distance 2 Ascent Dist 3 Descent Dist 4 Lap Dist 5 Pre Lap Dist 6 Odometer 7 Dist.to Go |
1 Elevation 2 Grade 3 VAM 4 VAM 30s 5 Total Ascent 6 Total Descent 7 Max Elevation 8 Min Elevation 9 VAM +Avg 10 VAM – Avg 11 VAM + Max 12 VAM – Max 13 Avg Grade + |
14 Avg Grade – 15 Max Grade + 16 Max Grade – 17 Lap Elev+ 18 Lap VAM+ 19 Lap Grade+ |
1 Elapsed Time 2 Timer 3 Laps 4 Lap Time 5 Time of Day 6 Sunrise 7 Sunset |
| More | |||
| 1 Temperature 2 GPS Accuracy 3 Heading 4 Calories | |||
4. [Order]: You can arrange the order of the pages. While riding, the page of order 1 will be displayed first.
5. [Homepage]: You can set one of the pages like the homepage. If there is no key operation for 10 seconds during riding, this page will be displayed.
6. [Hide]: When you set a page as hidden, the page will not be displayed during riding.
3.2 Backlight Setting

- Enter X2 [Setting] > [Backlight]
- You may set up the backlight mode, time, and brightness. It is recommended to set the backlight mode to auto, X2 will automatically turn on/off the backlight.
3.3 Others

- Enter X2 [Settings] > [Other]
- The function description of each category is as follows:
| Category | Description |
| Auto Start | After entering the X2 screen, if X2 sensed a movement speed that is greater than 3 km/h and lasts for more than 2 seconds, it will automatically start recording. |
| Auto Pause | If X2 sensed movement speed that is less than 3km/h during riding and lasts for more than 1 second, the recording will be paused automatically. |
| Smart Record | Record data frequency is every 5-10 seconds/data, without affecting the GPS trajectory. After enabling this function, the file size is approximately one-fourth of the recorded data per second. |
| Battery Save | Turning on the GPS chip power-saving mode can increase the X2’s battery life by more than 40 hours. |
| Auto Power Off | If there is no operation on the X2 for 15 minutes and X2 is not in sleep mode, then X2 will automatically shut down with a 15-second countdown notification. During the 15 second countdown, pressing any button on X2 will cancel the automatic shutdown. |
4 Pairing with sensors

- Enter X2 [Sensors] > [Add Sensor]
- X2 will search for nearby ANT+ devices that are functioning. You can select the ANT+ device you want to connect to with the two buttons on the right. After selecting, press the lower right button to connect to the device.
- X2 is able to connect to (1) Speed sensor, (2) Heart rate monitor, (3) Cadence sensor, (4) Speed/cadence sensor, (5) Power meter, (6) Smart trainer, etc.
- During the operation, press the left down button to return to the previous page.
| Speed sensor | |
| Heart rate monitor | |
| Cadence sensor | |
| Power meter | |
| Smart trainer |


Start Riding
5.1 GPS Signal
The X2 will automatically search for satellites after it is turned on. Please be in an outdoor environment with no shelter above. The first GPS search will take 30 seconds to 3 minutes. Stagnant status can help shorten the GPS search time.
You can confirm the current signal strength on the GPS symbol in the upper left corner of the X2 screen.
| GPS: Good signal reception | |
| GPS: Normal signal reception | |
| GPS: No signal reception (No positioning) |


5.2 Start recording
Press the lower right button to enter the [Riding] mode. After GPS positioning, you can press the lower right button to start riding. During riding, there will be a symbol in the upper left corner of the X2 screen.

During riding, you can press the right side buttons to switch between the ride data page, altimeter, and route guide page.
Note: When the route guide function is not used during riding, the route guide page will display your current riding track.
5.3 Lap record

During riding, press the lower-left button to manually record laps. X2 will display the lap number, lap time, and distance. The lap information screen will automatically close after displaying for 10 seconds. Or you can click any button below to leave the lap counting information screen.
5.4 Pause recording
- During riding, press the lower right button to pause the riding record.
- When the recording is paused, press the lower right button to continue the riding.
5.5 Save records

During riding/pause, press the left side button to open the menu.
Select [Save Record], X2 will save the current riding record, and display a summary of riding data. You may click any button to leave this screen.
Note: After X2 is paired with Xplova Connect App, You can browse the riding records saved in X2 on the App.
5.6 Back to the start
During riding, press the left side button to open the menu and select [Back to Start]. X2 will open the route guidance screen and use your riding trajectory to guide you back to the starting point.
5.7 Discard records
During record/pause, press the left side button to open the menu, select [Discard record], X2 will discard the current riding record.
Download Xplova Connect App
| https://play.google.com/store/apps/details?id=com.xplova.connect | https://itunes.apple.com/us/app/xplova-connect/id1280913424?mt=8 |


Open the app store (Google Play or App Store) of your smartphone, Then search for “Xplova Connect”. Download and install the app. You may also scan the QR Code to download the application.
Use Xplova Connect App
7.1 Smart Phone pairing
- After opening the Xplova Connect App, click the button on the top right
- Please select [X2].
- Follow the on-screen instructions to complete the pairing process step by step.
- When the App displays the message: X2 ready, the Bluetooth symbol on X2 will display:


Note 1: When the X2 Bluetooth symbol

Note 2: When the X2 Bluetooth symbol
Note 3: One X2 can only be paired with one mobile App.

7.2 Upload riding activity
When X2 is paired with the mobile app, click the button at the top right of the App

7.3 Delete riding activity
You can enter the App【Riding activity】and click the button

8 Advanced settings via Xplova Connect App
8.1 Page settings
Enter the App【page setting】. You can set each page of X2 through the App, including a selection of display grid numbers, the selection of data in each column, page opening or hiding, and page order.
You can also add 5 more customized riding data pages through the App to meet your browsing needs.
You can also delete the customized ride data page through the App.

8.2 Sensors
Enter [Sensors] in the App. You can connect to the sensors located by X2 through the App.

You can also unpaired X2’s connected sensors through the App.
8.3 Alarm setting

Enter [Alarm setting] in the App. You may set up the alarm categories through the App
8.4 Fitness settings

Enter the App [Fitness Settings]. You can set your weight, functional threshold power (FTP), Maximum heart rate (Maxima HR). Make your riding X2 training feedback data
more accurate.
8.5 Smart notification setting
Enter the [Smart Notification Settings] in the App. X2 smart notification can be turned on/off so that you can be notified of incoming calls, and messages while riding. The smart notification will automatically turn off after it is displayed for 30 seconds. You can also press any button in X2 to turn off the smart notification.
If there is no smart notification on your X2, please make the following confirmation:
- Please make sure that your mobile phone’s Bluetooth is on, and the App is connected with X2.
- Please make sure that the smart notification setting in your Xplova Connect App is on.
- Please make sure that the notification setting of the social app in your mobile phone is on.
Start indoor cycling
If you use the indoor traininers to ride indoors, please use the X2【Indoor Riding】mode to record. The type of record stored after the ride will be 【Indoor Riding】.
Start training
10.1 Training course download
X2 can execute training schedules designed for power and heart rate. You can download the Xplova training course through the Xplova Connect App or download the TrainingPeaks training course to X2 through the Xplova Connect App.
10.2 Perform training courses
- Enter X2【Training】mode, select the training course you want to execute, and press the lower right button to start the training. Press the lower right button again, after the record symbol appears, X2 starts to execute the lesson.
- If you are training indoors, please press the left side button to open the menu mmediately after executing the training course and select [Indoor Riding]. After the training, the type of records stored will be [Indoor Riding]. (If this step is not taken, it will be regarded as [outdoor riding])
- Description of the training course chart: the upper left shows the remaining time of the current step, and the upper right shows the remaining time of this training course.
- Press the left down button can skip this training step.

10.3 Close training session
- Press the left side button to open the menu and select [Stop Training] to close the training course.
- If you want to end the ride at this time, press the right side button to exit the route guidance page, and then press the left side button to open the menu, you can now select [Save Record/Discard Record].
Start route guidance
11.1 Route download
You can download the route to X2 through Xplova Connect App.
11.2 Execute route guidance
- Enter X2【Route Guidance】mode, select the route you want to execute, and press the lower right button to open the route. Press the lower right button again, and after the recording symbol appears, X2 will starts to record the ride and execute route guidance.
- When X2 displays the route guidance screen, the number on the upper right is the scale, and you can press the left side button to zoom in and out of the route.
- After riding, press the right side button to change the page, and then press the left side button to open the menu, you can now select [Save Record/Discard Record].
11.3 Turn off route guidance
- During riding, press the right side button to exit the route guidance page, then press the left side button to open the menu, and select [Stop Route Guidance] to close the route guidance.
- If you want to end the ride at this time, press the right side button to exit the route guidance page, and then press the left side button to open the menu, you can select [Save Record/Discard Record].
- If you do not [stop route guidance], this route will be reserved in [riding] mode until X2 is turned off or you stop this route guidance.
Other
12.1 Firmware update
- Please connect X2 to Xplova Connect App first
- Please enter the App【Settings】>【My Device】>【X2】
- Click [Firmware Update], the App will check if there is any firmware that needs to be updated.
- If the firmware needs to be updated, please follow the instructions of the App to complete the update. (Do not perform other operations during the updating process)
12.2 System Settings
- Press the left side button of X2 to enter [Main Menu]> [Settings]> [System]. You can reset the X2 to the original factory settings or delete the records.
- You can also view X2 system information here, such as firmware version or cycling computer’s ID.

13 Product Specifications
| Cycling computer size | 5.4 x 8.2 x 2.1 cm |
| Cycling computer weight | 65 gram |
| Screen size | 2.3 inch, built-in backlit |
| Display screen type | Trans-reflective, translucent LCD screen, black/white FSTN dot-matrix |
| Display resolution | 1284’160 pixel |
| Battery type | Built-In 880mAHRechargeable Lithium Battery |
| Battery life | Up to 40 hours (Under normal GPS signal strength) |
| Charging interface | Micro USB 5V input |
| Fully charge time | 2 hours/ Support power on charging |
| Water resistance rating | IPX7 |
| Operating temperature | -10°C -50°C |
| I Sensitive and quick GPS or Beiduo, sensors positioning locations | |
| GPS system | |
| Route guidance | 1 Turn-by-turn guidance, destination distance |
| Built-In Sensors | Barometric Altimeter, thermometer, accelerometer |
| Data transfer method | 5.0 BLE |
| Storage memory | 16 Mbyte ; (up to 200 hours of riding history) |
| Data display grid | Display up to 8 categories of data in one page, totally 80 data grid |
| Support wireless sensors ANT+ | External connection : ANT+ , support speed sensor • cadence • HRM belt • power meter, smart trainer |
| Xplova Connect App | Android 5.0 or above; IOS 10 or above; BLE |
| Languages | English, Chinese (tradition), Chinese (simplified), Spanish, French, German, Dutch, Japanese, Italian, Portuguese, Korean, Thai, Hungarian, Czech, Slovak, Polish |
| Contents of package | Xplova X2 Cycle computer – Micro USB Cable xl, Quick Start Guide xl • Warranty Card xl • handlebar mounts xl – handlebar mounts pad xl • Rubber strap x2 |