Lenovo 20VH001KUS ThinkPad L13 Gen 2 Laptop User Guide
Lenovo 20VH001KUS ThinkPad L13 Gen 2 Laptop User Guide


Replacement procedure for the short M.2 solid-state drive
- Disable the built-in battery. See “Disable Fast Startup and the built-in battery”.
- Turn off the computer and disconnect the computer from ac power and all connected cables.
- Close the computer display and turn over the computer.
- Remove the base cover assembly. See “Base cover assembly”.
- Remove the M.2 solid-state drive:
- Remove the screw that secures the M.2 solid-state drive bracket 1 . Then, remove the M.2 solidstate drive with the bracket out of the drive slot 2 .
- Turn over the M.2 solid-state drive with the bracket and remove the screw 1 . Then, remove the M.2 solid-state drive from the bracket 2 .
- Remove the screw that secures the M.2 solid-state drive bracket 1 . Then, remove the M.2 solidstate drive with the bracket out of the drive slot 2 .
- Install a new M.2 solid-state drive:
- Install the screw to secure the new M.2 solid-state drive on the bracket.
- Turn over the new M.2 solid-state drive with the bracket. Insert the new M.2 solid-state drive to the drive slot 1 . Then, pivot the bracket downward and install the screw to secure the bracket 2 .
- Install the screw to secure the new M.2 solid-state drive on the bracket.
- Reinstall the base cover assembly.
- Turn over the computer. Connect the ac power adapter and all disconnected cables to the computer.


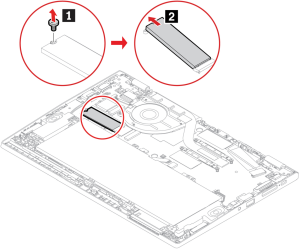
Replacement procedure for the long M.2 solid-state drive
- Disable the built-in battery. See “Disable Fast Startup and the built-in battery”.
- Turn off the computer and disconnect the computer from ac power and all connected cables.
- Close the computer display and turn over the computer.
- Remove the base cover assembly. See “Base cover assembly”.
- Remove the screw that secures the M.2 solid-state drive 1 . Then, remove the drive from the drive slot 2 .
- Insert the new M.2 solid-state drive to the drive slot 1 . Then, pivot the drive downward and install the screw to secure the drive 2 .


Keyboard
Prerequisite
Before you start, read Appendix A “Important safety information” and print the following instructions.
Replacement procedure
Note: You might be instructed to slide the keyboard frame forward or backward in some of the following steps. In this case, ensure that you do not press or hold the keys while sliding the keyboard frame. Otherwise, the keyboard frame cannot be moved.
- Disable the built-in battery. See “Disable Fast Startup and the built-in battery”.
- Turn off the computer and disconnect the computer from ac power and all connected cables.
- Take the tool out of the new keyboard package. Insert the tabs a and b into the slot between the TrackPoint buttons and the trackpad 1 . Slightly pivot the tool downward 2 to release the left and right TrackPoint buttons. Then, remove the two TrackPoint buttons 3 .
Note: If your new keyboard is not shipped with the special tool shown in the following procedure, you can use alternative tools to pry up the TrackPoint buttons. - Loosen the screws that secure the keyboard.
- Insert the tabs c and d into the two dents near the two screw heads as shown.
- Pivot the tool in the direction as shown to release the keyboard 1 . Push the keyboard in the direction as shown by arrows 2 to release the latches from the keyboard bezel.
- Pivot the keyboard slightly upward 1 and then turn over the keyboard 2 .


L13 Gen 2, L13 Yoga Gen 2, S2 Gen 6, and S2 Yoga Gen 6 User Guide
Was this manual helpful?
Thank you for your feedback!