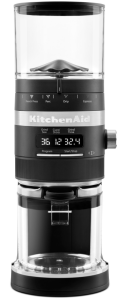
KitchenAid KCG8433 Coffee Grinder User Manual
KitchenAid KCG8433 Coffee Grinder

PARTS AND FEATURES
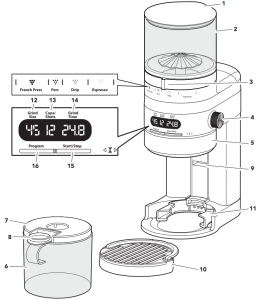

NOTE: The Top hopper holds a maximum of 12 oz (340 g) of coffee beans
- Top hopper lid
- Top hopper
- Grind size knob
- Dose selection knob
- Time adjustment knob
- Bottom hopper
- Bottom hopper lid
- Rubber stopper
- Portafilter holder guide
- Grounds catcher tray
- Portafilter holder
- Grind size indicator
- Dose selection indicator
- Grind time indicator
- Start/Stop button
- Program button
PRODUCT SAFETY
Your safety and the safety of others are very important.
We have provided many important safety messages in this manual and on your appliance. Always read and obey all saf,ety messages.
| This is the safety alert symbol. This symbol alerts you to potential hazards that can kill or hurt you and others. All safety messages will follow the safety alert symbol and either the word “DANGER” or “WARNING.” These words mean: |

| You can be killed or seriously injured if you don’t immediately follow instructions. | |
| You can be killed or seriously injured if you don’t follow instructions. |

All safety messages will tell you what the potential hazard is, tell you how to reduce the chance of injury, and tell you what can happen if the instructions are not followed.
IMPORTANT SAFEGUARDS
Before using the electrical appliance, the following basic precautions should always be followed including the following:
- Read all instructions.
- Do not operate any appliance with a damaged cord or plug or after the appliance malfunctions, or is dropped or damaged in any manner. Return appliance to the nearest authorized service facility for examination, repair or electrical or mechanical adjustment.
- The use of attachments not recommended or sold by the manufacturer may cause fire, electric shock or injury.
- Check the Top hopper for the presence of any foreign objects before using.
- Do not use outdoors.
- To protect against risk of electrical shock, do not put the Coffee Grinder in water or other liquid. This appliance is not intended for use by persons (including children) with reduced physical, sensory, or mental capabilities, or lack of experience and knowledge, unless they are closely supervised and instructed concerning use of the appliance by a person responsible for their safety. Close supervision is necessary when any appliance is used by or near children. Children should be supervised to ensure that they do not play with the appliance.
- Turn the appliance OFF, then unplug from the outlet when not in use, before assembling or disassembling parts and before cleaning. To unplug, grasp the plug and pull from the outlet. Never pull from the power cord.
- Avoid contacting moving parts.
- Do not let cord hang over edge of table or counter.
SAVE THESE INSTRUCTIONS
This product is designed for household use only.
ELECTRICAL REQUIREMENTS
Voltage: 120 VAC
Frequency: 60 Hz
Wattage: 150 Watts
NOTE: This appliance has a polarized plug (one blade is wider than the other). To reduce the risk of electric shock, this plug will fit iYour Burr Grinder has 70 unique grind size settings that are suitable for a range of brewing
methods, from the finest setting for espresso to the coarsest setting for french press.
By adjusting the Dose selection knob, you can choose from 1 to 2 shots of espresso or 1 to 12 cups of coffee. n a polarized outlet only one way. If the plug does not fit fully in the outlet, reverse the plug. If it still does not fit, contact a qualified electrician.
Do not modify the plug in any way.
Do not use an adapter.
Do not use an extension cord. If the power supply cord is too short, have a qualified electrician or service person to install an outlet near the appliance.
The cord should be arranged so that it will not drape over the countertop or tabletop where it can be pulled on by children or tripped over unintentionally
PRODUCT OVERVIEW
Your Burr Grinder has 70 unique grind size settings that are suitable for a range of brewing methods, from the finest setting for espresso to the coarsest setting for french press.
By adjusting the Dose selection knob, you can choose from 1 to 2 shots of espresso or 1 to 12 cups of coffee.
COFFEE GRIND SETTING CHART
Coffee Type |
French Press | Perc (Percolation) | Drip coffee | Espresso |
Grind Size |
Coarse | Medium Coarse | Medium | Fine |
| Grind Size Range | 1 – 24 | 25 – 35 | 36 – 54 | 55 – 70 |
Dose Selection |
1 – 12 cups | 1 – 12 cups | 1 – 12 cups | 1-2 shots |
| Use setting with | Bottom hopper | Bottom hopper | Bottom hopper | Portafilter holder |
PRODUCT ASSEMBLY
First, clean all parts and accessories. (See “Care and Cleaning” section). Place the product on a dry, flat, level surface such as a countertop or table.
- Place the Top hopper onto the machine with the ‘Lock icon’ facing front. Rotate the Top hopper until it clicks into place. Add whole coffee beans. Place the Top hopper lid onto the Top hopper.
- For grinding into the Bottom hopper:
Open the Rubber stopper and slide the Bottom hopper into position. - For grinding into a Portafilter:
Remove the Grounds catcher tray and then remove the Portafilter holder from its storage location. Insert Portafilter holder into Portafilter holder guide.
Replace the Grounds catcher tray. - For grinding into the Portafilter:
If using a standard residential Portafilter (54 mm), insert it along the top guides of the Portafilter holder. - For grinding into the Portafilter:
If using a commercial Portafilter (58 mm), insert it into the middle guides of Portafilter holder.


PRODUCT USAGE
- Select Grind Size: Refer to the Brew method icons on the machine. Rotate the Grind size knob to select a grind size within the brew method range you are using. The selected grind size will be shown on the display.
NOTE: As grind size number increases the actual grind size decreases (1 is Coarse and 70 is fine). - Select Coffee Dose:
Rotate the Dose selection knob for the number of cups or shots.
French press, Perc, Drip coffee: Select between 1 – 12 cups.
Espresso: Select between 1 – 2 shots. - To start grinding:
Press Start/Stop to begin grinding.
Grinder will stop automatically when the time reaches 0 on the display. - To pause during grinding:
Press Start/Stop. To resume grinding press Start/Stop.
NOTE: Grinder can remain paused for up to 15 seconds. After 15 seconds, the cycle will cancel and display will show the current selection. - To cancel the grinding cycle: Press and hold Start/Stop for 3 seconds.
TIP: If Grind size knob is hard to rotate, run the machine while adjusting the size to remove any coffee grounds caught between the burrs. - To change coffee amount for a dose:
If desired, rotate the Time adjustment knob to customize the desired amount of coffee for a particular selected dose. Increase the grinding time to increase the coffee ground amount or decrease the grinding time to decrease the coffee ground amount.


PROGRAM FUNCTION
The Burr Grinder is equipped with programing functionality. This functionality allows you to save customized doses for each brew methods, based on grinding time.
To save dose setting: Once you have identified a desire dose time, press Program button to save the grind time you have selected.
Once a new grind time for a dose within a brew method is saved, the Burr Grinder will automatically adjust the grind time up or down for all other doses within the brew method accordingly.
NOTE: To restore all factory dose settings, press and hold the Program button for 3 seconds.

MICRO-ADJUSTING THE CONICAL BURRS
The Burr Grinder is equipped with an adjustable Upper burr. Making adjustments to this Burr expands the grind size range, allowing you to customize even further to meet your taste preference
- Twist and lift the Top hopper to remove.
Twist the bottom lock to empty the Top hopper into another container. - Replace the empty Top hopper with Lid and twist to lock in place. Press Start/Stop to run the grinder until empty.
- Unplug the Burr Grinder. Remove the Top hopper and discard of any remaining coffee beans in the machine.
Lift the Wire handle of the Upper burr. Twist to unlock and lift the Upper burr by using the Wire handle. - Lift the Upper burr micro adjustment latch. Then, rotate the Upper burr to desired setting and engage adjustment latch back into position.
- Return the Upper burr to the machine and twist to lock into position.
Reattach the Top hopper.


CARE AND CLEANING
IMPORTANT: To avoid damage, never wash or immerse the main body of Burr Grinder, burrs, or power cord in water, or place in the dishwasher.
- The Top hopper, Top hopper lid, Bottom hopper, Bottom hopper lid, Grounds catcher tray, and Portafilter holder can be cleaned with warm, soapy water, then rinse with clean water and dry with clean soft cloth.
- Wipe clean the main body of Burr Grinder with a soft, damp cloth. Dry thoroughly.


TROUBLESHOOTING GUIDE
Problem |
Solution |
| The Burr Grinder display is not illuminated. | Your machine might be in stand by mode. Press any button or turn any knob to wake up the machine. |
| The Burr Grinder does not turn start. | Check if the Burr Grinder is securely plugged into a grounded outlet. |
| If you have a circuit breaker box, make sure the circuit is closed. | |
| If the Burr Grinder shows 3 dashes (—) on display. | It indicates the that Top hopper is not locked in place. See product assembly instructions for proper installation. |
| If the Burr Grinder does not turn on and display shows “Er2”. | Your Burr Grinder is in a motor overload protection mode. Unplug the Burr Grinder, clean the burrs, reassemble the machine and securely plug into a grounded outlet. |
| If the Burr Grinder does not turn on and display shows “Er3”. | Your Burr Grinder is in protection mode. Unplug the Burr Grinder and allow it to cool for 10 minutes before turning it back on. |
| If Coffee is not coming out from the grind outlet. | Ensure fresh coffee beans are in the Top hopper. |
| If the Burr Grinder is operating normally, but stops abruptly. | Stop the Burr Grinder. A coffee bean, may have jammed the burrs. Refer to “Care and Cleaning” section for details on cleaning the burrs. |
| The automatic dosing quantity is not to your liking. | Doses of coffee are programmable refer to the programming section for reference. |
| If the problem cannot be corrected. | See the “KitchenAid® Warranty and Service” sections. Do not return the Burr Grinder to the retailer – retailers do not provide service. NOTE: Any other servicing should be performed by an authorized service representative. |
WARRANTY AND SERVICE
KITCHENAID® BURR GRINDER WARRANTY FOR THE 50 UNITED STATES, THE DISTRICT OF COLUMBIA, PUERTO RICO, AND CANADA
This warranty extends to the purchaser and any succeeding owner for Burr Grinders operated in the 50 United States, the District of Columbia, Puerto Rico, and Canada.
Length of Warranty: |
One Year Full Warranty from date of purchase. |
KitchenAid Will Pay for Your Choice of: |
Hassle-Free Replacement of your Burr Grinder. See the next page for details on how to arrange for service, or call the Customer eXperience Center toll-free at 1-800-541-6390. OR The replacement parts and repair labor costs to correct defects in materials and workmanship. Service must be provided by an Authorized KitchenAid Service Center. |
KitchenAid Will Not Pay for: |
A. Repairs when your Burr Grinder is used in other than normal single family home use. B. Damage resulting from accident, alteration, misuse or abuse. C. Any shipping or handling costs to deliver your Burr Grinder to an Authorized Service Center. D. Replacement parts or repair labor costs for Burr Grinder attachments operated outside the 50 United States, District of Columbia, Puerto Rico, and Canada. |
| DISCLAIMER OF IMPLIED WARRANTIES; LIMITATION OF REMEDIES
IMPLIED WARRANTIES, INCLUDING TO THE EXTENT APPLICABLE WARRANTIES OF MERCHANTABILITY OR FITNESS FOR A PARTICULAR PURPOSE, ARE EXCLUDED TO THE EXTENT LEGALLY PERMISSIBLE. ANY IMPLIED WARRANTIES THAT MAY BE IMPOSED BY LAW ARE LIMITED TO ONE YEAR, OR THE SHORTEST PERIOD ALLOWED BY LAW. SOME STATES AND PROVINCES DO NOT ALLOW LIMITATIONS OR EXCLUSIONS ON HOW LONG AN IMPLIED WARRANTY OF MERCHANTABILITY OR FITNESS LASTS, SO THE ABOVE LIMITATIONS OR EXCLUSIONS MAY NOT APPLY TO YOU. IF THIS PRODUCT FAILS TO WORK AS WARRANTED, CUSTOMER’S SOLE AND EXCLUSIVE REMEDY SHALL BE REPAIR OR REPLACEMENT ACCORDING TO THE TERMS OF THIS LIMITED WARRANTY. KITCHENAID AND KITCHENAID CANADA DO NOT ASSUME ANY RESPONSIBILITY FOR INCIDENTAL OR CONSEQUENTIAL DAMAGES. This warranty gives you specific legal rights and you may also have other rights which vary from state to state or province to province. | |

HASSLE-FREE REPLACEMENT WARRANTY—50 UNITED STATES DISTRICT OF COLUMBIA, AND PUERTO RICO
We’re so confident the quality of our products meets the exacting standards of KitchenAid that, if your Burr Grinder should fail within the first year of ownership, KitchenAid will arrange to deliver an identical or comparable replacement to your door free of charge and arrange to have your original Burr Grinder returned to us. Your replacement unit will also be covered by our one year limited warranty. If your Burr Grinder should fail within the first year of ownership, simply call our toll-free Customer eXperience Center at 1-800-541-6390 Monday through Friday.
Please have your original sales receipt available when you call. Proof of purchase will be required to initiate the claim. Give the consultant your complete shipping address (no P.O. Box numbers, please).
When you receive your replacement Burr Grinder, use the carton, packing materials, and prepaid shipping label to pack up your original Burr Grinder and send it back to KitchenAid.
HASSLE-FREE REPLACEMENT WARRANTY—CANADA
We’re so confident the quality of our products meets the exacting standards of the KitchenAid brand that, if your Burr Grinder should fail within the first year of ownership, we will replace your Burr Grinder with an identical or comparable replacement. Your replacement unit will also be covered by our one year limited warranty.
If your Burr Grinder should fail within the first year of ownership, simply call our toll-free Customer eXperience Center at 1-800-807-6777 Monday through Friday.
Please have your original sales receipt available when you call. Proof of purchase will be required to initiate the claim. Give the consultant your complete shipping address.
When you receive your replacement Burr Grinder, use the carton, packing materials, and prepaid shipping label to pack up your original Burr Grinder and send it back to KitchenAid.
ARRANGING FOR SERVICE AFTER THE WARRANTY EXPIRES, OR ORDERING ACCESSORIES AND REPLACEMENT PARTS
In the United States and Puerto Rico:
For service information, or to order accessories or replacement parts, call toll-free at 1-800-541-6390 or write to:
Customer eXperience Center,
KitchenAid Small Appliances,
P.O. Box 218, St. Joseph, MI 49085-0218
Outside the United States and Puerto Rico:
Consult your local KitchenAid dealer or the store where you purchased the Burr Grinder for information on how to obtain service.
For service information in Canada:
Call toll-free 1-800-807-6777.
For service information in Mexico:
Call toll-free 01-800-0022-767.
DISCOVER MORE.
| |
PRODUCT QUESTIONS OR RETURNS
| |

®/™ ©2020 KitchenAid. All rights reserved. Used under license in Canada.
