Avanti HVLP 5 Stage Turbine Paint Sprayer User Guide
HVLP 5 Stage Turbine Paint Sprayer
QUICK START GUIDE
Accessories included:
- 28 ft. High flow hose
- HVLP turbine spray gun with 1.3mm nozzle set
- Motor and turbine intake filter set
- Nozzle removal wrench
- Nozzle cleaning tool
- Cleaning brush
- Air tube
Replacement parts available
Call 1 888 866 5797 to order
Read Owner’s Manual Before Use
WARNING! TO PREVENT SERIOUS INJURY: This Quick Start Guide is not intended to replace the Owner’s Manual & Safety Instructions. Before use, read all safety warnings and instructions therein to ensure proper usage and to avoid personal injury.
Personal Protection
WARNING! TO PREVENT SERIOUS INJURY: Wear ANSI-approved safety goggles, NIOSH-approved respirator, and heavy-duty work gloves during use.
Paint and Solvent Selection
RISK OF EXPLOSION – DO NOT SPRAY FLAMMABLE LIQUIDS.
WARNING! TO PREVENT SERIOUS INJURY: Do not spray or clean with liquids having a flash point less than 38°C (100°F).
Only use water or mineral spirits for cleaning.
Only use water-based or oil-based paint for spraying.
Clean Spray Gun
Clean spray gun immediately after use to prevent permanent damage. Returns not accepted and warranty void if sprayer is not properly cleaned immediately after every use.
1. Set Up
Assemble Sprayer according to Owner’s Manual.


2. Before First Use
Pre-Cleaning
RISK OF EXPLOSION – DO NOT SPRAY FLAMMABLE LIQUIDS.
WARNING! TO PREVENT SERIOUS INJURY: Do not spray or clean with liquids having a flash point less than 38°C (100°F).
Only use water or mineral spirits for cleaning. Only use water-based or oil-based paint for spraying.
NOTICE: Do not immerse Spray Gun Body in solvent. Do not allow solvent to enter the air inlet.
- Designate a container for waste.
- Remove Cup and fill with mineral spirits (sold separately) until a quarter full.
- Replace Cup.
- Turn Air Control Knob clockwise until it stops. It will be fully open.
- Turn Fluid Control Knob clockwise until two threads are showing.
- Plug Sprayer into grounded 120VAC outlet, then turn Sprayer on.
- Point Spray Gun at interior side of waste container. Depress Trigger and slightly shake Spray Gun while spraying solvent into the container.
- Turn off and unplug Sprayer, point Spray Gun into waste container and depress Trigger again to make sure no air pressure remains.
- Remove Cup and Lid, wipe with clean cloth, and allow to dry.
- Turn Lock Ring counterclockwise by hand to remove, then remove Air Cap and Air Valve, and and allow them to dry.
- Reassemble Spray Gun.
NOTICE: Do not use any kind of lubricant. The lubricant will mix with paint, causing poor results.
NOTE: Dispose of waste according to local hazardous waste standards.
3. Spray Gun Setup and Adjustment
Paint Preparation and Filling
RISK OF EXPLOSION – DO NOT SPRAY FLAMMABLE LIQUIDS.
WARNING! TO PREVENT SERIOUS INJURY: Do not spray or clean with liquids having a flash point less than 38°C (100°F).
Only use water or mineral spirits for cleaning. Only use water-based or oil-based paint for spraying.
Note: Proper paint mixture is essential. Follow paint manufacturer’s directions for thinning.
Most paints will spray easily if they are thinned properly.
- Thin paint according to manufacturer’s directions and mix thoroughly.
- Remove Cup.
- Carefully strain the paint into the Cup through a paint strainer or a piece of cheesecloth. Fill the Cup 3/4 full.
- Replace Cup.
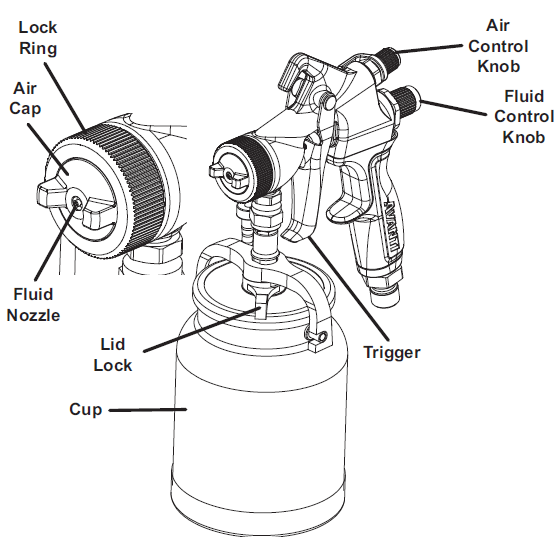
To change fan pattern: Lock Ring will be loose. Keep Fluid Nozzle flush with Air Cap unless
adjusting Pattern. Turn Air Cap clockwise until desired fan pattern is selected.
Fluid/Air Adjustment
- Turn Air Control Knob clockwise until it stops. It will be fully open.
- Turn Fluid Control Knob counterclockwise until two threads are showing.
- Plug Sprayer into grounded 120VAC outlet, then turn Sprayer on.
- Spray on piece of scrap material in short bursts, then check consistency.
- If necessary, slowly adjust Fluid Control Knob and/or Air Control Knob, then spray on scrap material until desired consistency is achieved.
- If paint is too thick, thin paint according to manufacturer’s instructions and repeat instructions above.
3. Spraying
RISK OF EXPLOSION – DO NOT SPRAY FLAMMABLE LIQUIDS.
WARNING! TO PREVENT SERIOUS INJURY: Do not spray or clean with liquids having a flash point less than 38°C (100°F).
Only use water or mineral spirits for cleaning. Only use water-based or oil-based paint for spraying.
Proper Spraying Techniques
Keep the Spray Gun within 45° up or down from the workpiece. Keep Cup full, if Spray Gun sputters, refill Cup.

Correct Gun Angle
Move your arm, not just your wrist.
Point gun directly towards the surface and maintain an even, steady distance and speed.

Pattern Adjustment
While Spray Gun is facing forward and Trigger is released:
a. To increase pattern size, turn Air Cap clockwise.
b. To decrease pattern size, turn Air Cap counterclockwise.
To Avoid Paint Build Up
Apply two thin coats rather than one thick coat. Overlap 1/3 to 1/2 on second coat.
Start moving the Spray Gun before fully depressing Trigger.
Fully depress Trigger before contacting the workpiece.
When finished with the stroke, release the Trigger while still moving the Spray Gun and after passing the workpiece.
- Depress Trigger fully and move Spray Gun in parallel strokes to the workpiece.
- Keep the distance from the workpiece between 6″ and 8″.
Note: Do not stop moving the Spray Gun while spraying.
If the Spray Gun stops even briefly while spraying the paint will build up and run down the workpiece.
To avoid clogs, check Fluid Nozzle regularly for dried paint and remove with a cloth as needed.
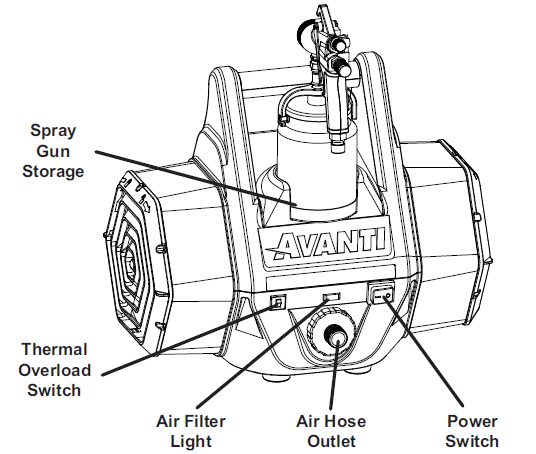
Note: The motor has thermal overload protection. If unit overheats, allow approximately 30 minutes for unit to cool, then press Thermal Overload Switch.
Note: The stroke speed and Fluid Control Knob adjustment will determine how much paint is being applied.
3. To prevent accidents, after use, release Trigger, turn off and unplug Sprayer, safely discharge any residual air pressure, and release Trigger again.
4. Clean the Spray Gun and Cup IMMEDIATELY after EVERY use and when it will be idle for more than 30 minutes. Delayed or inadequate cleaning will permanently clog the Spray Gun.
3. After Every Use
Post-Cleaning
RISK OF EXPLOSION – DO NOT SPRAY FLAMMABLE LIQUIDS.
WARNING! TO PREVENT SERIOUS INJURY: Do not spray or clean with liquids having a flash point less than 38°C (100°F).
Only use water or mineral spirits for cleaning. Only use water-based or oil-based paint for spraying.
NOTICE: Do not immerse Spray Gun Body in solvent. Do not allow solvent to enter the air inlet.
- Use solvent recommended by paint manufacturer.
- Designate container for waste.
- Remove Cup, the remove paint from Cup and dispose of properly.
- Add 1/4 cup solvent (sold separately) to Cup. Replace Cup, then shake Spray Gun for several seconds.
- Remove Cup, pour solvent into waste container and wipe away any paint residue from Cup and Lid with clean cloth.
- Add solvent to Cup until one quarter full. Replace Cup.
- Turn Air Control Knob clockwise until it stops. It will be fully open.
- Open Fluid Control Knob until two threads are showing.
- Plug Sprayer into grounded 120VAC outlet, then turn Sprayer on.
- Point Spray Gun at interior side of waste container.
Depress Trigger and slightly shake Spray Gun while spraying solvent into the container. Once the Cup is empty, repeat the process until the solvent comes out clean. - Turn off and unplug Sprayer, point Spray Gun into waste container and depress Trigger again to make sure no air pressure remains.
- Turn Lock Ring by hand and remove, then remove Air Cap, Air Valve, and Spring.
- Depress Trigger to retract Fluid Needle, then remove Fluid Nozzle with included wrench.
- Remove Fluid Control Knob, Fluid Needle Spring, and Fluid Needle.

15. Inspect parts and soak in solvent as necessary. Use included brush and nozzle cleaning tool to remove any paint.
Note: To prevent damage, do not bend Fluid Needle.
16. Wipe down Spray Gun Body with a clean cloth and solvent.
17. Make sure all parts are dry and free from residual paint, then reassemble Spray Gun.
NOTICE: Do not use any kind of lubricant. The lubricant will mix with paint, causing poor results.
NOTE: Dispose of waste according to local hazardous waste standards.
For technical questions, please call 1-888-866-5797.