Acer Smart Projector System User Guide


Acer Smart Projector
Smart System User’s Guide
Copyright © 2021. Acer Incorporated. All Rights Reserved.
Acer Projector User’s Guide Original Issue: 02/2021
Acer smart Projector
The Acer Smart Projector comes with a powerful and easy-to-use media center where you can wirelessly project any content from your iOS, Android, or Windows-based device, access and projects various default apps that are installed to the projector, manage and organize the media center Home page according to your preferences, and more.
Getting started To control the media center interface, use the supplied remote control or Bluetooth mouse (not supplied).
Initial setup
NOTE
The SMART mode is loaded by default after you start the projector. If you are using any other source and wish to switch to the SMART mode, press the SOURCE button on the projector keypad or on the remote control, and then select SMART option.
· If you plug in or unplug the Wi-Fi dongle, please restart the projector.
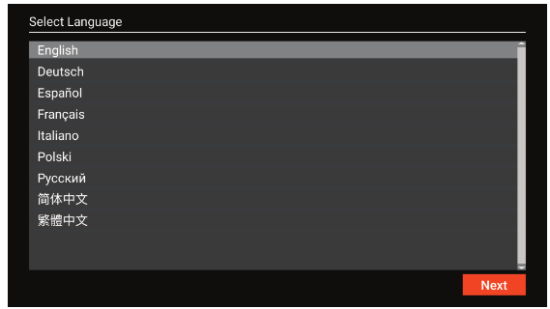
If you are using the projector for the first time, you will be prompted to select the following options during the initial setup:
- Select your preferred language and click next.
- Select your preferred Wi-Fi network and click next or set up the wireless connection later and click skip.
note: If the selected Wi-Fi network is secured, you are prompted to enter a password. Enter the password and then click Connect to continue. - Scan the respective QR code on the screen with your Android or iOS device to access and install the wireless projection app CollaVision. Then click Done to complete the initial setup.


remote control layout

| # | Icon | Function | Description |
| 1 | Infrared transmitter | Sends signals to the projector. | |
| 2 | POWER | Turns the projector on or off. | |
| 3 | Mouse | Smart mode: Switch to mouse mode for Navigation key. Others: Forbidden function. | |
| 4 | SOURCE | Changes the active source. | |
| 5 | Select/Enter | Confirms your selection of items. | |
| 6 | Four directional select keys | Use up, down, left, right buttons to select items or make adjustments to your selection. | |
| 7 | Volume Up | ||
| 8 | Volume Down | ||
| 9 | MENU | Press MENU to launch the Onscreen display (OSD) menu or exit the OSD menu. |


| # | Icon | Function | Description |
| 10 | |
KEYSTONE | Adjusts the image to compensate for distortion caused by tilting the projector. |
| 11 | BACK | Returns to the previous operation. | |
| 12 | |
VGA | Smart: Up, to select items.* Others: change source to the VGA connector. |
| 13 | |
FREEZE | Forbidden function. |
| 14 | |
PgUp | Smart: Left, to select items.* Others: Select the previous page under VGA or HDMI source. |
| 15 |
|
COMPONENT | Smart: CollaVision (WPS) Wireless Projection Support app hot key. Others: Forbidden funtion. |
| 16 |
|
PgDn | Smart: Forbidden function. Others: Select the next page under VGA or HDMI source. |
| 17 |
|
MEDIA | Smart: Down, to select items.* Others: Forbidden function. |
| 18 | HOME | Smart: Back to Home page. Others: Switch to Smart mode. | |
| 19 | |
HDMI™/MHL | Smart: Forbidden function. Others: Switch to HDMI source. |
| 20 |
|
HIDE | Smart: Forbidden function. Other: Momentarily turns off the video. Press HIDE to hide the image, press again to display the image. |
| 21 |
|
ZOOM IN | Smart: Forbidden function. Other: Zooms the projector display in. |
| 22 |
|
VIDEO | Smart: Right, to select items.* Others: Forbidden function. |
| 23 | |
ZOOM OUT | Smart: Forbidden function. Other: Zooms the projector display out. |
| 24 | |
LAN/WiFi | No function. |


- NOTE
- Functions vary depending on model definition.
- *”This feature will cause control compatibility issues depending on different level of app support.
Home page overview
After the initial setup, the media center Home page will open:

navigating the acer smart Projector Home page
The items on the Home page can be accessed by using the remote control or Bluetooth mouse.
notee:
The media center does not support the projector keypad.
- Remote control:
Press HoMe to access the Home page from any other page.
Press the four-direction navigation buttons (
Press enTeR to confirm the selection, open an item, or play/pause media content.
Press baCK to move to the previous page or exit the app.
Press MoUse to switch the remote control to the remote mouse mode. - Bluetooth mouse:
Hover the cursor over the item you wish to open and left-click to open it.
Right-click to exit a menu or app.
Right-click repeatedly (if necessary) to access the Home page from any other page.

Configure system settings
To configure Android system settings, click setting on the Home page.
Select a menu item to configure its preferences.
network & Internet
Note
Before configuring the network settings, make sure the Wi-Fi dongle is connected to the USB port on the rear of the projector.
To connect the projector to an available Wi-Fi network, do the following:
- Slide the Wi-Fi switch from Off to On.
- Select your preferred access point from the Wi-Fi list and click on it to make the connection.

Note
If the selected Wi-Fi network is secured, you are prompted to enter a password.
Note
In the Network & Internet menu, you can also view Wi-Fi data usage, add Virtual Private Network (VPN), and configure Private DNS mode settings.
Connected devices
Connect to a Bluetooth keyboard, Bluetooth mouse, Bluetooth remote controller, and manage connection preferences.
Apps & notifications
View recently opened apps, configure apps notifications, permissions, uninstall apps, and access settings.
Display
Adjust the display brightness, select a wallpaper, set a sleep timer, font size, and access advanced display settings.
storage
View and manage storage usage.
security & location
Set the screen lock, configure privacy settings, device admin apps, encryption and credentials, and enable or disable screen spinning.
accounts
Add an Owner account and enable or disable apps to auto-refresh data if you make any modifications to the Owner account.
accessibility
Configure text-to-speech output, display font size and display size, magnification settings, enable or disable large mouse pointer, removing animations, cursor dwell timing, screen auto-rotation, and more.
system
Configure Android keyboard settings, system date and time settings, backup options, reset options, and advanced system settings.

• Before updating the projector to the latest system version, please make sure the network connection is stable enough. Click on System updates option, and the update window will pop-up. Click to confirm to start the update process. During the system update, make sure the network connection is stable and the power cord is well plugged in.
Step 1: Check if the system needs to be updated. If not, the following message is displayed on the screen: notee:

Step 2: If the system needs to be updated, follow the onscreen instructions.
WARNING! During the update process, do not disconnect the power cord from the projector.
Disconnecting power while updating may result in system failure.

• To reset the entire system to the factory default settings, click RESET TABLET in Reset options > Erase all data (factory reset).

about tablet
View system related information, such as device name, legal information, Android version, and more.
aptoide app
aptoide app is pre-loaded app store that allows you to install and discover apps easily in a safe environment. Access games, streaming apps, configure aptoide settings, and more.
NOTE:
- To use Aptoide app, make sure the projector is connected to the Wi-Fi network.
- Apps that are not pre-loaded by Acer may not be compatible or work properly.
- Some apps may require a keyboard and mouse.
- Some apps may be region-specific.
- Users can install third-party apps by .apk file in the File Management or Web Browser. However, some third-party apps may have compatibility issues.
- For better compatibility with Aptiode, it is recommended not to update the Aptoide app version at all.

Accessing apps
You can access apps directly from the Home page or from the APP List.
To view and access all the default apps, click aPP list on the Home page.
Click directly on the app icon to open the app.
To add the app shortcuts to the Home page for quick access, do either of the following:
- Click+ and check up to two apps
- Click +add aPP on the Home page directly and check up to two apps


Adding apps to favorites
You can favorite apps for quick access.
To favorite apps, do the following:
- Click My favorite on the Home page.
- Click and check up to 12 apps to add them as favorite apps. When the app is selected as a favorite, the star next to it turns from gray to yellow > .

To remove the app from the My Favorite list, simply uncheck it.
Web browser
Use the web browser to browse through the web pages on the Internet. Click Web browser on the Home page.
Miracast app
Via Miracast app, you can wirelessly cast your Android or Windows device’s screen to the projector. Click Miracast on the Home page to start the wireless display service. For more information on wireless projection, refer to “Wireless projection support” on page 15.
NOTE
- The wireless display service requires Internet connection. Make sure the projector is connected to the WiFi network. For more information, refer to “Network & Internet” on page 8.
- Miracast does not support mirroring streaming app.
- If you want to use mirroring function, please refer to CollaVision (WPS) Wireless Projection Support app that supports iOS, Android, and Windows. Please find more information in CollaVision (WPS) Wireless Projection Support User Manual.
- The compatiblity of the mobile device with the Miracast app is not valid for all mobile device brands. If you encounter any compatibility issues, please contact the mobile device manufacturer.

- Open the action Center and select Project.
- Select Connect to a wireless display.
- A scan for wireless display devices will start. Select your desired wireless display device.
- Once connected, your Windows device should now be mirrored by the wireless display
For androide:
- Open the settings app.
- Tap on Connected Devices to open the menu.
- Select Connection Preferences from the list of options.
- Tap on Wireless Projection for android.
- Select your desired wireless display device.
- Tap on the device you want to pair with.

Wireless projection support
Via CollaVision app, you can wirelessly cast your Android, iOS, or Windows device’s screen to the projector.
NOTE: Please find more information in CollaVision (WPS) Wireless Projection Support User Manual.