Maytag MZC5216LW Chest Freezer Owner’s Manual


MAYTAG MZC5216LW Chest Freezer

FREEZER SAFETY
Your safety and the safety of others are very important. We have provided many important safety messages in this manual and on your appliance. Always read and obey all safety messages.
DANGER: You can be killed or seriously injured if you don’t immediately follow instructions.
WARNING: You can be killed or seriously injured if you don’t follow instructions.
All safety messages will tell you what the potential hazard is, tell you how to reduce the chance of injury, and tell you what can happen if the instructions are not followed.
IMPORTANT SAFETY INSTRUCTIONS
WARNING: To reduce the risk of fire, electric shock, or injury to persons when using your appliance, follow basic precautions, including the following:
- Children should be supervised to ensure that they do not play with the appliance.
- This appliance is not intended for use by persons (including children) with reduced physical, sensory, or mental capabilities, or lack of experience and knowledge, unless they have been given supervision or instruction concerning use of the appliance by a person responsible for their safety.
- Do not use an extension cord.
- If power supply cord is damaged, it must be replaced by the manufacturer, its service agent, or a similarly qualified person in order to avoid a hazard.
- This appliance is intended to be used in household and similar applications such as: staff kitchen areas in shops, offices, and other working environments; farm houses and by clients in hotels, motels, and other residential-type environments; bed and breakfast-type environments; and catering and similar non-retail applications.
- Do not store explosive substances such as aerosol cans with a flammable propellant in this appliance.
- Do not use replacement parts that have not been recommended by the manufacturer (e.g., parts made at home using a 3D printer).
- Keep ventilation openings, in the appliance enclosures or in the built-in structure, clear of obstacles.
- Do not use mechanical devices or other means to accelerate the defrosting process, other than those recommended by the manufacturer.
- Do not damage the refrigerant circuit.
- Do not use electrical appliances inside the food storage compartments of the appliance, unless they are of the type recommended by the manufacturer.
Proper Disposal of Your Old Freezer
WARNING: Risk of child entrapment. Before you throw away your old refrigerator or freezer:
- Take off the doors.
- Leave the shelves in place so that children may not easily climb inside.

WARNING: Suffocation Hazard
Remove doors or lid from your old appliance. Failure to do so can result in death or brain damage.

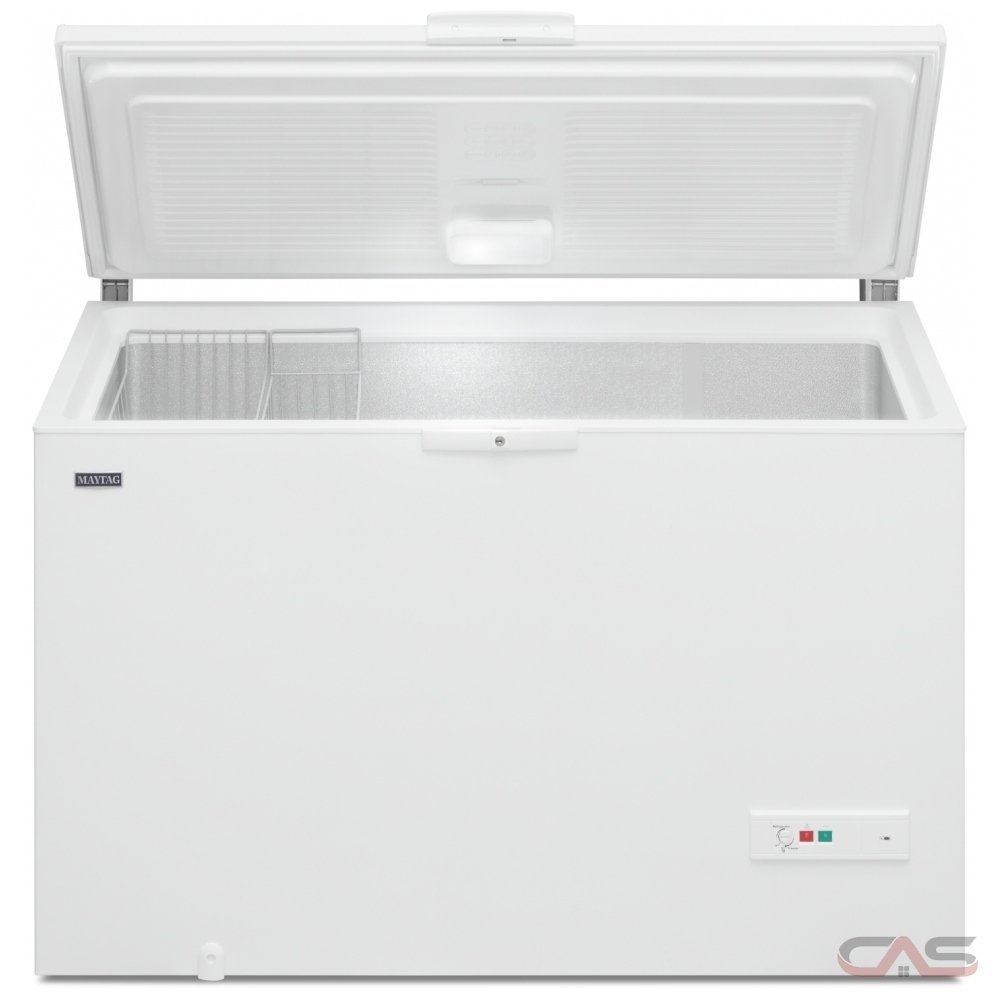
- A. Handle
- B. Safety Lock (if provided)
- C. Gasket
- D. Separator (if provided)
- E. Defrost water drain plug
- F. Control panel
- G. Side motor cooling grille
- H. Caster Wheels
- I. Interior Light
MAINTENANCE AND CARE
Defrosting and Cleaning Your Freezer
WARNING: Explosion Hazard Keep flammable materials and vapors, such as gasoline, away from appliance. Use nonflammable cleaner. Failure to do so can result in death, explosion, or fire.
Defrost and clean your freezer when frost has built up to about 1/4″ (0.6 cm) thickness, and thoroughly defrost and clean your freezer at least once a year. In high-humidity areas, a freezer may need more frequent defrosting and cleaning.
Do not use abrasive cleaners on your freezer. Do not use cleaning waxes, concentrated detergents, bleaches, or cleaners containing petroleum on plastic parts. Damage can occur.
NOTE: The drain cap must be removed before defrosting the freezer and replaced securely afterward.
- Unplug freezer or disconnect power.
- Remove all frozen food. Wrap frozen food in several layers of newspaper and cover with a blanket. Food will stay frozen for several hours. You may also store frozen food in a cooler, additional refrigerator-freezer, or in a cool area.
- Remove the drain cover (E) by pulling it straight out. Then insert the hose adapter (provided) into the drain outlet. Remove the plastic cap from inside the bottom of the freezer. Place the Separator pan (D), or a drain pan, under the drain, or attach a hose to the threaded end of the hose adapter and direct the water into a separate drain.
- Place pans of hot water in freezer with lid open to speed melting. Directing air from an electric fan into freezer will also help. Do not place fan or any electrical device in freezer.
- Use a plastic scraper to remove frost.
NOTE: Do not use an ice pick, knife, or other sharp-pointed tool to defrost freezer. Damage can occur. - Wipe water from walls with a towel or sponge.
- Wash the inside walls with a solution of mild detergent in warm water or 2 tbs (26 g) baking soda to 1 qt. (0.95 L) warm water. Do not use abrasive or harsh cleaners.
- Rinse well and wipe dry with a clean, soft cloth.
- Use a clean sponge or soft cloth and mild detergent in warm water to clean outside of freezer, door liner, and gasket.
- Rinse well and wipe dry with a clean, soft cloth.
- Wax painted metal surfaces on the outside of freezer to avoid rust.
NOTE: Do not use wax on plastic parts. Wax may damage them. - Remove the hose adapter and replace the drain cover and the plastic cap in the bottom of the freezer.
- Replace all frozen food.
- If your freezer is equipped with a temperature alarm, turn off alarm for 24 hours after defrosting.
- Plugin freezer or reconnect power. See “Using the Control.”
Changing the Light Bulbs (on some models)
To Replace Interior Light:
- Unplug freezer or disconnect power.
- Pinch top and bottom of light cover with both hands.
- Replace bulb with a 15 W maximum appliance bulb.
NOTE: Not all appliance bulbs will fit your freezer. Be sure to replace the bulb with one of the same size, shape, and wattage. - Align bottom of cover and snap top of cover in place.
- Plug in freezer or reconnect power.

Power Interruptions
If the power will be out for 24 hours or less, keep the door closed to help food stay cold and frozen. If the power will be out for more than 24 hours, do one of the following:
- Remove all frozen food and store it in a frozen food locker.
- If a food locker is not available, consume or can perishable food at once.
REMEMBER: A full freezer stays cold longer than a partially filled one. A freezer full of meat stays cold longer than a freezer full of baked goods. If you see that food contains ice crystals, it may be refrozen, although the quality and flavor may be affected. If the condition of the food is poor, dispose of it.
Moving Care
When you are moving your freezer to a new home, follow thesesteps to prepare it for the move.
- Remove all frozen food.
- Unplug the freezer.
- Take out all removable parts, wrap them well, and tape them together so they don’t shift and rattle during the move.
- Clean the freezer thoroughly.
- Tape the freezer shut and tape the electrical cord to the cabinet.
When you get to your new home, refer to the “Installing Your Freezer” and “Operating Your Freezer” sections for information on installation and setting the controls.
INSTALLING YOUR FREEZER
Unpacking
WARNING: Use two or more people to move and install or uninstall the appliance. Failure to do so can result in back or another injury.
Remove Packaging Materials
- Unpack the appliance.
- Remove the 5 spacers inserted between the door and the appliance.
- Make sure the defrost drain plug (if provided) is correctly positioned.

When Moving Your Freezer:
Your freezer is heavy. When moving the freezer for cleaning or service, be sure to cover the floor with cardboard or hardboard to avoid floor damage. Always pull the freezer straight out when moving it. Do not wiggle or “walk” the freezer when trying to move it, as floor damage could occur.
Clean Before Using
After you remove all of the packaging materials, clean the inside of your freezer before using it. See the “Maintenance and Care” section.
Location Requirements
WARNING: Keep flammable materials and vapors, such as gasoline, away from appliances. Use non-flammable cleaner. Failure to do so can result in death, explosion, or fire.
Ventilation and Clearance
- Keep flammable materials and vapors, such as gasoline, away from freezer.
- Do not cover the freezer with items such as blankets, sheets, and tablecloths. This reduces air circulation.
- Allow at least a 2.75″ (7.0 cm) clearance on both sides of the freezer and 2.75″ (7.0 cm) between the back of the freezer and the wall. Leave room above the freezer to open the lid.

Temperature
Your freezer operates most efficiently when located in an area where the temperature is normally between 32°F (0°C) and 110°F (43°C). Place your freezer in a location where the temperature will fall between the low and high recommended temperatures.
Upon Moving to Final Location
Level the freezer from side to side and front to back so that the lid will seal properly. Use shims to level the freezer if necessary.

NOTE: It should not be necessary to remove the lid during installation. If, for any reason, the hinges need adjustment, contact a designated service company.
Electrical Requirements
WARNING: Electrical Shock Hazard
- Plug into a grounded 3 prong outlet.
- Do not remove ground prong.
- Do not use an adapter.
- Do not use an extension cord.
- Failure to follow these instructions can result in death, fire, or electrical shock.
Before you move your freezer into its final location, it is important to make sure you have the proper electrical connection. Recommended Grounding Method A 115 V, 60 Hz, AC-only, 15 A or 20 A fused, grounded electrical supply is required. It is recommended that a separate circuit serving only your freezer be provided. Use an outlet that cannot be turned off by a switch. Do not use an extension cord.
NOTE: Before performing any type of installation, cleaning, or removing a light bulb, turn the temperature control to 0 (align circle on knob with desired number), as shown, to turn off cooling, and then disconnect the freezer from the electrical source.
Switching on the Appliance
- Plugin the appliance.
- The green LED lights up.
- Also, the red LED will switch on because the temperature inside the appliance is not yet sufficiently low for food storage. The red LED will normally switch off within the first six hours after the appliance is switched on.
- Place food inside the product only when the red LED (if provided) has switched off.
NOTE: As the seal is tight, the appliance lid cannot be reopened immediately after closing. Wait a few minutes before re-opening the lid of the appliance. - This appliance features “skin condenser” technology: the condensing unit is integrated into the walls of the freezer. For this reason the side and front walls of the product may become hot while the product is running. This is entirely normal and also reduces the risk of condensation forming in particularly critical environmental conditions.
OPERATING YOUR FREEZER
Using the Control
Allow the freezer to cool 6 to 8 hours before filling with frozen food.
NOTES:
- When the freezer is first started, the compressor will run constantly until the cabinet is cooled. It may take 6 to 8 hours (or longer), depending on room temperature and the number of times the freezer lid is opened.
- After the cabinet is cooled, the compressor will turn on and off as needed to keep the freezer at the proper temperature.
- The outside of your freezer may feel warm. This is normal. The freezer’s design and main function is to remove heat from the contents and air inside the freezer. The heat is transferred to the room air, making the outside of the freezer feel warm.
- Temperature adjustment thermostat.
- Red light (if provided): indicates that the temperature inside the product is not low enough.
- Green LED (if provided): when lit, indicates that the appliance is running.
The exact configuration of the control panel may vary according to the model.

Temperature Adjustment
Use the thermostat to select the ideal storage temperature. This product could be used both as freezer and as cooler.

Freezer Use:
- To use the product as freezer set thermostat in position “freezer”. In this case the product must be used to store frozen food, to freeze fresh food and to make ice. Internal temperature could be set between 6.8°F (-14°C) and 7.6°F (-22°C) (depending on the environmental conditions, this range may vary slightly).
- To use the product as cooler set thermostat in position “cooler”. In this case the product must be used to store fresh food and beverages. Internal temperature could be set between 33.8°F (1°C) and 41°F (5°C) (depending on the environmental conditions, this range may vary slightly).
- To turn off the product set thermostat in OFF position. In this case the product is already connected to power supply.
Refrigerator Use:
Before switching from freezer use to refrigerator use please:
- Check that frozen food is not present inside the cavity to avoid unwanted food defrosting.
- Defrost and clean the product to avoid water stagnation on the bottom.
NOTE: In the case of high levels of humidity, it is possible that inside the appliance condensation may form on both the walls and the bottom of the compartment. This is absolutely natural and does not jeopardise the operation of the appliance in any way.
Chest Freezer Food Storage:

- 1-3 months suggested for bread, fish and ice-cream
- 4-7 months suggested for poultry, citrus and beef
- 8-12 months for pork, vegetables and fruit
Key Eject Lock (on some models)
WARNING: Keep key away from children. Failure to do so can result in death, suffocation, or frostbite.
To lock or unlock the freezer, you must hold the key in the lock while turning. The lock is spring-loaded, so the key cannot be left in the lock. If the key is lost, contact your dealer for a replacement. Always give the model and serial number of your freezer when requesting a replacement key.
Sliding Basket (on some models)
Store small packages in the upper baskets to avoid losing them in the bottom of the freezer. Baskets can then be moved from side to side or they can be removed when loading or unloading the food below them.
To remove basket, lift it straight up and out. To replace basket, lower it back into place.

Installing Sliding Rail (on some models)
Unpack sliding rails from packaging. Line up the frames next to each other (A). Use the clips to connect the side rails to each other (B). Lower the connected rails to the bottom of the freezer (C). Baskets can be used in multiple locations (A).
Prepare baskets for use along the top of the freezer. Remove clips from the bottom of the basket (1) and click in place along the top of the basket (4).


For information on complete instructions for use and installation, or warranty, please visit https://www.whirlpool.com/owners, or in Canada https://www.whirlpool.ca/owners. This may save you the cost of a service call. However, if you need to contact us, use the information listed below for the appropriate region.
In the U.S.A.:
- 1–800–253–1301
- Whirlpool Brand Home Appliances
- Customer eXperience Center 553 Benson Road
- Benton Harbor, MI 49022-2692
In Canada:
- 1–800–807–8777
- Whirlpool Brand Home Appliances
- Customer eXperience Center 200 – 6750 Century Ave.
- Mississauga ON L5N 0B7
For information on complete instructions for use and installation, or warranty, please visit https://www.maytag.com/owners, or in Canada https://www.maytag.ca/owners. This may save you the cost of a service call. However, if you need to contact us, use the information listed below for the appropriate region.
In the U.S.A.:
- 1–800–344–1274
- Maytag Brand Appliances Customer eXperience Center
- 553 Benson Road
- Benton Harbor, MI 49022-2692
In Canada:
- 1–800–688–2002
- Maytag Brand Appliances
- Customer eXperience Center 200 – 6750 Century Ave.
- Mississauga Ontario L5N 0B7
For information on complete instructions for use and installation, or warranty, please visit https://www.amana.com/owners, or in Canada https://www.amana.ca/owners. This may save you the cost of a service call. However, if you need to contact us, use the information listed below for the appropriate region.
In the U.S.A.:
- 1–866–616–2664
- Amana Brand Home Appliances
- Customer eXperience Center 553 Benson Road
- Benton Harbor, MI 49022-2692
In Canada:
- 1–800–807–6777
- Amana Brand Home Appliances
- Customer eXperience Center 200 – 6750 Century Ave.
- Mississauga Ontario L5N 0B7