Motorola WM500 Wireless Remote Speaker Microphone User Manual


motorola WM500 Wireless Remote Speaker Microphone

Safety and Legal
This section provides the safety and legal information for this product.
Certification Marks

Intellectual Property and Regulatory Notices
Copyrights
The Motorola Solutions products described in this document may include copyrighted Motorola Solutions computer programs. Laws in the United States and other countries preserve for Motorola Solutions certain exclusive rights for copyrighted computer programs. Accordingly, any copyrighted Motorola Solutions computer programs contained in the Motorola Solutions products described in this document may not be copied or reproduced in any manner without the express written permission of Motorola Solutions.
No part of this document may be reproduced, transmitted, stored in a retrieval system, or translated into any language or computer language, in any form or by any means, without the prior written permission of Motorola Solutions, Inc.
Trademarks
MOTOROLA, MOTO, MOTOROLA SOLUTIONS, and the Stylized M Logo are trademarks or registered trademarks of Motorola Trademark Holdings, LLC and are used under license. All other trademarks are the property of their respective owners.
License Rights
The purchase of Motorola Solutions products shall not be deemed to grant either directly or by implication, estoppel or otherwise, any license under the copyrights, patents or patent applications of Motorola Solutions, except for the normal non-exclusive, royalty-free license to use that arises by operation of law in the sale of a product.
Open Source Content
This product may contain Open Source software used under license. Refer to the product installation media for full Open Source Legal Notices and Attribution content.
European Union (EU) and United Kingdom (UK) Waste of Electrical and Electronic Equipment (WEEE) Directive
The European Union’s WEEE directive and the UK’s WEEE regulation require that products sold into EU countries and the UK must have the crossed-out wheelie bin label on the product (or the package in some cases). As defined by the WEEE directive, this crossed-out wheelie bin label meansthat customers and end-users in EU and UK countries should not dispose of electronic and electrical equipment or accessories in household waste. Customers or end-users in EU and UK countries should contact their local equipment supplier representative or service centre for information about the waste collection system in their country.
Disclaimer
Please note that certain features, facilities, and capabilities described in this document may not be applicable to or licensed for use on a specific system, or may be dependent upon the characteristics of a specific mobile subscriber unit or configuration of certain parameters. Please refer to your Motorola Solutions contact for further information. © 2021 Motorola Solutions, Inc. All Rights Reserved
Notice to Users (FCC and Industry Canada)
This device complies with Part 15 of the FCC rules and Industry Canada’s license-exempt RSS’s per the following conditions:
- This device may not cause harmful interference.
- This device must accept any interference received, including interference that may cause undesired operation.
- Changes or modifications made to this device, not expressly approved by Motorola Solutions, could void the authority of the user to operate this equipment.
NOTE:
This equipment has been tested and found to comply with the limits for a Class B digital device, pursuant to part 15 of the FCC Rules. These limits are designed to pro-vide reasonable protection against harmful interference in a residential installation. This equipment generates, uses, and can radiate radio frequency energy and, if not installed and used in accordance with the instructions, may cause harmful interference to radio communications. However, there is no guarantee that interference will not occur in a particular installation.
If this equipment does cause harmful interference to radio or television reception, which can be determined by turning the equipment off and on, the user is encouraged to try to correct the interference by one or more of the following measures:
- Reorient or relocate the receiving antenna.
- Increase the separation between the equipment and receiver.
- Connect the equipment into an outlet on a circuit different from that to which the receiver is connected.
- Consult the dealer or an experienced radio or TV technician for help.
RF Energy Exposure Awareness and Product Safety Guide for Portable Two-Way Radios
CAUTION:
Before using this product, read the operating instructions for safe usage contained in the Product Safety and RF Exposure booklet enclosed with your radio which contains important operating instructions for safe usage and RF energy awareness and control for Compliance with applicable Standards and Regulations.
NOTE: This device is intended for use in occupational/controlled conditions where users are aware of their exposure and can exercise control over their exposure to meet the requirements in national and international regulations.
To ensure continued compliances with applicable RF exposure limits, use only Motorola Solutions approved, supplied or replacement antennas, batteries, and accessories.
For more information on what RF energy exposure is, and how to control your exposure to ensure compliance with established RF exposure limits, consult the following websites:
- https://www.fcc.gov/
- http://www.ic.gc.ca/eic/site/smt-gst.nsf/eng/sf11467.html
- http://www.ic.gc.ca/eic/site/smt-gst.nsf/eng/sf01904.html
- https://www.osha.gov/
- https://osha.europa.eu/en
- http://www.who.int/peh-emf/project/en/
For additional user training information on exposure requirements, consult the following websites:
- https://www.motorolasolutions.com/en_us/about/company-overview/corporateresponsibility/governance-and-policies/wireless-communication-and-healthfaqs.html
- http://learning.motorolasolutions.com/
Acoustic Safety
Exposure to loud noises from any source for extended periods of time may temporarily or permanently affect your hearing. The louder the radio volume, the less time is required before your hearing could be affected. Hearing damage from loud noise is sometimes undetectable at first and can have a cumulative effect. To protect your hearing:
- Use the lowest volume necessary to do your job.
- Turn up the volume only if you are in noisy surroundings.
- Turn down the volume before wearing the earpiece.
- Limit the amount of time you use headsets or earpieces at high volume.
- When using the radio without a headset or earpiece, do not place the radio speaker directly against your ear.
- If you experience hearing discomfort, ringing in your ears, or speeches that are muffled, you should stop listening to your radio through your headset or earpiece, and have your hearing checked by your doctor. To change the volume level, refer to Radio Product Safety Leaflet or Costumer Programming Software (CPS) for Surveillance extra loud (xL) Kit Configurations.
Important Information
- Do not charge your accessory in temperature below 0°C (32°F) or above 45°C (113°F).
- Do not store your accessory in direct sunlight or where expected temperatures can exceed below 0°C (32°F) or above 45°C (113°F) such as inside a parked car.Do not store your accessory in direct sunlight or where expected temperatures can exceed this range such as inside a parked car.
- Storing your fully charged accessory in high temperature conditions may permanently reduce the life of the internal battery.
- Battery life may temporarily shorten in low-temperature conditions.
- RSM should be stored in temperatures between -10°C (14°F) and 30°C (86°F) to minimize permanent battery capacity loss.
WARNING:
- To prevent injury, do not disassemble, puncture, or crush the RSM because this action can cause the battery to short-circuit.
- Do not expose or throw the RSM into heat or fire.
- Do not dispose the RSM into household waste.
- Do not fill the audio jack and USB charging port with water. If water enters the audio jack and/or USB charging port, remove water by shaking the RSM. Always cover the audio jack and USB charging port with a dust cap when not in use.
Open Source Software Legal Notices
This product contains Open Source Software. For more information regarding
licenses, acknowledgment, required copyright notices, and other usage terms, visit http://businessonline.motorolasolutions.com
Go to Resource Center→Product Information→Manual→Accessories→Remote Speaker→Microphone
Service and Warranty
Other than the clip, the Remote Speaker Microphone (RSM) is not repairable. The RSM is covered under the standard Motorola Solutions one-year limited warranty.
Warranty Exclusion
Motorola Solutions does not warrant the installation, maintenance or service of the Product, accessories, batteries, or parts.
Motorola Solutions is not responsible in any way for problems or damage caused by any ancillary equipment or peripherals (specific examples include, but are not limited to: batteries, chargers, adapters, and power supplies) not furnished or manufactured by Motorola Solutions which is attached to or used with the Product. When the Product is used with ancillary or peripheral equipment not supplied by Motorola Solutions, Motorola Solutions does not warrant the operation of the Product/peripheral combination. Motorola Solutions will not honor any warranty claim where the Product is used in such a combination and it is determined by Motorola Solutions that there is no fault with the Product. Upon open or dismantle the Product, the warranty is immediately voided. Motorola Solutions specifically disclaim any responsibility for any damage in any way caused by improper installation by unauthorized personnel.
Recommended RSM Wearing Positions
Figure 1: Recommended Wearing Position

NOTE: For better performance, wear the RSM and the device on the same side.
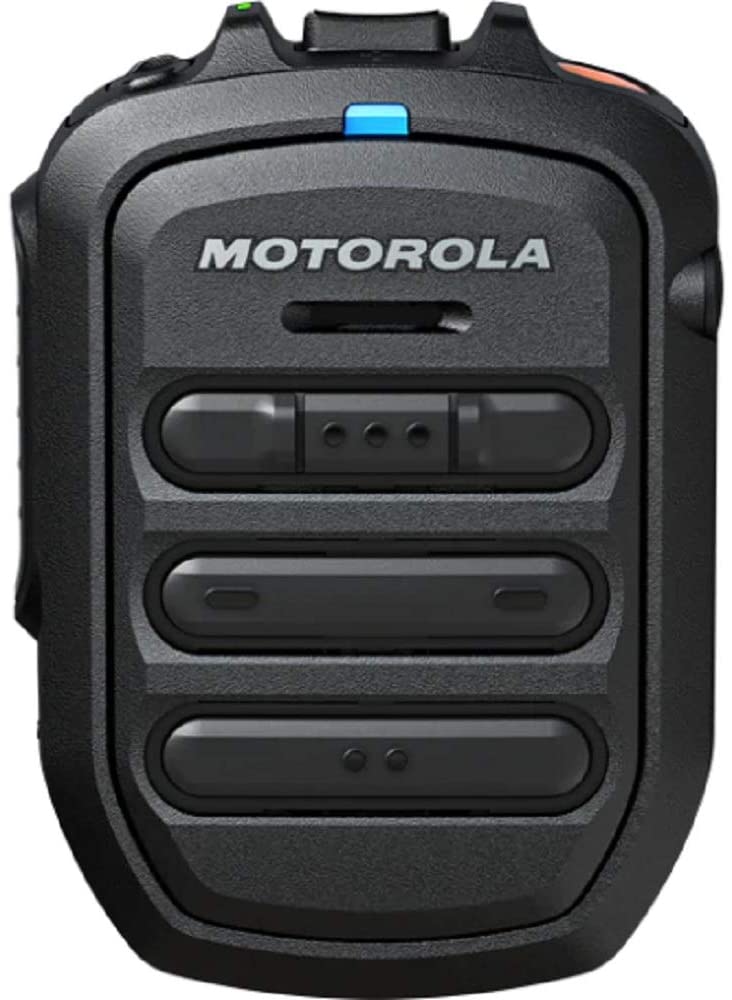
RSM Overview

RSM Overview and Description
| Label | Description |
| 1 | Volume toggle |
| 2 | Power Indicator |
| 3 | Power button |
| 4 | Push-To-Talk (PTT) button (for group call) |
| PTT call can be either transmitted to a talkgroup or individual user | |
| 5 | Multifunction (MFB) Button |
| Available multiple functions: • To change language in disconnected state • To answer calls upon incoming call • To reject calls upon incoming call • To end calls upon ongoing call • To mute/unmute microphone upon ongoing call | |
| 6 | P1 Programmable button |
| Label | Description |
| Function configured on the host or the WAVE application. WAVE default function: WAVE Operational Status Messaging (OSM) | |
| 7 | P2 Programmable Button |
| Function configured on the host or the WAVE application. WAVE default function: Channel Down | |
| 8 | P3 Programmable Button |
| Function configured on the host or the WAVE application. WAVE default function: Channel Up | |
| 9 | Audio/Bluetooth indicator |
| Function configured on the host or the WAVE application. WAVE default function: Wave OSM | |
| 10 | Audio/Bluetooth Indicator |
| 11 | Emergency button |
| 12 | Microphone |
| 13 | Speaker |
| 14 | Charging port |
| 15 | NFC Location |
| 16 | Audio jack |
NOTE:
Operational Status Message (OSM) requires pre-configuration in the WAVE Application. Answer, reject, end call, and microphone mute functionality is not applicable for the radios. More programmable functions may be added on the WAVE application in the future. Refer to Kodiak User Guide for more information.
WM500 RSM Button Operations
| Button | State | Short Press | Long Press (>
1.5 s) |
Very Long Press (> 3s) |
| Power | Off | N/A | Power On | Enter Pairing |
| On | Sign Of Line | N/A | Power Off | |
| PTT Connected PTT for Kodiak Group Call | ||||
| Not Connected | Kodiak Pairing | N/A | N/A | |
| Power + PTT | Off | N/A | N/A | Power On and Clear PDL |
| Power + Call Button | On | N/A | N/A | Enter/Exit Dark Mode |
| Call Button | Not Connected | Switches Lan- guage | N/A | N/A |

RSM Compatibility
List of radios or devices that are compatible to PMMN4127:
- LEX Series
- SLN 1000
- TLK 100
- MXP600, requires minimum WM500 firmware R04.00.00 (R04) or later
- MOTOTRBO ION, requires minimum WM500 firmware R03.00.00 (R03) or later
- Other compatible non-Motorola Solutions devices
Compatible Parts and Accessories

These accessories can be paired with a Kodiak Broadband PTT enabled device. Currently, the supported Kodiak feature is Operational Status Messaging (the additional features will be added in the futures), refer to your Kodiak User Guide for setup instructions.
NOTE:
MAC Address is located on top of individual box and within QR code behind belt clip. Additional MAC Address labels are provided inside individual box.
To support new radios and functionality, ensure that the WM500 firmware is upgraded to the latest version. Refer to WM500 online manual for the full list of compatible radios.
Getting Started
Familiarize yourself with basic information on how to use your Remote Speaker Microphone (RSM).
Charging the Battery
Procedure:
- Connect the USB charging cable to the Remote Speaker Microphone (RSM).
- Plug the charging cable to USB power source.
IMPORTANT: Charge the RSM immediately to prevent flat-battery condition.
Charging Indicator Behavior
| Power Indicator | Description |
| Blinking red | Battery is low. |
| Solid red | Battery is charging. |
| Solid green | Battery is fully charged. |
| Blinking green | More than 90% charged. |
| Rapid blinking red | Charging error. |
Status Indication
Refer to the following tables to understand your Remote Speaker Microphone (RSM) status indication.
Audio and Bluetooth Status Indication
| Audio/Bluetooth Indication | Description |
| Blinking blue | Enter pairing |
| Solid blue | Disconnected |
| Double blinking blue (Once) | Connected |
| Solid red | Mic Muted |
| Blinking green | Receiving Incoming Call |
To determine the details status of your RSM, press the Power button.
RSM Status Request Indication
| Indicator | Status | Description |
| Audio/Bluetooth | Blinking blue | Enter pairing |
| Double-blinking blue | Connected | |
| Power | Double-blinking green | Battery level is high |
| Double-blinking amber | Battery level is medium |
Pairing or Unpairing the RSM
Prerequisites: Make sure that your RSM is turned off.
Pairing the RSM through Bluetooth
Procedure:
- Press and hold the Power button until the “Power On” voice prompt follow by “Searching for Host” voice prompt and the blue LED blinks.
- From the Bluetooth compatible device list, search and select WM500_xxxx.xxxx denotes the alphanumeric MAC address of your WM500 RSM. If pairing is successful, your device sounds “Pairing Successful” and a voice prompt from the RSM indicating the device is connected.
NOTE: For iPhone users, you are required to choose your RSM from the Bluetooth list and pair again for the second time. The WM500 supports various pairing methods depending on the compatible device. Refer to the user guide of the respective compatible device for pairing details.
Pairing the RSM through NFC
Procedure:
- Press and hold the Power button until the “Power On” voice prompt follow by “Searching for Host” voice prompt and the blue LED blinks.
- Align the NFC locations on both the RSM and the compatible devices.
- Check the compatible device for indication of successful pairing.
Unpairing the RSM
Procedure:
Press and hold the Power and PTT buttons simultaneously. The blue LED blinks and a voice prompt from the RSM indicating that the paired device is “Cleared”.