Sony SA-RS3S Wireless Rear Speaker Instruction Manual


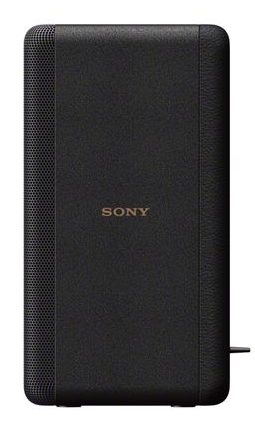
SONY SA-RS3S Wireless Rear Speaker

About compatible models for the rear speaker
The SA-RS3S rear speaker works only with the specified model. For information about compatible models, visit Sony’s website. In these Operating Instructions, the operations are described for speakers used with the compatible model HT-A7000.
Parts and Controls Front

Power indicator
- Flashes slowly (green): The rear speaker is not connected to a compatible model.
- Lights up (green): The rear speaker is connected to a compatible model.
- Flashes twice repeatedly (green): The rear speaker is attempting to connect to a compatible model.
- Flashes/lights up (amber): The software is updating.
- Lights up (red): The rear speaker is in standby mode.
- Turns off: The rear speaker is turned off.
Note
The brightness of the power indicator syncs with the DIMMER settings of a compatible model.
Rear

- Wall mount hole
- (power) button
- LINK button
- Mounting hole for the general speaker stand
- AC inlet
Installation
Installing on the Floor
The following illustration is the installation example to use the speakers with the compatible model HT-A7000 and an optional subwoofer.

- Check the right and left rear speakers using the label on the bottom of them. “REAR R” is for the right, “REAR L” is for the left.
- Install the speakers behind your listening position. The following installations are recommended to enjoy the surround sound effect.
- Align the height position of the speaker with your ear.
- Turn the speakers to your listening position.
Note
Lay the bottom (the face on which there is a label) down to install the speaker. Installations other than above are not supported.
Tip
To obtain a good surround sound, set the speaker distance from your listening position by using the setup menu of a compatible model. For details, refer to the Operating Instructions supplied with a compatible model.
Mounting on the Wall
The following illustration is the installation example to use the speakers with the compatible model HT-A7000 and an optional subwoofer.

Note
- Have the installation done by a Sony dealer or licensed contractor and pay special attention to safety during the installation.
- Sony shall not be held responsible for accidents or damage caused by improper installation, insufficient wall strength, improper screw installation or natural disaster, etc.
Prepare a screw (not supplied) that is suitable for the wall mount hole on the rear of the speakers.

Decide the wall mounting position of the speaker and fasten the screw there.

Hang the wall mount hole on the screw. Check the label on the bottom of the speakers. “REAR R” is for the right, “REAR L” is for the left.

Note
Prepare screws (not supplied) that are suitable for the wall material and strength. As a plasterboard wall is especially fragile, attach the screws securely in the wall beam. Mount the speakers onto a reinforced wall making sure that the heights of the right and left speakers are equal.
Connection
Tip
You can connect the optional subwoofer with a compatible model in the following way when installing it too.
Turn on a compatible model.
Connect the AC power cords (mains leads) (supplied) to the rear speakers, and then connect the cords to the AC outlets (mains).

Make sure that the power indicators on the speakers light in green. When the power indicators light in green, the connection between the speakers and a compatible model is established. If the connection is not established, connect the speakers to a compatible model manually. For details, see “If the Connection is not Established Automatically”.

If the Connection is not Established Automatically
If you cannot connect the speakers to a compatible model automatically or you use multiple compatible models and want to specify the compatible model for connecting the speakers, perform the manual connection.
The following operation is described for speakers used with the compatible model HT-A7000. Use the remote control supplied with the compatible model HT-A7000 when performing this operation. If you use other compatible models, refer to the Operating Instructions supplied with them.
Press HOME
The home menu appears on the TV screen.
Select
[Setup] – [Advanced Settings] on the home menu.
Select [Speaker Settings]
[Wireless Speaker Settings] – [Start manual linking]. The [Start manual linking] screen appears on the TV screen.
Press LINK on the speaker
The power indicator of the speaker that had LINK pressed flashes twice repeatedly in green.
Select [Start]
The manual link starts. The connecting process appears on the TV screen. To cancel the manual link, select [Cancel]. When [Rear Speaker (R)] and [Rear Speaker (L)]
display [Connected], select [Finish].
Press
The link is established and the power indicator of
the speakers lights in green.
Note
- If you perform [Start manual linking], [Link mode] of [Wireless Speaker Settings] is set to [Manual] automatically.
- Only the speakers for which [Connected] has been displayed in Step 6 connect to a compatible model. If the connection of the speakers cannot be established, perform the manual connection again.
If Wireless Transmission is Unstable
If you use multiple wireless systems, such as a wireless LAN, the wireless signals may become unstable. In this case, the transmission may be improved by changing the following setting. The following operation is described for speakers used with the compatible model HT-A7000. Use the remote control supplied with the compatible model HT-A7000 when performing this operation. If you use other compatible models, refer to the Operating Instructions supplied with them.
Press HOME
The home menu appears on the TV screen.
Select [Setup] – [Advanced Settings] on the home menu.
Select [Speaker Settings] – [Wireless Speaker Settings] – [RF Channel].
Select the setting you want
- [On] (default setting): Normally select this. The system automatically selects the better channel for transmission. Stronger mode for wireless interference.
- [Off]: The system selects a channel from the limited frequency band to prevent external wireless interference. If sound dropping occurs while [On] is selected, it may be improved by selecting [Off].
Note
- If you change the [RF Channel] setting from [Off] to [On], it may take 1 minute to reconnect.
- A compatible model may not meet this setting depending on the countries/regions where you purchase it.
Troubleshooting
If you experience any of the following difficulties while using the rear speakers, use this troubleshooting guide to help remedy the problem before requesting repairs. Should any problem persist, consult your nearest Sony dealer.
Be sure to bring all of your rear speakers, a compatible model and optional subwoofer (not supplied) even if it seems as though only one has a problem, when you request to repair.
The following solutions are described for speakers used with the compatible model HT-A7000.
If you use other compatible models, refer to the Operating Instructions supplied with them.
No sound is heard from the rear speakers
- Make sure the AC power cord (mains lead) of the rear speaker is connected properly.
- If the power indicator on the rear speaker does not light, try the following.
- Make sure the AC power cord (mains lead) of the rear speaker is connected properly.
- Press (power) of the rear speaker to turn on the power.
- If the power indicator on the rear speaker flashes slowly in green or lights in red, try the following.
- Move the rear speaker to a location near a compatible model so that the power indicator on the rear speaker lights in green.
- Follow the steps in “If the Connection is not Established Automatically.”
- Check the wireless connection status. For details, refer to the Operating Instructions supplied with a compatible model.
- If the power indicator on the rear speaker flashes in red, press (power) of the rear speaker to turn off the power and check whether the ventilation holes of the rear speaker is blocked or not.
- Press REAR + on the remote control of a compatible model to increase the volume of the rear speakers.
- If you change the [RF Channel] setting of a compatible model from [Off] to [On], it may take 1 minute for the sound to be output.
- If the power indicator flashes in red, disconnect the AC power cord (mains lead) of the rear speaker from the AC outlet (mains) and reconnect it again.
Sound skips or has noise
- If there is a device nearby that generates electromagnetic waves, such as a wireless LAN or a microwave oven in use, locate the rear speakers and a compatible model apart from that device.
- If there is an obstacle between a compatible model and the rear speakers, move or remove the obstacle.
- Locate a compatible model and the rear speakers as close as possible.
- Switch the network connection of the TV or Blu-ray Disc player from wireless to wired.
Specifications
POWER OUTPUT (rated) 30 W + 30 W (at 6 ohms, 1 kHz, 1% THD) POWER OUTPUT (reference) 50 W (per channel at 6 ohms, 1 kHz)
Speaker system
2-way 2 speaker system Bass reflex
Speaker
Woofer: 46 mm×54 mm cone type Tweeter: 16 mm dome type
Power requirements
220 V – 240 V AC, 50 Hz/60 Hz
Power consumption
On: 11 W Standby mode: 1 W or less Turned off: 0.5 W or less
Dimensions (w/h/d) (approx.)
100 mm × 187 mm × 100 mm (projecting parts not included).
Mass (approx.) 1.1 kg
Wireless transmitter/receiver section Communication system
Wireless Sound Specification Version 4.0
Frequency band
5 GHz
Modulation method
OFDM
Radio Frequency Bands and Maximum Output Power
| Frequency band | Maximum output power |
| 5150 – 5250 MHz | < 18 dBm |
| 5250 – 5350 MHz | < 18 dBm |
| 5470 – 5600 MHz | < 18 dBm |
| 5650 – 5725 MHz | < 18 dBm |
| 5725 – 5850 MHz | < 13.98 dBm |
Included items
- Rear speaker R (1), Rear speaker L (1)
- AC power cords (mains leads) (2)
- Operating Instructions (1)
Important information on software
This product contains software that is subject to the GNU General Public License (“GPL”) or GNU Lesser General Public License (“LGPL”). These establish that customers have the right to acquire, modify, and redistribute the source code of said software in accordance with the terms of the GPL or the LGPL. For the method to confirm the GPL, LGPL and other software licenses contained in the rear speakers, please refer to the Operating Instructions of a compatible model. When you use the compatible model HT-A7000, please refer to [Software License Information] under [Setup] – [Advanced Settings] – [System Settings] on the home menu. You may find a copy of the relevant source code as required under the GPLv2 (and other licenses) at https://oss.sony.net/Products/Linux You may obtain the source code as required by the GPLv2 on a physical medium from us for a period of three years after our last shipment of this product by applying through the form at https://oss.sony.net/Products/Linux This offer is valid to anyone in receipt of this information. Please note that Sony cannot answer or respond to any inquiries regarding the content of this source code. All other trademarks are trademarks of their respective owners.
WARNING
Do not install the speakers in a confined space, such as a bookcase or built-in cabinet. To reduce the risk of fire, do not cover the ventilation opening of the speakers with newspapers, tablecloths, curtains, etc. Do not expose the speakers to naked flame sources (for example, lighted candles). To reduce the risk of fire or electric shock, do not expose these speakers to dripping or splashing, and do not place objects filled with liquids, such as vases, on the speakers. The speakers are not disconnected from the mains as long as they are connected to the AC outlets, even if the speakers themselves have been turned off. As the main plug is used to disconnect the speakers from the mains, connect the speakers to an easily accessible AC outlet. Should you notice an abnormality in the speakers, disconnect the main plug from the AC outlet immediately. Do not place this product close to medical devices This product (including accessories) has magnet(s) which may interfere with pacemakers, programmable shunt valves for hydrocephalus treatment, or other medical devices.
Do not place this product close to persons who use such medical devices
Consult your doctor before using this product if you use any such medical device. Indoor use only.
For the speakers
The nameplates are located on the bottom of the speakers.
For models with the CE marking or UKCA
marking located on the speakers The validity of the CE marking is restricted to only those countries where it is legally enforced, mainly in the countries EEA (European Economic Area) and Switzerland. The validity of the UKCA marking is restricted to only those countries where it is legally enforced, mainly in the UK.
For the customers in Europe
Notice for customers: the following information is only applicable to equipment sold in countries applying EU directives and/or UK applying relevant statutory requirements. This product has been manufactured by or on behalf of Sony Corporation. EU and UK Importer: Sony Europe B.V. Inquiries to the EU Importer or related to product compliance in Europe should be sent to the manufacturer’s authorized representative, Sony Belgium, bijkantoor van Sony Europe B.V., Da Vincilaan 7-D1, 1930 Zaventem, Belgium. Inquiries to the UK Importer or related to product compliance in the UK should be sent to the manufacturer’s authorized representative, Sony Europe B.V., The Heights, Brooklands, Weybridge, Surrey KT13 0XW, United Kingdom.
Hereby, Sony Corporation declares that this equipment is in compliance with Directive 2014/53/EU. The full text of the EU declaration of conformity is available at the following internet address: https://compliance.sony.eu
Hereby, Sony Corporation declares that this equipment is in compliance with the UK relevant statutory requirements.The full text of the declaration of conformity is available at the following internet address: https://compliance.sony.co.uk.
For this radio equipment, the following restrictions on putting into service or of requirements for authorisation of use apply in BE, BG, CZ, DK, DE, EE, IE, EL, ES, FR, HR, IT, CY, LV, LT, LU, HU, MT, NL, AT, PL, PT, RO, SI, SK, FI, SE, UK, UK(NI), IS, LI, NO, CH, AL, BA, MK, MD, RS, ME, XK, TR: 5150 – 5350 MHz band is restricted to indoor operations only. This radio equipment is intended to be used with the approved version(s) of software that are indicated in the Declaration of Conformity. The software loaded on this radio equipment is verified to comply with the essential requirements of the Radio Equipment Regulations. The software version can be found in [Setup] – [Advanced Settings] – [Speaker Settings] – [Wireless Speaker Settings] – [Software Version] on the home menu of a compatible model.
Disposal of old electrical & electronic equipment (applicable in the European Union and other countries with separate collection systems)
This symbol on the product or on its packaging indicates that this product shall not be treated as household waste. Instead it shall be handed over to the appropriate collection point for the recycling of electrical and electronic equipment. By ensuring that this product is disposed of correctly, you will help to prevent potential negative consequences for the environment and human health, which could be caused by inappropriate waste handling of this product. The recycling of materials will help to conserve natural resources. For more detailed information about recycling of this product, please contact your local Civic Office, your household waste disposal service or the shop where you purchased the product.
This equipment should be installed and operated keeping the radiator over 20 cm away from the person’s body.
For the customers in Australia or New Zealand
It should be installed and operated with at least 20 cm and more between the radiator and person’s body (excluding extremities: hands, wrists, feet and ankles).
For the customers in Australia and India
Disposal of old electrical & electronic equipment (applicable in the European Union and other countries with separate collection systems)
Precautions
On safety
- Should any solid object or liquid fall into the rear speaker, unplug the system and have it checked by qualified personnel before operating it any further.
- Do not climb on the rear speaker, as you may fall down and injure yourself, or the rear speaker damage may result.
On power sources
- Before operating the rear speaker, check that the operating voltage is identical to your local power supply. The operating voltage is indicated on the nameplate at the bottom of the rear speaker.
If you are not going to use the rear speaker for a long time, be sure to disconnect the rear speaker from the wall outlet (mains). To disconnect the AC power cord (mains lead), grasp the plug itself; never pull the cord. - One blade of the plug is wider than the other for the purpose of safety and will fit into the wall outlet (mains) only one way. If you are unable to insert the plug fully into the outlet, contact your dealer.
- AC power cord (mains lead) must be changed only at a qualified service shop.
On heat buildup
- Although the rear speaker heats up during operation, this is not a malfunction. If you continuously use this rear speaker at high volume, the rear speaker temperature at the rear and bottom rises considerably. To avoid burning yourself, do not touch the rear speaker.
On placement
- Do not place the rear speaker near heat sources or in a place subject to direct sunlight, excessive dust, or mechanical shock.
- Do not place metal objects other than a TV around the rear speaker. Wireless functions may be unstable.
- If the rear speaker is being used in combination with a TV, VCR, or tape deck, noise may result and picture quality may suffer. In such a case, place the rear speaker away from the TV, VCR, or tape deck.
- Use caution when placing the rear speaker on a surface that has been specially treated (with wax, oil, polish, etc.), as staining or discoloration of the surface may result.
- The speakers of this rear speaker are not of magnetically shielded type. Do not place magnetic cards on the rear speaker or near it.
If you encounter color irregularity on a nearby TV screen
Color irregularities may be observed on certain types of TV sets.
On cleaning
Clean the rear speaker with a soft, dry cloth. Do not use any type of abrasive pad, scouring powder, or solvent such as alcohol or benzine. If you have any question or problem concerning your system, please consult your nearest Sony dealer.