KENWOOD KCL95 Cooking Chef XL Reboot Instructions


TYPE KCL95
Instructions


KENWOOD WORLD APP
A B


C D


To Use Your Cooking Chef Connect – Manual Operation
E F


G H

I J


K L


M N


O


Using Preset Programmes
P Q


R

S To Use The Weighing Function


T To Use Your Steamer Attachment


U Tool Height Adjustment


V To Fit and Use Your Splashguard Assembly


W To Fit and Remove Your Stir Assist Clip


X Assembling The High Temperature Creaming Beater


Safety
- Read these instructions carefully and retain for future reference.
- Remove all packaging and any labels.
- If the plug or cord is damaged it must, for safety reasons, be replaced by Kenwood or an authorised Kenwood repairer in order to avoid a hazard.
important note – electronic medical implants - Like all induction heating products, this appliance generates short-range magnetic fields. If any user or person in close proximity has a pacemaker or other active implants, please consult a doctor before use, concerning any possible incompatibility to prevent any risk to health.
- Switch off and unplug the appliance before fitting or removing tools/ attachments, after use and before cleaning.
- Keep body parts, hair, jewellery and loose clothing away from moving parts and fitted attachments.
- Never put your fingers etc., into the hinge mechanism.
- Never leave the appliance on unattended when in a non cooking mode.
- When leaving the appliance unattended in the cooking mode, pay close attention to the following:
o ensure the instructions are followed with regards to temperatures and maximum quantities to process;
o make sure the unit and cord are positioned out of reach of children and away from the edge of the work surface;
o check the progress on a regular basis to ensure enough liquid is added and food is not overcooking. - Never use a damaged appliance. Get it checked or repaired: see ‘Service and Customer Care’.
- Never use an unauthorised attachment or more than one attachment at once.
- Never exceed the maximum capacities and when using the induction heater never exceed the 3 litre maximum fill level marked on the inside of the bowl.
- When using an attachment, read the safety and usage instructions that come with it.
- Take care when lifting this appliance as it is heavy. Ensure the head is locked and that the bowl, tools, outlet covers and cord are secure before lifting.
- When moving the appliance always pick up by the pedestal base and mixer head. Do not lift or carry the appliance by the bowl handle.
- Never let the cord hang down where a child could grab it.
- Never let the power unit, cord or plug get wet.
- Be careful when handling or touching any part of the appliance when being used in the cook mode or after cooking, IN PARTICULAR THE BOWL, SPLASHGUARD AND TOOLS as they will remain HOT long after the appliance has been switched off. Use the handles to remove and carry the bowl. Use oven gloves when handling the hot bowl and hot mixing tools.
- The
- Take care when removing bowl tools after extended use as they may get hot.
- The underside of the bowl will remain hot long after the heating has stopped. Use caution when handling and use the work surface protection mat when placing the bowl on heat sensitive surfaces.
- Be careful of steam escaping from the mixer bowl particularly when opening the lid in the splashguard or when raising the mixer head.
- If transferring hot food from the mixer to the blender, always allow the ingredients to cool to room temperature before placing in the blender.
- Only use the bowl and tools supplied with this appliance. Never use the bowl with any other heat source.
- Never operate the appliance in the cook mode with the bowl empty.
- Never insert anything through the air vents.
- When using this appliance ensure it is positioned on a level surface away from the edge. Make sure it is at least 10 cm from walls and ensure that the vents are not blocked. Do not position below overhanging cupboards.
- For the correct and safe operation of the induction cooker ensure that the bowl base and temperature sensors are clean and dry before cooking.
- Metallic objects such as knives, forks, spoons and lids should not be placed on the bowl pedestal/induction area as they can get hot.
- As with all induction cooking appliances do not place credit cards, magnetic media or sensitive electronic equipment near to the appliance when in use.
- Do not use the appliance for deep frying foods.
- Always ensure food is thoroughly cooked before eating.
- Do not exceed 250ml when cooking with oil.
- Food should be eaten shortly after cooking or allowed to cool quickly and then refrigerated as soon as possible.
- Misuse of your appliance can result in injury.
- Do not use excessive force when pressing the touch screen and never use a sharp object to operate it.
- Do not use the whisk for heavy mixtures (e.g. creaming fat and sugar) as you could damage it.
- The power-supply cord is used to reduce risk resulting from becoming entangled in or tripping. Extension cords may be used if care is exercised in their use. If an extension cord is used: 1) The marked electrical rating of the extension cord should be at least as great as the electrical rating of the appliance; and 2) The cord should be arranged so that it will not drape over the countertop or tabletop where it can be pulled on by children or tripped over unintentionally. If the appliance is of the earthed type, the extension cord should be a earthing-type 3-wire cord. The electrical rating of the appliance is listed on the bottom of the unit.
- Appliances can be used by persons with reduced physical, sensory or mental capabilities or lack of experience and knowledge if they have been given supervision or instruction concerning use of the appliance in a safe way and if they understand the hazards involved.
- Children should be supervised to ensure that they do not play with the appliance.
- This appliance shall not be used by children. Keep the appliance and its cord out of reach of children.
- Only use the appliance for its intended domestic use. Kenwood will not accept any liability if the appliance is subject to improper use, or failure to comply with these instructions.
- The maximum rating is based on the mini chopper/mill attachment that draws the greatest load. Other attachments may draw less power.
- This appliance is not intended to be operated by means of an external timer or separate remote-control system.

Steamer attachment
- This attachment produces steam which can burn you.
- Do not get burnt by steam coming out of your steamer basket, especially when removing the splashguard or lifting the feed chute lid.
- Take care when handling parts; any liquid, condensation, steamer part or Stand mixer part will be very hot. Use oven gloves.
- Unplug the appliance before fitting or removing parts or cleaning.
Food safety
- Cook meat, poultry, fish and seafood thoroughly. And never cook them from frozen.
- Do not reheat cooked food in your steamer.
Before plugging in
- Make sure your electricity supply is the same as the one shown on the underside of your appliance.
- WARNING: THIS APPLIANCE MUST BE EARTHED.
- This appliance conforms to EC Regulation 1935/2004 on materials and articles intended to come into contact with food.
- This appliance is in compliance with the essential requirements and other relevant provisions of Directive 2014/53/EU.
Before using for the first time
- Wash the parts: see ‘Care and Cleaning’.
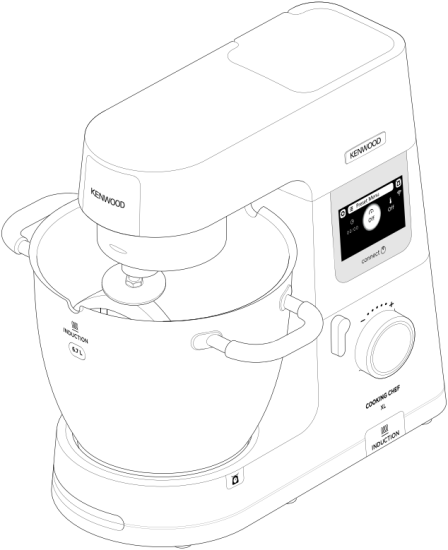
Know Your Kenwood Cooking Chef
Key
Attachment outlets
- High speed outlet (HSO)
- Slow speed outlet (SSO)
- Bowl tool socket
- Stir tool socket
Mixer - High speed outlet cover
- Mixer head
- Slow speed outlet cover
- Cooking chef bowl
- Head – lift lever
- Control dial
- On/Off switch
- Display screen
- Work surface protection mat
- Drain hole
- Bowl pedestal/induction area
- Air vents
- Temperature sensors
- Heat shield
- Rubber seal (removable)
- Splashguard
- Feed chute lid
- K-beater
- High temperature creaming beater
- Whisk
- Dough tool
- Stir tool
- Stir assist clip
- High temperature spatula
- Dough scraper
- Spanner
Steamer Attachment - Handle supports
- Supporting ring
- Folding handles
- Removeable tray
- Egg holders
Note: Slow Speed outlet attachments
The slow speed outlet on your Stand mixer model features the Twist Connection System. It is designed to accept Twist Connection System attachments.
When purchasing new attachments for the slow speed outlet you should check compatibility with your Stand mixer. All Twist Connection System attachments can be identified by the product code which starts with KAX and also by the Twist logo
If you own attachments featuring the Bar Connection System
For more information visit
www.kenwoodworld.com/twist.


Connecting to Kenwood World App

Refer to Illustrations A - D
The Kenwood World App will allow you to control your appliance through your smart phone or tablet.
- Plug in and press the On/Off switch on the side of the power unit.
- Select Settings

PIN number
- This will be required when prompted by the Kenwood World App.
- The appliance can only be connected when the PIN Number is shown on the display screen. If the PIN is entered incorrectly, follow the instructions on the app and retry.
- To display the unit’s PIN number, select Settings

Note:
WiFi
Operates with IEEE802.11 b, g and n at 2.4 GHz only, and connects to networks using WPA2-PSK
Compatibility
Kenwood World App compatible with latest versions of iOS and Android.
Factory reset
Important
- When disposing of the appliance, it is important to factory reset it to protect your personal data.
- Selecting this option will erase all WiFi data stored on the appliance and restore it to factory settings.
- To factory reset your appliance, select Settings

To Set Up Your Cooking Chef Connect
Refer to Illustrations E - I
IMPORTANT
- Make sure the induction area, temperature sensors and external surface of the bowl base are clean. Failure to do this will affect the heat sensor, resulting in poor cooking performance.
- Check that all the outlet covers including the heat shield are fitted. If they are not correctly fitted the heating function will not operate.
1 Plug in and press the On/Off switch.
2 Turn the head-lift lever clockwise and raise the mixer head until it locks.
3 Push the heat shield upwards onto the underside of the mixer head until fully located. The heat shield must never be used without the rubber seal fitted correctly. - If using the Cooking Chef Connect without heat, it is not necessary to fit the heat shield unless using the splashguard. Refer to ‘To Fit and Use Your Splashguard Assembly’ section.
4 Fit the bowl to the base.
5 Place the required tool in the bowl tool socket or stir tool socket if using the stir tool, locating the pin in the groove and then turn to lock into position. - To remove a tool, reverse step 5 above. (Always use oven gloves to remove tools after cooking).
6 To lower the mixer head, raise it slightly, then turn the head lift lever clockwise.
Lower into the locked position.
Stir Tool - when using the stir tool the stir assist clip can also be used to assist the mixing action, see ‘to fit and remove your stir assist clip’. The stir tool can also be used with the whisk. Do not use the stir tool with the dough tool.
To Use Your Cooking Chef Connect – Manual Operation
1 Add the relevant ingredients to be cooked/mixed.
2 Set the required time, speed and temperature.
Note: To use the machine as a mixer without heat, select ‘Off’ when setting the temperature. Turn the control dial anti-clockwise to use stir intervals and pulse. Turn the control dial clockwise to use continuous speeds.
3 Press the control dial to start.
4 To stop the unit at any time, press the control dial. If in cooking mode, take care as the unit will be hot.
• If the bowl temperature exceeds 60°C, for safety reasons the speed is automatically limited even if a higher speed has been selected. The speed will not automatically increase when the temperature drops below 60°C. The speed must be turned to the Off position first and the desired speed reselected.
High speed, high temperature mode (HSHT)
To mix at high speed at temperatures of 60°C and above
• Select time (if applicable), speed and temperature of 60°C or above.
• A warning will pop up on the display screen advising that you are entering HSHT mode
• Once the warning has been read and understood, press yes to confirm that you are happy to enter HSHT mode.
• Press the control dial to start.
This function MUST ONLY be used with the whisk and/ or stir tool. You should not exceed the maximum cooking capacity of 3 litres and you must ensure the splashguard is fitted. The machine must not be left unattended.
5 Once a programme has finished, the unit will beep 3 times.
• Note: If no time has been set, the heating and stirring processes will automatically end once the timer has reached 8 hours.
6 To stop the heating process, change the temperature to ‘OFF’. To stop the unit at any time press the control dial.
Important – If at any time the mixer head is raised during an operation, the heating process will pause and the bowl tool will stop and will not restart when the mixer head is lowered. To restart the mixer, lower the mixer head and press the control dial.
Using Preset Programmes
Refer to Illustrations P - R
- Select the Preset Menu.
- Choose the preset you wish to use.
- Follow the instructions on the display screen.
- To stop the unit at any time, press the control dial. Take care as the bowl and tools will be hot.
After Cooking
- Be careful when handling or touching any part of the appliance when being used in the cooking mode or after cooking, IN PARTICULAR THE BOWL AND TOOLS as they will remain HOT long after the appliance has been switched off.
- Use the two side handles to remove and carry the bowl. Use oven gloves when handling the hot bowl and hot tools.
- The underside of the bowl will remain hot long after the heating has stopped. Use caution when handling and use the work surface protection mat provided to protect heat sensitive surfaces.
Hints and Tips
- Some recipes, in particular those with a high water content, will not be able to reach a cooking temperature above 100°C (as this is the boiling point of water).
- When adding ingredients to the bowl during cooking, turn the speed down and add the ingredients slowly and evenly.
- To heat sauces quickly use a continuous stir setting.
- If using the splashguard during cooking, always remove it before lifting the mixer head. Be aware of condensation formed on the splashguard and heat shield.
- When lifting the mixer head lift it slowly to allow any liquid on the underside of the heat shield to flow back into the bowl.
- Four stir delay functions are available which enable you to select the appropriate amount of stirring for individual recipes. Some recipes will require constant stirring to stop ingredients from sticking to the bottom of the bowl, whereas others will benefit from intermittent stirring to maintain the texture of the food.
To Use The Weighing Function
Refer to Illustrations S
- Select the weighing function
- Fit the bowl.
- Zero the scale.
- Weigh the ingredients.
- To change between units tap the unit button on the weighing screen.

Note: Always place the appliance on a dry flat, stable surface prior to weighing. Do not apply pressure to the mixer or bowl whilst weighing as this will affect the accuracy of the scales. The weighing function can be used with the mixer head in either the down or up position.
| Preset Usage Chart | ||||
| The default settings can be adjusted to suit your recipe, where available. Non-adjustable settings are indicated by the When “Heating” is shown on the display screen, the timer will not start counting down until the correct temperature has been reached. | ||||
| Preset | Recommended Tool | Default Settings (adjustable) | Keep Warm Stage | Recipe Ideas / Uses |
| Egg White Whisking | (1 mins - 5 mins) (Min - Max) |
Egg whites for chocolate mousse | ||
| Sponge Cake | (30 secs – 5 mins) (1 – Max) |
Victoria Sponge, Cupcakes | ||
| Dough Kneading | (5 mins – 30 mins) (min – 1) |
Bread Rolls, Pizza | ||
| Dough Proving | (20 mins – 1 hr) (25˚C – 35˚C) |
Proving yeasted doughs | ||
| Chocolate Melting | (3 mins – 1 hr) |
Chocolate Mousse | ||
| Swiss Meringue | Base for Buttercream frosting | |||
| Italian Meringue | Lemon Meringue Pie Baked Alaska | |||
| Fruit Compote | Cake Fillings, Dessert toppings | |||
| Popcorn | For fresh homemade popcorn | |||
| Steam | (15 mins – 45 mins) |
Salmon en Papillote | ||
| All in One Dishes |
|
Bolognese | ||
| Chunky Soup |
|
Minestrone, Broths | ||
| Slow Cook | Beef bourguignon | |||


Recipe
Prune Marinade
200g Clear Runny Honey
40g Soft Prunes
40ml Water
- Place all ingredients into the mini chopper/mill. Refrigerate overnight.
- Fit the attachment to the Stand mixer.
- Switch to pulse for 4 seconds.
- Use as required.
Steamer Attachment
Refer to Illustration T
- When using your steamer basket, always keep your Cooking Chef away from walls and overhanging cupboards: the steam could damage them.
- Season food after cooking, this will help to prevent spots or pitting occurring on the stainless bowl.
- Place the removable tray on a flat surface ensuring that the handles are folded inwards.
- Fit the supporting ring onto the tray ensuring that the handle supports on the ring fit next to the V shaped cut outs in the tray.
- Fold out the handles and clip onto the handle supports.
- Place the food to be cooked onto the tray. Vegetables should be thoroughly cleaned and peeled as required.
- Add the required amount of water to the bowl (see cooking chart). Filtered water is best as it reduces limescale and spotting.
- Place the assembled steamer into the bowl it will find its own height.
- Fit the heatshield to the mixer head.
- Fit the bowl and steamer basket to the Kitchen Machine.
- Lower the mixer head and then fit the splashguard.
- Select the steam pre-set and adjust the cooking time (as per the Recommended Cooking Chart). Press the control dial to start
- Allow to cook for the required time.
- Remove the splashguard.
- Lift the mixer head.
- Lift out the steamer basket by the handles take care to prevent them folding inwards.
- Place the steamer basket on a large plate or other suitable container.
- Unclip the handles and fold in towards the centre. Lift off the supporting ring and fold out the handles.
- Remove the food.
important
Be careful when handling anything: any liquid, condensation, steamer part or Stand Mixer part will be very hot. Use oven gloves.
- Do not attempt to fit a mixing tool when using the steamer basket.
- Do not cook food in the mixer bowl whilst using the steamer basket.
Hints and Tips
- Liquid left in the bowl is good for making soup or stock. Be careful it will be very hot.
- Leave gaps between pieces of food.
- Stir large amounts half way through cooking.
- Similar sized pieces of food cook more evenly.
- If steaming more than 1 type of food, if something needs less time, add it later.
- If you lift the feed chute lid or remove the splashguard, steam will escape and cooking may take longer.
- Food will continue cooking when your Stand Mixer switches off, so remove food immediately.
- If your food’s not cooked enough, reset the time. You may need to top up with water.
- The cooking times are a guide only. Always check that food is thoroughly cooked before eating.
- Do not allow the unit to boil dry, top up with water as necessary.
Display Screen Explained | |
| Tap this icon to open the settings menu. | |
| Tap this icon to open the pre-set programmes menu. | |
| Tap this icon to weigh ingredients into the bowl. | |
|
Shows the time selected in hours (h), minutes (m) and seconds (s). |
| Shows the stir interval selected. If an intermittent speed (2 -> 4) is selected, the outer ring will progressively increase and the appliance will stir when it is full. | |
| Shows the temperature selected. A pulsing red background indicates the machine is in heating mode. A solid red background indicates the machine has reached the set temperature. | |
| Indicates that a setting (time, speed or temperature) cannot be adjusted. | |
| Status Information | Text here shows status information. |
| Indicates that the bowl, its contents and any parts being used are hot. Please handle with care. | |
| Indicates that the appliance is connected to a WiFi network. | |
| Indicates that the appliance is in the high speed high temperature mode (HSHT) | |
| Turn the control dial anti-clockwise to use stir intervals and pulse. Turn the control dial clockwise to use continuous speeds min – max. | |


Recipes | |||
| Recipe | Tool Used | Preset / Manual Settings | Ingredients |
| Minestrone | Chunky Soup |
Add the following all at once: 100g pancetta, diced | |
| Beef Stroganoff | All in One Dishes |
Add the following all at once: 600g beef, diced | |
| Crème Anglaise | Manual Settings |
Add the following all at once: 250g full fat milk | |
| Rice Pudding | Manual Settings
|
Add the following all at once: 150g short grain rice | |


| Temperature and Speed Settings | ||
| Temperature Guidelines | 60°C | Melting Chocolate |
| 72°C - 82°C | Poaching | |
| 98°C - 99°C | Simmering | |
| 100°C | Boiling, steaming | |
| 130°C - 140°C | Sautéing vegetables | |
| 180°C | Browning meat | |
| (P) | Pulse – For short bursts of maximum power. | |
| Stir interval 1 - The mixer will operate at a constant slow speed. Used for folding light ingredients into heavier mixtures. | ||
| Stir interval 2 - Intermittent stir with short pauses. When set to this speed, intermittently operates on a slow speed every 10 seconds for 1.5 revolutions. | ||
| Stir interval 3 - Intermittent stir with medium pauses. When set to this speed, intermittently operates on a slow speed every 30 seconds for 1.5 revolutions. | ||
| Stir interval 4 - Intermittent stir with long pauses. When set to this speed, intermittently operates on a slow speed every 5 minutes for 1.5 revolutions. | ||
| Speed min – max | Continuous speeds gradually increasing to max | |
| HSHT | To mix at temperatures above 60°C using speeds Min-Max. | |

Recommended Usage ChartThis is for guidance only and will vary depending on the exact recipe and ingredients being processed. | ||||
| K-beater For making cakes, biscuits, pastry, icing, fillings, eclairs and mashed potato. | ||||
Hints and Tips
| ||||
| Recipe/ Process | ||||
| Pastry & Biscuits-rubbing fat into flour | Flour weight | 910g | Min → 1 | 2 |
| All In one cake mixes | Total weight | 4kg | Min → Max | 45-60 secs |
| Creaming Beater For creaming and mixing soft ingredients | ||||
Hints and Tips
| ||||
| Recipe/ Process | ||||
| Creaming butter/margarine and sugar | 4.55kg |
Min → Max | 4 | |
| Beating eggs into cake mixes | Min → Max | 1-4 | ||
| Folding in flour, fruit etc | Min → 1 | 30-60 secs | ||
| Whisk For eggs, cream and soufflés. | ||||
Important
Before whisking egg whites, make sure there is no grease or egg yolk on the whisk or the bowl. | ||||
| Recipe/ Process | ||||
| Egg whites | 16 (605g) | Min → Max | 1½-2 | |
| Fatless sponges | 930g | 4 -6 | ||
| Cream | 2L | 1½-3 | ||
Pancake Batter
|
250g Flour |
Min | 10 secs | |
| Max | 45-60 secs | |||
Mayonnaise
|
2 Egg Yolks |
Max | 1-1½ | |


Eggs sizes used = medium sized (Weight 53 - 63g).
Whipping cream used = Fresh Whipping cream with minimum 38% Fat content
Recommended |