Honeywell BT0554FF0810 LED Indoor/Outdoor String Light with Bluetooth Speakers User Guide


Honeywell BT0554FF0810 LED Indoor/Outdoor String Light with Bluetooth Speakers

LED Indoor/Outdoor String Light with Bluetooth Speakers Use and Care Guide Read and Save These Instructions Before Use

IMPORTANT SAFETY INSTRUCTIONS
Note: This portable luminaire has a polarized plug (one blade is wider than the other) as a feature to reduce the risk of electric shock. This plug will fit in a polarized outlet only one way. If the plug does not fit fully in the outlet, reverse the plug. If it still does not fit, contact a qualified electrician. Never use with an extension cord unless plug can be fully inserted. Do not alter the plug.
READ ALL INSTRUCTIONS
WARNING: When using outdoor use portable luminaires, basic safety precautions should always be followed to reduce the risk of fire, electric shock, and personal injury, including the following:
- Use only two-wire outdoor extension cords that have two-prong plugs and receptacles that accept the appliance’s plug.
- Ground Fault Circuit Interrupter (GFCI) protection is to be provided on the circuit(s) or outlet(s) to be used for the wet location portable luminaire. Receptacles are available having built-in GFCI protection and are able to be used for this measure of safety.
- Use only with an extension cord for outdoor use, such as an extension cord of cord type SEW, SEOW, SEOOW, SOW, SOOW, STW, STOW, STOOW, SJEW, SJEOW, SJEOOW, SJW, SJOW, SJOOW, SJTW, SJTOW, or SJTOOW.
IMPORTANT: Read all safety precautions and installation instructions carefully before installing or servicing this fixture. Failure to comply with these instructions could result in a potentially fatal electric shock, fire, and/or property damage. In order to ensure proper installation, please follow each step below.
WARNING ATTENTION RISK OF ELECTRIC SHOCK
- RECEPTACLE OUTLETS USED FOR POWERING STRING LIGHTS SHALL COMPLY WITH ALL NATIONAL AND LOCAL ELECTRICAL CODES.
- CONSULT LOCAL ELECTRICIAN IF UNSURE OF COMPLIANCE REQUIREMENTS.
- DO NOT SUBMERSE.
- DO NOT USE AROUND AQUARIUMS.
- STRING LIGHTS ARE A WET LOCATION PRODUCT AND HAVE NO REPLACEABLE OR SERVICEABLE PARTS.
- DO NOT USE WITH EXTENSION CORD NEAR WATER OR WHERE WATER MAY ACCUMULATE.
- KEEP LAMPS AT LEAST 16 FEET FROM POOLS AND SPAS.
- KEEP PLUGS AND RECEPTACLES DRY.
- AVOID DAMAGE TO THE CORDS AND LAMP ASSEMBLIES DURING INSTALLATION. PERIODICALLY INSPECT THE STRING LIGHTS FOR PHYSICAL DAMAGE OR OTHER DAMAGE CAUSED BY OUTDOOR EXPOSURE TO THE ELEMENTS.
- REPLACE ANY DAMAGED STRING LIGHTS STRINGS.
- DO NOT INSTALL IN LOCATIONS WHERE STRING LIGHTS CAN BE STEPPED ON.
- ENSURE STRING LIGHTS ARE UNPLUGGED FROM POWER DURING INSTALLATION.
- STRING LIGHTS SHOULD BE INSTALLED OUT OF THE REACH OF CHILDREN OR NOT ALLOWING CHILDREN TO PLAY WITH THEM.
RISK OF FIRE
- STRING LIGHTS ARE DESIGNED TO BE MOUNTED WITH THEIR INDIVIDUAL KEYHOLE MOUNTING FEATURE. DO NOT MOUNT STRING LIGHTS BY USING THE MAIN ELECTRICAL CORD OR THE INDIVIDUAL DROP CORDS.
- STRING LIGHTS ARE DESIGNED TO BE LINKED BY USING THEIR ELECTRICAL PLUGS AND RECEPTACLES TO A MAXIMUM DISTANCE OF 108 FEET.
- STRING LIGHT INTERCONNECTING RECEPTACLES ARE INTENDED ONLY FOR THE LINKING OF COMPATIBLE STRING LIGHT STRINGS. DO NOT USE STRING LIGHT RECEPTACLES FOR ANY OTHER ELECTRICAL PURPOSE.
- DO NOT MOUNT STRING LIGHTS IN ANY POSITION WHERE THE BULB IS FACING UP.
- DO NOT ALLOW THE LED LAMP ASSEMBLIES TO BE IN CONTACT WITH COMBUSTIBLE MATERI-ALS. LED LAMP ASSEMBLIES SHOULD HANG FREELY AND NOT BE SUSCEPTIBLE TO REPETITIVE DAMAGE CAUSED BY ENVIRONMENTAL CONDITIONS SUCH AS WIND, RAIN, AND ICE.
- NOT INTENDED FOR INSTALLATION IN CEILINGS, SOFFITS, CABINETS, ATTICS, OR OTHER ENCLOSED SPACES.
INSTALLATION
Congratulations on your recent purchase of the LED String Lights. Purchase additional lights to form one continuous string up to 108 feet!
| Model# | Length (ft) | Bulb Spacing | Input (watt) | No. Bulb |
| BT0554FF0810 | 36 | 1.97 ft | 18W | 18 |
INITIAL SETUP
- Carefully unpack String Lights from box, then remove protective film from each bulb. Dispose of film properly (see warning).
- When installing String Lights outside, a Ground Fault Circuit Interrupter (GFCI) receptacle should be used. Before installing, plug the String Lights into the GFCI receptacle to ensure all lights work properly.
INSTALLING STRING LIGHTS
- IMPORTANT: Only mount String Lights to a solid support such as joists, beams, studs or other solid mounting surfaces.
- Each String Light is designed with a universal keyhole for mounting with lights hanging downward. Hardware options (not included) screws, nail, zip ties, hooks and more.
- Guide wires in compliance with local electrical and building codes may also be used to support the String Lights.
- Once appropriate GFCI outlet location, mounting surface and hardware are determined, mount your String Lights.
- When finished mounting, plug the male plug into the GFCI receptacle and place the female receptacle cover firmly over the unused outlet.
- Drill two (ø8mm) holes into the wall locations. Insert wall anchors (Parts I) into the holes. Then place clips over the wire so wire is completely covered by clip, insert nail (Part H) into clip holes and then insert into wall anchors to secure (use hammer to fully seat nails).


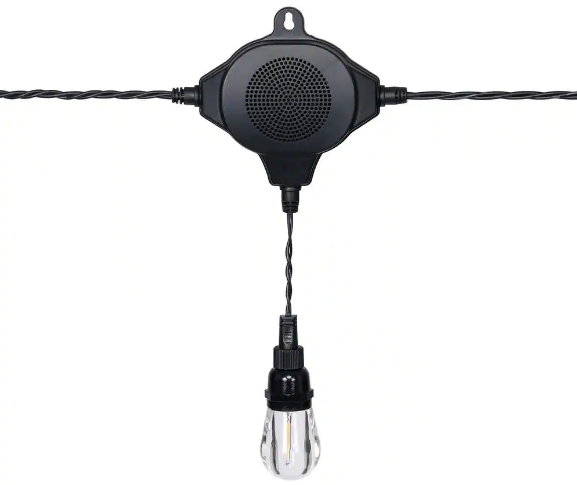
- AC Power Cord Plug
- DC Power Out
- Bluetooth speaker D: DC Power In
- Aux Out
- Aux In
- Bulb
REMOVING STRING LIGHTS SETS
- Always unplug String Lights from their receptacle prior to removing.
- Carefully remove each light individually from the mounting hardware. NOTE: For your safety, never pull or jerk lights from mounting hardware.
- Store lights in a dry location.
REPLACING BULBS
- Unplug light strand from power outlet.
- Unscrew cap (H) to reveal light bulb.
NOTE: UNSCREW CAP (H) ONLY, DO NOT TWIST THE LIGHT BULB. - Carefully remove light bulb and discard.
- Align 2 pins of replacement bulb with 2 holes on light strand and gently push pins into holes. Match +/- marking on string with +/- on bulb to install correctly.
- Screw cap (H) back tightly but do not over tighten.
- Plug in light strand.

CONNECTION OPTIONS
NOTE: A maximum of 3 lights can be connected off of a single circuit.
LINKING CABLE
- Up to 3 units can be connected using the DC power cord. Once installed, plug the power cord into the end of linked string light and repeat up to 2 times.
NOTE: Be careful to ensure the waterproof connectors are properly tightened when linking lights. - To link the audio in up to 3 string lights connect the audio cable from the aux out on first string light and then into the aux in on second string light. Repeat for up to 3 lights.
NOTE: When linking string lights, you should pair your Bluetooth with the first one in the linking chain, then connect all linked lights with provided aux cables. Only 1 light will beC able to paired from a single device. Always unplug string light from outlet before connecting additional string light.

HOW TO OPERATE BLUETOOTH SPEAKER
- Bluetooth Speakers will enter pairing mode when you turn on the light. Activate bluetooth on your device and find device named BT0554FF0020. Press to pair.
- The Bluetooth Speakers will turn off when the light is turned off.

For most reliable operation the distance between Bluetooth device and the string light should be less than 65.6ft(20m).
NOTE: Bluetooth performance can also be affected by Bluetooth device used and your individual environment (i.e. clear line of sight between device and string light normally provides better performance than multiple walls between device and string light).
TROUBLESHOOTING
| PROBLEM | POSSIBLE CAUSE | SOLUTION |
| Light will not come on. | A. Light not plugged into outlet. B. Outlet not powered.
C. Bulb(s) not lighting |
A. Plug power cord into outlet. B. Check to make sure breaker is on and test outlet with another working electrical device to make sure it is receiving power. NOTE: Unplug power cord first. C1. Check to see if screw cap is tight. If loose, hand tighten. C2. If screw cap is tight: Unscrew cap, remove bulb and re-insert bulb. Hand tighten. If bulb is still not lighting, contact customer service. |
| Bluetooth audio does not work. | A. Bluetooth not active or not close enough to device. B. Bluetooth may be paired to wrong device. C. Device volume may be low or muted. |
A. Ensure your device’s Bluetooth is turned on, in range and discoverable. B. Make sure you are selecting the correct device to pair to. C. Makes sure your audio level is set appropriately. |
| Audio can be heard out of first string light only in linked chain. | A. Aux Cords are not connected on linked lights. | A. Check to make sure aux cables are properly installed on all linked lights. |
FCC WARNING
WARNING: Changes or modifications to this unit not expressly approved by the party responsible for compliance could void the user authority to operate the equipment.This device complies with Part 15 of the FCC Rules. Operation is subject to the following two conditions:
- this device may not cause harmful interference, and
- this device must accept any interference received, including interference that may cause undesired operation.
NOTES:This equipment has been tested and found to comply with the limits for a Class B digital device, pursuant to Part 15 of the FCC Rules. These limits are designed to provide reasonable protection against harmful interference in a residential installation. This equipment generates, uses and can radiate radio frequency energy and, if not installed and used in accordance with the instructions, may cause harmful interference to radio communications. However, there is no guarantee that interference will not occur in a particular installation. If this equipment does cause harmful interference to radio or television reception, which can be determined by turning the equipment off and on, the user is encouraged to try to correct the interference by one or more of the following measures:
- Reorient or relocate the receiving antenna.
- Increase the separation between the equipment and receiver.
- Connect the equipment into an outlet on a circuit different from that to which the receiver is connected.
- Consult the dealer or an experienced radio/TV technician for help.
NOTE:
The Bluetooth brand elements may not be used in a fashion or manner that could impair or otherwise damage the goodwill associated with the Bluetooth brand or the Fellow Adopters (International Development Company). The Bluetooth brand elements shall therefore not be used in connection with products and services that do not enable any Bluetooth wireless functionality or in connection with unlawful, obscene, pornographic, excessively violent, hazardous,or otherwise poor-taste activities.
International Development Company
899 Henrietta Creek Rd. Roanoke, Roanoke, TX 76262 USA Toll-free: 1-877-723-0723
Made in China
© 2021 IDC, all rights reserved. The Honeywell Trademark is used under license from Honeywell International Inc. makes no representations or warranties with respect to this product. This product is manufactured for International Development Company.