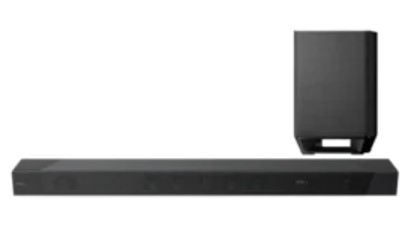
Sony HD-079 2.2 Channel Dolby Soundbar User Manual
SONY HD-079 2.2 Channel Dolby Soundbar User Manual

User Manual
A compact yet powerful Bluetooth soundbar with sleek looks and excellent audio response. 6 inbuilt speakers and 1 bass air tube hole provide clarity across a broad frequency range, with crisp highs and deep bass that belie the unit’s size. An integral USB port enables playback of MP3/WAV files directly from compatible media, with further flexible input options including Aux, HDMI(ARC),Optical, and Bluetooth. A convenient and cost-effective TV audio upgrade that doesn’t compromise on performance.
- Slender and stylish metallic grey design.
- 6 speakers for crisp, clear sound with deep bass
- Inbuilt 2.2 channel amplifier with 3 EQ presets
- Versatile input options to support a range of devices
- USB port for MP3 and WAV media playback
- Remote control and Aux cable included
Matters Need Attention
- Don’t put this product under high temperature wet environment and it will be worse when it is in the rain or crash strongly.
- To reduce the risk or electronic shock or fire, do not remove the cabinet cover simply contact a service professional.
- In the rear occurrence of malfunction, do not attempt to repair the unit on your own. Contact a certified service professional for a proper diagnosis and repair.
- If fragments or liquids fall into device box, please cut off the power right away. And it can be used only after professional staff checks it.
- Don’t install the unit in or near a place where it may come in contact with rain, moisture or other liquids.
Technical Specifications and Features
Powe output: 100W
Speaker drivers: 4 x 2.25″+ 2 x 3″ units
Bluetooth version: 5.0+EDR
Bluetooth range: Up to 10m
Connections: HDMI(ARC), OPTICAL, Coaxial, USB 2.0, AUX (3.5mm)
Power supply: 100-240V AC
Dimensions: 960 x 89 x65mm
Connections
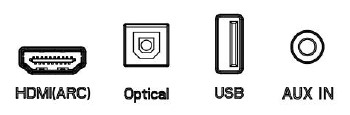


- HDMI(ARC): Use to connect compatible devices using a HDMI cable (not provided).
- OPTICAL IN: Use to connect compatible devices using an optical cable (not provided).
- USB IN: Use to connect a flash drive for direct MP3/WAV playback (FAT32 format and 32GB max).
- AUX IN: Use to connect compatible devices using the 3.5mm – 3.5mm stereo jack cable (provided).
- AC IN
LED display
- Red LED: Standby mode 2. bt: Bluetooth mode
- USB: USB media mode 4. AUX: Auxiliary input mode
- OPT: Optical mode 6. ARC: HDMI(ARC)mode
Remote Control


Soundbar controls

- MODE: Short press to select your preferred input mode(BT/USB/AUX/OPTICAL/ HDMI(ARC)).


Input Functions
- Power on/off: Press the Power on/off button on the remote control or soundbar control panel to turn the unit on and off.
- HDMI(ARC): Connect an HDMI ARC compatible device to the HDMI(ARC) port on the soundbar using a HDMI cable (not supplied). Select HDMI(ARC) mode either by pressing the HDMI(ARC) button on your remote control or repeatedly pressing the
MODE button on the soundbar control panel until ARC is displayed on the LED display. Ensure HDMI ARC is selected as the TV’s audio output, then adjust the volume of soundbar using the Volume up and Volume down buttons on the remote control or soundbar control panel. - AUX in: Connect a compatible device using the 3.5mm – 3.5mm stereo jack cable. Select AUX mode either by pressing the AUX button on your remote control or repeatedly pressing the MODE button on the soundbar control panel until AUX is displayed on the LED display. Ensure the connected device is producing an audio signal, then adjust the volume of soundbar using the Volume up and Volume down buttons on the remote control or soundbar control panel.
- Optical in: Connect a compatible device to the OPTICAL input on the soundbar using a digital optical cable (not supplied). Select OPT mode either by pressing the OPT button on your remote control or repeatedly pressing the MODE button on the soundbar control panel until OPT is displayed on the LED display. Ensure Optical SPDIF is selected as the TV’s audio output, then adjust the volume of the soundbar using the Volume up and Volume down buttons on the remote control or soundbar control panel.
- Bluetooth: Press the BT button on the remote control or repeatedly pressing the
MODE button on the soundbar control panel until bt is shown on the LED display. The LED display will flash to indicate that the soundbar is in Bluetooth pairing mode. Ensure that the device you wish to connect is also in pairing mode and search for HD-079 in its device list. When the two devices are paired, the LED display on the soundbar will stop flashing and remain constant. (The soundbar will now automatically re-pair with this device whenever it is within range and has Bluetooth turned on.) - USB media mode: The soundbar is compatible with USB flash drives of up to 32GB in size and can play MP3 and WAV audio files directly. Simply insert a compatible drive into the USB port on the back of the soundbar and the unit will automatically switch to USB mode and play the first compatible track. USB repeat mode (also accessed via the remote control) enables single track repeat (ONE), all track repeat (ALL)
The media player also has a memory function that will recall and continue from the last-played point when a USB flash drive that has previously been used with the soundbar is reinserted. - Equalizer modes: The soundbar has 3 equalizer presets, tailored to complement various styles of music. Press the EQ button on the remote to choose between Music (EQ1), Movie(EQ2), News (EQ3).
FCC WARNING
This device complies with part 15 of the FCC Rules. Operation is subject to the following two conditions: (1) this device may not cause harmful interference, and (2) this device must accept any interference received, including interference that may cause undesired operation.
Any changes or modifications not expressly approved by the party responsible for compliance could void the user’s authority to operate the equipment.
NOTE: This equipment has been tested and found to comply with the limits for a Class B digital device, pursuant to Part 15 of the FCC Rules. These limits are designed to provide reasonable protection against harmful interference in a residential installation. This equipment generates, uses and can radiate radio frequency energy and, if not installed and used in accordance with the instructions, may cause harmful
interference to radio communications. However, there is no guarantee that interference will not occur in a particular installation. If this equipment does cause harmful interference to radio or television reception,
which can be determined by turning the equipment off and on, the user is encouraged to try to correct the interference by one or more of the following
measures:
— Reorient or relocate the receiving antenna.
— Increase the separation between the equipment and receiver.
— Connect the equipment into an outlet on a circuit different from that to which the receiver is connected.
— Consult the dealer or an experienced radio/TV technician for help.
To maintain compliance with FCC’s RF Exposure guidelines, This equipment should be installed and operated with minimum distance between 20cm the radiator your body: Use only the supplied antenna.