NEC DS1-TM01 Tuner Module User Manual
NEC DS1-TM01 Tuner Module

Important Information
Refer to the “Important Information” and “Recommended Use & Maintenance” of the LCD Monitor in the User’s Manual for notes on handling.
Safety Precautions and Maintenance
FOR OPTIMUM PERFORMANCE, PLEASE NOTE
THE FOLLOWING WHEN SETTING UP AND
USING THE TUNER MODULE:
About the Symbols
To ensure safe and proper use of the product, this manual uses a number of symbols to prevent injury to you and others as well as damage to property. The symbols and their meanings are described below. Be sure to understand them thoroughly before reading this manual.
 |
Failing to heed this symbol and handling the product incorrectly could result in accidents leading to major injury or death. |
| Failing to heed this symbol and handling the product incorrectly could result in personal injury or damage to surrounding property. |

Examples of symbols
This symbol indicates you should be careful of electric shocks. | |
This symbol indicates something that must be prohibited. | |
This symbol indicates that the power cord should be unplugged from the power outlet. |


| Do not use the monitor if the monitor was dropped or the cabinet is damaged. It may cause an electric shock or fire. | |
| Do not insert objects of any kind into the cabinet slots, as they may touch dangerous voltage points, which can be harmful or fatal, or may cause electric shock, fire or equipment failure. | |
| When cleaning the monitor – Do not use flammable gas sprays to remove dust. Doing so could lead to a fire. | |
| Do not play with the plastic bag which covers the monitor. Do not use this bag for any other purpose. To avoid the danger of suffocation, do not place this bag over your head, nose or mouth. Do not place this bag over another personʼs head, nose or mouth. Keep this bag away from children and babies. | |


| Please install the monitor in accordance with the following information. Improper installation of the monitor may result in damage to the monitor, an electric shock or fire. Do not install the monitor in the locations below:
Do not mount this product face up, face down, or upside down for an extended period of time as it may cause permanent damage to the screen. | |
| To ensure the monitorʼs reliability, please clean the ventilation holes at the rear side of the cabinet at least once a year to remove dirt and dust. | |

Supplier’s Declaration of Conformity
FCC SDoC
This device complies with Part 15 of FCC Rules. Operation is subject to the following two conditions. (1) This device may not cause harmful interference, and (2) this device must accept any interference received, including interference that may cause undesired operation.
| U.S. Responsible Party: NEC Display Solutions of America, Inc. Address: 3250 Lacey Rd, Ste 500 Downers Grove, IL 60515 Tel. No.: (630)-467-3000 |
Type of Product: Tuner Module
Equipment Classification: Class B Peripheral
Model: DS1-TM01

FCC Information
The Federal Communications Commission does not allow any modifications or changes to the unit EXCEPT those specified by NEC Display Solutions of America, Inc. in this manual. Failure to comply with this government regulation could void your right to operate this equipment. This equipment has been tested and found to comply with the limits for a Class B digital device, pursuant to part 15 of the FCC Rules. These limits are designed to provide reasonable protection against harmful interference in a residential installation. This equipment generates, uses, and can radiate radio frequency energy, and, if not installed and used in accordance with the instructions, may cause harmful interference to radio communications. However, there is no guarantee that interference will not occur in a particular installation. If this equipment does cause harmful interference to radio or television reception, which can be determined by turning the equipment off and on, the user is encouraged to try to correct the interference by one or more of the following measures:
Reorient or relocate the receiving antenna.
Increase the separation between the equipment and receiver. Connect the equipment into an outlet on a circuit different from that to which the receiver is connected. Consult your dealer or an experienced radio/TV technician for help.
Canadian Notice
Cable-Compatible Analog and Digital Television Receiving Apparatus — Appareil de réception de télévision analogique et numérique câblocompatible, Canada BETS-7 / NTMR-7.
Manufactured under license from Dolby Laboratories.
Dolby, Dolby Audio, and the double-D symbol are trademarks of Dolby Laboratories.

Contents

Installation
Contact your dealer about the compatible monitor models.
– Before installing or removing this product, disconnect the monitor power cord from the power outlet.
– Pay careful attention not to insert foreign objects into the monitor while installing this product. Also, use care not to drop this product and the expansion slot cover.

Ensure the Option Board is securely fastened using the original screws to prevent the Option Board from falling out of the monitor. A falling Option Board may expose you to danger.
Models ME431 / ME501 / ME551 / ME651
Replace the option cover.
- Remove the slot covers (1) and (2) and option cover (a). (Figure 1)
- Fasten the option cover (b), included with the monitor, with the removed screws. (Figure 2)
(Recommended Fasten Force: 60.8 – 82.4N·cm).
NOTE: Do not apply a force exceeding the specified torque when tightening the screws. Otherwise, the screw holes may be damaged. (b) - Insert the option board along the rail and fasten it with the removed screws. (Figure 3)
(Recommended Fasten Force: 60.8 – 82.4N·cm).
NOTE: When installing this product, ensure that the top side is facing the rear of the monitor (see figure 3). This product can be damaged if inserted in the wrong orientation. Do not apply a force exceeding the specified torque when tightening the screws. Otherwise, the screw holes may be damaged. - Fasten the slot cover (2) to the unused slot with the removed screws. (Figure 4)
Use the screw holes shown in the figure when mounting.
(Recommended Fasten Force: 60.8 – 82.4N·cm).
NOTE: Do not apply a force exceeding the specified torque when tightening the screws. Otherwise, the screw holes may be damaged. (2)


Models M431 / M491 / M551 / M651 / MA431 / MA491 / MA551 / P435 / P495 / P555
- Remove the slot cover (1). (Figure 1)
- Insert the option board along the rail and fasten it with the removed screws. (Figure 2)
(Recommended Fasten Force: 60.8 – 82.4N·cm).
NOTE: Do not apply a force exceeding the specified torque when tightening the screws. Otherwise, the screw holes may be damaged.


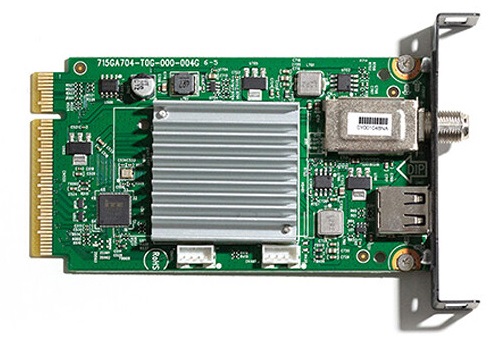
Part Names

❶ Service
USB 2.0 Type A port for USB storage device.
Insert a USB storage device when you execute Setting Copy function.
❷ RF IN (F Type)
RF input that connects to your VHF/UHF Antenna or Cable TV Service
Connections
NOTE: Do not connect/disconnect cables when turning on the monitor or other external equipment as this may result in a loss of the monitor image.
Before making connections:
- To protect the external equipment, turn off the main power of the monitor before making connections.
- Refer to the user manual included with each separate piece of equipment.
Wiring Diagram

Basic Operation
Selecting the Tuner
Press the OPTION button on the wireless remote control.
Opening the Tuner OSD menu
When the input signal of the monitor is “OPTION”, press the OPTION MENU button to open/close the Tuner OSD menu.
Wireless Remote Control
NOTE: Use your monitor’s wireless remote control. For details about procedures other than those listed below, or if your wireless remote control is different from the picture below, see the monitor’s user’s manual.

- POWER ON and STANDBY buttons
Switches the monitor between power on and standby. - OPTION button
Sets the input signal to “OPTION”. - OPTION MENU button
When the “OPTION” input is active, opens/closes the Tuner OSD
menu. - KEYPAD
Use these buttons to set and change passwords and change the
channel. - ENT button
Sets items within OSD menu and channels. - DISPLAY button
Shows/hides the current channel information. - MENU button
Opens/closes the monitor OSD menu.
Refer to your monitor’s user’s manual for more monitor OSD information. - UP/DOWN button
Acts as
down to select items within the OSD menu. - MINUS/PLUS (-/+) button
Acts as
or left to select items within the OSD menu. - EXIT button
Returns to previous menu within the OSD menu. - VOL +/- button
Increases or decreases audio output level. - CH/ZOOM +/- button
Changes the channel up or down. - ASPECT button
Selects picture aspect. - MTS button
Select the Multi-language.
Activates closed captioning.


Navigating The On-Screen Menu
Press the “OPTION MENU” button to open and the “EXIT” button to close the main menu of Tuner.
Channels Menu
The Channels Menu allows you to set your signal source options. According to various requirements in different source modes, certain features could be hidden (disabled) on the menu.

Auto Channel Scan
Automatically search the available channels.
Add/Skip Channels
Manually add or skip channels to the channel list.
Channel Labels
Create labels to any channel.
Setup Menu
The Setup Menu in TV mode is shown below.
According to various requirements in different source modes, certain features could be hidden (disabled) on the menu.
Menu Language
Select the menu display language.
English / Français / Español
Parental Controls
Set TV parental controls. This function blocks out the picture and sound of the selected rating levels. The factory preset password to enter Parental Controls feature is the 4-digit number 0000.
[Block Unrated TV]
Block or unblock the unrated programs.
[US]
Set the parental control level using Movie Ratings menu or US TV ratings lock menu.
[Canadian]
Set the parental control level using Canadian English menu or Canadian French menu.
[Change Password]
Change the 4-digit password. You will have to enter the new password first, then enter the new password again to confirm. Make sure to keep your new password.
[PRT5]
Use Region 5 to block various types of movies and television programs based on ratings systems used in the USA that you feel may be inappropriate due to its content. The Region 5 option will operate for Digital Channels (ATSC) only.
[Reset PRT5]
Clear the downloaded RRT5 rating information and restore to the factory default settings.
Closed Caption
Adjust the Closed Caption settings.
Caption Display / Analog Captions / Digital Captions / Digital CC Settings
Time Zone
Select the Time Zone setting.
Daylight Saving Time
Select the Daylight Saving Time setting.
Visual Impaired
Select to turn On/Off support methods for the visually impaired. (Only available for digital channels)
Menu Speech
Enable speech function for the OSD menu and certain operations.
Setting Copy
This function is for copying (exporting) all of the settings’ values for the menu tree from the DS1TM01 to a USB storage device, and loading (importing) settings’ values from a USB storage to another DS1-TM01. Setting values include the TV channel preset data, allowing users to copy the settings values to other DS1-TM01s instead of having to channel scan on each device.
NOTE:
- Supported file system on USB storage devices: FAT16, FAT32, NTFS
- Only USB mass storage class devices are supported. We cannot guarantee that all commercially available USB storage devices will work.
- Do not use a USB Hub.
- Do not use a multi-partition USB.
- Support USB 2.0 Type A connector (DC5V, max. 500mA). For USB device over 500mA, we suggest to use adaptor or external power.
System Info
Shows the module information.
Reset
Reset all settings to factory default settings.
Troubleshooting
| Problem | Solution |
| No picture, but a message is displayed. |
|
| No picture |
|
| No Closed Caption displayed |
|
| Remote control does not work |
|
| USB Flash Drive is not recognized |
|
Specifications
| Television System | NTSC Standard, ATSC Standard (8-VSB, Clear-QAM) | |
| Channel Coverage | VHF: 2 through 13 UHF: 14 through 69 Cable TV: Mild band (A – 8 through A – 1, A through I), Super band (J through W), Hyper band (AA through ZZ, AAA, BBB), Ultra band (65 through 94, 100 through 125) | |
| Interface | Antenna / Cable Input | VHF / UHF; F Type Connector |
| USB | USB2.0 Type A, DC5V, Max 500mA | |
| Video / Audio Output | SDM (Intel® Smart Display Module) Interface with monitor | |
| Video Resolution | 1920 x 1080 | |
| Control Method | Monitor’s Remote Control, RS-232C | |
| OSD | Language | English / French / Spanish |
| Dimensions | Net (W x H x D) | 80 x 25 x 123.2 mm |
| Gross (W x H x D) | 118 x 55 x 169 mm | |
| Weight | Net | 0.1 kg |
| Gross | 0.16 kg | |
| Power | from Monitor | 5.3 W / DC12V, 5.3m W / DC3.3V |
| Operating Environment | Temperature | 0 – 40°C (with Monitor), 0 – 55°C (w/o Monitor) |
| Humidity | 10 – 80% (Non-condensing) | |
| Altitude | 0 – 2,000 m | |
| Storage Environment | Temperature | -10 – 60°C |
| Humidity | 5 – 85% (Non-condensing) | |
| Regulation | US | FCC (SDoC) |
| Canada | BETS-7 | |
| Accessories | Manual | Setup Manual (User’s Manual is on website) |
