Husqvarna EP 121B Concrete Placement Equipment User Manual


Husqvarna EP 121B Concrete Placement Equipment

Introduction
Product description
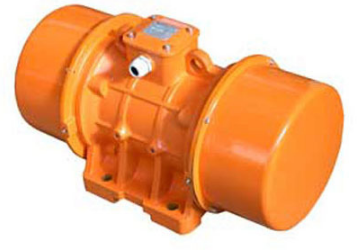
The product is a concrete vibrator. The product has a pneumatically operated motor that only contains 2 moving parts. Compressed air is supplied to the product through the air valve. An automatic lubricator can be installed as an optional equipment. The automatic lubricator is supplied by the manufacturer of the air compressor.
Intended use
The product is for professional operation only. The product removes air bubbles from wet concrete. Do not use the product for other tasks.
Product overview

- Rear cover
- Rear flange
- Housing
- Rotor
- Lamella
- Shaft
- Air connector
- Front flange
- Front cover
- Operator’s manual
Rating plate

- Product type
- Serial number
- Air pressure, kg/m2
- Air consumption, m3/min
- Year of manufacture
- Land of manufacture
- Manufacturer
Product liability
As referred to in the product liability laws, we are not liable for damages that our product causes if:
- the product is incorrectly repaired.
- the product is repaired with parts that are not from the manufacturer or not approved by the manufacturer.
- the product has an accessory that is not from the manufacturer or not approved by the manufacturer.
- the product is not repaired at an approved service center or by an approved authority.
Safety definitions
Warnings, cautions and notes are used to point out specially important parts of the manual.
WARNING: Used if there is a risk of injury or death for the operator or bystanders if the instructions in the manual are not obeyed.
CAUTION: Used if there is a risk of damage to the product, other materials or the adjacent area if the instructions in the manual are not obeyed.
Note: Used to give more information that is necessary in a given situation.
General safety instructions
WARNING: Read the warning instructions that follow before you use the product.
- This product is a dangerous tool if you are not careful or if you use the product incorrectly. This product can cause serious injury or death to the operator or others. Before you use the product, you must read and understand the contents of this operator’s manual.
- Save all warnings and instructions.
- Comply with all applicable laws and regulations.
- The operator and the employer of the operator must know and prevent the risks during operation of the product.
- Do not let a person operate the product unless they read and understand the contents of the operator’s manual.
- Do not operate the product unless you receive training before use. Make sure that all operators receive training.
- Do not let a child operate the product.
- Only let approved persons operate the product.
- The operator is responsible for accidents that occur to other persons or their property.
- Do not use the product if you are tired, ill, or under the influence of alcohol, drugs or medicine.
- Always be careful and use your common sense.
- This product produces an electromagnetic field during operation. This field can under some circumstances interfere with active or passive medical implants. To decrease the risk of serious injury or death, we recommend persons with medical implants to speak to their physician and the medical implant manufacturer before operating this product.
- Keep the product clean. Make sure that you can clearly read signs and decals.
- Do not use the product if it is defective.
- Do not do modifications to this product.
- Do not operate the product if it is possible that other persons have done modifications to the product.
Safety instructions for operation
WARNING: Read the warning instructions that follow before you use the product.
- Make sure that you know how to stop the product quickly in an emergency.
- The operator must have the physical strength that is necessary to operate the product safely.
- Use personal protective equipment. Refer to Personal protective equipment on page 4.
- Make sure that only approved persons are in the work area.
- Keep the work area clean and bright.
- Make sure that you are in a safe and stable position during operation.
- Make sure that there is no grease or oil on the handle.
- Do not use the product in areas where fire or explosions can occur.
- The product can cause objects to eject at high speed. Make sure that all persons in the work area use approved personal protective equipment. Remove loose objects from the work area.
- Before you go away from the product, stop the product and disconnect the power source.
- Make sure that clothes, long hair and jewelry do not get caught in moving parts.
- Do not sit on the product.
- Do not hit the product.
- Make sure that you or other persons cannot get caught in and fall on cables, hoses and shafts in the work area.
- Before you operate the product, find out if there are hidden wires, electrical cables or other sources of electricity. Do not operate the product unless you know that it is in a safe work area.
Vibration safety
WARNING: Read the warning instructions that follow before you use the product.
- During operation of the product, vibrations go from the product to the operator. Regular and frequent operation of the product can cause or increase the degree of injuries to the operator. Injuries can occur in fingers, hands, wrists, arms, shoulders, and/or nerves and blood supply or other body parts. The injuries can be debilitating and/or permanent, and can increase gradually during weeks, months or years. Possible injuries include damage to the blood circulation system, the nervous system, joints, and other body structures.
- Symptoms can occur during operation of the product or at other times. If you have symptoms and continue to operate the product, the symptoms can increase or become permanent. If these or other symptoms occur, get medical aid:
- Numbness, loss of feeling, tingling, pricking, pain, burning, throbbing, stiffness, clumsiness, loss of strength, changes in skin color or condition.
- Symptoms can increase in cold temperatures. Use warm clothing and keep your hands warm and dry when you operate the product in cold environments.
- Do maintenance on and operate the product as given in the operator’s manual, to keep a correct vibration level.
- The product has a vibration damping system that decreases the vibrations from the handles to the operator. Let the product do the work. Do not push the product with force. Hold the product at the handles lightly, but make sure that you control the product and operate it safely. Do not push the handles into the end stops more than necessary.
- Keep your hands on the handle or handles only. Keep all other body parts away from the product.
- Stop the product immediately if strong vibrations suddenly occurs. Do not continue the operation before the cause of the increased vibrations is removed.
Dust safety
WARNING: Read the warning instructions that follow before you use the product.
- Operation of the product can cause dust in the air. Dust can cause serious injury and permanent health problems. Silica dust is regulated as harmful by several authorities. These are examples of such health problems:
- The fatal lung diseases chronic bronchitis, silicosis and pulmonary fibrosis
- Cancer
- Birth defects
- Skin inflammation
- Use correct equipment to decrease the quantity of dust and fumes in the air and to decrease dust on work equipment, surfaces, clothing and body parts. Examples of controls are dust collection systems and water sprays to bind dust. Decrease dust at the source where possible. Make sure that the equipment is correctly installed and used and that regular maintenance is done.
- Use approved respiratory protection. Make sure that the respiratory protection is applicable for the dangerous materials in the work area.
- Make sure that the airflow is sufficient in the work area.
- If it is possible, point the exhaust of the product where it cannot cause dust to go into the air.
Noise safety
WARNING: Read the warning instructions that follow before you use the product.
- High noise levels and long-term exposure to noise can cause noise-induced hearing loss.
- To keep the noise level to a minimum, do maintenance on and operate the product as given in the operator’s manual.
- Use approved hearing protection while you operate the product.
- Listen for warning signals and voices when you use hearing protection. Remove the hearing protection when the product is stopped, unless hearing protection is necessary for the noise level in the work area.
Personal protective equipment
WARNING: Read the warning instructions that follow before you use the product.
- Always use approved personal protective equipment when you operate the product. Personal protective equipment cannot fully prevent injury but it decreases the degree of injury if an accident does occur. Let your dealer help you select the correct personal protective equipment.
- Regularly do a check of the condition of the personal protective equipment.
- Use an approved protective helmet.
- Use approved hearing protection.
- Use approved respiratory protection.
- Use approved eye protection with side protection.
- Use protective gloves.
- Use boots with steel toe-cap and non-slip sole.
- Use approved work clothing or equivalent close-fitting clothing that has long sleeves and long legs.
Safety instructions for pneumatic air hoses
WARNING: A loose pneumatic air hose can move around randomly and with force. There is a risk of injury or death if the operator or bystanders are hit by a pneumatic air hose. Read the warning instructions that follow before you use the product.
- Examine the pneumatic air hose and the connectors for damage. Replace damaged parts immediately.
- Make sure that all connectors for the pneumatic air hose are correctly installed.
- Make sure that the pneumatic air hose is correctly connected.
- Do not hold the pneumatic air hose to lift or move the product.
- Do not disconnect a pneumatic air hose that is pressurized. Before you disconnect the pneumatic air hose, stop the air compressor and then operate the start and stop function on the product to release the remaining pressure.
- Do not point the airflow in the direction of your body or other persons. Air can go into the blood circulation and cause death.
- Do not use compressed air to remove dirt from your clothing.
- If you use claw couplings, install lockpins and use safety cables. Lockpins and safety cables prevent failure in the connections between pneumatic air hoses and between a pneumatic air hose and a tool.
Safety instructions for maintenance
WARNING: Read the warning instructions that follow before you use the product.
- If the maintenance is not done correctly and regularly, the risk of injury and damage to the product increases.
- Use personal protective equipment. Refer toPersonal protective equipment on page 4.
- Clean the product to remove dangerous material before you do the maintenance.
- Disconnect the product from the power source before you do the maintenance.
- Do not do modifications to the product. Modifications that are not approved by the manufacturer can cause serious injury or death.
- Always use original accessories and spare parts. Accessories and spare parts that are not approved by the manufacturer, can cause serious injury or death.
- Replace damaged, worn or broken parts.
- Only do the maintenance as given in this operator’s manual. Let an approved service agent do all other servicing.
- After maintenance, do a check of the vibration level in the product. If it is not correct, speak to an approved service agent.
- Let an approved service agent do servicing on the product regularly.
Operation
Introduction
WARNING: Read and understand the safety chapter before you use the product.
To start and stop the product
- Drain the water from the air compressor tank. Refer to the operator’s manual for the air compressor.
- Push air through the air hose to drain the water.
- Make sure that the connector filter is clean.
- Examine the connector seals for damage. Replace damaged seals.
- Lubricate the product. Refer to To lubricate the product on page 6.
- Connect the product to the air compressor.
- Start the air compressor. Make sure that the air pressure is correct. Refer to Technical data on page 10.
Note: The speed of the vibration increases if the air pressure increases. The product does not start the vibration if the air pressure is too low.
CAUTION: Make sure that the air pressure is not more than the maximum air pressure to prevent damage to the product. - To stop the product, stop the air compressor.
To operate the product
- Put the product in the (A) positions. Do not put the product in the (B) positions.
- If the product is in a position where it cannot be started, turn the flanges, shaft and lamella 90 degrees.
Note: If the product is moved to a different position, move the flanges, shaft and lamella to their initial positions.

Maintenance
Introduction
WARNING: Read and understand the safety chapter before you do maintenance on the product.
To lubricate the product
The product comes without oil. Make sure that the air is lubricated through an automatic lubricator assembled less than 10 m/32 ft. from the product. If an automatic lubricator is not installed, the product must be manually lubricated.
- Lubricate the product each day or each 4 hours during continuous operation.
- Put 4 cm3 of oil into the air hose through the coupling. Refer to Technical data on page 10 for the correct type of oil.
To clean the product
CAUTION: Do not use a high-pressure washer to clean the product.
- Use fuel to clean all the parts of the product.
- Remove concrete from the surfaces of the product after each operation before the concrete becomes hard.
- Remove grease and oil.
To disassemble the product
- Disconnect the air hose from the connector (A).
- Remove the rear cover (B).
- Remove the 8 screws for the rear flange (C) and front flange (D).
- Attach the housing (E) to a vise and push off the shaft (G) from the connector side.
- Remove the lamella (F) from the shaft.
- Push the front flange off the shaft.

To assemble the product
- Lubricate all moving parts.
- Replace the lamella (A) on the shaft (B).
- 3. Adjust the thickness of the lamella with 800 grit abrasive paper for a tight fit in the groove of the shaft.
Note: Keep the lamella 1 night in oil until assembly to prevent changes in thickness because of moist conditions. Only adjust the thickness of the flat surface of the lamella. - Put a position tool into the first exhaust hole on the right side of the rear flange (C).
- Put the shaft into the rear flange. Make sure that the lamella is level with the position tool.
- Remove the position tool.
- Put the flange assembly into the housing (D) with the exhaust holes at the top side and the lamella on the right side.
- Put the rear cover (E) on the rear flange. The exhaust holes must be opposite to the holes on the rear flange.
- Assemble the rotor (F).
- Assemble the front flange (G). The inner side holes must be opposite to the holes on the rear flange.
- Assemble the 8 screws for the rear flange and front flange. Tighten the screws to the correct torque 21.6 Nm.


Troubleshooting
| Problem | Cause | Solution |
| The product does not start. | There is no air pressure. | Make sure that the air compressor is on and that the product is correctly connected to the air hose. |
| Make sure that the air hose is not blocked or twisted. | ||
| Examine the air flow and the air pressure. | ||
| There is no air flow. | Make sure that the air compressor is on and that the product is correctly connected to the air hose. | |
| Make sure that the air hose is not blocked or twisted. | ||
| The air exhaust is blocked. | Remove the blockage. Clean the air exhaust. | |
| The product does not oper- ate correctly. | Make sure that there is no mechanical friction or block- age in the product. | |
| Examine the lamella. Make sure that the lamella is as- sembled correctly and is not damaged. | ||
| Examine the product parts. Make sure they are not dam- aged from corrosion. | ||
| Make sure that the rotor is in the correct position. Refer to To operate the product on page 6. |
| Problem | Cause | Solution |
| The air goes directly through the exhaust or the product vibrations are slow. | The rotor is blocked. | Shake the tube carefully when the tube is pressurized. |
| The air pressure is too low to start the product. | Measure the air pressure. Refer to Technical data on page 10. | |
| The air flow is too low to start the product. | Measure the air flow. Refer to Technical data on page 10. | |
| There is a leak in the air hose. | Attach the clamps correctly on the air hose. | |
| Replace the air hose if it is necessary. | ||
| The product is not suffi- ciently lubricated. | Lubricate the product. Refer to To lubricate the product on page 6. | |
| The lamella is worn out. | Replace the lamella. | |
| The product is not attached correctly. | Attach the product correctly. Refer to To operate the product on page 6. | |
| The vibration of the con- crete is not constant. | The centrifugal force is too low. | Change to a product with more power. |
| The air exhaust is blocked. | Remove the blockage. Clean the air exhaust. | |
| The air pressure is too low. | Measure the air pressure. Refer to Technical data on page 10. | |
| The product is not attached correctly. | Attach the brackets correctly to the concrete form. Exam- ine the bolts after 15 minutes of operation. Tighten the bolts if they are loose. | |
| Attach the product with the correct bolts to the brackets. | ||
| The number of products used is not sufficient. | Add products were vibration is missing. | |
| The correct product is not used. | Attach high frequency products to a vertical concrete form. | |
| Attach lower frequency products to a horizontal concrete form. | ||
| The air hose is too long. | Refer to the operator’s manual for the air compressor for correct length. | |
| The concrete form is not sufficiently rigid. | Make the concrete form more rigid. | |
| The product does not oper- ate correctly in a dusty en- vironment. | There is sand or dust in the product. | Disassemble and clean all the parts with fuel. Then lubri- cate all parts and assemble the product. |
| The air exhaust is blocked. | Remove the blockage. Clean the air exhaust. |
| Problem | Cause | Solution |
| The product does not oper- ate correctly in a moist en- vironment. | Moist is mixed with the oil in the product. | Disassemble and clean all the parts with fuel. Refer to To disassemble the product on page 6. Then lubricate all parts and assemble the product. Refer to To assemble the product on page 6. |
| The lamella absorbs water and causes a blockage in the rotor. | Drain the water from the air compressor tank. | |
| Disassemble and clean all the parts with fuel. Then lubri- cate all parts and replace the lamella. Keep the lamella in oil until assembly. Refer to To assemble the product on page 6. |
Storage and disposal
Storage
- Clean the product before storage.
- Keep the product in a dry and frost-free area.
- Keep the product in a locked area to prevent access for children or persons that are not approved.
Disposal of the product
- Obey the local recycling requirements and applicable regulations.
- When the product no longer is used, send it to the dealer or discard it at a recycling location.
Technical data
| Type | EP 121B | EP 271B | EP 371B | EP 601B |
| Frequency, rpm | 9000 | 9350 | 9350 | 8800 |
| Centrifugal force, N | 8100 | 10350 | 26800 | 31500 |
| Amplitude, mm/in. | 0.80/0.03 | 1.10/0.05 | 1.70/0.07 | 2.10/0.08 |
| Air consumption, l/mm or cfm1 | 1200 or 42 | 1200 or 42 | 1400 or 50 | 1400 or 50 |
| Weight, kg/lbs. | 9.50/21 | 10.00/22 | 16.50/37 | 18.00/40 |
| Bracket | VT2 | VT2 | VT4 | VT4 |
| Pneumatic tool oil | Non-detergent oil | |||
| Air pressure for operation, bars/PSI | 6/87 | |||
| Minimum air pressure, bars/PSI | 5/72 | |||
| Maximum air pressure, bars/PSI | 7/101 | |||
| Noise emissions | ||||
| Sound pressure level LP at the oper- ators ear, dB(A)2 | 90.0 | 90.8 | 95.0 | 100.0 |
Noise and vibration declaration statement
These declared values were obtained by laboratory type testing in accordance with the stated directive or standards and are suitable for comparison with the declared values of other products tested in accordance with the same directive or standards. These declared values are not suitable for use in risk assessments and values measured in individual work places may be higher. The actual exposure values and risk of harm experienced by an individual user are unique and depend upon the way the user works, in what material the product is used, as well as upon the exposure time and the physical condition of the user, and the condition of the product.
- Measured at an air pressure of 6 bars/87 PSI
- Noise level measured in air at 1m from the product according to EN ISO 6081. Uncertainty: ± 3dB
Product dimensions EP 121B, EP 271B

| Position | mm/in. |
| A | 183/7.2 |
| B | 78/3.1 |
| C | 140/5.5 |
| D | 234/9.2 |
| E | 130/5.1 |
| F | 40/1.6 |
| G | 85/3.3 |
Product dimensions EP 371B, EP 601B

| Position | mm/in. |
| A | 242/9.5 |
| B | 99/3.9 |
| C | 220/8.7 |
| D | 236/9.3 |
| E | 126/4.9 |
| F | 52/2.0 |
| G | 80/3.1 |
EC Declaration of Conformity
We, Husqvarna AB, SE-561 82 Huskvarna, Sweden, tel:+46-36-146500, declare on our sole responsibility that the product:
| Description | Concrete Vibrator |
| Brand | HUSQVARNA |
| Type/Model | EP 121B/271B/371B/601B |
| Identification | Serial numbers dating from 2020 and onwards |
complies fully with the following EU directives and regulations:
| Directive/Regulation | Description |
| 2006/42/EC | “relating to machinery” |
and that the following harmonized standards and/or technical specifications are applied;
EN 12649:2008+A1:2011
Partille, 2020-12-07
Martin Huber
R&D Director, Concrete Surfaces & Floors
Husqvarna AB, Construction Division
Responsible for technical documentation