Makita DCW180 Cordless Cooler & Warmer Box Instruction Manual


makita DCW180 Cordless Cooler & Warmer Box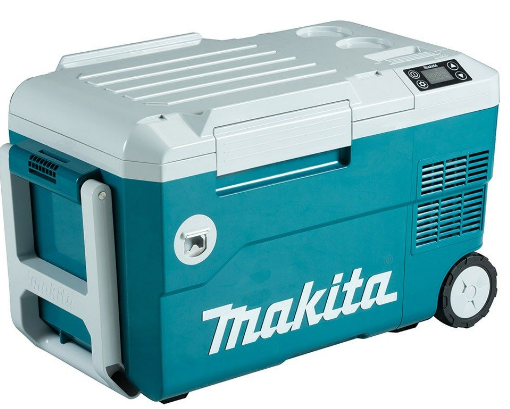

SPECIFICATIONS
| Model: | DCW180 | ||
| Capacity | 20L (5.3 gal) | ||
| Input | Battery cartridge | D.C. 18V | |
| AC adaptor | Refer the indication on the AC adaptor. (Input voltage varies depending on the country.) | ||
| Cigarette lighter adaptor | D.C. 12V / 24V | ||
| Anti-shock protection class | III | ||
| Climate type | SN/N/ST/T | ||
| Insulation material / Foaming material | Polyurethane foam / Cyclopentane (C5H10) | ||
| Refrigerant | R-1234yf (26 g) (0.06 lbs) | ||
| Operating power | cooling power 90W, heating power 42W | ||
| Dimensions | External dimensions | 623(L)mm x 341(W)mm x 371.5(H)mm (24-1/2″ x 13-3/8″ x 14-5/8″) | |
| Inside of the chamber | 323(L)mm x 240(W)mm x 261(H)mm (12-3/4″ x 9-1/2″ x 10-1/4″) | ||
| Net weight | 14.3kg (32 lbs) (with BL1860 x 2)/13.0kg (28.6 lbs) (without battery) | ||
| Protection degree | IPX4 (only powered by battery pack) | ||
| Operating time * (with BL1860B x1) | 30 °C (85 °F) ambient temperature | -18 °C (0 °F) control temperature | 2.5 hours |
| 5 °C (40 °F) control temperature | 8.5 hours | ||
| 0 °C (30 °F) ambient temperature |
60 °C (140 °F) control temperature |
2 hours | |
| Applicable battery cartridge | BL1815N / BL1820B / BL1830 / BL1830B / BL1840B / BL1850B / BL1860B | ||
| Applicable charger | DC18RC / DC18RD / DC18RE / DC18SD / DC18SE / DC18SF / DC18SH | ||
| USB power supply port | Type | A | |
| Output voltage | D.C. 5V | ||
| Output current | D.C. 2.4A | ||
- Operating times are approximate and may differ depending on battery type, charging status, and usage condition.
- Due to our continuing program of research and development, the specifications herein are subject to change without notice.
- Specifications may differ from country to country.
- Some of the battery cartridges and chargers listed above may not be available depending on your region of residence.
WARNING: Only use the battery cartridges and chargers listed above. Use of any other battery cartridges and chargers may cause injury and/or fire.
Symbols
- The followings show the symbols which may be used for the appliance. Be sure that you understand their meaning before use.
SAFETY WARNINGS
- This appliance is not intended for use by persons (including children) with reduced physical, sensory or mental capabilities, or lack of experience and knowledge, unless they have been given supervision or instruction concerning use of the appliance by a person responsible for their safety. Children should be supervised to ensure that they do not play with the appliance.
- The device is suitable for:
- Operation in vehicles
- Cooling and deep-freezing food
- Camping use only when the appliance is powered by a battery pack
- WARNING: Keep ventilation openings in the appliance enclosure clear of obstruction.
- WARNING: Do not use mechanical devices or other means to accelerate the defrosting process, other than those recommended by the manufacturer.
- WARNING: Do not use electrical appliances inside the food storage compartments of the appliance, unless they are of the type recommended by the manufacturer.
- Do not store explosive substances such as aerosol cans with a flammable propellant in this appliance.
- This appliance is intended to be used in households and similar applications such as
- staff kitchen areas in shops, offices, and other working environments;
- farmhouses and by clients in hotels, motels, and other residential type environments;
- bed and breakfast type environments;
- catering and similar non-retail applications.
- If the SUPPLY CORD is damaged, it must be replaced by a special cord or assembly available from the manufacturer or its service agent.
- This appliance contains flammable insulation blowing gases inside. When disposing of the appliance, follow your local regulations relating to the disposal of flammable insulation blowing gases.
- WARNING: Risk of child entrapment. Before you throw away your old refrigerator or freezer:
- Take off the doors.
- This appliance uses FLAMMABLE REFRIGERANTS. Read and follow this instruction for handling. Ask our service center for servicing. When disposing of the appliance, follow your local regulations relating to disposal of FLAMMABLE REFRIGERANTS.
- When positioning the appliance, ensure the power cord is not tapped or damaged.
- Do not locate multiple portable socket outlets or portable power supplies at the rear of the appliance.
- WARNING: Do not damage the refrigerant circuit.
- The installation clearance around and above the unit shall be no less than 15mm.
IMPORTANT NOTICES
- Read the instruction manual carefully before use.
- Check if the voltage range used is the same as that marked on the nameplate, whether the power cord plug matches the socket, and ensure that the socket is well-grounded.
- Do not place the product upside down, or tilt it above 15°.
- Do not immerse the appliance in water or other liquid to prevent electric shock. Do not expose to rain.
- When not in use or clean, remove the battery and unplug the power plug.
- Any accessories not recommended by the manufacturer may not be used.
- Do not place the appliance next to a high-temperature gas or electric stove to avoid accidents.
- Do not start the power button frequently (at least 5 minutes each time) to avoid damage to the compressor.
- Do not insert metal foil or other conductive materials into the appliance to prevent fire or short circuit.
- Do not use chemical washing liquids and hard tools to clean the product.
- Insert the plug completely into the “DC IN” inlet. Failure to do so may deform the plug or cause a fire.
- Clean the cigarette lighter socket before inserting the plug. Failure to do so may deform the plug or cause a fire.
- Do not operate the appliance while driving. Doing so may cause an accident.
- When the remaining automobile battery capacity gets small, use the appliance with the engine running. After using the appliance, unplug the cigarette lighter socket to prevent the loading on the automobile battery.
- Do not abuse the AC adaptor and cigarette lighter adaptor.
- Clean the plug of the AC adaptor and cigarette lighter adaptor. Dirt such as water or salt adher-ing to the plug may cause rust and result poor conductivity, deformation or fire.
- Do not touch the plug of the AC adaptor and cigarette lighter adaptor immediately after operation. They may be extremely hot and could burn your skin.
- Do not disassemble the appliance.
- Do not charge the car battery while using the appliance. Unacceptable voltage may be applied to the product, resulting in failure or fire.
- Do not use a flammable sprayer near the appliance. Otherwise, it may cause fire.
- During operation, do not touch the contents, especially those made of metal, inside the appliance with wet hands. Doing so may cause frostbite.
- Do not handle the plug with wet or greasy hand. Doing so may cause electric shock.
- Do not put such as medicines or academic materials in the appliance. This appliance can-not store materials that require strict temperature control.
- Do not use this product as a step stool or chair. It may cause falls and injuries.
- Do not leave this appliance in hot places, such as in a car under the sun. Doing so may cause a fire.
- Do not allow small children and pets to play with this appliance. Keep the appliance out of reach of children when storing.
- Do not overfill food and drink in the appliance. Cooling performance may be reduced, causing food and drink to rot.
- Be careful not to run out of battery power while keeping food and drink cool or warm. Do not store opened foods for a long time. Food and drink may rot.
- Do not use near heating materials or gas appli-ances. Cooling performance may be reduced, or a gas leak may cause a fire.
- Do not use a knife or a screwdriver to remove ice or frost from the appliance. Doing so may damage the inside of the appliance and cause a malfunction, or the enclosed gas or oil may squirt.
- Do not use the DC output (DC) of the engine generator as the power supply. Doing so may cause a failure.
- Do not put water etc. directly in the appliance. Water may get inside the appliance and cause a malfunction. If water has accumulated in the chamber, wipe it off with a soft cloth.
- Be careful not to pinch your finger when closing and opening the upper cover.
- Do not put things that are easily perishable when operating heating mode. Food and drink may rot.
- When operating heating mode, do not touch the inside of the appliance with your hand for a long time. Risk of low-temperature burns.
- Do not use this appliance in the refrigerator vehicle or refrigerator chamber. Dew condensation easily occurs in the refrigerator vehicle and refrigerator chamber, causing water droplets to fall on the appliance and result in malfunctions.
- Do not put creatures such as pets in the appliance. This appliance cannot save creatures.
- Do not put a cold agent in a broken bag. If the cold agent leak in the appliance, the metal part of the appliance may be corroded. If the cold agent leaks, wipe it off with a damp soft cloth and then wipe dry with a soft cloth.
- Attach the shoulder band securely so that
it does not drop off due to the weight of the appliance. Otherwise, the appliance may fall and cause injury. - When putting food and drink in the appliance, put a cold or hot thing in advance. This appliance cannot cool or heat in a short time.
- When using the appliance in a car, be sure to install the appliance in a stable place such as the luggage space or the feet of the rear seats, and fix it. Do not place the appliance on the seat in an unstable state. If the car suddenly starts or stops during driving, the appliance may fall over and move, causing injury.
- Hold the appliance firmly when carrying. Otherwise, the appliance may fall and cause a malfunction, or falling on your feet may cause injury.
Safety warnings for battery-operated appliance
Battery-operated appliance use and care
- Prevent unintentional starting. Ensure the switch is in the off-position before connecting to the battery pack, picking up or carrying the appliance. Carrying the appliance with your finger on the switch or energizing appliance that has the switch on invites accidents.
- Disconnect the battery pack from the appliance before making any adjustments, changing accessories, or storing the appliance. Such preventive safety measures reduce the risk of starting the appliance accidentally.
- Recharge only with the charger specified by the manufacturer. A charger that is suitable for one type of battery pack may create a risk of fire when used with another battery pack.
- Use appliances only with specifically designated battery packs. Use of any other battery packs may create a risk of injury and fire.
- When the battery pack is not in use, keep it away from other metal objects, like paper clips, coins, keys, nails, screws or other small metal objects, that can make a connection from one terminal to another. Shorting the battery terminals together may cause burns or a fire.
- Under abusive conditions, liquid may be ejected from the battery; avoid contact. If contact accidentally occurs, flush with water. If liquid contacts eyes, additionally seek medical help. Liquid ejected from the battery may cause irritation or burns.
- Do not use a battery pack or appliance that is damaged or modified. Damaged or modified batteries may exhibit unpredictable behavior resulting in fire, explosion, or risk of injury.
- Do not expose a battery pack or appliance to fire or excessive temperature. Exposure to fire or temperature above 130 °C may cause an explosion.
- Follow all charging instructions and do not charge the battery pack or appliance outside the temperature range specified in the instructions. Charging improperly or at temperatures outside the specified range may damage the battery and increase the risk of fire.
- Have servicing performed by a qualified repair person using only identical replacement parts. This will ensure that the safety of the product is maintained.
- Do not modify or attempt to repair the appliance or the battery pack except as indicated in the instructions for use and care.
Important safety instructions for battery cartridge
- Before using the battery cartridge, read all instructions and cautionary markings on (1) battery charger, (2) battery, and (3) product using the battery.
- Do not disassemble the battery cartridge.
- If the operating time has become excessively shorter, stop operating immediately. It may result in a risk of overheating, possible burns and even an explosion.
- If electrolyte gets into your eyes, rinse them out with clear water and seek medical attention right away. It may result in loss of your eyesight.
- Do not short the battery cartridge:
- Do not touch the terminals with any conductive material.
- Avoid storing battery cartridges in a container with other metal objects such as nails, coins, etc.
- Do not expose the battery cartridge to water or rain.
- Do not nail, cut, crush, throw, drop the battery cartridge, or hit against a hard object to the battery cartridge. Such conduct may result in a fire, excessive heat, or explosion.
- Do not use a damaged battery.
- The contained lithium-ion batteries are subject to the Dangerous Goods Legislation requirements. For commercial transports e.g. by third parties, forwarding agents, the special requirements on packaging and labeling must be observed. For the preparation of the item being shipped, consulting an expert for hazardous material is required. Please also observe possibly more detailed national regulations. Tape or mask off open contacts and pack up the battery in such a manner that it cannot move around in the packaging.
- When disposing of the battery cartridge, remove it from the appliance and dispose of it in a safe place. Follow your local regulations relating to the disposal of battery. Use the batteries only with the products specified by Makita. Installing the batteries to non-compliant products may result in a fire, excessive heat, explosion, or leak of electrolyte. If the appliance is not used for a long period of time, the battery must be removed from the appliance.
- During and after use, the battery cartridge may take on heat which can cause burns or low-temperature burns. Pay attention to the handling of hot battery cartridges.
- Do not touch the terminal of the tool immediately after use as it may get hot enough to cause burns.
- Do not allow chips, dust, or soil stuck into the terminals, holes, and grooves of the battery cartridge. It may result in poor performance or breakdown of the tool or battery cartridge.
- Unless the tool supports the use of near high-voltage electrical power lines, do not use the battery cartridge near high-voltage electrical power lines. It may result in a malfunction or breakdown of the tool or battery cartridge.
- Keep the battery away from children.
SAVE THESE INSTRUCTIONS.
CAUTION: Only use genuine Makita batteries. Use of non-genuine Makita batteries, or batteries that have been altered, may result in the battery bursting causing fires, personal injury and damage. It will also void the Makita warranty for the Makita appliance and charger.
Tips for maintaining maximum battery life
- Charge the battery cartridge before completely discharged. Always stop appliance operation and charge the battery cartridge when you notice less appliance power.
- Never recharge a fully charged battery cartridge. Overcharging shortens the battery service life.
- Charge the battery cartridge with room temperature at 10 °C – 40 °C (50 °F – 104 °F). Let a hot battery cartridge cools down before charging it.
- When not using the battery cartridge, remove it from the tool or the charger.
- Charge the battery cartridge if you do not use it for a long period (more than six months).
PARTS DESCRIPTION
| 1 | Control panel | 2 | Battery cover | 3 | Upper cover hook |
| 4 | Upper cover | 5 | Handle | 6 | Carrying Handle |
| 7 | Opener | 8 | Filter cover | 9 | Wheel |
| 10 | “DC IN” socket | 11 | Temperature plus button | 12 | Power button |
| 13 | Cool / heat switch button | 14 | Temperature display | 15 | Battery indicator |
| 16 | Temperature reduction button | 17 | USB power supply port | – | – |
OPERATION
1. Connecting the power supply
Battery
CAUTION: Always switch off the tool before installing or removing of the battery cartridge. Hold the tool and the battery cartridge firmly when installing or removing battery cartridge. Failure to hold the tool and the battery cartridge firmly may cause them to slip off your hands and result in damage to the tool and battery cartridge and a personal injury. Be careful not to pinch your finger when opening or closing the battery cover.
To install the battery cartridge, open the battery cover.
Align the tongue on the battery cartridge with the groove in the housing and slip it into place. Insert it all the way until it locks in place with a little click. Then close the battery cover. To remove the battery cartridge, slide it from the appliance while sliding the button on the front of the cartridge.
CAUTION: Always install the battery cartridge fully until the red indicator cannot be seen. If not it may accidentally fall out of the tool causing injury to you or someone around you. Do not install the battery cartridge forcibly. If the cartridge does not slide in easily, it is not being inserted correctly.
NOTE: Up to two battery cartridges can be installed, although the appliance uses one battery cartridge for operation.
AC adaptor (Only used for Recreational vehicles)
When using the appliance with AC power, use the AC adaptor supplied with the appliance. Insert the plug to the “DC IN” inlet of the appliance and then insert the other end to an outlet.
Cigarette lighter adaptor
When using the appliance with the cigarette lighter socket, use the cigarette lighter adaptor supplied with the appliance. Insert the plug to the “DC IN” inlet of the appliance and then insert the other end to the cigarette lighter socket.
CAUTION: Insert the plug completely into the “DC IN” inlet. Failure to do so may deform the plug or cause a fire. Always close the “DC IN” socket cover firmly when the power cord is not plugged.
NOTICE: When the appliance has been operated for about 24 hours with the battery cartridge installed, battery cartridge may shut down its own power to protect the battery cartridge. In this case, the appliance can not operate with the bat-tery power supply and the battery indicator also goes off.
To resume the battery power supply, remove and re-install the battery cartridge.NOTE: When the appliance shifts power supply, the compressor will stop for about 3 minutes to protect the compressor.
NOTE: After turning off the appliance, it takes about 3 minutes to restart the compressor because of the pro-tection of the compressor.
Turning on the appliance
Press the power button to turn on the appliance. Press the power button again to turn off the appliance.
Switching cooling/heating mode
- Press the cool/heat switch button to switch the oper-ating mode.
- The temperature display flashes the control temperature.
- When the appliance operates in cooling mode, the control temperature is -18 °C, -10 °C, 0 °C, 5 °C or 10 °C (0 °F, 15 °F, 30 °F, 40 °F or 50 °F).
- When the appliance operates in heating mode, the control temperature is 55 °C or 60 °C (130 °F or 140 °F).
Selecting the control temperature
Press the temperature plus button or the temperature reduction button to select the control temperature.
The appliance starts cooling / heating 5 seconds after without any operation, then the control temperature stop flashing and the temperature display shows the current temperature.
The appliance stops cooling/heating when the current temperature reaches the control temperature.
Tips for efficient cooling
Opening the upper cover for long periods can cause a significant increase in the temperature in the chamber.
- If the chamber is left empty for long periods:
- Switch off the appliance.
- Defrost the chamber.
- Clean and dry the chamber.
- Leave the upper cover open to prevent mold from developing within the chamber.
FUNCTION
Indicating the remaining battery capacity
- The battery indicator shows the remaining battery capacity.
- The remaining battery capacity is shown as the following table.
| Battery indicator status | Remaining battery capacity | |
| On | Off | |
| 50% to 100% | ||
| 20% to 50% | ||
| 0% to 20% | ||
| (Blinking) |
Charge the battery | |
(Only for battery cartridges with the indicator)
Press the check button on the battery cartridge to indi-cate the remaining battery capacity. The indicator lamps light up for a few seconds.
| Indicator lamps | Remaining capacity | |||||
| Lighted | Off |
Blinking | ||||
| 75% to 100% | ||||||
| 50% to 75% | ||||||
| 25% to 50% | ||||||
| 0% to 25% | ||||||
| Charge the battery. | ||||||
| The battery may have malfunctioned. | ||||||
NOTE: Depending on the conditions of use and the ambient temperature, the indication may differ slightly from the actual capacity.The first (far left) indicator lamp will blink when the battery protection system works.
Appliance/battery protection system
The appliance is equipped with a protection system. This system automatically cuts off power to extend appliance and battery life. The appliance will automatically stop during operation if the appliance or battery is placed under one of the following conditions.
- Battery over-discharge protection
When the battery capacity becomes low, the appliance stops automatically. The battery indicator prompts that the battery should be charged. Remove the batteries from the appliance and charge the batteries. - Overcurrent protection
When the appliance/battery is operated in a manner that causes it to draw an abnormally high current, the appliance automatically stops. In this situation, stop the application that caused the appliance to become overloaded. Then turn the appliance on to restart. - Low-voltage protection
When the car input voltage is lower than the rated voltage, this protection system turns off the appliance and the temperature display shows “F3” with a beep sound. - Over-voltage protection
When the input voltage is higher than the rated voltage, this protection system turns off the appliance and the temperature display shows “F4” with a beep sound. - Short circuit protection
The circuit has a short circuit protection function in the case of a short circuit. In this situation, take the appliance to Makita Authorized or Factory Service Centers.
Tilt protection function
The appliance is equipped with the tilt protection function. When operating the appliance in cooling mode, the appliance will automatically shut down if the appliance is placed under one of the following angles.
- When the appliance gets equal to or greater than 30° from a level angle as shown A-1 in the figure, the appliance shuts down and the temperature display shows “F1” for a while. It takes 3 minutes to restart after the appliance is back in a level position. When the appliance gets equal to or greater than 70° from a level angle as shown A-2 in the figure, the appliance shuts down and the temperature display shows “F6” until restart. It takes 2 hours to restart after the appliance is back in a level position.
- When the appliance get equal to or greater than 30° from level angle as shown B-1 in the figure, the appliance shuts down and the temperature display shows “F1” for a while. It takes 3 minutes to restart after the appliance back in level position. When the appliance get equal to or greater than 40° from the level angle as shown B-2 in the figure, the appliance shuts down and the temperature display shows “F6” until restart. It takes 2 hours to restart after the appliance back in level position.
- When the appliance get equal to or greater than 30° from level angle as shown C-1 in the figure, the appliance shuts down and the temperature display shows “F1” for a while. It takes 3 minutes to restart after the appliance back in level position. When the appliance get equal to or greater than 70° from level angle as shown C-2 in the figure, the appliance shuts down and the temperature display shows “F6” until restart. It takes 2 hours to restart after the appliance back in level position.
- When the appliance get equal to or greater than 30° from level angle as shown D-1 in the figure, the appliance shuts down and the temperature display shows “F1” for a while. It takes 3 minutes to restart after the appliance back in level position. When the appliance get equal to or greater than 70° from level angle as shown D-2 in the figure, the appliance shuts down and the temperature display shows “F6” until restart. It takes 2 hours to restart after the appliance back in level position.
- When the appliance turns 180° from level angle, the appliance shuts down and the temperature display shows “F6” until restart. It takes 2 hours to restart after the appliance back in level position.
USB charging
There is a USB port in the battery compartment. The USB port continuously outputs 5V voltage in the operation state.
Memory function
After setting the control temperature, if the user does not operate within 5 seconds, the current setting will be memorized. Next time, the appliance starts in the same setting.
Switching the unit of temperature
.You can switch the unit of temperature to °C (degree Celsius) or °F (degree Fahrenheit) by following the procedure.
- Turn on the appliance.
- Press the cool/heat switch button until the unit (°C or °F) starts flashing.
- Press the temperature plus button or the temperature reduction button to select unit.
- Press the cool/heat switch button, or leave the appliance 5 seconds without any operation. The unit selection is completed.
Shoulder belt
- Put the belt through the left and right handles.
- Buckle the belt.
Error code
For the specific errors, the temperature display shows the following code.
| Error code | Matter |
| F1 | Tilt protection is active. Refer the section for the tilt protection function. |
| F2 | Running out of battery. |
| F3 | Input voltage is low. Refer the paragraph for the car input protection. |
| F4 | Input voltage is high. Refer the paragraph for the overvoltage protection. |
| F5 | Something is wrong with the sensor in the appliance. Take the appliance to Makita Authorized or Factory Service Centers. |
| F6 | Tilt protection is active. Refer the section for the tilt protection function. |
MAINTENANCE
CAUTION: Always be sure that the appliance is switched off, unplugged, and the battery cartridge is removed before attempting to perform inspection or maintenance.
NOTICE: Never use gasoline, benzene, thinner, alcohol or the like. Discoloration, deformation, or cracks may result.
To maintain product SAFETY and RELIABILITY, repairs, any other maintenance or adjustment should be performed by Makita Authorized or Factory Service Centers, always using Makita replacement parts.
Cleaning
- Clean the oil stain in the chamber regularly.
- Clean around the interior of the chamber to prevent odor.
- Clean the dust on the filter regularly to improve refrigeration efficiency.
- The sealing strip of the upper cover is easy to get dirty, clean it in time.
Defrosting
To defrost, turn off the power and wait until the frost has melted. Then wipe off the water.
Cleaning the filter
- Push the slide cover in the direction of the arrow shown in the figure, and then take the filter cover off.
- Take off the filter, clean the filter, and then install the filter back in the filter cover.
- Install the filter cover back.
OPTIONAL ACCESSORIES
CAUTION: These accessories or attachments are recommended for use with your Makita tool specified in this manual. The use of any other accessories or attachments might present a risk of injury to persons. Only use accessory or attachment for its stated purpose. If you need any assistance for more details regarding these accessories, ask your local Makita Service Center.
- Makita genuine battery and charger
NOTE: Some items in the list may be included in the tool package as standard accessories. They may differ from country to country.
MAKITA LIMITED WARRANTY.
- Please refer to the annexed warranty sheet for the most current warranty terms applicable to this product.
- If an annexed warranty sheet is not available, refer to the warranty details set forth below website for your respective country.
- United States of America: www.makitatools.com Canada: www.makita.ca Other countries: www.makita.com