Yamaha YMS100 Mallet Stand Owner’s Manual


YAMAHA YMS100 Mallet Stand Owner’s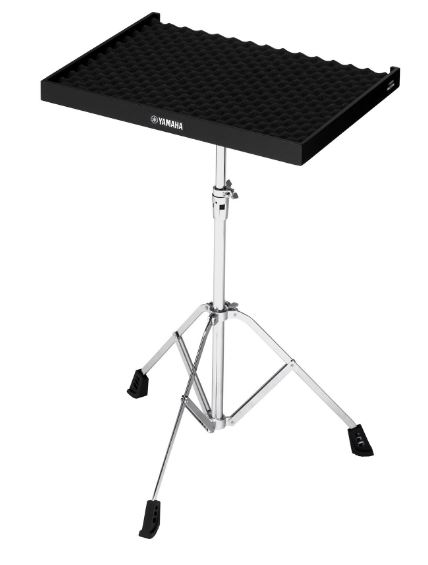

Thank you for purchasing the Yamaha Mallet Stand YMS100. In order to enjoy long-term use of this product, please read this owner’s manual carefully before using. After you have read the manual, keep it in a safe and handy place for future reference.
Installation


PRECAUTIONS
Please read the following instructions and explanations on handling before using the mallet stand. For your safety, please observe the following precautions regarding its placement and daily use. Especially in the case of children, a responsible adult should provide instruction on the proper use and treatment of the mallet stand.
WARNING
Disregarding the warnings with this mark or misuse may result in death or serious injury.
- Place on a stable, flat surface. If the floor is stepped or sloped, the stand may fall over or drop resulting in injury.
- Firmly tighten fixing bolts at two locations. Bolts loosening during use may cause injury due to the stand falling over or dropping.
- Thread the threaded end on the pipe leg assembly into the clamp on the bottom of the table and fix securely. Used when attached loosely, the table may fall over or drop resulting in injury.
- Do not play around the mallet stand. Hitting your head or face on the stand may cause injury.
- Never stand close to the mallet stand during earthquakes. Strong tremors can cause the stand to fall over resulting in injury.
- Make sure that the legs are open to their most stable state. The stand can fall over and result in injury if the legs are unstable.
- Do not suddenly loosen fixing bolts when adjusting stand height. Injury to hands or fingers can result from the pipe or table slipping.
- Do not use the mallet stand as a toy. The table may fall over or drop resulting in injury.
CAUTION
Disregard of cautions with this mark or misuse may result in personal injury or the loss of personal property.
- Assemble the instrument in the proper sequence by following the assembly instructions in this manual. Also, make sure to tighten the screws or bolts regularly. Failure to do so may result in damage to the instrument or cause the instrument to overturn, possibly causing injury.
- Do not place more than 1kg on the table. Placing more than 1kg on the table can cause it to tip over.
- Do not place objects in one place on the table. Extremely poor weight balance on the table can cause it to tip over.
- Do not adjust table height with objects placed on the table. Doing so can cause the objects on the table to move about or drop off the table resulting in injury.
- Take care not to pinch your fingers when opening or closing the legs. Moving parts of the legs can cause injuries to fingers.
- Be careful not to injure yourself on the inner and end surfaces of the pipe. Rough surfaces on the end and inside of the pipe can cause injury.
- Do not use any screws other than those in the included accessories. Otherwise, the instrument/stand may fall or overturn resulting in injury.
- Never use the stand for placing anything other than the Percussion instruments. Otherwise, the instrument/stand may fall or overturn resulting in injury.
NOTICE
Never use thinner or benzene to clean. Doing so may discolor the finish. Please wipe the mallet stand with a soft, dry cloth.
Assembly
Refer to the illustration shown below.
- Place the table 1 upside down on a piece of cardboard or a cloth spread out on the floor to protect the floor from scratches.
- Connect the leg to the table.
- Loosen the table fixing bolt 2, and then insert the Upper tube 3 into the leg assembly 4.
- Tighten the fixing bolt 2 securely.
- Loosen the wing nut of the table bracket 5 at the center of the table bottom.
- After inserting the tip part of the Upper tube 3 vertically into the center of table bracket 5, securely pinch it with the tube clamp 6. Also in this step, align the clamp of table bracket 5 and tube clamp 6 so that they are parallel with each other. Adjust them by using the locking nut of table bracket 5.
- Tighten the wing nut.
- Open the legs 7 to their most stable state, and then tighten the leg fixing bolt 8.
CAUTION Be careful not to pinch your fingers when opening the legs. - Holding the mallet stand firmly, turn it upright and place it on the floor.
- Adjust the height of the table.
- Loosen the table fixing bolt 2.
- Holding the table, adjust it to the desired height.
- Tighten the fixing bolt 2 securely.
- Loosen the screw of the memory clamp 0 by using a tuning key 9, and then move the memory clamp 10 to the boundary line of the leg assembly 4 and the Upper tube 3.
- Tighten the screw of the memory clamp 0 by using a tuning key 9.
The assembly is now complete. To disassemble, follow the assembly steps in reverse order.
Specifications
- Table dimensions (W x D x H): 601 x 451 x 44 mm
- Inner table dimensions (W x D x H): 583 x 433 x 10 (The upper surface of the cushion) mm
- Adjustable height (height from the floor to the upper surface of the cushion): 730-1120 mm
- Weight: 5.6 kg
- The contents of this manual apply to the latest specifications as of the publishing date. To obtain the latest manual, access the Yamaha website and download the manual file.