Hoover Heritage 5620 Compact Hand Steamer Instruction Manual


HOOVER Heritage 5620 Compact Hand Steamer
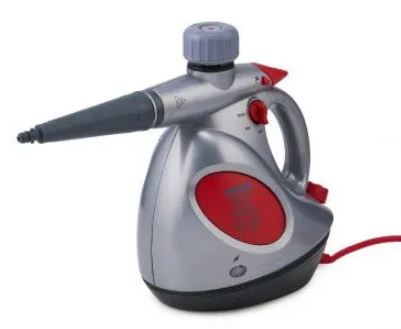

Features

- Water fill cap
- Steam release button
- Solution Control
- Handle
- Solution tank cap
- Base
- Body
- Thermostat indicator light
- Hose
- Mini window squeegee
- Elbow nozzle
- Wall paper scraper
- Wire brush
- Grout brush
- Glass brush
- Extension nozzle
- Steam Pad
- Cup
Specifications
Power Cable Length: 3m Water Capacity: 320mL Watts: 1200W Heat Time: 3-4 minutes Solution Capacity: 150mL
Customer Care
Please contact Godfreys customer support and service hotline Australia on 1800 815 270 or New Zealand on 0800 282 288 to find your local spare parts provider.
- Part/Part Number
- Replacement Pad/31400100
- Mini Window Squeegee/31150303
- Hose Assembly/31220424
- Extension Nozzle/31140077
Before you begin
This cleaner must be operated in accordance with these instructions and used only for domestic household cleaning to remove DRY dirt and dust from household carpets, flooring, walls and fabrics. This cleaner is not fit to be used as an industrial cleaner hence will void the manufacturer’s warranty if used inappropriately.
Please read these instructions thoroughly
This will ensure you obtain full benefit from your new cleaner. Keep this Instruction Manual in a handy place for future reference.
Important
Always switch the cleaner off and remove the plug from the electricity supply before cleaning your appliance, when not in use, or attempting any maintenance task. The cleaner must only be connected to an AC supply at the voltage shown on the rating plate. This cleaner should only be used for its intended purpose as described in these instructions.
Warning
Warning: the power and heat of the steam may have adverse consequences for certain materials. Always check, before putting the device into operation, whether a surface or material is actually suitable for treatment with steam. Do this by executing a test on a hidden surface of the material you wish to treat.
- The force and heat of the steam may damage certain materials. Some fabrics may react to the temperature of the steam. For example: unpainted wood or leather can be bleached by the action of steam; glossy plastic can be dulled by steam; acrylic fibre, velvet and linen react very sensitively to the temperature of steam.
- Do not hold the steam in the direction of one spot for long periods! This can cause damage to materials!
- Exposure to hot steam can cause scalding!
- Burns can occur from touching hot parts, hot water or steam. Use caution when draining the appliance after use as there may be hot water in the unit.
- The filler cap must not be open during use, ensure it if firmly sealed before commencing use.
- Always open the filler cap slowly when opening the water tank, this will allow any remaining steam to escape gradually.
- To reduce the risk of contact with hot water emitting from the steam nozzle, hold the nozzle away from the body and check for signs of condensation or leakage.
- Nozzle and attachments become hot during use. To avoid injuries, do not touch nozzle while using this appliance. Do not attempt to change attachments while unit is emitting steam.
- The hose may become hot during use. Use caution when handling to avoid burns or other injury.
- Never directly steam towards people, animals or plants.
- ‘Never attempt to steam clean clothes which are still being worn.
- Do not handle or operate the steamer with wet hands and follow electrical safety precautions at all times, i.e., never operate without shoes.
- Ensure that the cleaner does not operate on an empty tank.
- Do not fill the steam water tank with more than 320mL of water. Overfilling may result in a possible electric shock.
- Only water should be used in this unit. Other cleaning agents will damage the unit and can cause injuries.
- Do not add cleaning solutions, scented perfumes, oils or any other chemicals to the water used in this appliance, as this may damage the unit or make it unsafe for use.
- Use tap water or distilled/purified water if the tap water in your area is very hard.
- Do not apply steam directly to very cold glass surfaces.
- The steam should not be aimed directly at parts containing electrical components such as the electrical components inside an oven.
- Damage caused by improper use of steam on objects, materials, persons and/or animals or by not observing the instructions in this manual will void the warranty.
Instructions for Use (continued)
This product is intended for domestic use only.
Warning: danger of scalding. Please use caution when using the steam cleaner. The steam emitted from this aperture is very hot!
Attention:
- Water tank is under pressure.
- Pull the plug from the wall socket.
- Keep the trigger pressed to allow the steam to escape.
- Allow the device to cool down for 5 minutes before refilling

Operating Instructions
- Assembling the accessories The steam hose with steam gun must be connected to the cleaner and the desired accessory must be attached before the Steam Cleaner can be used.
- Place the cleaner on a flat surface Unscrew the filler cap by pressing the cap down firstly, and simultaneously turning it in an anti-clockwise direction. Use measuring jug supplied when filling with water.
- Use the measuring cap when filling with water (Max. 320mL). Pressing the cap down, then screw up the filler cap in a clockwise direction.

- Do not fill the water tank with more than 320mL of water.
- Ensure the filler cap is securely tightened before commencing use.
Always switch the cleaner off before you attach or remove the hose and/or accessories, and make sure the attachments and inserts are cooled down completely before connecting or disconnecting.

Using the solution tank
- Open the solution tank cover by screwing in an anti-clockwise direction.
- Fill the solution tank with a maximum of 150mL of solution and securely seal the solution cap before commencing use.
Turning on the cleaner
- Plug the power cable into the mains power. Wait approximately 4 minutes for the steam to reach the correct temperature to commence operation.
- The power on light will illuminate when the cleaner is connected to the mains power.
Assembling the accessories
- Accessories must be securely connected to the cleaner for optimum performance and to ensure the cleaner is being used safely.
- To use the solution tank for enhanced cleaning with perfume or soap, adjust the steam dial to the MIN or MAX setting, the solution will automatically be released with the steam.
WARNING:
If soap or perfume is not required, ensure the dial is set to the off position.
Turning off the cleaner and storing
- Remove from the mains power supply and allow the cleaner to cool completely, Turn the filler cap slightly to release the remaining pressure.
- Before storing, ensure the water tank is completely empty .and then replace the filler cap tightly to store.
Warning : The filler cap will not open if steam pressure is still in the boiler!
Assembling the accessories
Assembling the straight nozzle and hose:Connect the straight nozzle to the steam socket on the front of the cleaner by aiming the arrow mark on the nozzle to the line on the socket . To do this, turn the nozzle 90 degrees in a clockwise direction and securely attach it to the body of the cleaner. Turn the nozzle 90 degrees in an anti-clockwise direction when detaching the nozzle from the socket. To detach the hose, follow the above steps, press the unlock button and turn 90 degrees in an anti-clockwise direction, then gently pull until it releases.

Removing the filler cap
- Window squeegee: connect the window squeegee to the nozzle and cover with the steam pad to use the cleaner for windows, curtains, material upholstery, ironing and Fine wrinkles.
- Straight nozzle can be used to clean windowsills, bathtubs, cookers.
- Hose can be used for narrow or hard to reach places, assemble with other accessories for a range of cleaning applications. When the cleaner is initially turned on, the cleaner,may output release excess steam, this is normal.

Notice: The hose is quite hot when using hold the end of the accessory to avoid touching the hot surface.
- The detail nozzle may be used on its own for cleaning or may also be fitted with other nozzles, place the detail nozzle to the mouth of nozzle, by, turning 90 degrees in a clockwise direction until it is firmly fitted.
- Metal brush and Nylon brush can be used for: gas cooker cleaning, bathroom and equipment, dirty floor tiles, work surfaces, cooking utensils, windows and mirrors
- Bend nozzle can be used for hard to reach areas, toilets, windowsills.
- Glass brush can be used for glass window surfaces, glass doors, mirrors, floor tiles, ceramic tiles and stainless steel appliances.
Maintenance
Warning: ensure the appliance is cooled down completely before emptying, cleaning or storing.
After use
Switch the cleaner off and unplug from the mains power supply. Wait until the cleaner has cooled down completely. Only clean the appliance by wiping over the housing with a slightly moistened cloth. Do not use any cleaning agents, abrasives or alcohol as they may damage the housing. It is recommended to rinse the tank after approximately 5 uses Fill the water tank with water and shake vigorously to clean it. This will loosen any lime scale that has been deposited on the bottom of the water tank. Pour out the water and allow the tank to dry completely before replacing the filler cap tightly. The water tank should be treated with lime scale remover approx. every 6 months to prolong the life of the cleaner. Place one or at most two lime scale removal sticks in 1 litre of warm water (50 °C) and fill the water tank with the solution. Allow the solution to work for approx. 30 minutes and then pour away the water with the dissolved solids. Repeat this process if necessary and then rinse out the tank with water.
Conditions of warranty
Your Hoover cleaner, in the case of domestic use, has a two year parts and labour warranty against product defects and failures when the product is used in accordance with the terms and conditions of this warranty statement. This warranty commences from the original date of purchase and is not transferable; please retain your original proof of purchase for any warranty claims. This warranty is valid only in the country where the cleaner is purchased. This cleaner must be operated in accordance with these instructions and used only for domestic household cleaning to remove DRY dirt and dust from household carpets, flooring, walls and fabrics. This cleaner is not fit to be used as an industrial cleaner hence will void the manufacturer’s warranty if used inappropriately. Accessories and consumable including Brushes, Squeegees, Pads, Nozzles, Filters and Dust Bags, unless defective in manufacture, are not subject to this warranty. In order to prolong the life of accessories and consumables, regular care and maintenance is recommended. When properly used and cared for, your cleaner will render excellent service; refer to the instruction manual for further details, as misuse or failure to follow the instructions makes this warranty void. In the event of service or advice being needed, please contact Electrical Home-Aids Pty. Limited, Level 1, Building 3, Brandon Office Park, 530 Springvale Road, Glen Waverley Victoria 3150, or on 1800 815 270 (AUS) or 0800 282 288 (NZ), Monday Friday 9am-5pm EST. The decision to repair or replace the cleaner is at the sole discretion of Electrical Home-Aids Pty. Limited. If Electrical Home-Aids Pty. Limited decide to repair or replace the cleaner, it will do so at its own cost. Hoover Floorcare is unable to accept responsibility under this warranty for any repair work not carried out by an authorised Hoover Service Agent or from the use of non-genuine parts.
If any part is no longer available or manufactured, Hoover Floorcare will replace it with a genuine functional replacement part. This warranty does not apply to the cost of replacing any parts of the product due to normal wear and tear, alterations, improper installation, physical abuse, misuse or accidental damage. Any transportation costs involved in the repair of defective parts shall be borne by the claimant. If proof of purchase cannot be provided at the time of a warranty claim or service, any work carried out on the cleaner is chargeable. The repair or replacement of the cleaner under this warranty does not extend the original period of warranty. The benefits conferred by this warranty are in addition to all other rights and remedies in respect of the product as outlined under the Competition and Consumer Act and other State and Territory laws. “Our goods come with guarantees that cannot be excluded in the Australian Consumer Law. You are entitled to a replacement or refund for a major failure and for compensation for any other reasonably foreseeable loss or damage. You are also entitled to have the goods repaired or replaced if the goods fail to be of acceptable quality and the failure does not amount to a major failure.”
Register warranty online:
www.godfreys.com.au
www.godfreys.co.nz
Customer Support & Service Hotline
AUS: 1800 815 270
NZ: 0800 282 288