Makita DVC260 Cordless Backpack Vacuum Cleaner Instruction Manual

Instruction Manual


WARNING
- This machine is not intended for use by persons including children with reduced physical, sensory or mental capabilities, or lack of experience and knowledge.
- Children should be supervised to ensure that they do not play with the cleaner.
- See the chapter “SPECIFICATIONS” for the type reference of the battery.
- See the section “Installing or removing battery cartridge” for how to remove or install the battery.
- When disposing of the battery cartridge, remove it from the tool and dispose of it in a safe place. Follow your local regulations relating to the disposal of batteries.
- If the tool is not used for a long period of time, the battery must be removed from the tool.
- Do not short the battery cartridge.
- See the chapter “MAINTENANCE” for the appropriate details of precautions during user maintenance.
SPECIFICATIONS
| Model: | DVC260 | |
| Capacity | Filter bag | 2.0 L |
| Dust bag | 1.5 L | |
| Maximum air volume | With hose 028 mm | 1.5 m3/min |
| With hose 038 mm | 1.8 rthmin | |
| Dimensions (L x W x I-1) (excluding the harness) |
230 mm x 152 mm x 373 mm | |
| Rated voltage | D.C. 36 V | |
| Net weight (Vacuum cleaner type) |
3.8 – 4.3 kg | |
- Due to our continuing program of research and development, the specifications herein are subject to change without notice.
- Specifications and battery cartridges may differ from country to country.
- The weight does not include accessories but battery cartridge(s). The lightest and heaviest combined weight of the appliance and battery cartridge(s) are shown in the table.
Applicable battery cartridge and charger
| Battery cartridge | BL1815N / BL1820B / BL1830B / BL1840B / BL1850B / BL1860B |
| Charger | DC18RC / DC18RD / DC18RE / DC18SD / DC18SE / DC18SF /DC18SH |
- Some of the battery cartridges and chargers listed above may not be available depending on your region of residence.

Symbols
The followings show the symbols which may be used for the equipment. Be sure that you understand their meaning before use.
| Read the instruction manual. | |
| Take particular care and attention. | |
| Only for EU countries Due to the presence of hazardous components in the equipment, waste electrical and electronic equipment, accumulators and batteries may have a negative impact on the environment and human health. Do not dispose of electrical and electronic appliances or batteries with household waste! In accordance with the European Directive on waste electrical and electronic equipment and on accumulators and batteries and waste accumulators and batteries, as well as their adaptation to national law, waste electrical equipment, batteries, and accumulators should be stored separately and delivered to a separate collection point for municipal waste, operating in accordance with the regulations on environmental protection. This is indicated by the symbol of the crossed-out wheeled bin placed on the equipment. |


Intended use
The tool is intended for collecting dry dust. The tool is suitable for commercial use, for example in hotels, schools, hospitals, factories, shops, offices and rental businesses.
Noise
The typical A-weighted noise level determined accord-ing to IEC60335-2-69, IEC60704-2-1: Sound pressure level (LpA) : 70 dB(A) or less Uncertainty (K) : 2.5 dB(A) The noise level under working may exceed 80 dB (A).
Vibration
The vibration total value (tri-axial vector sum) deter-mined according to IEC60335-2-69: Work mode: operation without load Vibration emission (ah) : 2.5 m/s2 or less Uncertainty (K) : 1.5 m/s2
NOTE: The declared vibration total value(s) has been measured in accordance with a standard test method and may be used for comparing one tool with another.
NOTE: The declared vibration total value(s) may also be used in a preliminary assessment of exposure.
EC Declaration of Conformity
For European countries only
The EC declaration of conformity is included as Annex A to this instruction manual.
SAFETY WARNINGS
Cordless vacuum cleaner safety warnings
WARNING: IMPORTANT! READ CAREFULLY all safety warnings and all instructions BEFORE USE. Failure to follow the warnings and instructions may result in electric shock, fire, and/or serious injury.
- Before use, make sure that this cleaner must be used by people who have been adequately instructed on the use of this cleaner.
- Do not use the cleaner without the filter. Replace a damaged filter immediately.
- Do not attempt to pick up flammable materials, fireworks, lighted cigarettes, hot ashes, hot metal chips, sharp materials such as razors, needles, broken glass or the like.
- NEVER USE THE CLEANER IN THE VICINITY OF GASOLINE, GAS, PAINT, ADHESIVES, OR OTHER HIGHLY EXPLOSIVE SUBSTANCES. The switch emits sparks when turned ON and OFF. And so does the motor commutator during operation. A dangerous explosion may result.
- This cleaner is not suitable for picking up hazardous dust.
- Never vacuum up toxic, carcinogenic, combustible, or other hazardous materials such as asbestos, arsenic, barium, beryllium, lead, pesticides, or other health-endangering materials.
- Never use the cleaner outdoors in the rain.
- For Finland, this machine is not to be used outdoors at low temperature.
- Do not use close-to-heat sources (stoves, etc.).
- Do not block cooling vents. These vents permit cooling of the motor. The blockage should be carefully avoided otherwise the motor will burn out from lack of ventilation.
- Keep proper footing and balance at all times.
- Do not fold, tug or step on the hose.
- Stop the cleaner immediately if you notice poor performance or anything abnormal during operation.
- DISCONNECT THE BATTERIES. When not in use, before servicing, and when changing accessories.
- Clean and service the cleaner immediately after each use to keep it in tiptop operating
- MAINTAIN THE CLEANER WITH CARE. Keep the cleaner clean for better and safer performance. Follow instructions for changing Keep handles dry, clean, and free from oil and grease.
- CHECK DAMAGED PARTS. Before further use of the cleaner, a guard or other part that is damaged should be carefully checked to determine that it will operate properly and perform its intended function. Check for alignment of moving parts, binding of moving parts, breakage of parts, mounting, and any other conditions that may affect its operation. A guard or other part that is damaged should be properly repaired or replaced by an authorized service center unless otherwise indicated elsewhere in this instruction manual. Have defective switches replaced by authorized service cen Don’t use the cleaner if the switch does not turn it on and off.
- REPLACEMENT PARTS. When servicing, use only identical replacement parts.
- When not in use, always store the cleaner indoors.
- Be kind to your cleaner. Rough handling can cause breakage of even the most sturdily built
- Do not attempt to clean the exterior or interior with benzine, thinner or cleaning chemicals. Cracks and discoloration may be caused.
- Do not use cleaner in an enclosed space where flammable, explosive or toxic vapors are given off by oil-base paint, paint thinner, gasoline, some moth-proofing substances, etc., or in areas where flammable dust is present.
- Do not operate the cleaner while under the influence of drugs or alcohol.
- As a basic rule of safety, use safety goggles or safety glasses with side shields.
- Use a dust mask in dusty work conditions.
- This machine is not intended for use by per sons including children with reduced physical, sensory or mental capabilities, or lack of expe rience and knowledge.
- Children should be supervised to ensure that they do not play with the cleaner.
- Never handle battery(ies) and cleaner with wet hands.
- Use extreme caution when cleaning on stairs.
- Do not use the cleaner as a stool or work The machine may fall down and may result in personal injury.
Battery tool use and care
- Recharge only with the charger specified by the manufacturer. A charger that is suitable for one type of battery pack may create a risk of fire when used with another battery pack.
- Use power tools only with specifically designated battery packs. Use of any other battery packs may create a risk of injury and fire.
- When the battery pack is not in use, keep it away from other metal objects, like paper clips, coins, keys, nails, screws, or other small metal objects, that can make a connection from one terminal to another. Shorting the battery terminals together may cause burns or a fire.
- Under abusive conditions, liquid may be ejected from the battery; avoid contact. If contact acci dentally occurs, flush with water. If liquid contacts eyes, additionally seek medical help. Liquid ejected from the battery may cause irritation or burns.
- Do not use a battery pack or tool that is dam aged or modified. Damaged or modified batteries may exhibit unpredictable behavior resulting in fire, explosion or risk of injury.
- Do not expose a battery pack or tool to fire or excessive temperature. Exposure to fire or temperature above 130 °C may cause an explosion.
- Follow all charging instructions and do not charge the battery pack or tool outside the temperature range specified in the instruc Charging improperly or at temperatures outside the specified range may damage the battery and increase the risk of fire.
- Do not use a corded power supply such as a bat tery adapter or portable power pack with this The cable of such power supply may hinder the operation and result in personal injury.
Service
- Have your power tool serviced by a qualified repair person using only identical replacement This will ensure that the safety of the power tool is maintained.
- Follow instructions for lubricating and changing accessories.
- Keep handles dry, clean, and free from oil and
Important safety instructions for battery cartridge
- Before using battery cartridge, read all instructions and cautionary markings on (1) battery charger, (2) battery, and (3) product using battery.
- Do not disassemble or tamper with the battery cartridge. It may result in a fire, excessive heat, or explosion.
- If operating time has become excessively shorter, stop operating immediately. It may result in a risk of overheating, possible burns and even an explosion.
- If electrolyte gets into your eyes, rinse them out with clear water and seek medical attention right away. It may result in loss of your eyesight.
- Do not short the battery cartridge:
Do not touch the terminals with any conductive material.
Avoid storing battery cartridges in a container with other metal objects such as nails, coins, etc.
Do not expose the battery cartridge to water or rain. - A battery short can cause a large current flow, overheating, possible burns, and even a breakdown.
- Do not store and use the tool and battery cartridge in locations where the temperature may reach or exceed 50 °C (122 °F).
- Do not incinerate the battery cartridge even if it is severely damaged or is completely worn out. The battery cartridge can explode in a fire.
- Do not nail, cut, crush, throw, drop the battery cartridge, or hit against a hard object to the battery cartridge. Such conduct may result in a fire, excessive heat, or explosion.
- Do not use a damaged battery.
The contained lithium-ion batteries are subject to the Dangerous Goods Legislation require For commercial transports e.g. by third parties, forwarding agents, the special requirements on packaging and labeling must be observed. For the preparation of the item being shipped, consulting an expert for hazardous material is required. Please also observe possibly more detailed national regulations. Tape or mask off open contacts and pack up the battery in such a manner that it cannot move around in the packaging. - When disposing of the battery cartridge, remove it from the tool and dispose of it in a safe place. Follow your local regulations relating to the disposal of batteries.
- Use the batteries only with the products specified by Makita. Installing the batteries to non-compliant products may result in a fire, excessive heat, explosion, or leak of electrolyte.
- If the tool is not used for a long period of time, the battery must be removed from the tool.
- During and after use, the battery cartridge may take on heat which can cause burns or low-temperature burns. Pay attention to the handling of hot battery cartridges.
- Do not touch the terminal of the tool immediately after use as it may get hot enough to cause burns.
- Do not allow chips, dust, or soil stuck into the terminals, holes, and grooves of the battery cartridge. It may result in poor performance or breakdown of the tool or battery cartridge.
- Unless the tool supports the use of near high-voltage electrical power lines, do not use the battery cartridge near high-voltage electrical power lines.
It may result in a malfunction or breakdown of the tool or battery cartridge. - Keep the battery away from children.
SAVE THESE INSTRUCTIONS.
Use of non-genuine Makita batteries, or batteries that have been altered, may result in the battery bursting causing fires, personal injury, and damage. It will also void the Makita warranty for the Makita tool and charger.
Tips for maintaining maximum battery life
- Charge the battery cartridge before completely discharged. Always stop tool operation and charge the battery cartridge when you notice less tool power.
- Never recharge a fully charged battery cartridge. Overcharging shortens the battery service life.
- Charge the battery cartridge with room temperature at 10 °C – 40 °C (50 °F – 104 °F). Let a hot battery cartridge cool down before charging it.
- When not using the battery cartridge, remove it from the tool or the charger.
- Charge the battery cartridge if you do not use it for a long period (more than six months).
FUNCTIONAL DESCRIPTION
Installing or removing battery cartridge

To remove the battery cartridge, slide it from the tool while sliding the button on the front of the cartridge.
To install the battery cartridge, align the tongue on the battery cartridge with the groove in the housing and slip it into place. Insert it all the way until it locks in place with a little click. If you can see the red indicator as shown in the figure, it is not locked completely.
Tool/battery protection system
The tool is equipped with a tool/battery protection system. This system automatically cuts off power to the motor to extend tool and battery life. The tool will automatically stop during operation if the tool or battery is placed under one of the following conditions.
Overload protection
When the tool is operated in a manner that causes it to draw an abnormally high current, the tool automatically stops without any indication. In this situation, turn the tool off and stop the application that caused the tool to become overloaded. Then turn the tool on to restart.
Overheat protection
When the tool is overheated, the tool stops automatically.
Let the tool cool down before turning the tool on again.
Overdischarge protection
When the battery capacity becomes low, the tool stops automatically. If the product does not operate even when the switches are operated, remove the batteries from the tool and charge the batteries.
Indicating the remaining battery capacity
Only for battery cartridges with the indicator

Press the check button on the battery cartridge to indicate the remaining battery capacity. The indicator lamps light up for a few seconds.

NOTE: Depending on the conditions of use and the ambient temperature, the indication may differ slightly from the actual capacity.
NOTE: The first (far left) indicator lamp will blink when the battery protection system works.
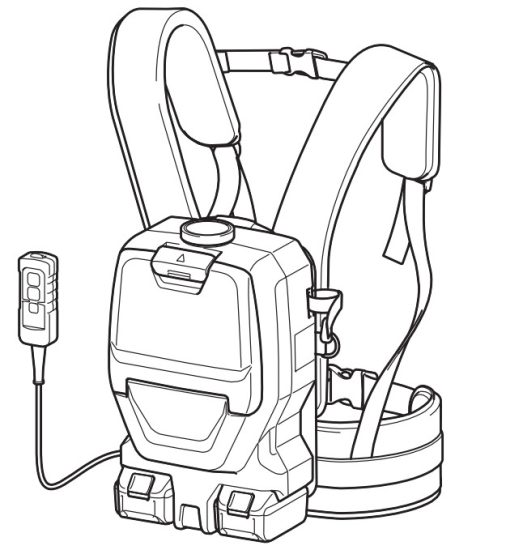
Switch box position
The switch box can be hooked on either side of the lower belt. Arrange the cord so that the switch box comes to your desired side. To prevent the cord from being damaged, pass the cord through the hook as illustrated.

Adjusting belts
The tightness of the shoulder belts, upper and lower belts can be adjusted. Put your arms through the shoulder belts first then fasten the upper and lower belts.
To tighten, pull the end of the strap as illustrated. To loosen, pull up the end of the fastener.
Shoulder belts

Upper belt

Lower belt

Carrying hook
Always grab the carrying hook when handling the vacuum cleaner body.

Extension wand
For vacuum cleaner type only
The length of the wand can be adjusted. Loosen the ring on the wand and adjust the wand length. Tighten the ring at your desired length.

Switch action
To start vacuuming, press


LED light
LED light is installed in the head of the switch box to ease the operations in dark places. Press

NOTE: The LED light is automatically turned off when the vacuum cleaner is not operated for more than 10 minutes.
NOTE: The vacuum cleaner will automatically switch off and the LED light flashes when the vacuum cleaner is overheated due to the reduced airflow into the machine caused by clogged hose, pipe, filter, or other reasons.
Hose band
Hose band can be used for holding the hose or free nozzle.
To secure the hose to the vacuum cleaner body, pass the hose band through the slot on the body. You can attach the hose band on either side.\

To hold the free nozzle on the lower belt, pass the hose band through the loop on the lower belt.

Hose hook
For vacuum cleaner type only
When you suspend the operation, the hook on the hose can be used for hanging the wand on the lower belt.

ASSEMBLY
Assembling hose
Insert the hose cuff into the vacuum cleaner body and turn it clockwise.
► 1. Hose cuff 2. Vacuum cleaner body
Assembling wand and nozzle
For vacuum cleaner type only
Connect the nozzle to the extension wand. After that, shoulder the vacuum cleaner body then connect the hose with the extension wand.
Connecting extension wand and nozzle
► 1. Extension wand 2. Free nozzle 3. T-shape nozzle
Connecting hose and extension wand

► 1. Hose 2. Extension wand 3. Free nozzle
NOTE: The free nozzle can be attached to the hose directly.
Connecting the tool
For dust extraction type only
Connect the front cuff on the hose with the tool’s extraction outlet.

► 1. Front cuff 2. Extraction outlet
Always use a suitable front cuff. The front cuff can be detached by turning it counterclockwise while holding the hose. When connecting, make sure that the front cuff is securely screwed in the hose.

► 1. Hose 2. Front cuff
When using the front cuff 24, insert it to the front cuff 22 that is connected to the hose.

► 1. Front cuff 22 2. Front cuff 24
Attaching bent pipe assembly
For dust extraction type, use the optional bent pipe assembly for vacuum cleaning. To attach the bent pipe assembly, unscrew the front cuff from the hose and fasten the sleeve of the bent pipe assembly onto the hose.
► 1. Hose 2. Bent pipe assembly 3. Sleeve
Installing filter bag
Always use the vacuum cleaner with the filter bag properly installed. Otherwise, the vacuumed dust or particles may be exhausted from the cleaner and they may cause respiratory disease to the operator.
NOTICE: When the filter bag is already full, replace it with a new one. Continuous use with the filter bag full results in reduced suction power.
- Unlock the latch by lifting the bottom side. Push the grooved area to lift the front latching side. Pull the latch to open the lid.
- Insert the filter bag into the slit on the upper side of the room as illustrated.
When using the dust bag (optional accessory), insert the brim of the dust bag into the slit. - Align the hole of the filter bag with the hose cuff and push the cardboard portion to the end. Make sure that the rubber ring on the filter bag goes over the rim of the hose cuff.


OPERATION
- Shoulder the vacuum cleaner body and fasten upper and lower belts. Adjust the tightness as necessary.
- Press
- Replace the filter bag when it becomes full. Open the lid and take out the filter bag. Pull the strip on the side of the opening to shut the filter bag and dispose of the filter bag in whole.
When using a dust bag (optional accessory), take out the dust bag and dispose of the dust by releasing the latch.
NOTICE: Periodically check the filter bag if it is full. Continuous use with the filter bag full results in reduced suction power.
NOTICE: Do not use a used filter bag. The filter bag is designed for single use. If you want to use the bag repeatedly, use a dust bag (optional accessory).


MAINTENANCE
CAUTION: Always be sure that the tool is switched off and the battery cartridge is removed before attempting to perform inspection or maintenance.
NOTICE: Never use gasoline, benzene, thinner, alcohol, or the like. Discoloration, deformation, or cracks may result.
Cleaning the HEPA filter
CAUTION: Do not use the vacuum cleaner without a filter or continue to use the dirty or damaged filters. Vacuumed dust or particles may be exhausted from the cleaner and they may cause respiratory disease to the operator.
NOTICE: To keep optimum suction power and clean exhaust, clean the filter periodically. If enough suction power is not obtained even after the cleaning, replace the filter with a new one.
NOTICE: To prevent the filter from being damaged, do not use the following tools and similar items for cleaning :
Air duster
High-pressure washer
Tools made of hard materials such as a metallic brush
- Open the lid and take out the filter bag. Release the hook on the filter and remove it from the vacuum cleaner body.
- Beat the dust off from the filter. The filter can be washed with water. Rinse away the dust and particles on the filter every 1 or 2 months. After that, dry the filter completely in a shaded and well-ventilated place to prevent unpleasant odor or malfunctions.
- To install the filter, insert the side without the flap into the holder then push the filter downward until the flap is secured by the rib.

Cleaning the dust bag
Regularly clean the dust bag with soap and water. Turn the dust bag inside out and remove the sticky dust.
Wash lightly by hand and rinse well with water. Dry completely before installing to the vacuum cleaner.

NOTICE: Wet dust bag lowers the vacuuming performance as well as the life of the motor.
To maintain product SAFETY and RELIABILITY, repairs, any other maintenance or adjustment should be performed by Makita Authorized or Factory Service Centers, always using Makita replacement parts.
OPTIONAL ACCESSORIES
If you need any assistance for more details regarding these accessories, ask your local Makita Service Center.
| • Hose (for vacuum cleaner type) | • Round brush |
| • Hose (for dust extraction type) | • Straight pipe |
| • Extension wand | • Bent pipe |
| • Free nozzle | • Filter bag |
| • T-shape nozzle | • Dust bag |
| • Nozzle for carpet | • Front cuff |
| • Corner nozzle | • HEPA filter |
| • Nozzle assembly | • Makita genuine battery and charger |
| • Shelf brush | |
NOTE: Some items in the list may be included in the tool package as standard accessories. They may differ from country to country.
Makita Europe N.V.
Jan-Baptist Vinkstraat 2,
3070 Kortenberg, Belgium
Makita Corporation
3-11-8, Sumiyoshi-cho,
Anjo, Aichi 446-8502 Japan
www.makita.com
885492H228
20201222