Honeywell 8690i Mini Wearable Mobile Computer User Guide


Honeywell 8690i Mini Wearable Mobile Computer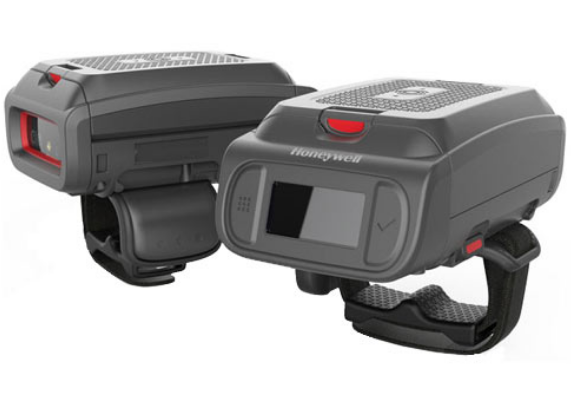

Overview

Note: The battery must be fully charged before the first use. An MB4-BAT-SCN07 or an MB4-SCN07 Charging Station must be purchased separately.
Attach the Scanner to Your Hand

Pull the finger strap to secure it and tuck the excess strap length into the finger guide channel.

Right or Left Handed Operation
To release the finger trigger, turn over the scanner. Slide the latch toward the user window to release the finger trigger. Turn the finger strap around and snap it into place to change the operation to the correct hand.

Power Up the Scanner
Press the trigger to power up the scanner. The battery, WiFi, and Bluetooth status appear in the window.
User Window

The user window displays prompts for using the scanner in your environment. The buttons to the left and right of the window are used to scroll through the windows or to enter responses to screen prompts.
- Press both the right and left buttons at the same time to view the WiFi, Bluetooth, and battery status.
- Press and hold the left button for 6 seconds to restart the scanner.
Wrist Position When Scanning

Warning: Do not stare directly into the laser beam.
How to Scan a Bar Code
The 8690i scanner has a view finder that projects a bright aim-ing pattern. This aiming pattern should be centered over the bar code, but it can be positioned in any direction for a good read.
Connect the Scanner via Bluetooth®Pair with a PC or Laptop Bluetooth Serial Port: Host Reconnect Mode
The 8690i can pair with host Bluetooth devices such as personal computers, laptops, and tablets. In this mode, the host will continually attempt to connect with the scanner. If the scanner and the host become disconnected, the host will manage the reconnection.
- Scan the Host Reconnect Mode bar code, below.
- Set your host device so it searches for other Bluetooth devices. (Refer to your host device’s User’s Guide for pairing instructions.)
- Once your host device has located the scanner, select the 8690i scanner name from the list displayed.
Note: Refer to the 8690i User’s Guide if your host device displays a PIN.
The Bluetooth symbol appears in the scanner window when the scanner pairs with a host.
Pair with a PC or Laptop Bluetooth Serial Port: Scanner Reconnect Mode
In this mode, the scanner will continually attempt to connect with the host. If the scanner and the host become disconnected, the scanner will manage the reconnection.
- Scan the Scanner Reconnect Mode bar code below.
- Set your host device so it searches for other Bluetooth devices. (Refer to your host device’s User’s Guide for pairing instructions.)
- Once your host device has located the scanner, select the 8690i scanner name from the list displayed.
Note: Refer to the 8690i User’s Guide if your host device displays a PIN.
The Bluetooth symbol appears in the scanner window when the scanner pairs with a host.
Pair with a PC or Laptop Bluetooth: HID Keyboard Mode
In this mode, the 8690i pairs with a Bluetooth device using a HID keyboard.
- Scan the Bluetooth HID Keyboard Connect bar code below.
- Set your host device so it searches for other Bluetooth devices. (Refer to your host device’s User’s Guide for pairing instructions.)
- Once your host device has located the scanner, select the 8690i scanner name from the list displayed.
Note: Refer to the 8690i User’s Guide if your host device displays a PIN.
The Bluetooth symbol appears in the scanner window when the scanner pairs with a host.
Disconnect from the Host
Once your scanner has been connected to a host, you must dis-connect it in order to communicate with a different device. Scan the Bluetooth Disconnect bar code to unlink the scanner from the currently linked host.
Pair with an Android™ Mobile Device Tap and Pair
You can pair your Android™ phone with the 8690i by touching the devices together.
- Make sure the NFC setting is On in your phone.
- Touch the Android phone to the scanner.
- The phone recognizes the scanner and prompts you to pair.
- Verify the pairing of the 8690i in your phone’s Bluetooth settings.
Pair with an Android, Apple™ or Windows® Mobile Device
The 8690i can pair with Android, Apple, and Windows mobile devices, excluding Windows CE and Mobile.
- Set your mobile device so it searches for other Bluetooth devices. (Refer to your mobile device’s User’s Guide for pair-ing instructions.)
- Scan the Bluetooth HID Keyboard Connect bar code below.
- On the mobile device, the 8690i scanner is shown as a keyboard. Click on it to pair.
The Bluetooth symbol appears in the scanner window when the scanner pairs with a mobile device.
Pair with a Honeywell Vehicle Mount Computer
The 8690i can pair with Honeywell vehicle mount computers, such as the Thor VM1 or VM2, or with Tecton mobile computers
- Scan the Bluetooth HID Keyboard Disconnect bar code below.
- Use the 8690i to scan the EZPairing bar code that is either supplied with the device, attached to the device, or displayed on the screen. The EZPairing bar code begins with {FNC3}LnkB, followed by 10 digits, like the sample below.
The Bluetooth symbol appears in the user window when the 8690i pairs with a host.
Reset Custom Defaults
If you want the custom default settings restored to your 8690i, scan the Activate Custom Defaults bar code below. This is the recommended default bar code for most users. It resets the 8690i to the custom default settings. If there are no custom defaults, it resets the 8690i to the factory default settings (Blue-tooth HID Keyboard Emulation). Any settings that have not been specified through the custom defaults are defaulted to the fac-tory default settings.
Activate Custom Defaults
Note: Scanning the Defaults bar code also causes both the 8690i and the host to perform a reset and become unlinked. You must relink (pair) the 8690i to the host.
Replace the Battery
Note: The battery should be replaced in an environment free from excessive dust or particulate to avoid an internal buildup of dust in the unit. When the battery is low, the 8690i beeps and vibrates and the window shows a Battery Low warning. You can also press both the right and left buttons at any time to view the battery’s charge status. To replace the battery, squeeze the battery latch and lift up on the battery.

Replace the battery by snapping it in to the scanner.
Support
To search our knowledge base for a solution or to log into the Technical Support portal and report a problem, go to www.hsmcontactsupport.com.
User Documentation
For the user guide and other documentation, go to www.honeywellaidc.com.
Limited Warranty
For warranty information, go to www.honeywellaidc.com and click Resources > Product Warranty. Patents For patent information, see www.hsmpats.com.www.hsmpats.com.
Disclaimer
Honeywell International Inc. (“HII”) reserves the right to make changes in specifications and other information contained in this document without prior notice, and the reader should in all cases consult HII to determine whether any such changes have been made. The information in this publication does not repre-sent a commitment on the part of HII. HII shall not be liable for technical or editorial errors or omis-sions contained herein; nor for incidental or consequential damages resulting from the furnishing, performance, or use of this material. HII disclaims all responsibility for the selection and use of software and/or hardware to achieve intended results. This document contains proprietary information that is pro-tected by copyright. All rights are reserved. No part of this docu-ment may be photocopied, reproduced, or translated into another language without the prior written consent of HII. Copyright2020 Honeywell International Inc. All rights reserved. Microsoft® Windows®, Windows NT®, Windows 2000, Windows ME, Windows XP, and the Windows logo are trademarks or regis-tered trademarks of Microsoft Corporation. The Bluetooth® word mark and logos are owned by Bluetooth SIG, Inc. Android™ is a trademark of Google Inc. Apple is a trademark of Apple Inc., registered in the U.S. and other countries.
FCC Part 15 Subpart B Class B
This device complies with part 15 of the FCC Rules. Operation is subject to the following two conditions
- This device may not cause harmful interference.
- This device must accept any interference received, including interference that may cause undesired operation.
This equipment has been tested and found to comply with the limits for a Class B digital device pursuant to part 15 of the FCC Rules. These limits are designed to provide reasonable protection against harmful interference in a residential installation. This equipment generates, uses, and can radiate radio frequency energy and, if not installed and used in accordance with the instructions, may cause harmful interference to radio communications. However, there is no guarantee that interference will not occur in a particular installation. If this equipment does cause harmful interference to radio or television reception, which can be determined by turning the equipment off and on, the user is encouraged to try to correct the interference by one or more of the following measures:
- Reorient or relocate the receiving antenna.
- Increase the separation between the equipment and receiver.
- Connect the equipment into an outlet on a circuit different from that to which the receiver is connected.
- Consult the dealer or an experienced radio or television technician for help.
If necessary, the user should consult the dealer or an experienced radio/television technician for additional suggestions. Honeywell is not responsible for any radio or television interference caused by unauthorized modifications of this equipment or the substitution or attachment of connecting cables and equipment other than those specified by Honeywell. The correction is the responsibility of the user.
Caution: Any changes or modifications made to this equipment not expressly approved by Honeywell International Inc. may void the authorization to operate this equipment.
Canadian Compliance
This Class B digital apparatus complies with Canadian RSS-247. Operation is subject to the following conditions:
- This device may not cause harmful interference.
- This device must accept any interference received, including interference that may cause undesired operation.
RF Radiation Exposure Statement
The radiated output power of the wireless device is below the Industry Canada (IC) radio frequency exposure limits. The wireless device should be used in accordancewith theinstructions in theUser Guide. This device is compliant with the IC Specific Absorption Rate (“SAR”) limits when operated as a portable device.
RF Exposure
The equipment complies with FCC RF exposure limits set forth for an uncontrolled environment. The equipment must not be co-located or operating in conjunction with any other antenna or transmitter. Use only shielded data cables with this system. Thisunit hasbeen tested withcablesless than 3 meters. Cablesgreater than 3 meters may not meetclass B performance.