Panasonic FV-01VCN1 WhisperAir Repair Air Purifier Instruction Manual


Panasonic FV-01VCN1 WhisperAir Repair Air Purifier

READ AND SAVE THESE INSTRUCTIONS
Thank you for purchasing this Panasonic product.
Please read these instructions carefully before attempting to install, operate or service the Panasonic product. Please carefully read the “GENERAL SAFETY INFORMATION”. Failure to comply with instructions could result in personal injury or property damage. Please explain to users how to operate and maintain the product after installation and this booklet should be presented to users. Please retain this booklet for future reference.
GENERAL SAFETY INFORMATION
For Your Safety
To reduce the risk of injury, loss of life, electric shock, fire, malfunction, and damage to equipment or property, always observe the following safety precautions.
Explanation of symbol word panels
The following symbol word panels are used to classify and describe the level of hazard, injury, and property damage caused when the denotation is disregarded and improper use is performed.
WARNING
Denotes a potential hazard that could result in serious injury or death.
CAUTION
Denotes a hazard that could result in minor injury.
The following symbols are used to classify and describe the type of instructions to be observed.


WARNING
To reduce the risk of fire, electric shock or injury to persons, observe the following:
- Use this unit only in the manner intended by the manufacturer. If you have any questions, contact the manufacturer.
- Before servicing or cleaning the unit, switch power off at service panel and lock the service disconnecting means to prevent power from being switched on accidentally.
- When the service disconnecting means cannot be locked, securely fasten a prominent warning device, such as a tag, to the service panel.
- Installation work and electrical wiring must be done by qualified person(s) in accordance with all applicable codes and standards, including fire-rated construction.
- When cutting or drilling into a wall or ceiling, do not damage electrical wiring and other hidden utilities.
- Install the unit at least 7.5 ft (2.3 m) above the floor.
- The product must be properly grounded.
- Do not install with a method which is not approved in the instructions.
- Do not disassemble the unit for repair. It may cause fire or electric shock.
CAUTION
- Follow all local electrical and safety codes, as well as the National Electrical Code (NEC) and the Occupational Safety and Health Act (OSHA).
- Make sure that the electric service supply voltage is AC 120 V 60 Hz.
- Protect the supply wiring from sharp edges, oil, grease, hot surfaces, chemicals or other objects.
- To reduce the chance of injury, make sure all parts are installed to manufacturer’s instructions.
- Do not install this product where the interior room temperature may exceed 104 °F (40 °C).
- Do not kink the supply wiring.
- Not for use in cooking area. (Fig. A)
- Inspection and maintenance by non-qualified persons is prohibited. May cause injury or electric shock.
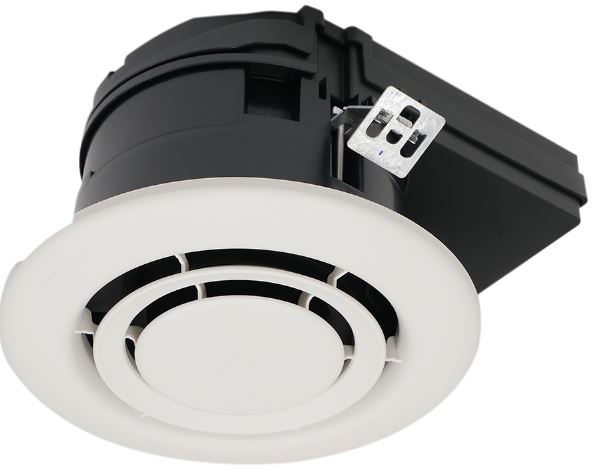
- If the grille is removed, do not press the service switch, it is for technical servicing purposes only. (Fig. B)

Note
While the product is operating, the LED light will be off. If the LED light is blinking, call the Panasonic Call Center for technical servicing.
DESCRIPTION AND INSTRUCTIONS FOR USE
This product uses a turbo fan driven by an AC motor. The motor is designed to have an extended service life with reduced energy consumption. The motor also incorporates a thermal-cutoff for safety. This product has a snapping quick removal type grille. This product uses a high capacity turbo fan developed to reduce the noise level. This product requires a power switch for the user to control the ON/OFF functions (see wiring diagram). nanoe™ X is the next generation of nanoe™ technology and is generated from moisture in the air that contains highly reactive components known as hydroxyl (OH) radicals, which are effective at suppressing pollutants and odors. Conditions for use:
- Room temperature: About 41 °F 104 °F (5 °C 40 °C)
- Relative humidity: About 30% 85%
- The actual effect differs according to the room condition and the method of use.
- This product is not a medical equipment.
UNPACKING
Unpack and carefully remove the unit from the packing case. Refer to the supplied accessories list to verify that all parts are present.
SUPPLIED ACCESSORIES
| Part Name | Appearance | Qty. |
| Installation instructions | 1 | |
| Limited warranty | 1 |


DIMENSIONS

| No. | Part name | Qty. | No. | Part name | Qty. |
| 1 | Junction cover | 1 | 7 | Frame | 1 |
| 2 | Electric case assy | 1 | 8 | nanoe™ X unit | 1 |
| 3 | Grille | 1 | 9 | Install plate | 2 |
| 4 | Motor | 1 | 10 | Install screw | 2 |
| 5 | Fan | 1 | 11 | LED Light | 1 |
| 6 | nanoe™ X cover | 1 |
WIRING DIAGRAM

INSTALLATION AND OPERATING REQUIREMENTS
- Install at a minimum 6 inches (152 mm) away from any wall to reduce dust or particle build up.
- Please wear personal protection equipment during installation (gloves, goggles, etc.).
- Install plates take up at most, 9 1/ 8 inches (233 mm). Make sure there is nothing that can be damaged around or above the unit inside the ceiling hole.
- Do not install in a bathroom with a bathtub and/or shower where it is exposed to high humidity.
- Install at least 5 feet (1.5 m) away from any ventilation fan.
- Do not install on a slanted ceiling. It may affect the performance of the nanoe™ X.
- Please use the template on the back cover to trace the hole size in the ceiling.
- This product is for residential and commercial use. Installing this product in a restroom with no shower and bathtub is permitted. In the case of residential bathrooms with a shower and/or bathtub, installation is not permitted due to high humidity.

INSTALLATION
- Make a Ø 6 inch (152 mm) hole in the ceiling and take out the conduit wires more than 15 ¾ inches (400 mm) from the ceiling. Do not attempt to install in an opening larger than 6 inches3/8
(161 mm) in diameter. - Pull the tab upwards to remove the grille.
- Remove the screw ST4X12 and slide to release the junction cover.
- Open one of the knock-out holes (two options) on the junction cover.
- Secure conduit or stress relief to the opened knock-out hole. Refer to the wiring diagram (page 4) and follow all local electrical safety codes as well as the National Electrical Code (NEC). Using UL approved wire nuts, connect the conduit wires to the unit wires.
- While pressing the install plates upwards and towards the body of the product, carefully insert the device vertically into the installation hole.
- Rotate the product inwards to fit properly onto the surface of the drywall. Once inside the hole, release the install plates.
- The install plates will position themselves onto the drywall.
- Rotate the product inwards to fit properly onto the surface of the drywall. Once inside the hole, release the install plates.
- Use a Phillips head screwdriver to tighten the screws clockwise into the device on the ceiling. As you tighten the install screws, the install plates will expand and fix themselves on the drywall.
CAUTION
Make sure the body of the product is secured to the ceiling. - Slant the grille and align to and hook on the protrusion and securely fit the grille until it clicks. Follow the instruction label on the grille.
- Make sure the grille is securely placed all around.
CAUTION
If the grille is not securely mounted and flush to the ceiling, it could cause injury if it were to fall off


MAINTENANCE (CLEANING)
WARNING
Disconnect power source before working on unit.
CAUTION
- Please wear gloves during the cleaning work.
- Do not use cleaning sprays, solvents or water near or inside the product.
- Do not immerse motor in water when cleaning.
- Do not soak grille or other resin parts in hot water over 140 °F (60 °C).
- Never use gasoline, benzene, thinner or any other such chemicals for cleaning the product.
This product only requires exterior cleaning. Removing the grille is not necessary. Please choose one method of cleaning from the two options below.
- Remove dust and dirt from grille body using a vacuum cleaner.
- Using a cloth dampened with kitchen detergent, remove any dirt from the grille body. Wipe dry with a clean cloth.


SPECIFICATIONS
| Rated Voltage [V] | Rated Frequency [Hz] | Air Volume [CFM] |
Noise [sones] |
Speed [rpm] |
Power Consumption [W] | Net weight [Lb (kg) ] |
| 120 | 60 | 9 | < 0.3 | 1510 | 4.0 | 3.1 (1.4) |
The performance data above was measured at 0 static pressure according to Panasonic standards.

PRODUCT SERVICE
Warning Concerning Removal of Covers. The unit shou ld be serviced by qualified technicians only. Your product is designed and manufactured to ensure a minimum of maintenance. Should your unit require service or parts, call Panasonic Call Center at 1-866-292-7299.
Panasonic Corporation of North America
Two Riverfront Plaza, Newark, NJ 07102
www.panasonic.com