Asus 4G-AX56 Dual Band 4G LTE Router User Guide
ASUS 4G-AX56 Dual Band 4G LTE Router User Guide

Package contents
- 4G-AX56
- Power adapter
- Ethernet cable
- Quick Start Guide
A quick look at 4G-AX56
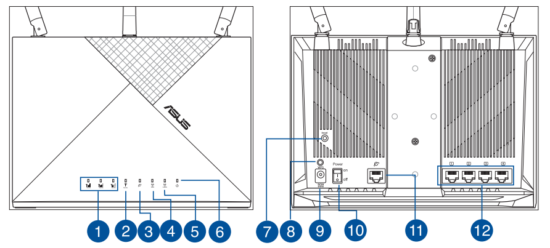

- Signal LEDs
- Mobile Broadband LED
- WAN (Internet) LED
- 5GHz LED
- 2.4GHz LED
- Power LED
- Reset button
- WPS button
- DCIN port
- Power On/Of
- WAN (Internet) port
- LAN ports 1 ~ 4
Position your 4G-AX56
For optimal wireless transmission between the wireless router and connected wireless devices, ensure that you:
- Place the wireless router in a centralized area for a maximum wireless coverage for the network devices.
- Keep the wireless router within the view of sight of a window or clearance, and away from metal or solid obstructions and direct sunlight.
- Keep the wireless router away from conventional radio emission devices operating within the 2.4GHz spectrum. Devices such as Bluetooth, cordless phone, transformer, heavy duty motors, fluorescent lights, microwave oven, refrigerators, and other industrial equipment may interfere with the smooth transmission of 2.4GHz WiFi.
- Always update to the latest firmware. Visit the ASUS website at http://www.asus.com to get the latest firmware updates.
- Orient the antennas as shown in the drawing below.

NOTES
Use only the adapter that came with your package. Using other adapters may damage the device.
Specifications
| DC Power adapter | DC Output: +12V with 2A current | ||
| Operating Temperature | 0~40o C | Storage | 40~70o C |
| Operating Humidity | 10~95% | Storage | 5~95% |
Insert a Nano SIM card into 4G-AX56
- Open the Nano SIM cover at the bottom of 4G-AX56 to reveal the Nano SIM slot.
- Pop open the Nano SIM tray by dipping either a paper clip or a SIM eject tool into the hole beside the tray.
- Place your Nano SIM card onto the tray.
- Slide the tray back into the Nano SIM card slot, and close the cover.

Set up your 4G-AX56

- Insert a Nano SIM card into 4GAX56.
- Plug the power adapter into the DCIN port and switch ON 4G-AX56. Wait for a couple of minutes for 4G-AX56 to become ready.
- Connect to 4G-AX56 via either wired or wireless connection.
- [Wired Connection] Connect an Ethernet cable between your computer and any of the yellow Ethernet ports at the back of 4G-AX56.
- [Wireless Connection] Connect to the default SSID as indicated at the back of 4G-AX56.
- Once the Mobile broadband LED lights up, open “router.asus.com” with your desirable web browser. You will be redirected to the ASUS Quick Internet Setup Wizard. Follow the onscreen instructions to complete the setup process.
- For the convenience of router management, you can consider to install the handy ASUS router app.
NOTES:
- Ensure that the Mobile Broadband LED lights up before configuring 4G-AX56 with Mobile Broadband. Turn off the 4GAX56 and check the fitting of your Nano SIM card if otherwise.
- 4G-AX56 can be configured to accept either Mobile Broadband or Ethernet WAN source. Load Balance and Fail Over is also supported between the two sources if both sources are available.
- 4G-AX56 automatically detects the ISP connection type at default state. During the QIS (Quick Internet Setup) process, you may be asked to key in the PIN code of the Nano SIM card installed and the APN (Access Point Name) information of the mobile carrier in order to receive connection.
Mobile Broadband LED indications
| LED | Indications | |
| Mobile Broadband LED | White | Connected to 4G mobile broadband |
| Cyan | Connected to 3G mobile broadband | |
| Red | Cannot conned to mobile broadband | |
| Off | No Nano SIM card detected | |
| WAN (Internet) LED | White | Wired broadband is online |
| Red | Wired broadband is offline | |
| Power | White | 4G-AX56 is powered on |
| Off | 4G-AX56 is powered off | |
| 5GHz | White | 5GHz WiFi is enabled |
| Off | 5GHz WiFi is disabled | |
| 2.46Hz | White | 2.46Hz VViFi is enabled |
| Off | 2.46Hz WiFi is disabled |
Was this manual helpful?
Thank you for your feedback!