Motorola Curve Series Two-Way Radio User Guide


SOLUTIONS
QUICK REFERENCE GUIDE
CURVE SERIES TWO-WAY RADIO
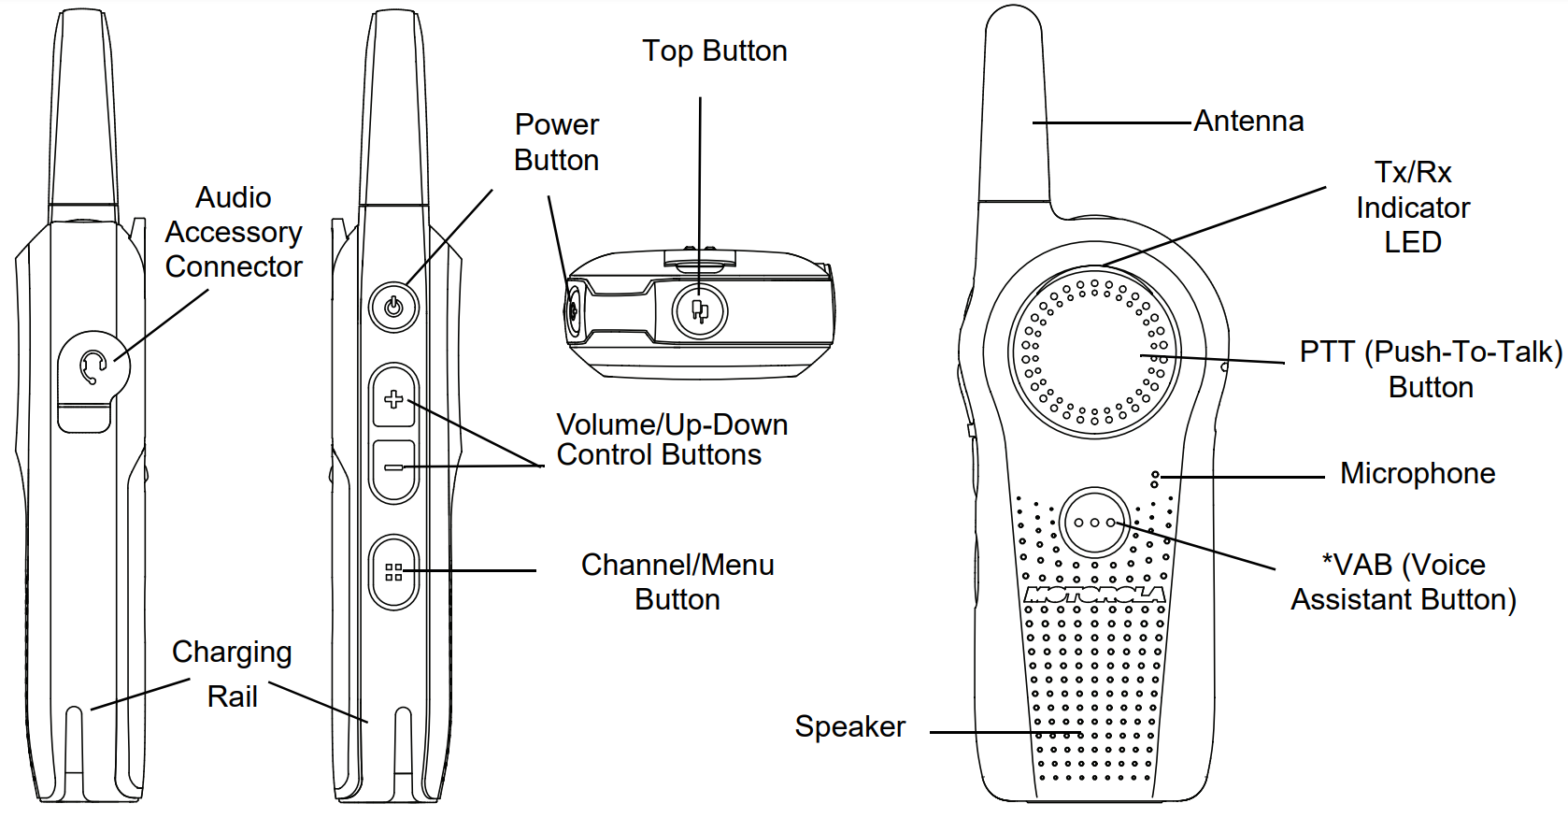

* Voice Assistant button enables you to initiate the connection through WiFi. Hold the VA button to log in or out, send a voice message, or trigger a call.
Congratulations on your new Digital Radio!
Fully charge the battery before first use.
Refer to http://www.motorolasolutions.com/curve for information on product details, brochures, CPS software, and approved accessories.
A GETTING STARTED
INSTALLING THE BATTERY
- Slide the battery latch to unlock position
- Align the battery contacts with the tabs in the battery compartment. Insert and fit the battery until it locks in place.
- Put the battery door back on the radio. Slide the latch to the lock position


2. CHARGING THE BATTERY
- Connect the power supply to the drop-in charger tray or a power cord to the multi-unit charger (MUC).
- Insert the radio into the tray. Ensure that the lateral battery slots are inserted in the tray rails.
- The charger LED flashes a few times to indicate the current battery charge when the radio is inserted into the charger.
- Short press the Power button to check the battery status on the device.
3. TURNING THE RADIO ON AND OFF
- To turn on the radio, press the Power button for around 3 seconds until the radio plays the power-up tone and the radio Transmit/ Receive (Tx/Rx) Indicator LED begins to blink.
- To turn the radio off, press and hold the Power button until the power down tone is heard and the radio Tx/Rx Indicator LED turns off. Tip: Every time the radio powers on, a voice prompt announces the current channel and battery level.
IMPORTANT!
NON-INTERFERENCE/PRIVACY FEATURE
The Curve Series provides an easy way to ensure non-interference and improved private communications. Follow the following simple steps to select your own four-digit radio PROFILE ID Number (different from the default “0000”). Make sure all your radios are configured with the same number.
- Ensure that the radio is turned off.
- Hold down PTT, (+), and Power buttons at the same time until you hear the radio turn on and announce “Programming Mode”.3. Press Channel/Menu button. The radio announces “Current PROFILE ID <Number>”.
- Use the (+) and (-) buttons to change each PROFILE ID digit.
- Use Menu to move from one digit to the next.
- After all PROFILE ID digits have been changed, the entire new number is announced.
- To exit, press and hold the PTT button.
Important: Ensure that all your radios are configured with the same PROFILE ID or they will not communicate.
Tip: Select a PROFILE ID that is easy to remember, for example, a store number or a street address number.
TRANSMITTING AND RECEIVING
- Press the (+) or (-) button to increase or decrease the volume.
- To receive, listen through the speaker.
- To respond, press FIRMLY the PTT button and WAIT to hear the Talk Permit Tone (a quick double beep) Before you start speaking. Hold the radio vertically 1 inch to 2 inches (2.5 cm to 5 cm) from the mouth when talking.
- Release the PTT to listen.
LED INDICATOR
| Indicator | Transmit/Receive Status | Battery Charging Status |
| Slow blinking Red | The radio is on standby. | N/A |
| Solid Red | The radio is in transmission mode. | The battery is charging. |
| Fast Blinking Red | The radio is in receiving mode. | Indicates a faulty condition. |
| Slow Blinking Green | VA in standby mode. | The battery is fully charged. |
| Slower Blinking Green | The radio is in scan mode. | N/A |
| Solid Green | VA is in transmission mode. | N/A |
| Fast Blinking Green | VA is in receiving mode. | N/A |
CHANGING CHANNELS
- To change the channel, press the Channel/Menu button. The radio announces the current channel.
- Press (+) or (-) button to change the channel. The radio guides you through the channel changes with voice prompts.
- Short press PTT to exit.
Tip: It is not necessary to wait for the voice prompt to be completed before continuing with next button press.
REPLYING PRIVATELY
The Top button is set to Private Reply Feature by default.
- Press the Top button to reply privately to the person currently talking to a group (Top button LED will blink orange).
- After the person finishes transmitting, press the PTT button to talk one-on-one (the Top button LED illuminates solid orange). Both parties hear voice prompts to announce the beginning and end of the private transmission.
- After the private conversation is over, the Top button LED is off.
Important: The radio times out Private transmissions after 10 seconds of inactivity.
Tip: If you want to talk privately to someone, simply call the name of the person. When the person responds, press the Top button and then press the PTT button to talk privately.
ADVANCED CONFIGURATION MODE/OTHER FEATURES
The Curve Series allows for other special features such as Radio PROFILE ID, Maximum Channels, Top button programming, Home Channel, and Instant Mute through Advanced Configuration Mode.
- To enter this mode, turn the radio on while pressing the PTT and (+) buttons while the voice prompts to guide you.
ATTENTION!
Before using this product, read the RF Energy awareness and Acoustic Safety information and operating instructions contained in the Safety and RF Energy Exposure Booklet enclosed with your radio package.
Notice to Users (FCC and Industry Canada)
This device complies with Part 15 of the FCC rules and Industry Canada’s license-exempt RSSs per the following conditions:
- This device may not cause harmful interference.
- This device must accept any interference received, including interference that may cause undesired operation.
- Changes or modifications made to this device, not expressly approved by Motorola Solutions, could void the authority of the user to operate this equipment.
The Curve series operates in the license-free 900MHz ISM Band (902-928 MHz). For product-related questions, please call 1-800-4486686.
MOTOROLA, MOTO, MOTOROLA SOLUTIONS, and the Stylized M Logo are trademarks or registered trademarks of Motorola Trademark Holdings, LLC, and are used under license. All other trademarks are the property of their respective owners.
© 2021 Motorola Solutions, Inc.
All rights reserved.
Printed in
