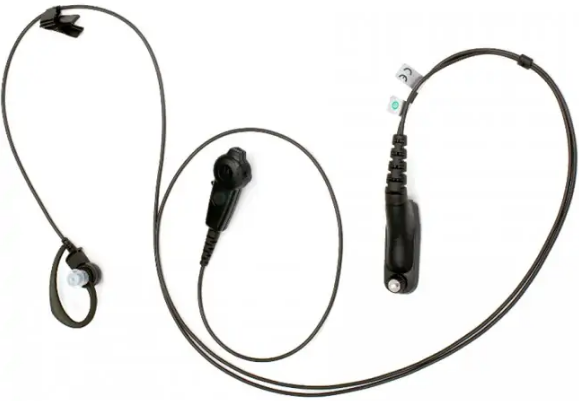
Motorola PMLN6127 Impres Surveillance Earpiece User Guide

motorola PMLN6127 Impres Surveillance Earpiece

ATTENTION!
These Surveillance Earpieces, when attached to the radio, are restricted to occupational use only to satisfy FCC ICNIRP RF energy exposure requirements. Before using this product, read the RF energy awareness information and operating instructions in the Product Safety and RF Exposure booklet enclosed with your radio to ensure compliance with RF energy exposure limits.
ACOUSTIC SAFETY
Exposure to loud noises from any source for extended periods of time may temporarily or permanently affect your hearing. The louder the volume, the less time is required before your hearing could be affected. Hearing damage from loud noise is sometimes undetectable at first and can have a cumulative effect. To protect your hearing:
- Use the lowest volume necessary to do your job.
- Turn up the volume only if you are in noisy surroundings.
- Turn down the volume before connecting headset or earpiece.
- Limit the amount of time you use headsets or earpieces at high volume.
- When using the radio without a headset or earpiece, do not place the radio’s speaker directly against your ear.
- NOTE: For radio to detect the accessory properly, turn the radio off before connecting the audio accessory to the radio.
DESCRIPTION
The PMLN6127/PMLN6128/PMLN6129/PMLN6130 Surveillance Earpieces with Push-To-Talk (PTT) Microphone can be used when the operator would like to conceal two-way radio usage from others. These kits include one programmable button. These surveillance accessories are used in quiet environments to prevent others from hearing radio transmission. NOTE: It is the user’s responsibility to ensure that the surveillance features of the selected accessory are suitable for his/her intended use.
OPERATION
Attaching the Surveillance Accessory to the Radio
- Turn the radio off.
- Remove the side connector cover from the side of the radio, attach the surveillance kit connector to the radio, and tighten the thumbscrew to secure the connection.
- Turn the radio on and adjust the audio volume to a comfortable listening level.
- Wearing the PMLN6127, PMLN6128, PMLN6129 and PMLN6130
- These Surveillance Earpieces with PTT Microphone have concealable features. They have two cords, one for the earpiece and one for the microphone/PTT switch combination. Both cords are long enough to place underneath a shirt, jacket, or other clothing. The microphone operates with a PTT switch that is small enough to fit in one’s palm, and is easily concealed by closing the hand. The microphone/PTT also has a clip to secure to the collar of a shirt, jacket, etc.
Receiving
When the surveillance unit is connected to the radio side connector, the radio speaker is muted, and the audio is only heard from the earpiece speaker.
Transmitting
- PMLN6127, PMLN6128, PMLN6129 and PMLN6130
While using any of these surveillance accessories, transmit by pressing the small PTT mounted on the surveillance microphone body, and speaking into the surveillance microphone in the normal manner. - Additional Features of PMLN6127, PMLN6128, PMLN6129 and PMLN6130
These surveillance earpieces with PTT microphone have a programmable button. - Using the Programmable Button
The Accessory (Accy) No Dot button is programmable through the radio Customer Programming Software (CPS). Your radio user guide contains a full description of the programmable functions that are available through thisbutton. Check with your local dealer for more information supporting the programmable button. - Removing the Surveillance Accessory
Turn the radio off before removing the surveillance unit from the radio side connector. Remember to reattach the radio side connector cover when an accessory is not being used. - Disconnecting the Translucent Tube
Rotate the Quick Disconnect about 90º and release it from the audio tube adapter. Refer to Figure 1.
CARE AND MAINTENANCE
- Clean the accessory, especially the ear tube and ear tip by:
- washing periodically with a mild liquid soap and rinsing with water.
- wiping off each used part that touched the ear with a tissue.
- keeping canal free and clear of wax.
IMPORTANT: For hygienic reasons, do not return any items once the package seal is broken.
NOTE: It is recommended to replace the translucent tube every 6 months or less for hygienic reasons.
SERVICE
The following replacement parts and alternate configurations are available for the surveillance kits.
Replacement Parts/Options
A custom earpiece requires the PMLN6242 Translucent Tube. For use with PMLN6129 and PMLN6130 kits ONLY.
INSTALLATION
- Removing the rubber ear tip
- Remove the rubber ear tip by pulling it out and away from the elbow. Refer to Figure 1.
Attaching the foam ear tube plug
- Slip the end of the black tube over the elbow.
- Use your fingertips to squeeze the foam ear tube plug fairly tight around the center of the black tube.
- While the ear tube plug foam is compressed, insert it into your ear canal far enough to be worn comfortably. Within a few seconds after the ear tube insertion, the compressed foam will conform to the shape of your ear canal.
- To further reduce the noise level, compress the additional foam earplug provided. While the foam earplug is compressed, insert it into the other (open) ear canal far enough to be worn comfortably. Within a few seconds after the earplug insertion, the compressed foam will conform to the shape of your ear canal.