Makita DHG180 Cordless Heat Gun Instruction Manual


makita DHG180 Cordless Heat Gun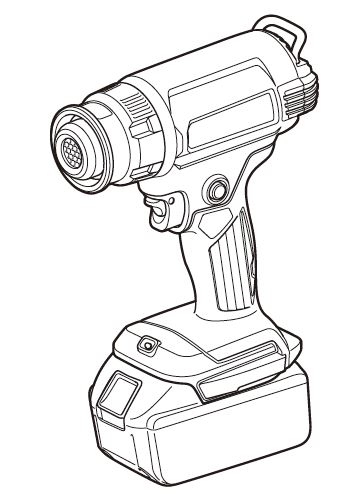

SPECIFICATIONS
| Model: | DHG180 | DHG181 |
| Rated voltage | D.C. 18 V | |
| Temperature | 550 °C ( 1,022 °F) | Ambient temperature – 550 °C (1,022 °F) |
| Air volume | 200 L/min ( 7.1 cu.ft./min) | 1: 120 L/min ( 4.2 cu.ft./min) 2: 200 L/min ( 7.1 cu.ft./min) |
| Dimensions (L x W x H) with BL1860B | 168 mm x 79 mm x 251 mm (6-5/8″ x 3-1/8″ x 9-7/8″) |
173 mm x 79 mm x 255 mm (6-13/16″ x 3-1/8″ x 10″) |
| Net weight | 1.0 – 1.3 kg (2.2 – 2.9 lbs) | 1.0 – 1.4 kg (2.2 – 3.1 lbs) |
- Due to our continuing program of research and development, the specifications herein are subject to change without notice.
- Specifications and battery cartridges may differ from country to country.
- The weight may differ depending on the attachment(s), including the battery cartridge. The lightest and heaviest combinations, according to EPTA-Procedure 01/2014, are shown in the table.
Applicable battery cartridge and charger
| Battery cartridge | BL1815N / BL1820B / BL1830 / BL1830B / BL1840B / BL1850B / BL1860B |
| Charger | DC18RC / DC18RD / DC18RE / DC18SD / DC18SE / DC18SF / DC18SH |
Some of the battery cartridges and chargers listed above may not be available depending on your region of residence.
Symbols

The followings show the symbols which may be used for the equipment. Be sure that you understand their meaning before use.
Intended use
This cordless heat gun has been designed for various of heating applications such as heat shrinking of heat-shrinkable wrap or tubes, soldering or de-soldering electronic components, peeling-off self-adhesive tapes or stickers, loosening rusted nut or bolt, shaping plastic parts, drying, melting and unfreezing, etc.
IMPORTANT SAFETY INSTRUCTIONS
READ THESE INSTRUCTIONS
Hidden areas such as behind walls, ceilings, floors, soffit boards and other panels may contain flammable materials that could be ignited by the heat gun when working in these locations. The ignition of these mate-rials may not be readily apparent and could result in property damage and injury to persons.
WARNING: Extreme care should be taken when stripping paint. The peelings, residue, and vapors of paint may contain lead, which is poisonous. Any pre-1977 paint may contain lead and paint applied to homes prior to 1950 is likely to contain lead. Once deposited on surfaces, hand-to-mouth contact can result in the ingestion of lead. Exposure to even low levels of lead can cause irreversible brain and nervous system damage; young and unborn children are particularly vulnerable. Before beginning any paint removal process you should determine whether the paint you are removing contains lead. This can be done by your local health department or by a professional who uses a paint analyzer to check the lead content of the paint to be removed. LEAD-BASED PAINT SHOULD ONLY BE REMOVED BY A PROFESSIONAL AND SHOULD NOT BE REMOVED USING A HEAT GUN.
Persons removing paint should follow these guidelines:
- Move the work piece outdoors. If this is not possible, keep the work area well ventilated. Open the windows and put an exhaust fan in one of them. Be sure the fan is moving the air from inside to outside.
- Remove or cover any carpets, rugs, furniture, clothing, cooking utensils and air ducts.
- Place drop cloths in the work area to catch any paint chips or peelings. Wear protective clothing such as extra work shirts, overalls and hats.
- Work in one room at a time. Furnishings should be removed or placed in the center of the room and covered. Work areas should be sealed off from the rest of the dwelling by sealing doorways with drop cloths.
- Children, pregnant or potentially pregnant women and nursing mothers should not be present in the work area until the work is done and all clean up is complete.
- Wear a dust respirator mask or a dual filter (dust and fume) respirator mask which has been approved by the Occupational Safety and Health Administration (OSHA), the National Institute of Safety and Health (NIOSH), or the United States Bureau of Mines. These masks and replaceable filters are readily available at major hardware stores. Be sure the mask fits. Beards and facial hair may keep masks from sealing properly. Change filters often. DISPOSABLE PAPER MASKS ARE NOT ADEQUATE.
- Use caution when operating the heat gun. Keep the heat gun moving as excessive heat will generate fumes that can be inhaled by the operator.
- Keep food and drink out of the work area. Wash hands, arms and face and rinse mouth before eating or drinking. Do not smoke or chew gum or tobacco in the work area.
- Clean up all removed paint and dust by wet mopping the floors. Use a wet cloth to clean all walls, sills and any other surface where paint or dust is clinging. DO NOT SWEEP, DRY DUST OR VACUUM. Use a high phosphate detergent or trisodium phosphate (TSP) to wash and mop areas.
- At the end of each work session put the paint chips and debris in a double plastic bag, close it with tape or twist ties and dispose of it properly.
- Remove protective clothing and work shoes in the work area to avoid carrying dust into the rest of the dwelling. Wash work clothes separately. Wipe shoes off with a wet rag that is then washed with the work clothes. Wash hair and body thoroughly with soap and water.
SAVE THESE INSTRUCTIONS
- A battery shall be recharged only with the specified charger for the battery. A charger that may be suitable for one type of battery may create a risk of fire when used with another battery.
- Use a battery-operated heat gun only with a specifically designed battery pack. The use of any other batteries may create a risk of fire.
- When battery pack is not in use, keep it away from other metal objects like paper, clips, coins, keys, nails, screws, or other small metal objects that can make a connection from one terminal to another. Shorting the battery terminals together may cause sparks, burns or a fire.
- Do not incinerate this heat gun even if it is severely damaged. The batteries can explode in a fire.
- This appliance is not intended for use by persons (including children) with reduced physical, sensory or mental capabilities, or lack of experience and knowledge unless they have been given supervision or instruction concerning the use of the appliance by a person responsible for their safety. Children should be supervised to ensure that they do not play with the appliance.
- Be careful when using the appliance in places where there are combustible materials;
- be aware that heat may be conducted to combustible materials that are out of sight;
- when working in these locations, keep the heat gun moving in a back-and-forth motion. Lingering or pausing in one spot could ignite the panel or the material behind it.
- Do not expose power tools to rain or wet conditions. Water entering a power tool will increase the risk of electric shock.
- Do not overreach. Keep proper footing and balance at all times. This enables better control of the power tool in unexpected situations.
- Do not apply to the same place for a long time.
Cordless heat gun safety warnings
- Misuse of the heat gun could cause risk of fire.
- Do not use this tool as a hairdryer.
- Never leave the heat gun unattended when it is running.
- Do not use the heat gun in humid, flammable, or explosive environments.
- Check the work area before operation. Do not use the tool if safety is not confirmed.
- Keep the work area sufficient for air ventilation. Poisonous smoke may be generated when working with some materials.
- . While the heat gun is running or shortly after the heat gun is turned off, do not touch the nozzle or accessory attached to the nozzle as it has become very hot. Wait until the nozzle or accessory is cooled down completely.
- Do not look down into the nozzle of the heat gun when it is running.
- Do not allow the hot nozzle of the heat gun to touch any object or material that is flammable or easily melted or damaged by heat when the heat gun is running or shortly after turning off.
- When installing or removing the nozzle, allow the nozzle to cool sufficiently.
- After use, allow the tool to stand on its own or place the heating nozzle upward before cooling.
- Always turn off the heat gun, disconnect the power source and let it cool down completely before moving or storing.
- Never obstruct the air inlet or air ventilation in any way. Doing so could cause the heat gun extremely hot and damaged.
- Do not allow any object to drop into the nozzle of the heat gun. It may cause a short circuit or overheat.
- Never point the heat gun toward any other persons or flammable objects.
- Heat slowly while moving the heat gun up, down, left, and right. Do not apply to the same place for a long time.
- Clean the paint from the nozzle; it could ignite.
- When using the tool with it stands on its own, but the tool in the stable position.
- When using the tool with accessories, make sure that the accessories are attached to the tool firmly.
- Use Makita’s genuine accessories.
- Do not take the tool as a blower.
- Indication: Battery is partially charged when delivered. The battery has to be fully charged to ensure the battery power before first-time usage. The battery pack has to be removed from the tool for charging.
- The battery can be charged at any time which will not shorten its lifetime. Any discontinuation during charging will not damage the battery either.
Safety warnings for battery-operated tool
Battery-operated tool use and care
- Prevent unintentional starting. Ensure the switch is in the off-position before connecting to a battery pack, picking up or carrying the tool. Carrying the tool with your finger on the switch or energizing tool that has the switch on invites accidents.
- Disconnect the battery pack from the tool before making any adjustments, changing accessories, or storing the tool. Such preventive safety measures reduce the risk of starting the tool accidentally.
- Recharge only with the charger specified by the manufacturer. A charger that is suitable for one type of battery pack may create a risk of fire when used with another battery pack.
- Use power tools only with specifically designated battery packs. Use of any other battery packs may create a risk of injury and fire.
- When the battery pack is not in use, keep it away from other metal objects, like paper clips, coins, keys, nails, screws or other small metal objects, that can make a connection from one terminal to another. Shorting the battery terminals together may cause burns or a fire.
- Under abusive conditions, liquid may be ejected from the battery; avoid contact. If contact accidentally occurs, flush with water. If liquid contacts the eyes, additionally seek medical help. Liquid ejected from the battery may cause irritation or burns.
- Do not use a battery pack or tool that is damaged or modified. Damaged or modified batteries may exhibit unpredictable behavior resulting in fire, explosion or risk of injury.
- Do not expose a battery pack or tool to fire or excessive temperature. Exposure to fire or temperatures above 130 °C may cause an explosion.
- Follow all charging instructions and do not charge the battery pack or tool outside the temperature range specified in the instructions. Charging improperly or at temperatures outside the specified range may damage the battery and increase the risk of fire.
- Have servicing performed by a qualified repair person using only identical replacement parts. This will ensure that the safety of the product is maintained.
- Do not modify or attempt to repair the tool or the battery pack except as indicated in the instructions for use and care.
Important safety instructions for battery cartridge
- 1. Before using the battery cartridge, read all instructions and cautionary markings on (1) battery charger, (2) battery, and (3) product using the battery.
- Do not disassemble or tamper with the battery cartridge. It may result in a fire, excessive heat, or explosion.
- If the operating time has become excessively shorter, stop operating immediately. It may result in a risk of overheating, possible burns and even an explosion.
- If electrolyte gets into your eyes, rinse them out with clear water and seek medical attention right away. It may result in loss of your eyesight.
- 5. Do not short the battery cartridge:
- Do not touch the terminals with any conductive material.
- Avoid storing battery cartridges in a container with other metal objects such as nails, coins, etc.
- Do not expose the battery cartridge to water or rain. A battery short can cause a large current flow, overheating, possible burns and even a breakdown.
- Do not store and use the tool and battery cartridge in locations where the temperature may reach or exceed 50 °C (122 °F).
- Do not incinerate the battery cartridge even if it is severely damaged or is completely worn out. The battery cartridge can explode in a fire.
- Do not nail, cut, crush, throw, drop the battery cartridge, or hit against a hard object to the battery cartridge. Such conduct may result in a fire, excessive heat, or explosion.
- Do not use a damaged battery.
- The contained lithium-ion batteries are subject to the Dangerous Goods Legislation requirements. For commercial transports e.g. by third parties or forwarding agents, the special requirements on pack-aging and labeling must be observed. For the preparation of the item being shipped, consulting an expert for hazardous material is required. Please also observe possibly more detailed national regulations. Tape or mask off open contacts and pack up the battery in such a manner that it cannot move around in the packaging.
- When disposing the battery cartridge, remove it from the tool and dispose of it in a safe place. Follow your local regulations relating to the disposal of batteries.
- Use the batteries only with the products specified by Makita. Installing the batteries to non-compliant products may result in a fire, excessive heat, explosion, or leak of electrolyte.
- If the tool is not used for a long period of time, the battery must be removed from the tool.
- During and after use, the battery cartridge may take on heat which can cause burns or low-temperature burns. Pay attention to the handling of hot battery cartridges.
- Do not touch the terminal of the tool immediately after use as it may get hot enough to cause burns.
- Do not allow chips, dust, or soil stuck into the terminals, holes, and grooves of the battery cartridge. It may cause heating, catching fire, burst and malfunction of the tool or battery car-tridge, resulting in burns or personal injury.
- Unless the tool supports the use near high-voltage electrical power lines, do not use the battery cartridge near high-voltage electri-cal power lines. It may result in a malfunction or breakdown of the tool or battery cartridge.
- Keep the battery away from children.
SAVE THESE INSTRUCTIONS
CAUTION: Only use genuine Makita batteries. Use of non-genuine Makita batteries, or batteries that have been altered, may result in the battery bursting causing fires, personal injury and damage. It will also void the Makita warranty for the Makita tool and charger.
Tips for maintaining maximum battery life
- Charge the battery cartridge before completely discharged. Always stop tool operation and charge the battery cartridge when you notice less tool power.
- Never recharge a fully charged battery cartridge. Overcharging shortens the battery service life.
- Charge the battery cartridge with room temperature at 10 °C – 40 °C (50 °F – 104 °F). Let a hot battery cartridge cool down before charging it.
- When not using the battery cartridge, remove it from the tool or the charger.
- Charge the battery cartridge if you do not use it for a long period (more than six months).
PACKAGE CONTENT LIST
Check that the items listed below are included in the package.
- 1 Cordless Heat gun
- 1 Set of accessories (Some accessories may not be necessary depending on your purpose.)
- 1 Instruction manual
NOTE: When parts are missing or damaged, please contact your dealer.
PARTS DESCRIPTION

| 1 | Heating nozzle | 2 | Front cover |
| 3 | Lock off lever | 4 | Switch trigger |
| 5 | Lock on button | 6 | LED light |
| 7 | Hook | 8 | Hook release button |
| 9 | Air volume switch (1/2) | 10 | Temperature dial |
ASSEMBLY
Attaching and detaching accessories
The heat gun can use with accessories or without the accessories according to various of heating purposes.
Attaching the accessory
- Choose the appropriate nozzle according to the heating applications.
- Push the fitting end of the nozzle onto the heating
MOUNTING THE CORRECT ACCESSORY (IF APPLICABLE)


WARNING: Ensure the power tool is switched off and the battery cartridge is removed from the power tool before attaching the accessories. Attaching the accessories with a switch on or a battery cartridge attached may cause the risk of accidents.
WARNING: Make sure to attach the accessories securely. Otherwise, the accessory may fall off accidentally and cause burn injury.
Detaching the accessory
Turn the front cover in the direction of the arrow in the illustration, the accessory will be ejected. This allows you to remove nozzles without touching them while they are still hot.

WARNING: Do not touch the accessory attached to or ejected from the heat gun immediately after use. Do not eject the accessory to any person or animal. The nozzle attachment gets extremely hot after use and cause risk burn injury.
WARNING: Do not eject the accessory to any surface that is flammable or easy to be melt. The nozzle attachment gets extremely hot after use and cause risk of fire or melting the surface.
WARNING: Use the identical accessories included in the original package or serviced by the dealer or service center. Use wrong or defective accessories may cause the hot air to flow backward and damage the tool and create a hazard.
Installing or removing the battery cartridge
CAUTION: Always switch off the tool before installing or removing of the battery cartridge.
CAUTION: Hold the tool and the battery cartridge firmly when installing or removing the battery cartridge. Failure to hold the tool and the battery cartridge firmly may cause them to slip off your hands and result in damage to the tool and battery cartridge and a personal injury.

- Red indicator
- Button
- Battery cartridge
To remove the battery cartridge, slide it from the tool while sliding the button on the front of the cartridge. To install the battery cartridge, align the tongue on the battery cartridge with the groove in the housing and slip it into place. Insert it all the way until it locks in place with a little click. If you can see the red indicator as shown in the figure, it is not locked completely.
CAUTION: Always install the battery cartridge fully until the red indicator cannot be seen. If not, it may accidentally fall out of the tool, causing injury to you or someone around you.
CAUTION: Do not install the battery cartridge forcibly. If the cartridge does not slide in easily, it is not being inserted correctly.
OPERATION
NOTE: At first use of the heat gun, some smoke may emit from the nozzle. This is normal and will soon decrease.
Switching On and Off
Switching On
- Pull the lock-off lever downwards and pull in the switch trigger to switch on tool.
- Press in the lock-on button on the left with your thumb to keep the tool running.
Switching Off
- Release the switch trigger to stop.
- To stop the tool from the locked position, pull the switch trigger fully to unlock. Release the switch trigger to stop.

- Lock-off lever
- Switch trigger
- Lock-on button
Temperature setting (DHG181)
The temperature is adjustable by turning the temperature dial. The dial is marked 1 (lowest temperature) to 6 (highest temperature). Adjust to suitable temperature for your applications. The following table suggests setting for different applications.
| Setting | Applications |
| 1 (Ambient temperature) |
Cooling the hot parts. |
| Cooling the machines before changing the nozzle. | |
| 2 – 6 | Drying paint and varnish. |
| Removing stickers. | |
| Waxing and de-waxing. | |
| Shrinking PVC wrapping and insulation tubes. | |
| Thawing frozen pipes. | |
| Welding plastics. | |
| Bending plastic pipes and sheets. |
Air volume setting (DHG181)
The air volume is adjustable by switching the air volume switch at position 1 or 2.

- Air volume switch (1/2)
Using the tool with it stands on its own
This tool can be used with upright position or with the heat nozzle facing up as shown in the figure. When using the tool with it stands on its own, turn on the switch and then press in the lock on button to keep the tool running.

WARNING: Only use the tool in either posture as shown. Turn off the switch before putting down the tool in other postures.
CAUTION: When using the tool with it stands on its own, put the tool on the stable position. Using the tool on unstable place or a place with a slope, the tool may fall down and cause an injury.
Cooling down
The heating nozzle and accessories became very hot during use. Let them cool down before attempting to move or store the tool.
CAUTION: After use, do not touch nozzle until it has had time to cool.
CAUTION: Do not leave work area until tool has cooled. Be alert for indications of concealed fire. Allow time for the tool to cool then clean and store the tool indoors out of children’s reach.
FUNCTIONAL DESCRIPTION
LED light
CAUTION: Do not look in the light or see the source of light directly. Pull the switch trigger to light up the lamp. The lamp keeps on lighting while the switch trigger is being pulled. The lamp goes out approximately 10 seconds after releasing the switch trigger.
NOTE: Use a dry cloth to wipe the dirt off the lens of the lamp. Be careful not to scratch the lens of lamp, or it may lower the illumination.
Hook
The hook allows you to hang the tool to your selected location.
- Press the hook release button.
- Swing the hook outside.

1. Hook release button
2. Hook
To store the hook, swing the hook to the original posi-tion, and then push the hook into the tool until it clicks.

Tool/battery protection system
The tool is equipped with a tool/battery protection system. This system automatically cuts off power to the motor to extend tool and battery life. The tool will auto-matically stop during operation if the tool or battery is placed under one of the following conditions.
Over-discharge protection
When the battery capacity becomes low, the tool stops automatically. If the product does not operate even when the switches are operated, remove the batteries from the tool and charge the batteries.
Protections against other causes
A protection system is also designed for other causes that could damage the tool and allows the tool to stop automatically. Take all the following steps to clear the causes, when the tool has been brought to a temporary halt or stopped in operation.
- Turn the tool off, and then turn it on again to restart.
- Charge the battery(ies) or replace it/them with recharged battery(ies).
- Let the tool and battery(ies) cool down.
If no improvement can be found by restoring the protection system, then contact your local Makita Service Center.
Indicating the remaining battery capacity
Only for battery cartridges with the indicator

- Indicator lamps
- Check button
Press the check button on the battery cartridge to indicate the remaining battery capacity. The indicator lamps light up for a few seconds.

MAINTENANCE
CAUTION: Always be sure that the tool is switched off and the battery cartridge is removed before attempting to perform inspection or maintenance.
NOTICE: Never use gasoline, benzine, thinner, alcohol or the like. Discoloration, deformation or cracks may result.
To maintain product SAFETY and RELIABILITY, repairs, any other maintenance or adjustment should be performed by Makita Authorized or Factory Service Centers, always using Makita replacement parts. The tool has been designed to operate over a long period of time with a minimum of maintenance. Continuous satisfactory operation depends upon proper care and regular cleaning of the tool.
Lubrication
No lubrication is needed for this product.
Cleaning
- Keep the ventilation openings and switch trigger clean and free of foreign materials.
- Clean the tool with soft cloth periodically and preferably after each time of use.
OPTIONAL ACCESSORIES
CAUTION: These accessories or attachments are recommended for use with your Makita tool specified in this manual. The use of any other accessories or attachments might present a risk of injury to persons. Only use accessory or attachment for its stated purpose. If you need any assistance with more details regarding these accessories, ask your local Makita Service Center.
- Nozzle
- Pressure roller
- Scraper
- Makita genuine battery and charger
NOTE: Some items in the list may be included in the tool package as standard accessories. They may differ from country to country.
MAKITA LIMITED WARRANTY
Please refer to the annexed warranty sheet for the most current warranty terms applicable to this product. If the annexed warranty sheet is not available, refer to the warranty details set forth at below website for your respective country. United States of America: www.makitatools.com Canada: www.makita.ca Other countries: www.makita.com