SILVERCREST Electric Pastry Press Instruction Manual
SILVERCREST Electric Pastry Press Instruction Manual

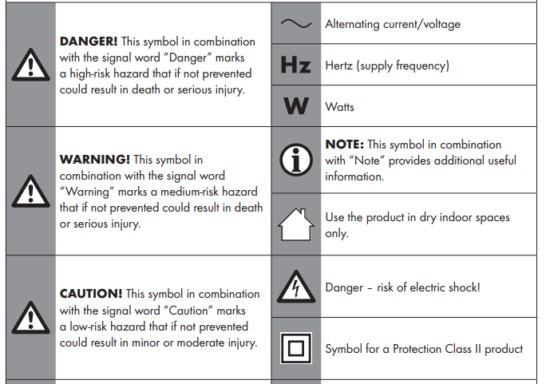
Warnings and symbols used
The following warnings are used in this user manual and on the packaging:


Introduction
We congratulate you on the purchase of your new product. You have chosen a high quality product. The instructions for use are part of the product. They contain important information concerning safety, use and disposal. Before using the product, please familiarise yourself with all of the safety information and instructions for use. Only use the product as described and for the specified applications. If you pass the product on to anyone else, please ensure that you also pass on all the documentation with it.
Intended use
This product is designed for forming and decorating pastry. Do not use the product for any other purpose.
This product is only intended for private household use, not for commercial purposes.
The manufacturer accepts no liability for damages caused by improper use.
Scope of delivery
After unpacking the product, check if the delivery is complete and if all parts are in good condition. Remove all packing materials before use.
1 Electric pastry press
1 /2 Motif discs
3 Pastry tips
1 Instruction manual
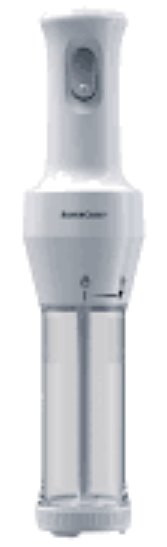
Description of parts


- Start button
- Motor unit
- Power cord with power plug
- Shaft with shaft adapter
- Tube
- Motif discs (12x)
- Tube cover
- Pastry tip cover
- Pastry tips (3x)
- Pastry tip adapter
Technical data
- Input voltage: 220‒240 V∼, 50/60 Hz
- Power consumption: 28 W
- Protection class: II /
- Short-time duty (KB): 2 minutes

Safety instructions
BEFORE USING THE PRODUCT, PLEASE FAMILIARISE YOURSELF WITH ALL OF THE SAFETY INFORMATION AND INSTRUCTIONS FOR USE! WHEN PASSING THIS PRODUCT ON TO OTHERS, PLEASE ALSO INCLUDE ALL THE DOCUMENTS!
In the case of damage resulting from non-compliance with these operating instructions the warranty claim becomes invalid! No liability is accepted for consequential damage! In the case of material damage or personal injury caused by incorrect handling or non-compliance with the safety instructions, no liability is accepted!
Intended use
WARNING! Misuse may lead to injury. Use this product solely in accordance with these instructions. Do not attempt to modify the product in any way.
Children and persons with disabilities
WARNING! RISK OF LOSS OF LIFE OR ACCIDENT TO INFANTS AND CHILDREN!
Never leave children unsupervised with the packaging material.
The packaging material represents a danger of suffocation. Children frequently underestimate the dangers.
Always keep children away from the packaging material.
- This product can be used by children aged from 8 years and above and persons with reduced physical, sensory or mental capabilities, or lack of experience and knowledge if they have been given supervision or instruction concerning use of the product in a safe way and understand the hazards involved. Children shall not play with the product.
- Cleaning and user maintenance shall not be made by children unless they are older than 8 and supervised.
- Keep the product and its cord out of reach of children less than 8 years.
Electrical safety
DANGER! Risk of electric shock! Never attempt to repair the product yourself. In case of malfunction, repairs are to be conducted by qualified personnel only
WARNING! Risk of electric shock! Do not immerse the product in water or other liquids. Never hold the product under running water.
WARNING! Risk of electric shock! Never use a damaged product. Disconnect the product from the power supply and contact your retailer if it is damaged.
- The product is not to be used if it has been dropped, if there are visible signs of damage.
- Before connecting the product to the power supply, check that the voltage and current rating corresponds with the power supply details shown on the product’s rating label.
- Regularly check the power plug and the power cord for damages. If the power cord is damaged, it must be replaced by the manufacturer, its service agent or similarly qualified persons in order to avoid a hazard.
- Protect the power cord against damages. Do not let it hang over sharp edges, do not squeeze or bend it. Keep the power cord away from hot surfaces and open flames.
- The product must always be disconnected from the mains when not under supervision and before assembly, disassembly or cleaning.
- No action is needed from users to shift the product between 50 and 60 Hz. The product adapts itself for both 50 and 60 Hz.
Operation
- Protect the product against heat. Do not place the product close to open flames or heat sources (e.g. stoves or heating appliances).
- Do not operate the product for more than 2 minutes without interruption (short-time duty KB = 2 minutes). Allow the product to cool down before operating it again.
Cleaning and storage
WARNING! Risk of injury!
Disconnect the product from the power supply before cleaning work and when not in use.
- Do not pull the power plug out of the electrical outlet by the power cord.
- Protect the product, its power cord and power plug against dust, direct sunlight, dripping and splashing water.
- Store the product in a cool, dry place, protected from moisture and out of the reach of children.
Before first use
- Remove the packaging. Check if all parts are complete.
- Clean the product and its accessories (see “Cleaning and care”).
Assembly
NOTE: Before removing or attaching accessories, disconnect the power plug [3] from the wall outlet.
Selecting a motif disc


Inserting a motif disc
- Select the desired motif disc [6].
- Insert the motif disc [6] with the labelled side up into the tube cover [7] (Fig. B).
- Place the tube cover [7] with the motif disc [6] on the tube [5].
- Turn the tube cover [7] in the direction of the arrow until it engages.

Selecting a pastry tip

Inserting a pastry tip
- Place the pastry tip adapter 10 with the screw thread facing down on the tube cover [7] (Fig. C).
- Place the tube cover [7] with the pastry tip adapter 10 on the tube [5].
- Turn the tube cover [7] in the direction of the arrow until it engages.
- Select the desired pastry tip [9].
- Place the pastry tip [9] on the pastry tip adapter 10.
- Place the pastry tip cover [8] on the pastry tip [9] and the pastry tip adapter 10 and screw it tight
Assembling the product
- Place the tube [5] on the motor unit [2]. To do this, insert the 2 elevations on the tube into the guide rails of the shaft with shaft adapter [4].
- on the tube [5] must be aligned
- Lock the tube [5] with the motor unit [2] by turning it clockwise. on the tube must be aligned with


Operation
NOTES
- Do not operate the product for more than 2 minutes without interruption (Short-time duty KB = 2 minutes). Allow the product to cool down before operating it again.
- Fill the tube [5] to the mark -MAX- at the most.
- Always use only one motif disc [6] or one pastry tip [9], never several at the same time.
- After attaching the tube [5], never hold the product with the dough container facing upwards. This could cause ingredients to enter the motor unit [2
Using the product
- Disconnect the tube [5] from the motor unit [2].
- Insert the desired motif disc [6] or pastry tip [9] into the tube [5] (see “Insert motif disc” and “Inserting a pastry tip”).
- Shape the dough into a roll. Fill the tube [5] with the dough roll.
- Connect the tube [5] to the motor unit [2] (see “Assembling the product”).
- Connect the power plug [3] with a suitable wall outlet. The product is now ready for operation.
- Hold the product with the motif disc [6] or pastry tip [9] facing down on the baking tray.
- Press and hold the start button [1] until the first cookie has been formed.
- The length of time you need to press and hold the start button [1] depends on the desired shape and size of the cookie.
- If you press the start button [1] for a short time, you will form a small cookie. The longer you press and hold the start button, the larger the cookie.
- Release the start button [1] and move the product to another position.
- Repeat the steps until you have shaped a sufficient number of cookies. Place the cookies in the desired quantity on the baking tray.
Refilling the product
- Remove the tube [5] from the motor unit [2].
- Push the shaft adapter [4] back into the motor unit [2]. Fill the tube [5].
- Reassemble the product (see “Assembling the product”).
Recipe
Butter cookies

- 125 g Butter
- 125 g Fine sugar
- 1 packet Vanilla sugar
- 1 Egg
- 1 Egg white
- 250 g Flour (Type 405)
- 1 pinch Salt
Preparation
- Stir butter, sugar, vanilla sugar, salt, egg and egg white until foamy.
- Add the flour.
- Use the product to form small cookies on the tray.
- Bake 12–15 minutes at 175–190 °C in a convection oven.
NOTE: If the dough is too sticky, place it in the freezer for 15 minutes.
Troubleshooting
| Problem | Cause | Solution |
| Product shows no function. | Product is not connected to the wall outlet. Start button [1] is not pressed. |
Insert the power plug [3] into the wall outlet. Press the start button [1]. |
| Shaft adapter [4] does not move. | Tube [5] is not properly connected to motor unit [2 Dough/mass is too solid.
|
Lock the tube [5] (see „Assembling the product“). Dilute the dough with a little liquid (e.g. water or milk). |
| Cookies are too small | Start button [1] was not pressed long enough | Press the start button [1] longer. |
| Cookies are too large | Start button [1] was pressed too long. | Press the start button [1] for a shorter time |
| Dough can not be pressed out. | Dough is too solid. | Dilute the dough with a little liquid (e.g. water or milk). |
| Cookies do not keep their shape. | Dough is too runny Dough is too sticky |
Add a little flour to the dough Put the dough in the freezer for 15 minutes. |
| Motif disc [6] is clogged. | Dough is not fine-pored enough. | The use of nuts, chocolate drops or similar ingredients is not recommended. |
| Cookie shape is not consistent | Cookies do not stick to the baking sheet. | Greasing the baking tray is not recommended. |
| Decoration does not stick. | Dough/mass is not moist enough. | Brush the surface to be decorated with a little water or milk. |
Cleaning and care


| Part | Cleaning |
| [2] Motor unit |
|
| [4] Shaft with shaft adapter [5] Tube [6] Motif discs [7] Tube cover [8] Pastry tip cover [9] Pastry tips 10 Pastry tip adapter |
|
After cleaning: Allow the parts to dry.
Storage
- Before storage: Clean the product.
- Store the product in the original packaging when it is not in use.
- Store the product at a dry location out of the reach of children.
Disposal
The packaging is made entirely of recyclable materials, which you may dispose of at local recycling facilities.


Warranty
The product has been manufactured to strict quality guidelines and meticulously examined before delivery. In the event of product defects you have legal rights against the retailer of this product. Your legal rights are not limited in any way by our warranty detailed below.
The warranty for this product is 3 years from the date of purchase. The warranty period begins on the date of purchase. Please keep the original sales receipt in a safe location. This document is requiredas your proof of purchase.
Should this product show any fault in materials or manufacture within 3 years from the date of purchase, we will repair or replace it – at our choice – free of charge to you. This warranty becomes void if the product has been damaged, or used or maintained improperly.
The warranty applies to defects in material or manufacture. This warranty does not cover product parts subject to normal wear, thus possibly considered consumables (e.g. batteries) or for damage to fragile parts, e.g. switches, rechargeable batteries or glass parts.
Warranty claim procedure
To ensure quick processing of your case, please observe the following instructions:
Please have the till receipt and the item number (e.g. IAN 123456_7890) available as proof of purchase.
You will find the item number on the rating plate, an engraving, on the front page of the instructions for use (bottom left), or as a sticker on the rear or bottom of the product.
If functional or other defects occur, please contact the service department listed either by telephone or by e-mail.
You can return a defective product to us free of charge to the service address that will be provided to you. Ensure that you enclose the proof of purchase (till receipt) and information about what the defect is and when it occurred.
Service
Service Great Britain
Tel.: 08000569216
E-Mail: [email protected]
Service Ireland
Tel.: 1800 200736
E-Mail: [email protected]