Sony SA-SW5 Optional Wireless Subwoofer Instruction Manual


SONY SA-SW5 Optional Wireless Subwoofer
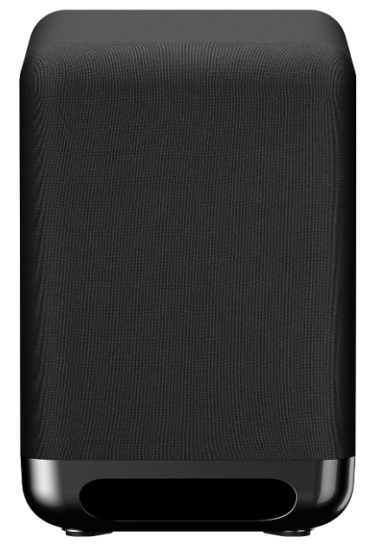

Parts and Controls
Front

Power indicator
- Flashes slowly (green): The subwoofer is attempting to automatically connect to a compatible model.
- Lights up (green): The subwoofer is connected to a compatible model.
- Flashes twice repeatedly (green): The subwoofer is attempting to manually connect to a compatible model.
- Flashes/lights up (amber): The software is updating.
- Lights up (red): The subwoofer is in standby mode.
- Turns off: The subwoofer is turned off.
Slit
Note
The brightness of the power indicator syncs with the DIMMER settings of a compatible model.
Rear

- (power) button
- LINK button
- AC inlet
Installation
The following illustration is the installation example to use the subwoofer with the compatible model HT-A7000 and optional rear speakers.

- Install the subwoofer in the place that you want.
- You can install the subwoofer in the place that you want because the output sound from it has no directivity.
The above illustration is the example for the installation of the subwoofer.
Note:Install the subwoofer with the slit on the bottom, as shown in the “Parts and Controls” illustration. The subwoofer is not designed to be installed in a different orientation.
Connection
Tip: You can connect the optional rear speaker with a compatible model in the following way when installing it too.
- Turn on a compatible model.
- Connect the AC power cord (mains lead) (supplied) to the subwoofer and then connect the cord to the AC outlets (mains).
- Make sure that the power indicator on the subwoofer lights in green. When the power indicator lights in green, the connection between the subwoofer and a compatible model is established. For the cases below, follow the steps under “Performing a Manual Connection” to connect the subwoofer to a compatible model.
- When you use multiple compatible models and want to specify the model to which you wish to connect the subwoofer.
- If you have previously connected other subwoofers to the compatible model.
- If you cannot connect the subwoofer to a compatible model automatically for any other reason.


Performing a Manual Connection
The following operation is described for the subwoofer used with the compatible model
HT-A7000 or HT-A9. Use the remote control supplied with the compatible model HT-A7000 or HT-A9 when performing this operation.
If you use other compatible models, refer to the Operating Instructions supplied with them.
- Press HOME The home menu appears on the TV screen.
- Select [Setup] – [Advanced Settings] on the home menu. Settings] – [Start manual linking].
- The [Start manual linking] screen appears on the TV screen.
- Press LINK on the subwoofer. The power indicator of the subwoofer that had LINK pressed flashes twice repeatedly in green.
- Select [Start]. The manual connection starts. The connecting process appears on the TV screen. To cancel the manual connection, select [Cancel].
- When [Subwoofer] display [Connected], select [Finish].
- Press (enter). The manual connection is established and the power indicator of the subwoofer lights in green.
Note
- If you perform [Start manual linking], [Link mode] of [Wireless Speaker Settings] is set to [Manual] automatically.
- Only the speakers for which [Connected] has been displayed in Step 6 connect to a compatible model. If the subwoofer is not properly connected, perform the operation again from Step 1.
If Wireless Transmission is Unstable
If you use multiple wireless systems, such as a wireless LAN, the wireless signals may become unstable. In this case, the transmission may be improved by changing the following setting. The following operation is described for the subwoofer used with the compatible model HT-A7000 or HT-A9. Use the remote control supplied with the compatible model HT-A7000 or HT-A9 when performing this operation. If you use other compatible models, refer to the Operating Instructions supplied with them.
- Press HOME. The home menu appears on the TV screen.
- Select [Setup] – [Advanced Settings] on the home menu.
- Select [Speaker Settings] – [Wireless Speaker Settings] – [RF Channel].
- Select the setting you want.
- [On] (default setting): Normally select this. The system automatically selects the better channel for transmission. Stronger mode for wireless interference.
- [Off]: The system selects a channel from the limited frequency band to prevent external wireless interference. If sound dropping occurs while [On] is selected, it may be improved by selecting [Off].
Note
- If you change the [RF Channel] setting from [Off] to [On], it may take 1 minute to reconnect.
- A compatible model may not meet this setting depending on countries/regions where you purchase it.
Troubleshooting
If you experience any of the following difficulties while using the subwoofer, use this troubleshooting guide to help remedy the problem before requesting repairs. Should any problem persist, consult your nearest Sony dealer. Be sure to bring all of your subwoofers, a compatible model and optional rear speakers (not supplied) even if it seems as though only one has a problem when you request to repair. The following solutions are described for the subwoofer used with the compatible model HT-A7000 or HT-A9. If you use other compatible models, refer to the Operating Instructions supplied with them.
No sound or only a very low-level sound is heard from the subwoofer.
- Press SW (volume) + or BASS + on the remote control of a compatible model to increase the subwoofer volume.
- Make sure that the power indicator on the subwoofer is lit in green.
- If the power indicator on the subwoofer does not light, try the following.
- Make sure the AC power cord (mains lead) of the subwoofer is connected properly.
- Press (power) of the subwoofer to turn on the power.
- If the power indicator on the subwoofer flashes slowly in green or lights in red, try the following.
- Move the subwoofer to a location near a compatible model so that the power indicator on the subwoofer lights in green.
- Follow the steps in “Performing a Manual Connection.”
- Check the wireless connection status. For details, refer to the Operating Instructions supplied with a compatible model..
- If the power indicator on the subwoofer flashes in red, press (power) of the subwoofer to turn off the power and check whether the ventilation holes of the subwoofer is blocked or not.
- If the input sources contain very little bass sound components (i.e., a TV broadcast), the sound from the subwoofer may be difficult to hear. You can check the subwoofer sound by emitting the test tone.
- Set the night mode to off. For details, refer to the Operating Instructions supplied with a compatible model.
- If you change the [RF Channel] setting from [Off] to [On], it may take 1 minute for the sound to be output.
Sound skips or has noise.
- If there is a device nearby that generates electromagnetic waves, such as a wireless LAN or a microwave oven in use, locate the subwoofer and a compatible model apart from it.
- If there is an obstacle between the subwoofer and a compatible model, move or remove it.
- Locate the subwoofer and a compatible model as close as possible.
- Change the [RF Channel] setting to [Off], and then change to [On] again.
- Switch the network connection of the TV or Blu-ray Disc player from wireless to wired.
- Change the [Wireless Playback Quality] setting to [Connection].
Specifications
- POWER OUTPUT (reference)
300 W (at 2 ohms, 100 Hz) - Speaker system
Subwoofer speaker system, Passive radiator type - Speaker
180 mm cone type 200 mm × 300 mm cone type, Passive radiator - Power requirements
120 V – 240 V AC, 50 Hz/60 Hz - Power consumption
On: 43 W Standby mode: 1 W or less Turned off: 0.5 W or less - Dimensions (approx.) (w/h/d)
277 mm × 409 mm × 422 mm (not including the projection portion) - Mass (approx.)
13.0 kg
Wireless transmitter/receiver section
- Communication system
Wireless Sound Specification Version 4.0 - Frequency band
5 GHz - Modulation method
OFDM - Included items
- Subwoofer (1)
- AC power cord (mains lead) (2)
- Operating Instructions (1)
Important information on software
This product contains software that is subject to the GNU General Public License (“GPL”) or GNU Lesser General Public License (“LGPL”). These establish that customers have the right to acquire, modify, and redistribute the source code of said software in accordance with the terms of the GPL or the LGPL. For the method to confirm the GPL, LGPL and other software licenses contained in the subwoofer, please refer to the Operating Instructions of a compatible model. When you use the compatible model HT-A7000 or HT-A9, please refer to [Software License Information] under [Setup] – [Advanced Settings] – [System Settings] on the home menu. You may find a copy of the relevant source code as required under the GPLv2 (and other licenses) at https://oss.sony.net/Products/Linux You may obtain the source code as required by the GPLv2 on a physical medium from us for a period of three years after our last shipment of this product by applying through the form at https://oss.sony.net/Products/Linux This offer is valid to anyone in receipt of this information. Please note that Sony cannot answer or respond to any inquiries regarding the content of this source code. All other trademarks are trademarks of their respective owners.
WARNING
Do not install the subwoofer in a confined space, such as a bookcase or built-in cabinet. To reduce the risk of fire, do not cover the ventilation opening of the subwoofer with newspapers, tablecloths, curtains, etc. Do not expose the subwoofer to naked flame sources (for example, lighted candles). To reduce the risk of fire or electric shock, do not expose this subwoofer to dripping or splashing, and do not place objects filled with liquids, such as vases, on the subwoofer. The subwoofer is not disconnected from the mains as long as it is connected to the AC outlet, even if the subwoofer itself has been turned off. As the mains plug is used to disconnect the subwoofer from the mains, connect the subwoofer to an easily accessible AC outlet. Should you notice an abnormality in the subwoofer, disconnect the main plug from the AC outlet immediately.
Do not place this product close to medical devices
This product (including accessories) has a magnet(s) which may interfere with pacemakers, programmable shunt valves for hydrocephalus treatment, or other medical devices. Do not place this product close to persons who use such medical devices. Consult your doctor before using this product if you use any such medical device.
Indoor use only.
Precautions
On safety
- Should any solid object or liquid fall into the subwoofer, unplug the system and have it checked by qualified personnel before operating it any further.
- Do not climb on the subwoofer, as you may fall down and injure yourself, or the subwoofer damage may result.
On power sources
- Before operating the subwoofer, check that the operating voltage is identical to your local power supply. The operating voltage is indicated on the nameplate at the rear of the subwoofer.
- If you are not going to use the subwoofer for a long time, be sure to disconnect the subwoofer from the wall outlet (mains). To disconnect the AC power cord (mains lead), grasp the plug itself; never pull the cord.
- One blade of the plug is wider than the other for the purpose of safety and will fit into the wall outlet (mains) only one way. If you are unable to insert the plug fully into the outlet, contact your dealer.
- AC power cord (mains lead) must be changed only at a qualified service shop.
On heat buildup
- Although the subwoofer heats up during operation, this is not a malfunction. If you continuously use this subwoofer at high volume, the subwoofer temperature at the rear and bottom rises considerably. To avoid burning yourself, do not touch the subwoofer.
On placement
- Do not place the subwoofer near heat sources or in a place subject to direct sunlight, excessive dust, or mechanical shock.
- Do not place metal objects other than a TV around the subwoofer. Wireless functions may be unstable.
- If the subwoofer is being used in combination with a TV, VCR, or tape deck, noise may result and picture quality may suffer. In such a case, place the subwoofer away from the TV, VCR, or tape deck.
- Use caution when placing the subwoofer on a surface that has been specially treated (with wax, oil, polish, etc.), as staining or discoloration of the surface may result.
- The speakers of this subwoofer are not of magnetically shielded type. Do not place magnetic cards on the subwoofer or near it.
If you encounter color irregularity on anearby TV screen
Color irregularities may be observed on certain types of TV sets.
On cleaning
Clean the subwoofer with a soft, dry cloth. Do not use any type of abrasive pad, scouring powder, or solvent such as alcohol or benzine. If you have any question or problem concerning your system, please consult your nearest Sony dealer.