Bosch PLR 50 C Laser Range Finder Instruction Manual


PLR 50 C Laser Range Finder
Instruction Manual


Visit the online operating instruction for additional product information.

Safety Instructions
the measuring tool is not used in accordance with these instructions. Never make warning signs on the measuring tool unrecognizable. SAVE THESE INSTRUCTIONS FOR FUTURE REFERENCE AND INCLUDE THEM WITH THE MEASURING TOOL WHEN RANSFERRING IT TO A THIRD PARTY.
- Warning! If operating or adjustment devices other than those specified here are used or other procedures are carried out, this can lead to dangerous exposure to radiation.
- The measuring tool is delivered with a laser warning sign (marked in the illustration of the measuring tool on the graphics page).
- If the text of the laser warning label is not in your national language, stick the provided warning label in your national language over it before operating for the first time.
Do not direct the laser beam at persons or animals and do not stare into the direct or reflected laser beam yourself. You could blind somebody. cause accidents or damage your eyes.
- If laser radiation hits your eye, you must close your eyes and immediately turn your head away from the beam.
- Do not make any modifications to the laser equipment.
- Do not use the laser goggles (accessory) as protective goggles. The laser goggles
make the laser beam easier to see: they do not protect you against laser radiation. - Do not use the laser goggles (accessory) as sunglasses or while driving. The laser goggles do not provide full UV protection and impair your ability to see
- Have the measuring tool serviced only by a qualified specialist using only original replacement parts. This will ensure that the safety of the measuring tool is main
- Do not let children use the laser measuring tool unsupervised. They could unintentionally blind themselves or other persons.
- Do not use the measuring tool in explosive atmospheres which contain flammable liquids, gases or dust. Sparks may be produced inside the measuring which can ignite dust or fumes.
- The measuring tool is equipped with a wireless interface. Local operating restrictions, e.g. in aeroplanes or hospitals, must be observed.
The Bluetooth word mark and logos are registered trademarks owned by Bluetooth SIG, Inc. and any use of such marks by Robert Bosch Power Tools GmbH is under license.
- Caution! When using the measuring tool with Bluetooth’, a fault may occur in other devices and systems, aeroplanes and medical devices (e.g. pacemakers, hearing aids). Also, damage to people and animals in the immediate vicinity cannot be completely excluded. Do not use the measuring tool with Bluetooth in the vicinity of medical devices, petrol stations, chemical plants, areas with a potentially explosive atmosphere and in blasting areas. Do not use the measuring tool with Bluetooth on aeroplanes. Avoid using the product near your body for extended
- Do not use the measuring tool if the touchscreen is visibly damaged (e.g. cracks in the surface etc.).
Product Description and Specifications
Intended Use
The measuring tool is intended for measuring distances, lengths, heights, clearances and inclines, and for calculating areas and volumes.
The measuring tool is suitable for indoor use.
The measuring results can be transferred to other devices via Bluetooth®.
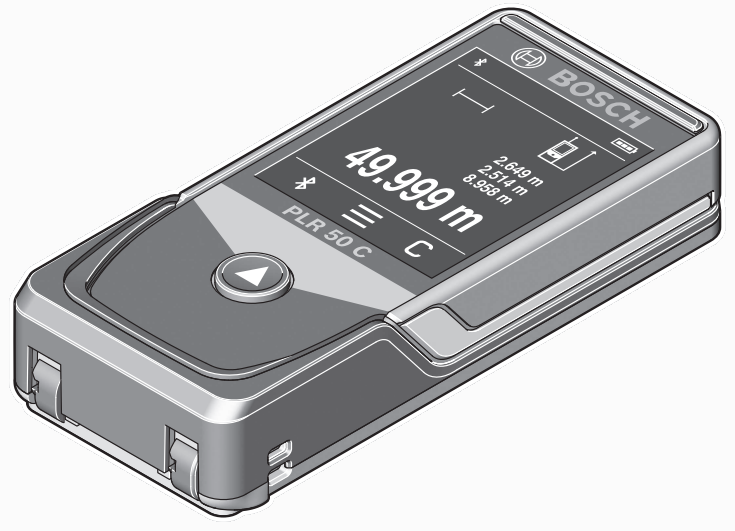
Product Features
The numbering of the product features refers to the representation of the measuring tool in the images.
- Measuring button
- Touchscreen
- Stop plate
- Battery compartment cover
- Battery compartment cover locking mechanism
- Serial number
- Laser warning label
- Laser beam output
- Reception lens
- Protective bag
Display Elements
(a) Bluetooth® status
(b) Temperature warning
(c)Battery indicator
(d)Laser switched on
(e)
(f)Measured value lines
(g)Result line
(h) C Delete button
(i)
(j)
(k)Measuring function button
(l)
(m)
(n)
(o)
(p)


Technical data
Digital laser measure |
PLR 50 C |
| Article number | 3 603 F72 2.. |
Distance measurement |
|
| Measuring range | 0.05-50 m |
| Measuring accuracy’) | ±2.0 mm |
General |
|
| Operating temperature’ | —10 °C to +50°C |
| Storage temperature | —20 °C to +70°C |
| Relative air humidity max. | 90% |
| Max. altitude | 2000 m |
| Pollution degree according to IEC 61010-1 | 2D) |
| Laser class | 2 |
| Laser type | 635 nm, < 1 mW |
| Divergence of the laser beam | < 1.5 mrad (full angle) |
| Bosch Power Tools | 1 609 92A 7HD 1(14.03.2022) |
| Automatic switch-off after approx. | |
| Laser | 20 s |
| Measuring tool (without measurement)E) | 5 min |
| – Bluetooth® (when inactive) | 3 min |
| Batteries | 3 x 1.5 V LRO3 (AAA) |
| Data transmission | |
| Bluetooth | Bluetooth® 4.2 (Low Energy)n |
| Operating frequency range | 2402-2480 MHz |
| Max. transmission power | 2.5 mW |
A) When measuring from the front edge. In unfavourable conditions such as very strong lighting, a temperature greatly deviating from 25 °C or a poorly reflecting surface, the measuring range can be restricted.
B) In unfavourable conditions such as strong lighting, high altitudes or a poorly reflecting surface, the maximum deviation can be ±4 mm with a deviation of ±0.15 mm/m. In favourable conditions, a deviation of ±0.05 mm/m needs to be taken into account.
C) In continuous measurement mode, the max. operating temperature is +40 °C.
D) Only non-conductive deposits occur, whereby occasional temporary conductivity caused by condensation is expected.
E) Bluetooth® deactivated
F) When using Bluetooth® Low Energy devices, it may not be possible to establish a connection depending on the model and operating system.
Bluetooth® tools must support the GATT profile.
The serial number (6) on the type plate is used to clearly identify your measuring tool.
Inserting/Changing the Battery
Take the non-rechargeable batteries out of the measuring tool if you are not using it for a long time. The non-rechargeable batteries can corrode and self-discharge during prolonged storage.

Operation
Using the touchscreen
Do not use the measuring tool if the touchscreen is visibly damaged (e.g. cracks in the surface etc.).

- The display divides into the fields of the status bar (A) and touch-screen (B) with the menu bar (C).
- The status bar (A) shows the Bluetooth® connection status, temperature warning and the state of charge of the non-re-chargeable batteries/rechargeable batteries.
- The measuring tool can be controlled by touching the buttons using the touchscreen (B).
- The menu bar (C) holds additional functions (e.g. Bluetooth® on/off, menu, delete).
- Use only your fingers to operate the touchscreen. Lightly tap the relevant button (control). Do not tap the touchscreen with high pressure or sharp objects.
- Do not bring the touchscreen into contact with other electrical devices or water.
- To clean the touchscreen, switch the measuring tool off and wipe off dirt with a microfibre cloth, for instance.
Start-Up
- Never leaves the measuring tool unattended when switched on, and ensure the measuring tool is switched off after use. Others may be dazzled by the laser beam.
- Protect the measuring tool from moisture and direct sunlight.
- Do not expose the measuring tool to any extreme temperatures or variations in temperature. For example, do not leave it in a car for extended periods of time. In case of large variations in temperature, allow the measuring tool to adjust to the ambient temperature before putting it into operation. The precision of the measuring tool may be compromised if exposed to extreme temperatures or variations in temperature.
- Avoid substantial knocks to the measuring tool and avoid dropping it. After strong external influences on the measuring tool, you should always carry out an accuracy check (see “Accuracy Check”, page 25) before further work. Switching On and Off
- Press the A button to switch the measuring tool and the laser on.
- Press and hold the
- If no button on the measuring tool is pressed for approx. 5 min, the measuring tool will switch off automatically to preserve the non-rechargeable batteries. All stored values are retained when the tool is switched off.

Measuring Process
Once switched on, the measuring tool is in the length measurement function.
Once the measuring tool has been switched on, the rear edge of the measuring tool is selected as the reference level for measurement. You can change the reference level.
“Selecting the Reference (see Level”, page 22)
- Apply the measuring tool to the point at which you want to start the measurement (e.g. wall).
- Press the
- Target the target surface with the laser beam.
- Briefly press the
- In the continuous measurement function, the measurement begins immediately after the first press of the

Selecting the Reference Level
For the measurement, you can select from various reference levels:


Basic Settings Menu
In the Basic settings menu, you can find the following basic settings:
–
–
– Grade measurement calibration (see “Accuracy Check”, page 25)
Press the
Press the required button to activate or deactivate the function.
If the function is activated, the function is displayed as a white symbol. If the function
is deactivated, the function is displayed as a grey symbol.
To leave the Basic settings menu, press the


Measuring functions
Selecting/Changing Measuring Function
You will find the following functions in the Functions menu:
–
–
–
–
–
–
–
–
▪
▪
▪
Press the (k) button and press the required function.
For more information, you can access the online operating instructions at www.bosch-pt.com/manuals


Integrated help function
The help function integrated in the measuring tool offers detailed animations for individual measuring functions/measuring processes.
Open the Functions menu.
Press the
Press the required function.
The animation shows the detailed procedure for the selected measuring function.
Press the
Bluetooth® interface
Activating the Bluetooth® interface for transmitting data to a mobile device
Ensure that the Bluetooth® interface is activated on your mobile device.
Press the
The Bluetooth® symbol is displayed in the (a) status bar (A).
These can be downloaded in the respective app stores, depending on the device.
The connection between mobile devices and measuring tools is established after the Bosch application started. If multiple active measuring tools are found, select the appropriate measuring tool using the serial number. You can find the serial number (6) on your measuring tool’s type plate.
If no connection can be established within 3 minutes after pressing the button, Bluetooth® switches off automatically to preserve the non-rechargeable batteries. batteries/rechargeable
Deactivating the Bluetooth® interface


Press the
Accuracy Check
For more information, you can access the online operating instructions at www.bosch-pt.com/manuals
Error Message

Maintenance and Service
Maintenance and Cleaning
Only store and transport the measuring tool in the protective bag provided.
Keep the measuring tool clean at all times.
Never immerse the measuring tool in water or other liquids.
Wipe off any dirt using a damp, soft cloth. Do not use any detergents or solvents.
Take particular care of the reception lens (9), which must be handled with the same level of care you would give to a pair of glasses or a camera lens.
If the measuring tool needs to be repaired, send it off in the protective bag (10).
After-Sales Service and Application Service
Our after-sales service responds to your questions concerning maintenance and repair of your product as well as spare parts. You can find explosion drawings and information on spare parts at: www.bosch-pt.com
The Bosch product use advice team will be happy to help you with any questions about our products and their accessories.
In all correspondence and spare parts orders, please always include the 10‑digit article number given on the nameplate of the product.
Great Britain
Robert Bosch Ltd. (B.S.C.)
P.O. Box 98
Broadwater Park
North Orbital Road
Denham Uxbridge
UB 9 5HJ
At www.bosch-pt.co.uk you can order spare parts or arrange the collection of a product in need of servicing or repair.
Tel. Service: (0344) 7360109
E-Mail:
You can find further service addresses at: www.bosch-pt.com/serviceaddresses
Disposal
Do not dispose of the measuring tools or battery packs/batteries with household waste.
Only for EU countries:
According to the Directive 2012/19/EU on waste electrical and electronic equipment and its transposition into national law, measuring tools that are no longer usable, and, according to the Directive 2006/66/EC, defective or drained batteries must be collected separately and disposed of in an environmentally correct manner.
If disposed of incorrectly, waste electrical and electronic equipment may have harmful effects on the environment and human health, due to the potential presence of hazardous substances.
Only for the United Kingdom:
According to Waste Electrical and Electronic Equipment Regulations 2013 (2013/3113)
and the Waste Batteries and Accumulators Regulations 2009 (2009/890), measuring
tools that are no longer usable must be collected separately and disposed of in an environmentally friendly manner.
Further information for South Africa
You can have the ICASA certification logo shown in the display of the measuring tool.
To do so, press and hold the

