LG MFL71780909 AUTO EMPTY CHARGING STATION Owner’s Manual


LG MFL71780909 AUTO EMPTY CHARGING STATION

SAFETY INSTRUCTION
READ ALL INSTRUCTIONS BEFORE USE
The following safety guidelines are intended to prevent unforeseen risks or damage from unsafe or incorrect operation of the appliance. The guidelines are separated into ‘WARNING’ and ‘CAUTION’ as described below.
Safety Messages
WARNING
- To reduce the risk of explosion, fire, death, electric shock, injury or scalding to persons when using this product, follow basic precautions, including the following:
Technical Safety - This appliance is not intended for use by persons (including children) with reduced physical, sensory or mental capabilities, or lack of experience and knowledge, unless they have been given supervision or instruction concerning use of the appliance by a person responsible for their safety. Children should be supervised to ensure that they do not play with the appliance.
- Do not allow the appliance to be used as a toy. Close attention is necessary when used by or near children.
- Do not allow children to play with or hang on the appliance.
- Do not use the appliance with a damaged power cord or plug. The cord must be replaced. If the appliance is not working as it should, has been dropped, damaged, left outdoors, or dropped into water, return it to an LG Electronics service center.
- Do not pull or carry by cord, use cord as a handle, close a door on cord, or pull cord around sharp edges or corners. Do not run appliance over cord. Keep cord away from heated surfaces.
- Do not unplug by pulling on cord. To unplug, grasp the plug, not the cord.
- Place the cords from other appliances out of the area to be cleaned.
Battery - Never use the battery and the vacuum cleaner from other appliances with this appliance. Use only the battery and the vacuum cleaner provided by LG Electronics.
- Use appliances only with specifically designated battery packs. Use of any other battery packs may create a risk of injury and fire.
- Recharge only with the charger specified by the manufacturer. A charger that is suitable for one type of battery pack may create a risk of fire when used with another battery pack.
- Never use the battery and the charging station from this appliance with other appliances.
- Unplug the power cord and remove the battery if the appliance will not be used for an extended period of time.
- Do not use modified or damaged batteries.
- When disposing of the battery or the appliance, remove the battery from the appliance and safely dispose of it.
- Do not use a battery pack or appliance that is damaged or modified. Damaged or modified batteries may exhibit unpredictable behavior resulting in fire, explosion or risk of injury.
- Do not disassemble, remove or short-circuit the battery.
- Have the battery replaced when it is no longer able to hold a charge.
- Refer to the Charging the Battery section instructions for the method of replacing the battery.
- When disposing of this appliance, follow regulations for the disposal of rechargeable lithium-ion batteries.
- Follow all local ordinances and regulations when handling or disposing of the battery.
- Disconnect the battery pack before cleaning or servicing.
- Prevent unintentional starting. Ensure the switch is in the off position before connecting to the battery pack, picking up or carrying the appliance. Carrying the appliance with your finger on the switch or energizing an appliance that has the switch on invites accidents.
- When the battery pack is not in use, keep it away from other metal objects, like paper clips, coins, keys, nails, screws or other small metal objects, that can make a connection from one terminal to another. Shorting the battery terminals together may cause burns or a fire.
- Under abusive conditions, liquid may be ejected from the battery. If this happens, avoid contact. If contact accidentally occurs, flush with water. If liquid contacts eyes, additionally seek medical help. Liquid ejected from the battery may cause irritation or burns.
- Do not modify or attempt to repair the appliance or the battery pack (as applicable) except as indicated in the instructions for use and care.
Installation - To avoid an electrical shock or fire, do not install, charge or store the appliance where it may be exposed to water, rainfall or high humidity.
- Install, charge and store the appliance in a well-ventilated place.
- Avoid operating the appliance in areas where there is a risk of leakage of flammable gas, industrial oil or metallic dust.
- Do not store or install the appliance, power cord or plug near heating devices or open flames.
- Install the charging station on a firm, level surface.
- Install the device so that it does not tip over.
- To prevent tipping, self-standing mode installations should be anchored to the wall using the provided anchoring kit.
- Use the anchoring screws only when attaching to concrete or similar solid surfaces.
- Never drill into a wall without first checking that the area behind it is free from power conduits, plumbing, vents, or cables.
- Do not use or store the appliance at temperatures below 5°C or above 38°C.
- Do not store or install the appliance where it is exposed to temperatures below freezing or exposed to outdoor weather conditions.
- When installing or moving the appliance, be careful not to pinch, crush, or damage the power cord or plug.
Operation - This appliance is exclusively for use with the LG Electronics CordZero A9 Vacuum Cleaner. Do not use it for other appliances or other purposes.
- Use only as described in this manual. Use only the manufacturer’s recommended attachment.
- This appliance is designed for normal indoor domestic use only. It is not to be used for any non-residential, commercial, or industrial application.
- Do not use or store the appliance in any outdoor location, garage environment or on wet surfaces.
- This appliance is equipped with a double insulated power cord.The power plug must be plugged into an appropriate outlet socket that is installed in accordance with all local codes and ordinances.
- Do not handle the power cord, plug, or appliance controls with wet hands.
- Wipe any moisture or dirt off the cord or plug with a dry cloth.
- Unplug the power cord using the plug, not the cord. Pulling on the cord can damage it and result in electric shock or fire.
- Never attempt to operate this appliance if it is damaged, malfunctioning, partially disassembled or has missing or broken parts, including a damaged cord or plug. Take it to an authorized LG Electronics service centre or dealer for as sistance.
- Do not apply excessive force to the power cord to bend it, or place it under a heavy object as this will damage it.
- Do not use multiple-outlet adapters with this appliance. Make sure to use a power socket with a capacity of 10 A.
- Do not plug the appliance into a damaged or loose outlet.
- Make sure to unplug the power cord when the appliance is not to be used for an extended period of time.
- Do not damage, alter, excessively bend, twist, pull, pinch or heat the power cord.
- Before using the appliance, remove any wire or string on the floor.
- Avoid touching the prongs of the power plug with your finger(s) when unplugging the power cord.
- Do not cover the power cord with a rug or carpeting.
- Push the power plug firmly into the wall outlet so that it is not loose.
- If the product has been submerged, contact an LG Electronics service center or dealer for instructions before resuming use.
- If the product makes a strange noise or emits an odor or smoke, discontinue use and contact an LG Electronics customer information center.
- Only qualified technicians or service personnel from LG Electronics may disassemble, repair or modify the appliance.
- Never insert a sharp metal object such as a pin, nail or knife in a hole or gap in the appliance or the charging station.
- Make sure that no water, beverage or detergent gets inside the appliance or the charging station.
- Do not allow children to use the appliance.
- Do not let children or pets get close to the appliance when using, charging or storing.
- Keep clothing and hair, fingers, or other parts of the body away from openings and moving parts.
- Do not use in an enclosed space where vapors are present from paint thinner, mothproofing substances, flammable dust or other explosive or toxic materials.
- Make sure that the filter is installed before use.
- Do not touch the charging terminals on the appliance or the charging station, or insert an electrified object inside the appliance or the station.
- Do not lean the appliance on walls, chairs or tables.
- If the earth leakage breaker is tripped when the product is put on the charging station, immediately remove the appliance from the charging station. Contact an LG Electronics customer service centre.
- Do not use or store a heating device or flammable substance (ether, benzene, alcohol, chemicals, combustible sprays, insecticide, air freshener or cosmetics) in close proximity to the appliance.
- Do not attempt to clean up a liquid substance (water, beverage), odorous substances (candy, chocolate, pet excrement), metal objects (blades, pins), flammable substances, surfactants, or glass shards with this appliance.
- In the event of a gas leak (natural gas, propane gas, etc.) do not operate this or any other appliance. Open a window or door to ventilate the area immediately.
- Do not hold the charging station upside down with the battery in the charging station.
- Do not expose the appliance, and the battery in particular, to heat, a heating device or direct sunlight.
- Do not keep the appliance or its battery inside a vehicle that is exposed to direct sunlight.
- Never allow any water, beverage or detergent to get inside the battery.
- Do not apply physical impacts to the battery.
- Do not use the appliance without the dust bag and filters in place.
Maintenance - Make sure to unplug the power cord when cleaning or maintaining the charging station.
- Do not spray or use water, inflammable materials such as gasoline or thinners, or surfactants such as detergent or bath soap near the appliance.
Disposal - Keep packing materials out of the reach of children. Packaging materials can pose a suffocation risk for children.
- Destroy the carton, plastic bag, and other packing materials after the appliance is unpacked. Children might use them for play. Cartons covered with rugs, bedspreads, or plastic sheets can become airtight chambers.
- Dispose of this appliance according to local, state, and regional laws and regulations.
- Contact your local city council or the related government authority before disposing of this appliance.
CAUTION
- To reduce the risk of injury to persons, malfunction, or damage to the product or property when using the appliance, follow basic safety precautions, including the following:
Operation - Do not open the door of the product using excessive force.
- Do not carry the product with the Vacuum Cleaner, nozzles, or accessories inside; it may cause injury or product damage.
- When opening and closing the product door or control panel, be careful not to get your fingers caught.
- Remove all the protective plastic from the Vacuum Cleaner before use. Otherwise, it may cause abnormal noise during the dust emptying operation.
- Keep the area around the charging station clean. A strong airstream can be emitted from the exhaust on the back of the product, causing dust to accumulate on the floor.
- This appliance has a built-in safety device to prevent damage from overheating. If the appliance becomes overheated after extended use, it may automatically turn off. If this occurs, leave the appliance in a cool, well-ventilated area for about an hour before turning on the power again.
- Do not subject the product to shocks or drop it.
- Do not install wet or damp filters.
- Do not clean the product with a volatile or organic solvent (thinner or acetone).
- Always use a soft cloth to clean the appliance.
- Remain aware of your surroundings while using the appliance to avoid colliding with people or animals.
- Do not kick or apply force to the appliance.
- Do not put any object other than the appliance, especially a metallic or magnetic object, on the charging station.
- Keep fingers away from pinch points when assembling the appliance or the charging station.
- Do not let a child or a pet hang onto the charging station.
- Follow all applicable state and local codes and regulations when installing the mounting station.
- Do not use double-sided tape to anchor the charging station on wallpaper. Use the provided screws to anchor the charging station.
- The weight of the charging station and the appliance could damage the paper.
- Do not remove the battery during operation.
INSTALLATION
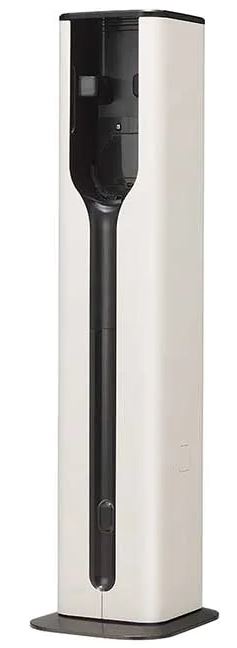
Product Overview
The images in this guide may be different from the actual components and accessories, which are subject to change by the manufacturer without prior notice for product improvement purposes.
Front View

| Part Name | Part Name | ||
| a | Control Panel | f | Motor Protection Filter (Expendable) |
| b | Vacuum Cleaner Mounting Unit | g | Exhaust Filter (Expendable) |
| c | Nozzle Hook*1 | h | Cleaning Brush |
| d | Bedding Nozzle or Pet Nozzle | i | Crevice Tool |
| e | Dust Bag (Expendable) | j | Combination Tool |
NOTE
Use the charging station only with the provided vacuum cleaner. Using a vacuum cleaner other than the one designed to be used with the charging station, as improper sealing of the products may result and dust not being emptied from vacuum cleaner.
Accessories Included
Accessories

- a Dust Bag (Expendable)
Installation Kit

- String (Including the slide and loop) b Fixing Rack (2EA)
- Wall Fixing Screw
- Wall Fixing Anchor
- Product Fixing Screw
NOTE
The dust bag exhaust filter and the motor protection filter will eventually need to be replaced. Contact an LG Electronics customer service center.
Specifications
Appliance
| Model | VDS-ST**** |
| Dimensions (Width X Depth X Height) | 255 mm X 297 mm x 1009 mm |
| Weight | Approximately 10.1 kg |
| Power Consumption | 1700 W (Cleaning) 0.4 A (Charging) |
| Input | 220 V~ 50 Hz |
| Output | 28.3 V% / 1.15 A |
Battery
The charging station allows you to charge two batteries but charge one battery at a time.
The spare battery will start charging only when the battery in the vacuum cleaner is fully charged.
NOTE
The number of batteries varies depending on the vacuum cleaner purchased. The spare battery is available to buy separately.
| Model | EAC633822** |
| Voltage | DC 25.2 V |
| Capacity | 2400 mA |
Installing the Charging Station
Follow the steps below to install the charging station on a hard and level floor.
CAUTION Do not install on carpeted floors or rugs. The product may fall, causing injury or damage.

- 1 Place the product on a flat, hard surface.
- During installation, allow 5cm clearance in the rear and a radius of 20cm to the front & sides to be able to open both doors of the product.
- When storing with the mop nozzle, install the product further away from the wall.
- Using the anti-tip kit, fix the product firmly to the wall.
- You may need to seek professional help to assist with securing the product to the wall using an anti-tip kit.
- Plug the power plug into the outlet.
- When the power plug is connected correctly, the status display flashes and the product setting is initialized. Once initialization is completed, the status display turns off.
- Use a velcro tie to bind and tidy the excess cable.

Anti-tip Kit Installation
Anti-tip kit is intended to secure the product to the wall firmly in order to prevent the product from falling over or tipping,which may lead to personal injury, or product or floor damage. Install and use the kit in the following manner.
WARNING
- Carefully read and follow the guidelines in order to prevent property damage or personal injury.
- Do not lean against the product or place a heavy object on top of it.
- Manage and supervise children or pet animals to prevent them from bumping into products and falling, or clinging to the product.
- If you prefer not to install this kit immediately, ensure that you keep it out of the reach of children as this may pose a choking hazard.
- Do not use this kit for purposes other than the installation of the charging station.
- When drilling holes for mounting of anti-tip kit, use caution and wear gloves, protective clothing & protective goggles to prevent personal injury.
- If there is a pipe (gas pipe, water pipe, pneumatic pipe, etc.), an electric cable or an electric wire behind the wall, do not install the product on that wall.
- Before moving the product to its final position, decide on a proper position for installing the wall fixing anchor
- Install the wall fixing anchor and the fixing rack directly behind the product.
- Install the wall fixing anchor and the fixing rack directly behind the product.
- Insert the fixing rack into the loop at the end of the string and insert the provided wall fixing screw into the fixing rack screw hole.
- Drill a 4 mm wide and 44.5 mm deep hole at the selected position on the concrete wall and insert the wall fixing anchor into the hole. Fix the fixing rack to the wall firmly using the wall fixing screw.
- Insert the nearest string into the slide knot and form a loop as shown in the figure. Insert the fixing rack into the loop and insert the product fixing screw into the fixing rack screw hole.
- Align the screw hole on the fixing rack with the hole at the back of the product and fix the fixing rack to the product firmly by fastening the product fixing screw. \
- Adjust the length of the string on the slide by pulling it in accordance with the gap between the wall and the product.


CAUTION
- Do not tighten the wall fixing screw excessively. Doing so may cause the wall fixing to become loose and the product to fall, resulting in personal injury or product damage.
- Use the fixing rack only if the wall is concrete or solid wall. If the wall is not solid and the product falls, personal injury or product damage may result.
- Do not insert the fixing rack into the loop in the middle. Doing so may cause the slide to slip after the product falls, resulting in personal injury or product damage.
- If the distance between the wall and the product is too great, the product may fall.
Storing the Accessories
Storing the Tools
Use the product to store the inlet and components provided with the vacuum cleaner.
The components may differ depending on the vacuum cleaner model.
Storing on Sides
- Open the nozzle hook a on both sides of the product.
- To open the nozzle hooks, press on the right side. Be careful not to pinch fingers when opening.
- To open the nozzle hooks, press on the right side. Be careful not to pinch fingers when opening.
- Hang the nozzle on the nozzle hook.


Storage Inside
- Open the left door of the product and insert the bedding nozzle or the pet nozzle 1 for storage.
- Open the right door and insert the combination tool 2 the crevice tool 3 and the cleaning brush 4 for storage.


NOTE
- Before moving the product, unplug it and remove the vacuum cleaner, nozzles, and accessories.
- To carry the product, open both doors and hold the areas shown.

OPERATION
Charging the Battery
Before Charging the Battery
- Make sure that the adapter is connected to both the charging station and the power outlet.
- Fully charging a single battery usually takes 4 hours. It will take twice as long to charge both the main and spare batteries.
- The battery will not be charged if the indoor temperature is below 5 ℃. Only charge the battery when indoor temperatures are between 5 ℃ and 38 ℃.
- The battery will eventually need to be replaced. Due to the battery characteristics, runtime is shortened after using the appliance repeatedly for an extended period.
- The last bar on the battery indicator begins to flash when the battery needs to be recharged. Use the appliance with a fully charged battery.
- To maintain battery life on dual-battery models, swap the positions of the two batteries periodically, between the main body and the spare charging station.
Charging the Spare Battery
After the vacuum cleaner has finished charging, the spare battery will start charging.
One or two batteries are provided. The number of batteries varies depending on the model purchased.
- Lift the front of the control panel located at the top of the charging station.
- To insert, align the battery with the outline of the battery charger.
- Press the battery down into the compartment.


NOTE
- The spare battery icon in the status display flashes during charging and remains on when charging is complete.
- Insert the spare battery completely. If the spare battery is inserted correctly, the spare battery icon flashes.
Control Panel Features
Control Panel

| List | Descriptions | |
|
a |
Status Display | The display shows the dust emptying operation status or when to replace the dust bag, charging status of the spare battery, and dust emptying mode. |
|
b |
Start | Press the Start/Stop button once to start the dust emptying operation. • With the Start/Stop button is selected, a melody plays. When the vacuum cleaner is mounted in the emptying station, the dust bin cover opens automatically and the dust emptying operation begins. • When you purchase the product, the manual dust emptying mode is set by default. |
| Stop | Press the Start/Stop button once to cancel or pause the dust emptying operation. • Dust emptying operates in 3 stages, and its function is different for each stage (preparation ~ dust emptying ~ finishing). – Pressing the Start/Stop button in the Preparation Stage (mounting the body of the vacuum cleaner): The dust emptying operation is canceled and the product returns to the charging status. – Pressing the Start/Stop button in the Dust Emptying Stage (the dust bin cover opens automatically, and the dust emptying operation begins): The dust emptying (replace bag) indicator flashes white along with emitting a beeping sound, and the dust emptying operation is paused. Repress the Start/Stop button to start additional dust emptying operation. – Pressing the Start/Stop button in the Finishing Stage (the dust bin cover closes automatically, the body of the vacuum cleaner is released): Pressing the Start/Stop button does not work | |
| Change Dust Emptying Mode | Press and hold the Start/Stop button for at least 3 seconds to switch between automatic or manual dust emptying mode. |
Status Display

| List | Descriptions | |
|
a |
Dust Emptying (Replace Bag) Indicator | • Indicates the dust emptying operation status or when to replace the dust bag. – White: Product is emptying dust. – Flashing red: If the indicator flashes red while emptying dust, this indicates dust bag requires replacement. At the end of dust emptying operation, replace dust bag. – Flashing red, beeping: If the dusty emptying operation is complete and the dust bag is full, the indicator will flash red, beep 10 times and then turn off. – If the indicator flashes red, replace the dust bag to maintain product performance. |
|
b |
Spare Battery Indicator | • Indicates the charging status of the spare battery. – Flashes: When the spare battery is mounted in the charger. – On (steady): Spare battery charging is complete. – The spare battery will not charge until the battery mounted in the vacuum cleaner is fully charged. Check the battery level on the handle of the vacuum cleaner to check whether charging is complete. |
|
c |
Auto Emptying Indicator | • Lights to indicate that the automatic dust emptying mode is on. – Automatic dust emptying mode automatically starts the operation every time the vacuum cleaner is mounted correctly onto the product. – If you remove the vacuum cleaner and mount it immediately, dust emptying operation may not start automatically, depending on the circumstance. If it doesn’t start automatically, select the Start/Stop button to start. |
NOTE
Remove all the protective plastic from the vacuum cleaner before use. Otherwise, it may cause abnormal noise during the dust emptying operation.
Using the Product
Using the Manual Mode
- Insert the vacuum cleaner into the product.
- After adjusting the length adjustment pipe of the vacuum cleaner to the shortest length, attach it to the product.
- If a vacuum cleaner pipe is connected to a combination tool or crevice tool, the vacuum cleaner will not fit inside the emptying station. Mount vacuum cleaner to emptying station with a combination too or crevice tool attached.
- If the vacuum cleaner fits properly inside the product, the alarm will sound. If the alarm does not sound, reinsert the vacuum cleaner.
- Before starting the dust emptying operation, pull the easy dust emptying lever on the vacuum cleaner down 2 or 3 times to sweep away the dust to make the operation easier.
- Press the Start/Stop button. The dust emptying (replace bag) icon flashes white, and the dust emptying operation begins along with a melody.
- When the dust emptying operation is complete, a melody sounds, the dust emptying (replace bag) icon turns off, and the vacuum cleaner starts charging.

Using the Auto Mode
When the automatic dust emptying mode is set, the dust emptying operation starts automatically whenever the vacuum cleaner is properly inserted into the product.
- Press and hold Start/Stop for 3 seconds to change from the Manual mode to the Auto mode.
- Insert the vacuum cleaner into the product. 3 When the dust emptying operation is complete, a melody sounds, the dust emptying (replace bag) icon turns off, and the vacuum cleaner starts charging.
WARNING Do not wash the vacuum cleaner body or the inlet with water. If water enters the built-in motor, it can cause electric shock or fire.
CAUTION
- Do not forcibly remove the vacuum cleaner during the dust emptying operation or when it is paused. Since the vacuum cleaner is mounted, the product may break or fall, causing injury or product damage.
- Remove the vacuum cleaner after the dust emptying (replace bag) icon in the status display is turned off completely.
- Do not put foreign objects such as hands, garbage, toys in the dust suction area of the product without a vacuum cleaner mounted.
- Do not push, pull, or lean on the product; it may fall, causing injury or damage.
- Do not put objects like smartphones on the product’s control panel. The product may malfunction due to vibration, or the object may fall to the floor, causing injury or damage.
- If the power suddenly turns off during the dust emptying operation, you will be unable to remove the vacuum cleaner from the emptying station. Causes for power loss include a power outage, a turned-off power strip, an unplugged power cord, and a tripped circuit breaker.
- Once power is restored, the product will reset and then the product can be removed from the emptying station.
NOTE - The sound of the high-performance motor may be louder than the existing wireless vacuum cleaner. It is normal to hear sounds such as the vacuum cleaner, dust bin cover opening, product operating unit, and suction.
- During the vacuum cleaner dust emptying operation, a stronger suction force is applied just before the dust emptying operation finishes. The sound may increase, however, this is normal and does not indicate a fault.
- During the dust emptying operation, the product and spare battery are not charged for safety reasons.
- Replace the dust bag every 3 months to maintain the dust emptying performance. The frequency of replacing dust bag may vary depending on the environment.
- The dust bin may not be emptied completely under certain conditions (very full, contains long hairs, etc.). If this happens, press Start/Stop to repeat the emptying process.
- Clean the dust bin’s inside, the easy dust emptying lever and the large dust separator to remove the remaining dust. For more information, see the vacuum cleaner owner’s manual.
- The AUTO dust emptying function may not be able to remove dust and debris from the cleaner’s canister if the Kompressor lever function has been used repeatedly. A build-up of compressed dust and debris within the canister from using the Kompressor lever repeatedly will need to be removed by hand after using the AUTO function.
MAINTENANCE
Cleaning the Appliance
Cleaning the Product Body
- Disconnect the power plug from the outlet.
- Wipe the control panel using a soft cloth.
- The product may malfunction if there is dust on the control panel.
- The product may malfunction if there is dust on the control panel.
- Clean the dust around the dust suction area using a vacuum cleaner.


Changing the Dust Bag
- Open the left and right doors of the component storage.
- Hold the product with one hand and open the dust bag door with the other hand.
- Press the UP button 1 above the PUSH label with one hand. The dust bag is released.
- Pull out the dust bag lever 2 b to remove the dust bag.
- As the dust bag is pulled out, the top opening is closed.
- As the dust bag is pulled out, the top opening is closed.
- Throw away the dust bag.
- Prepare a new dust bag.
- To avoid odors, do not reuse the dust bags.
- Place the end of the dust bag on the rail inside the product.
- Slide the dust bag in along the rails of the product until it is completely inserted.
- Grab the dust bag lever 2 and push it up until you hear a “click” sound.


NOTE
- The dust bag door will not close without a dust bag. Discard the dust bag and be sure to put a new dust bag in place.
- Replace the dust bag once every 3 months. The replacement cycle may vary depending on the environment.
- Replace the dust bag if it smells, even if it is not full.
- The motor protection filter will eventually need to be replaced. Contact an LG Electronics customer service centre.
Cleaning the Filters
Clean the motor protection filter and the exhaust filter every 3 months or sooner if the dust emptying function seems weaker.
- Clean the filters more frequently if the appliance is used regularly or in areas with a lot of dust.
CAUTION - Do not use the appliance without the exhaust filter and the motor protection filter installed. Doing so could result in product damage.
- Open the left and right component storage doors.
- Hold the product with one hand and open the dust bag door with the other hand.
- Hold the product with one hand and take out the motor protection filter with the other hand.
- To remove the exhaust filter, hold the bottom of the product and pull the handle end of the filter.
- Remove dust from the motor protection filter and exhaust filter once every 3 months and wash it using room temperature water.
- To avoid odor and the malfunction of the motor, allow the motor protection filter and the exhaust filter to dry completely in a well-ventilated area out of direct sunlight for at least 24 hours before reassembling.
- Push the motor protection filter and exhaust C filter back into thier original positions.
- Make sure that the filters are in place before using the product.


TROUBLESHOOTING
Before Calling for Service
| Symptoms | Possible Cause & Solution |
| Dust emptying doesn’t work. | The power plug is not connected.
• Connect the power plug to an outlet. |
| The Vacuum Cleaner is not properly inserted into the product.
• Remove the Vacuum Cleaner and reinsert it. If it is installed properly, a beep will sound. | |
| Dust emptying operation is stopped.
• When the Dust Emptying Start/Stop button is pressed, the dust emptying operation starts from the beginning. | |
| It is set to automatic or manual dust emptying mode.
• When you purchase the product, the manual dust emptying mode is set by default. After inserting the Vacuum Cleaner into the product, pressing the Dust Emptying Start/Stop button starts the dust emptying operation. • When it is in automatic dust emptying mode, the dust emptying operation starts automatically whenever the vacuum cleaner is properly inserted into the product. | |
| Product setting initialization doesn’t work even after the power plug is plugged in again. | The internal motor of the product is not operating properly .
• Disconnect the power plug from the outlet and contact an LG Electronics Service Centre. |
| The power supply has been cut off. | The power supply has been cut off.
• Check whether the power plug is connected correctly to the outlet. • If using a multi-outlet strip, make sure the strip is turned on. • Check if the breaker is tripped or there is a power outage. |
| Symptoms | Possible Cause & Solution |
| It won’t charge. | It is not plugged in.
• Plug it into an outlet. |
| There is a foreign object on the charging terminals.
• After unplugging from the outlet, wipe off any foreign matter from the charging terminal with a dry cloth. | |
| The room temperature was 5 °C or less during charging.
• Charging may not work if the temperature where you are charging is 5 °C or less. Before use, fully charge the vacuum cleaner at a temperature above 5 °C. | |
| The vacuum cleaner is not properly inserted into the product.
• When the vacuum cleaner is properly inserted into the product, a beep sounds. If the beep does not sound, reinsert the vacuum cleaner. | |
| The auxiliary battery is not properly inserted into the product.
• Push in the auxiliary battery all the way. When the auxiliary battery is properly inserted, the auxiliary battery icon flashes. | |
| The product has a strange smell. | The product is purchased within 3 months.
• The odors from manufacturing the product should be gone within 3 months. |
| The Vacuum Cleaner smells.
• After cleaning with the mop nozzle, the wet dust may emit an odor. After finishing cleaning, remove the damp dust from the mop nozzle before storing the vacuum. • The pre-filter, exhaust filter, or large dust separator may smell after washing if it isn’t dried completely. After washing with water, dry them thoroughly in the well-ventilated shade for at least 24 hours before using them again. | |
| The dust bag smells.
• If you clean foreign matter that smells (such as pet excrement) with a vacuum cleaner, the vacuum may smell even if you do not have a full dust bag. Replace the new dust bag even if it isn’t full. • If you have not replaced the dust bag for a long time, it may smell. Replace it with a new dust bag even if it isn’t full. | |
| Two icons [dust emptying (replace bag) and auxiliary battery] flash simultaneously. | The motor that holds the Vacuum Cleaner isn’t working properly.
• Disconnect the power plug from the outlet and contact an LG Electronics Service Centre. |
| The motor that opens and closes the Vacuum Cleaner dust bin cover isn’t working properly.
• Disconnect the power plug from the outlet and contact an LG Electronics Service Centre. |