Bosch GKF 550 Professional Palm Router User Manual


Safety instructions
General Power Tool Safety Warnings
WARNING Read all safety warnings, instructions, illustrations and specifications provided with this power tool. Failure to follow all instructions listed below may result in electric shock, fire and/or serious injury.
Save all warnings and instructions for future reference.
The term “power tool” in the warnings refers to your mains-operated (corded) power tool or battery-operated (cordless) power tool.
Work area safety
- Keep work area clean and well lit. Cluttered or dark areas invite accidents.
- Do not operate power tools in explosive atmospheres, such as in the presence of flammable liquids, gases or dust. Power tools create sparks which may ignite the dust or fumes.
- Keep children and bystanders away while operating a power tool. Distractions can cause you to lose control.
Electrical safety
- Power tool plugs must match the outlet. Never modify the plug in any way. Do not use any adapter plugs with earthed (grounded) power tools. Unmodified plugs and matching outlets will reduce risk of electric shock.
- Avoid body contact with earthed or grounded surfaces, such as pipes, radiators, ranges and refrigerators. There is an increased risk of electric shock if your body is earthed or grounded.
- Do not expose power tools to rain or wet conditions. Water entering a power tool will increase the risk of electric shock.
- Do not abuse the cord. Never use the cord for carrying, pulling or unplugging the power tool. Keep cord away from heat, oil, sharp edges or moving parts. Damaged or entangled cords increase the risk of electric shock.
- When operating a power tool outdoors, use an extension cord suitable for outdoor use. Use of a cord suitable for outdoor use reduces the risk of electric shock.
- If operating a power tool in a damp location is unavoidable, use a residual current device (RCD) protected supply. Use of an RCD reduces the risk of electric shock.
Personal safety
- Stay alert, watch what you are doing and use common sense when operating a power tool. Do not use a power tool while you are tired or under the influence of drugs, alcohol or medication. A moment of inattention while operating power tools may result in serious personal injury.
- Use personal protective equipment. Always wear eye protection. Protective equipment such as a dust mask, non-skid safety shoes, hard hat or hearing protection used for appropriate conditions will reduce personal injuries.
- Prevent unintentional starting. Ensure the switch is in the off-position before connecting to power source and/or battery pack, picking up or carrying the tool. Carrying power tools with your finger on the switch or energising power tools that have the switch on invites accidents.
- Remove any adjusting key or wrench before turning the power tool on. A wrench or a key left attached to a rotating part of the power tool may result in personal injury.
- Do not overreach. Keep proper footing and balance at all times. This enables better control of the power tool in unexpected situations.
- Dress properly. Do not wear loose clothing or jewelry. Keep your hair and clothing away from moving parts. Loose clothes, jewellery or long hair can be caught in moving parts.
- If devices are provided for the connection of dust extraction and collection facilities, ensure these are connected and properly used. Use of dust collection can reduce dust-related hazards.
- Do not let familiarity gained from frequent use of tools allow you to become complacent and ignore tool safety principles. A careless action can cause severe injury within a fraction of a second.
Power tool use and care
- Do not force the power tool. Use the correct power tool for your application. The correct power tool will do the job better and safer at the rate for which it was designed.
- Do not use the power tool if the switch does not turn it on and off. Any power tool that cannot be controlled with the switch is dangerous and must be repaired.
- Disconnect the plug from the power source and/or remove the battery pack, if detachable, from the power tool before making any adjustments, changing accessories, or storing power tools. Such preventive safety measures reduce the risk of starting the power tool accidentally.
- Store idle power tools out of the reach of children and do not allow persons unfamiliar with the power tool or these instructions to operate the power tool. Power tools are dangerous in the hands of untrained users.
- Maintain power tools and accessories. Check for misalignment or binding of moving parts, breakage of parts and any other condition that may affect the power tool’s operation. If damaged, have the power tool repaired before use. Many accidents are caused by poorly maintained power tools.
- Keep cutting tools sharp and clean. Properly maintained cutting tools with sharp cutting edges are less likely to bind and are easier to control.
- Use the power tool, accessories and tool bits etc. in accordance with these instructions, taking into account the working conditions and the work to be performed. Use of the power tool for operations different from those intended could result in a hazardous situation.
- Keep handles and grasping surfaces dry, clean and free from oil and grease. Slippery handles and grasping surfaces do not allow for safe handling and control of the tool in unexpected situations.
Service
Have your power tool serviced by a qualified repair person using only identical replacement parts. This will ensure that the safety of the power tool is maintained.
Safety information for edge routers
- Hold the power tool by insulated gripping surfaces only, because the cutter may contact its own cord. Cutting a “live” wire may make exposed metal parts of the power tool “live” and could give the operator an electric shock.
- Use clamps or another practical way to secure and support the workpiece to a stable platform. Holding the work by your hand or against the body leaves it unstable and may lead to loss of control.
- The permitted speed of the cutting bit must be at least equal to the maximum speed marked on the power tool. If cutting bits run faster than their rated speed, they may break and fly off.
- Routers and other accessories must be able to fit exactly in the tool holder (collet) of your power tool. Ap-plication tools that do not fit exactly in the tool holder of the power tool will turn unevenly, vibrate heavily and may cause a loss of control.
- Only bring the power tool into contact with the workpiece when switched on. Otherwise there is danger of kickback if the cutting tool jams in the workpiece.
- Never rout over metal objects, nails or screws. The router could become damaged and cause increased vibration.
- Use suitable detectors to determine if utility lines are hidden in the work area or call the local utility company for assistance. Contact with electric lines can lead to fire and electric shock. Damaging a gas line can lead to explosion. Penetrating a water line causes property damage or may cause an electric shock.
- Do not use blunt or damaged routers. Blunt or damaged routers cause increased friction, create imbalances and may become jammed.
- Always wait until the power tool has come to a complete stop before placing it down. The application tool can jam and cause you to lose control of the power tool.
Products sold in GB only:
Your product is fitted with an BS 1363/A approved electric plug with internal fuse (ASTA approved to BS 1362).
If the plug is not suitable for your socket outlets, it should be cut off and an appropriate plug fitted in its place by an au-thorised customer service agent. The replacement plug should have the same fuse rating as the original plug.
The severed plug must be disposed of to avoid a possible shock hazard and should never be inserted into a mains socket elsewhere.
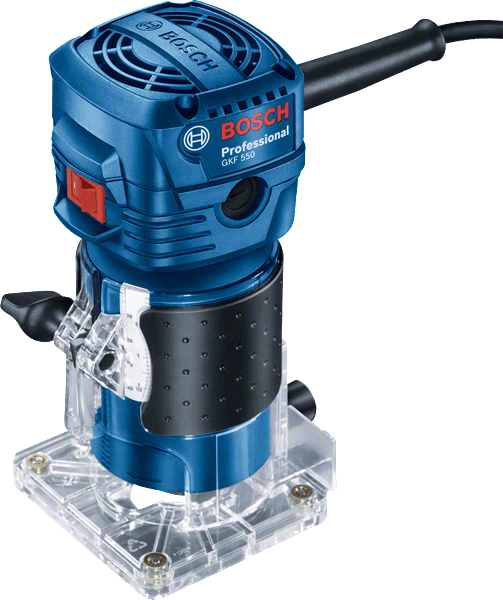
Product Description and Specifications
Read all the safety and general instructions. Failure to observe the safety and general in-structions may result in electric shock, fire and/or serious injury.
Please observe the illustrations at the beginning of this oper-ating manual.
Intended use
The power tool is intended for copy routing as well as routing grooves, edges, profiles and elongated holes in wood, plastic and light building materials while resting firmly on the workpiece.
Product features
The numbering of the product features refers to the diagram of the power tool on the graphics page.
- Drive unit
- Routing base
- Carbon brush bracket
- Nut for routing guide
- Chip deflector
- Router bitA)
- Cap nut with collet
- Guide plate
- Base plate
- Wing bolt for routing base
- On/off switch
- Scale for setting routing depth
- Collet
- Tool holder
- Open-ended spanner (10 mm)A)
- Open-ended spanner (17 mm)A)
- Guide bushingA)
- Parallel guideA)
- Wing bolt for parallel guideA)
- PilotA)
- Wing bolt for fixing the horizontal alignmentA)
- Wing bolt for horizontal alignment of the pilotA)
- Guide rollerA)
- Handle (insulated gripping surface)
A) Accessories shown or described are not included with the product as standard. You can find the complete selection of accessories in our accessories range.
Technical data
| Edge router
Article number |
GKF 550
3 601 FA0 0.. | |
| Rated power input | W | 550 |
| No-load speed | min-1 | 33,000 |
| Tool holder | mm inches |
6 ¼ |
| Weight according to EPTA-Procedure 01:2014 |
kg | 1.4 |
| Protection class | / II |
The specifications apply to a rated voltage [U] of 230 V. These specifications may vary at different voltages and in country-specific models.
Fitting
- Pull the plug out of the socket before carrying out any work on the power tool.
Changing the tool
- Wearing protective gloves while fitting and changing router bits is recommended.
Original router bits from the extensive range of Bosch ac-cessories are available from your specialist dealer.
Removing the routing base (see figure A)

Before fitting a router bit, you must first separate the routing base (2) from the drive unit (1).
Open the wing bolt (10) on the routing base (2).
Pull the drive unit out in an upward direction.
Changing the Collet (see figure B)
Depending on the router bit used, you may have to change the cap nut with the collet (7) before fitting the router bit. If the right collet for your router bit is already fitted, please follow the work steps in the following section.
The collet (13) must sit in the cap nut with a small amount of play. The cap nut (7) must be easy to fit. If the cap nut or col-let is damaged, replace it immediately.
Place the open-ended spanner (15) on the tool holder (14)(see figure C1).
Unscrew the cap nut (7) anticlockwise using the open-ended spanner (16).
If required, clean all the parts you want to fit with a soft brush or by blowing them clean with compressed air before assembling them.
Place the new cap nut on the tool holder (14).
Loosely tighten the cap nut.

- Do not, under any circumstances, tighten the collet with the tightening nut until a router bit has been fit-ted. The collet may otherwise become damaged.
Fitting the router bit (see figure C1 – C2)


Router bits are available in a wide variety of designs and qualities depending on the intended application.
Router bits made of high-performance high-speed steel (HSS) are suited to machining soft materials such as soft-wood and plastic.
Router bits with carbide tips (HM) are especially suitable for hard and abrasive materials such as hardwood and alu-minium.
Original router bits from the extensive range of Bosch ac-cessories are available from your specialist dealer.
Only use undamaged and clean router bits.
Fitting the routing base (see figure A)
To start routing, the routing base (2) must be fitted back onto the drive unit (1).
Open the wing bolt (10) on the routing base (2).
Slide the drive unit (1) into the routing base (2).
Close the wing bolt (10) on the routing base (2).
- After assembly, always check that the drive unit is firmly seated in the routing base.
Dust/Chip Extraction
Dust from materials such as lead-containing coatings, some wood types, minerals and metal can be harmful to one’s health. Touching or breathing in the dust can cause allergic reactions and/or lead to respiratory infections of the user or bystanders.
Certain dust, such as oak or beech dust, is considered carcinogenic, especially in connection with wood-treatment additives (chromate, wood preservative). Materials containing asbestos may only be worked by specialists.
- Provide for good ventilation of the working place.
- It is recommended to wear a P2 filter-class respirator. Observe the relevant regulations in your country for the materials to be worked.
Avoid dust accumulation at the workplace. Dust can easily ignite.
Operation
- Products that are only sold in AUS and NZ: Use a residual current device (RCD) with a nominal residual current of 30 mA or less.
- Pay attention to the mains voltage. The voltage of the power source must match the voltage specified on the rating plate of the power tool. Power tools marked with 230 V can also be operated with 220 V.
Setting the routing depth
- The routing depth must only be set while the power tool is switched off.
To set the rough routing depth, proceed as follows:
- Place the power tool with a fitted router bit onto the work-piece you want to machine.
- Open the wing bolt (10) on the routing base (2).
- Move the drive unit (1) to the required depth using the scale for setting the routing depth (12) as a guide.
- Close the wing bolt (10) on the routing base (2).
- Check the routing depth you have set by carrying out a practical test and correct it if required.
Starting Operation
Switching on/off
To switch on the power tool, set the on/off switch (11) to I. To switch off the power tool, set the on/off switch (11) to 0.
Working Advice
- Protect router bits against shock and impact.
- Pull the plug out of the socket before carrying out any work on the power tool.
Routing direction and routing process (see figure D)

- Routing must always be carried out with the work-piece being moved against the direction in which the router bit (6) is turning (up cut). If the workpiece is moved in the same direction as the router bit is turning (down cut), the power tool may be pulled out of your hands.
- Only use the power tool when the routing base (2) is fitted. Losing control of the power tool can cause injuries.
Note: Be aware that the router bit (6) always protrudes slightly from the base plate (9). Do not damage the template or the workpiece.
Set the routing depth you want.
Switch on the power tool and guide it to the point you want to machine.
Switch off the power tool after routing. - Do not put the power tool down before the router bit has come to a complete stop. Application tools that are still running can cause injuries.
Routing with guide bushing (see figure E1 – E3)
Using the guide bushing (17), you can transfer contours from templates or patterns to the workpiece.
Select the guide bushing that is suitable for the thickness of the template or pattern. Due to the protruding height of the guide bushing, the template must have a minimum thickness of 8 mm (see figure E1).

Select a router bit with a diameter that is smaller than the interior diameter of the guide bushing.
Unscrew the four cylinder screws on the underside of the guide plate (8) and remove the guide plate.
Insert the guide bushing (17) into the guide plate (see fig-ure E2).
Loosely screw the guide plate back onto the base plate (9). It must still be possible to move the guide plate freely.
To ensure that the distance between the centre of the router bit and the edge of the guide bushing is uniform, the guide bushing and guide plate must (if necessary) be centrally aligned with each other.

- Align the guide plate such that the router bit and guide bushing are centred on the opening in the guide plate (see figure E3).
- Hold the guide plate in this position and firmly tighten the fastening screw.

To rout with the guide bushing (17), proceed as follows:
- Place the power tool with the guide bushing (17) onto the template.
- Guide the power tool with the protruding guide bushing along the template using lateral pressure.
Edge or profile routing (see figure F)

For edge and profile routing without a parallel guide, the router bit must be fitted with a pilot pin or a ball bearing. While it is switched on, guide the power tool towards the workpiece from the side until the pilot pin or the ball bearing of the router bit is touching the side of the workpiece edge that you want to machine.
Guide the power tool along the workpiece edge. Pay atten-tion that the router is positioned perpendicularly. Too much pressure can damage the edge of the workpiece.
Routing with a parallel guide (see figure G)
Fit the parallel guide (18) to the routing base (2) using the knurled screw (4).
Set the required stop depth using the wing bolt on the paral-lel guide (19).
While it is switched on, guide the power tool along the work-piece edge with a uniform feed and while applying lateral pressure to the parallel guide.

Routing with a pilot (see figure H)
Fit the pilot to the routing base (2) using the nut (4). Guide the power tool along the workpiece edge with a uni-form feed.
Lateral clearance: To change the amount of material being removed, you can adjust the lateral clearance between the workpiece and the guide roller (23) on the pilot (20). Loosen the wing bolt (21), set the lateral clearance you want by turning the wing bolt (22), then retighten the wing bolt (21).
Height: Set the vertical alignment of the pilot according to the router bit you are using and the thickness of the work-piece you want to machine.
Loosen the nut (4) on the pilot, slide the pilot into the de-sired position and retighten the bolt.

Maintenance and Service
Maintenance and Cleaning
- Pull the plug out of the socket before carrying out any work on the power tool.
- To ensure safe and efficient operation, always keep the power tool and the ventilation slots clean.
In order to avoid safety hazards, if the power supply cord needs to be replaced, this must be done by Bosch or by an after-sales service centre that is authorised to repair Bosch power tools.
After-Sales Service and Application Service
Our after-sales service responds to your questions concerning maintenance and repair of your product as well as spare parts. You can find explosion drawings and information on spare parts at: www.bosch-pt.com
The Bosch product use advice team will be happy to help you with any questions about our products and their accessories.
In all correspondence and spare parts orders, please always include the 10‑digit article number given on the nameplate of the product.
Cambodia
Robert Bosch (Cambodia) Co., Ltd
Unit 8BC, GT Tower, 08th Floor, Street 169, Czechoslovakia Blvd, Sangkat Veal Vong
Khan 7 Makara, Phnom Penh
VAT TIN: 100 169 511
Tel.: +855 23 900 685
Tel.: +855 23 900 660
www.bosch.com.kh
People’s Republic of China
China Mainland
Bosch Power Tool (China) Co. Ltd.
Bosch Service Center
567, Bin Kang Road
Bin Kang District
Hangzhou, Zhejiang Province
China 310052
Tel.: (0571) 8887 5566 / 5588
Fax: (0571) 8887 6688 x 5566# / 5588#
E-Mail:
www.bosch-pt.com.cn
HK and Macau Special Administrative Regions Robert Bosch Co. Ltd.
21st Floor, 625 King’s Road
North Point, Hong Kong
Customer Service Hotline: +852 2101 0235
Fax: +852 2590 9762
E-Mail:
www.bosch-pt.com.hk
India
Bosch Service Center
69, Habibullah Road, (Next to PSBB School), T. Nagar