Bosch MCM3200W MultiTalent 3 800W Food Processor Instruction Manual


BOSCH MCM3200W MultiTalent 3 800W Food Processor Instruction

For your safety
Before use, read these instructions carefully in order to become familiar with important safety and operating instructions for this appliance.If the instructions for correct use of the appliance are not observed, the manufacturer’s liability for any resulting damage will be excluded.
This appliance is intended for domestic use only. Use the appliance for processing normal amounts of food for the household; see “Recipes / Ingredients / Processing” section.
This appliance is suitable for mixing, kneading, beating, cutting and shredding food. Other applications are possible if the accessories approved by the manufacturer are used. It must not be used for processing other objects or substances. Use the appliance with original accessories only. Please keep the operating instructions in a safe place. If passing on the appliance to a third party, always include the operating instructions. Only use the appliance indoors at room temperature and up to 2000 m above sea level.
General safety instructions
Risk of electric shock
- The appliance must not be used by children.
- The appliance and its power cord must be kept away from children. Appliances can be used by persons with reduced physical, sensory or mental capabilities or lack of experience and knowledge if they have been given supervision or instruction concerning use of the appliance in a safe way and if they understand the hazards involved.
- Children shall not play with the appliance.
- Connect and operate the appliance only in accordance with the specifications on the rating plate. Do not use the appliance if the power cord and/or appliance are damaged.
- Before replacing accessories or additional parts, which move during operation, switch off the appliance and disconnect from the power supply. Always disconnect the appliance from the supply if it is left unattended and before assembling, disassembling or cleaning.
- Do not place the power cord over sharp edges or hot surfaces.
- To prevent injury, a damaged power cord must be replaced by the manufacturer or his customer service or a similarly qualified person.
- Only our customer service may repair the appliance.
Safety instructions for this appliance
- Risk of injury
- Risk of electric shock
If the power is interrupted, the appliance remains switched on and restarts when the power is restored.
Never immerse the base unit in liquids or place under running water and do not clean in the dishwasher.
Before rectifying a fault, pull out the mains plug. - Risk of injury from the rotating tools!
While the appliance is operating, never place fingers in the mixing bowl. Always use the pusher for adding ingredients.
After switching off, the drive continues running for a short time. Change tools only when the drive is at a standstill. - Risk of injury from sharp blades/rotating drive!
Never reach into the attached blender jug!
Do not remove/attach the blender jug until the drive has stopped. Do not remove/attach the universal cutter jug until the drive has stopped. - Risk of injury from sharp blades!
Do not touch blades of the universal blade with bare hands. When not in use, always store the universal blade in the blade guard. Clean them with a brush.
Do not grip the sharp blades or edges of the cutting discs. Grip the discs by the plastic part in the centre only!
Do not place fingers in the feed tube. Only use the pusher when adding more ingredients. Do not touch blades of the blade insert with bare hands. Clean them with a brush. - Risk of scalding!
If processing hot liquids, steam escapes through the funnel in the lid. Add a max. 0,4 litres of hot or frothing liquid. - Risk of injury!
Never assemble accessories on the base unit.
Explanation of the symbols on the appliance or accessory
- Caution! Rotating tools.
Do not place fingers in the feed tube. - Lock blade insert in the blender or universal cutter jug.
- Remove blade insert from the blender or universal cutter jug.
- Blade insert with blender/cutting blade
- Blade insert with grinding blade
Congratulations on the purchase of your new Bosch appliance. You can find further information about our products on our website.
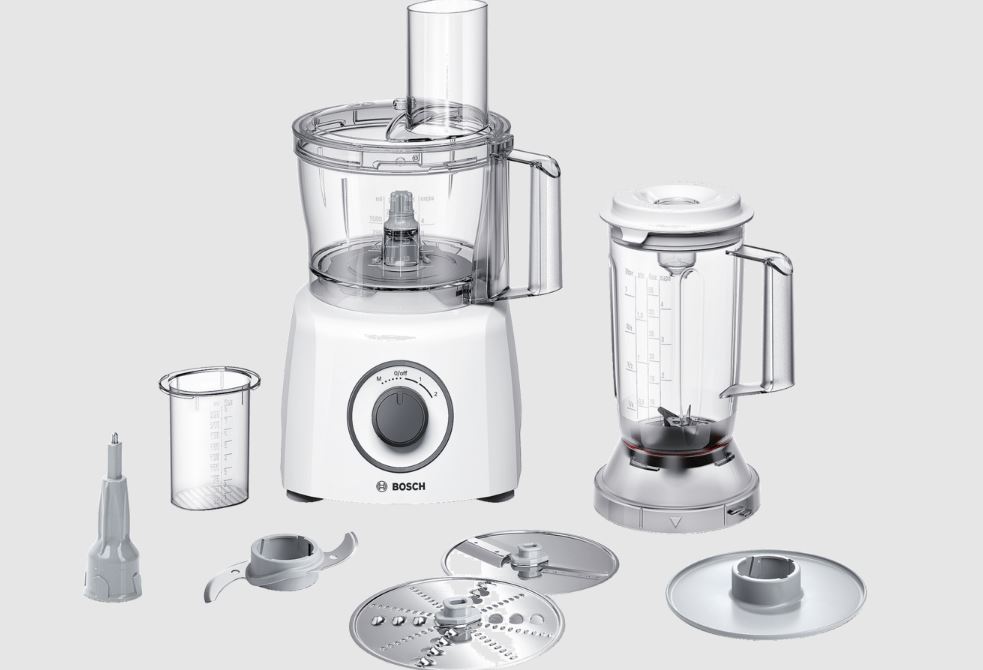
Overview

Please fold out the illustrated pages. Fig. A
Base unit
- Rotary switch
P = Stop
M = Instantaneous switching at maximum speed, hold switch for required blending duration.
Settings 1–2, Operating speed:
1 = low speed – slow,
2 = high speed – fast. - Drive
- ord store
- Bowl
- Tool holder
- Tools
- Universal blade with blade guard
- Kneading hook
- Beating disc
- Cutting discs
- Slicing reversible disc – thick/thin
- Shredding reversible disc – coarse/fine
- Reversible slicing/shredding disc
- Lid
- Filler opening
- Pusher
Accessories
- Blade insert with blender/cutting blade and seal
- Blade insert with grinding blade and seal
- Universal cutter jug
- Blender jug
- Lid for blender
- Filler opening
- Funnelshaped stopper for some models
With the universal cutter use the appliance at full power (according to the recipe). You can find the recipe on the illustrated pages (Fig. F).
If the universal cutter is not included with the hand blender, it can be ordered from customer service (order no. 12005833).

Operation
Before operating the appliance and accessories for the first time, clean thoroughly; see “Cleaning and servicing”.
Preparation
- Place the base unit on a smooth, clean surface.
- Pull cable out of the base unit to the required length.
Important information
- Use only the rotary switch to switch the appliance on or off.
- Never switch the appliance off by rotating the bowl, the blender or a tool.
- Do not switch the appliance on unless tools or accessories have been completely attached.
Bowl with accessories/tools
- Risk of injury from the rotating tools!
- While the appliance is operating, never place fingers in the mixing bowl.
- Always use the pusher for adding ingredients.
- After switching off, the drive continues running for a short time. Change tools only when the drive is at a standstill.
Warning!
When working with the bowl, the appliance cannot be switched on until the bowl has been attached and the lid has been attached and screwed on tight.
Universal blade
for cutting, mincing, mixing.
Risk of injury from sharp blades!
Do not touch blades of the universal blade with bare hands. When not in use, always store the universal blade in the blade guard. Grip the universal blade by the edge of the plastic handle only.
Kneading hook
for kneading dough and mixingin ingredients that ought not be cut (e.g. raisins and chocolate chips).
Beating disc
for cream, egg white and mayonnaise.
- Attach the bowl (arrow on bowl on dot on the appliance .) and rotate as far as possible in a clockwise direction (,).
- Insert tool holder into the bowl.
- Insert universal blade, whisking disc or kneading hook into the tool holder and release.
Note position of the tools when inserting them! Press tools all the way down.
Warning!
Do not add ingredients until the tools have been inserted.
- Add ingredients.
- Attach lid with pusher (match arrow on lid on dot on bowl .) and rotate in
a clockwise direction (,). Lid lug must be located fully in the slot in the bowl handle. - Insert the mains plug.
- Set the rotary switch to the desired setting.
- To add more ingredients, set the rotary switch to P.
- Remove the pusher and add ingredients through the feed tube. Pusher can be used as a measuring cup.
Cutting discs
- Risk of injury from sharp blades!
- Do not grip the sharp blades or edges of the cutting discs. Grip the discs by the plastic part in the centre only! Do not place fingers in the feed tube. Only use the pusher when
- adding more ingredients.
- Slicing reversible disc – thick/thin for slicing fruit and vegetables.
- Process at setting 1. Identification on the reversible slicing disc: “grob” for the thick cutting side, “fein” for the thin cutting side
Warning!
The reversible slicing disc is not suitable for slicing hard cheese, bread, rolls or chocolate. Slice boiled, waxy potatoes only when they are cold.
Shredding reversible disc – coarse/fine
for shredding vegetables, fruit and cheese, except for hard cheese (e.g. Parmesan).
Process at setting 1.
Designation on the reversible shredding disc: “2” for the coarse shredding side
“4” for the fine shredding side
Warning!
The reversible shredding disc is not suitable for shredding nuts. Shred soft cheese with the coarse side only at setting 2.
Reversible slicing/shredding disc
for slicing and shredding fruit, vegetables and cheese.
The process at setting 2.
Note: Do not process any hard foods using the slicing/grating reversible disc as this may blunt the blade. Use the slicing reversible disc (thick/thin) for this purpose. Fig. C

- Attach the bowl (arrow on bowl on dot on the appliance .) and rotate as far as possible in a clockwise direction (,).
- Insert tool holder into the bowl. Depending on the required use:
- Place cutting disc on tool holder. Turn required slicing/shredding side face up. Place disc on the disc holder so that the drivers on the tool holder grip the opening in the discs.
- Attach lid with pusher (match arrow on lid on dot on bowl .) and rotate in a clockwise direction (,). Lid lug must be located fully in the slot in the bowl handle.
- Insert the mains plug.
- Set the rotary switch to the desired setting.
- Fill with contents which are to be sliced or shredded.
- When adding contents which are to be sliced or shredded, apply only light pressure to the pusher. Remove the pusher and add ingredients through the feed tube.
Warning!
Empty the bowl before it becomes so full that the cutting or grating contents reach the carrier disc.
After using the appliance
- Set the rotary switch to P.
- Remove mains plug.
- Rotate the lid in an anticlockwise direction and remove.
- Remove tool: Take tool holder together with universal blade, whisking disc or kneading hook out of the bowl. Remove the tools from the tool holder.
- Take out the cutting discs by the plastic stud in the centre. Take tool holder out of the bowl.
- Rotate bowl anticlockwise and remove.
- Clean all parts, see “Cleaning and servicing”.
Blender
Blade insert with blender/cutting blade for mixing liquid or semisolid food, for cutting/ chopping raw fruit and vegetables, for puréeing food.
Risk of injury from sharp blades rotating drive!
Never place fingers in the attached blender! Do not remove/attach the blender until the drive is at a standstill. Do not touch blades of the blade insert with bare hands. Clean them with a brush.
Risk of scalding!
If processing hot liquids, steam escapes through the funnel in the lid. Add a max. 0,4 litres of hot or frothing liquid.
Warning!
Blender may be damaged. Do not process deepfrozen ingredients (except ice cubes). Do not operate blender when empty. Fig. D

- Place seal on the blade insert. Ensure that the seal is positioned correctly.
Important information
If the seal is damaged or not correctly positioned, liquid may run out. - Insert blade insert with blender/cutting blade p into the blender jug and lock anticlockwise (m).
- Turn blender jug over (blade insert face down).
- Attach the blender jug (match arrow on the jug to the dot on the appliance .) and rotate as far as possible in a clockwise direction (,).
- Add ingredients.
Maximum capacity, liquid = 1.0 litres
(frothing or hot liquids max. 0.4 litres). Optimal processing capacity – solids = 80 g. - Attach lid and press firmly. Hold lid while working.
- Insert the mains plug.
- Set the rotary switch to the desired setting.
- To add more ingredients, set the rotary switch to P.
- Remove the lid and add ingredients or
- remove the funnel and gradually add solid ingredients through the refill opening or
- pour liquid ingredients through the funnel. After using the appliance
- Set the rotary switch to P.
- Remove mains plug.
- Rotate the blender in an anticlockwise direction and remove.
- Remove lid.
- Loosen blade insert clockwise (l) and remove from the blender jug.
- Clean all parts, see “Cleaning and servicing”.
Universal cutter Use (depending on model):
- With the blade insert with blender/cutting blade p for cutting and chopping meat, hard cheese, onions, herbs, garlic, fruit, vegetables.
- With the blade insert with grinding blade q for grinding and cutting fairly small quantities of spices (e.g. pepper, cumin, juniper, cinnamon, dried anise, saffron), grain (e.g. wheat, millet, linseeds), coffee and sugar.
Risk of injury from sharp blades / rotating drive!
- Do not remove/attach the universal cutter until the drive has stopped.
- Do not touch blades of the blade insert with bare hands. Clean them with a brush.
Fig. F shows guide values for the maximum quantities and processing times when working with the universal cutter. Fig. E

- Put down universal cutter jug with the opening face up.
- Add food, which is to be cut, in the jug. Note MAX mark on the jug!
- Place seal on the blade insert. Ensure that the seal is positioned correctly.
- If the seal is damaged or not correctly positioned, liquid may run out.
- Insert blade insert (p/q) into the universal cutter jug and lock anticlockwise (m).
- Turn universal cutter over (blade insert face down).
- Attach the universal cutter (arrow on jug on dot on the appliance .) and rotate all the way clockwise (,).
- Insert the mains plug.
- Set the rotary switch to the desired setting.
Note: The longer the appliance remains switched on, the finer the ingredients are cut. Recommendations on using the accessories can be found in the section “Recipes/ Ingredients/Processing”.
After using the appliance
- Set the rotary switch to P.
- Remove mains plug.
- Rotate universal cutter anticlockwise and remove.
- Turn universal cutter over (blade insert face up).
- Loosen blade insert clockwise (l) and remove from the universal cutter jug.
- Empty jug.
- Clean all parts, see “Cleaning and servicing”.
Cleaning and servicing
The appliance requires no maintenance. Thorough cleaning protects the appliance from damage and keeps it functional. An overview of cleaning the individual parts can be found in Fig. G.

Risk of electric shock
Never immerse the base unit in water or place under running water.
Warning!
Surfaces may be damaged. Do not use abrasive cleaning agents.
Note: If processing e.g. carrots and red cabbage, the plastic parts will become discoloured by a red film which can be removed with a few drops of cooking oil.
Cleaning the base unit
- Remove mains plug.
- Wipe the base unit with a damp cloth. If required, use a little detergent.
- Then dry the base unit.
Cleaning the bowl and accessories
Risk of injury from sharp blades!
Do not touch blades of the universal blade with bare hands. When not in use, always store the universal blade in the blade guard. Clean them with a brush. Do not grip the sharp blades or edges of the cutting discs. Grip the discs by the plastic part in the centre only!
All parts are dishwasherproof. Do not wedge plastic parts in the dishwasher as they could warp.
Cleaning the blender / universal cutter
Risk of injury from sharp blades!
Do not touch blades of the blade insert with bare hands. Clean them with a brush.
The blender jug (without blade insert), lid and funnel are dishwasherproof.
Do not clean the blade insert in the dishwasher, but under running water (do not soak in water). Remove seal for cleaning.
Troubleshooting
Risk of injury!
Before rectifying a fault, pull out the mains plug.
Fault:
The appliance does not start or appliance switches off during operation.
Possible cause:
The bowl or lid or the accessory has not been attached correctly or has become detached.
Remedial action:
- Set the rotary switch to P.
- Correctly attach bowl/lid or accessory and screw on all the way.
- Switch the appliance on again.
Important information
If the fault cannot be eliminated, please contact customer service (see customer service addresses at the end of this booklet).
Storage Fig. H
The tools can be stored in the bowl to save space.

Disposal
Dispose of packaging in an environmentallyfriendly manner. This appliance is labelled in accordance with European Directive 2012/19/EU concerning used electrical and electronic appliances (waste electrical and electronic equipment – WEEE). The guideline determines the framework for the return and recycling
of used appliances as applicable throughout the EU. Please ask your specialist retailer about current disposal facilities.
Guarantee
The guarantee conditions for this appliance are as defi ned by our representative in the country in which it is sold. Details regarding these conditions can be obtained from the dealer from whom the appliance was purchased. The bill of sale or receipt must be produced when making any claim under the terms of this guarantee.
Changes reserved.
Recipes / Ingredients / Processing
| or
|
low | approx. 12 min | Yeast dough
– Max. 500 g flour – 25 g yeast or 1 packet of dried yeast – 220 ml milk (room temperature) – 1 egg – 1 pinch of salt – 80 g sugar – 60 g butter – Graded rind of half a lemon ■ Add all ingredients (except the milk) to the bowl. ■ Set rotary switch to a low speed for 10 seconds. ■ Add milk and stir at low speed for about 1½ minutes. Ingredients should be at the same temperature. When the dough has a smooth appearance, place in a warm location. |
| M | Onions, garlic
– from 1 onion, quartered, up to 300 g – from 1 clove of garlic up to 300 g ■ Process until it has been chopped to the required size. | ||
| high | Hard cheese (e.g. parmesan)
– 10 g to 200 g ■ Cut the cheese into cubes. ■ Process until it has been chopped to the required size. | ||
| high | Chocolate
– 50 g to 200 g ■ Cut or break the chocolate into pieces. ■ Process until it has been chopped to the required size. | ||
| high | Parsley
– 10 g to 50 g ■ Process until it has been chopped to the required size. | ||
| high | Meat, liver (for mince, steak tartare, etc.) – 50 g to 500 g ■ Remove bones, gristle and sinews. Dice the meat. Making sausage meat, stuffing and pâté: ■ Put meat (beef, pork, veal, poultry, or even fish, etc.) together with other ingredients and spices into the bowl and mix into a dough. | ||
| high | approx. 1.52 min |
Strawberry sorbet
– 250 g frozen strawberries – 100 g icing sugar – 180 ml cream ■ Put all ingredients in the bowl. Switch on immediately, otherwise the mixture will go lumpy. Mix until a creamy sorbet forms. | |
| low | Beaten egg white
– 2 to 6 egg whites ■ Beat at a low speed. |
| high | Whipped cream
– 200 g to 400 g ■ Whisk at high speed. | ||
| low/ high | Mayonnaise
– 1 egg – 1 tsp. mustard – 150200 ml oil – 1 tbs. lemon juice or vinegar – 1 pinch of salt – 1 pinch of sugar Ingredients should be at the same temperature. ■ Mix all ingredients (except oil) for several seconds at setting 1. ■ Switch appliance to setting 2, slowly pour oil through the feed tube and mix until the mixture emulsifies. Eat the mayonnaise immediately, do not store. | ||
| high/M | Nuts, almonds
– 50 g to 200 g ■ Remove shells completely, otherwise the blender blade will be blunted. ■ Process until it has been chopped to the required size. | ||
| high/M | Puréeing fruit or vegetables
– Apple sauce, spinach, carrot and tomato purée; raw or cooked ■ Put ingredients and spices into the blender and purée. | ||
| high | Chocolate-milk
– 80 g–100 g cooled chocolate – approx. 400 ml hot milk ■ Chop up the chocolate in the blender, add the hot milk and mix briefly. | ||
| M | Honey and hazel nut spread
– 15 g hazelnuts – 110 g blossom honey (room temperature) ■ Put the nuts in the universal cutter jug and cut with the blender/ cutting blade for 20 seconds on setting M. ■ Remove the universal cutter jug, turn it over and take out the blade insert. ■ Add the honey. Close the universal cutter jug again with the blade and put on the base unit. ■ Wait until all the honey has run down over the blade. Then mix everything for 5 seconds on setting M. |
Fig. F shows guide values for the maximum quantities and processing times when working with the universal cutter jug and the blade inserts.