Makita DML810 Cordless Area Worklight Instruction Manual


Makita DML810 Cordless Area Worklight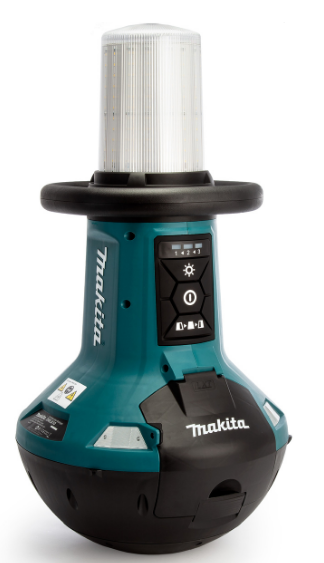

SPECIFICATIONS
| Model: | DML810 |
| LED | 0.2 W x 202 |
| Rated voltage | A.C. 120V, 60Hz D.C. 14.4V / 18V |
| Luminous flux | 5,500lm / 3,000lm / 1,500lm |
| Operating time (with BL1860B x2, all LEDs light up) |
4 hours (5,500lm) / 18 hours (1,500lm) |
| Maximum number of interconnectable appliances | 8 |
| Operating temperature | 0 °C ~ 40 °C |
| Storage temperature | -20 °C ~ 60 °C |
| Dimensions (L x W x H) | 420 mm x 420 mm x 787 mm (16-1/2″ x 16-1/2″ x 31″) |
| Net weight (without battery cartridge and power cord) |
13.9kg (30.6lbs) |
- Due to our continuing program of research and development, the specifications herein are subject to change without notice.
- Specifications may differ from country to country.
- Operating times are approximate and may differ depending on battery type, charging status, and usage condition.
Applicable battery cartridge and charger
| Battery cartridge | D.C.14.4 V Model | BL1430B |
| D.C.18 V Model | BL1815N / BL1820B / BL1830 / BL1830B / BL1840B / BL1850B / BL1860B | |
| Charger | DC18RC / DC18RD / DC18RE / DC18SD / DC18SE / DC18SF / DC18SH | |
- Some of the battery cartridges and chargers listed above may not be available depending on your region of residence.
WARNING: Only use the battery cartridges and chargers listed above. Use of any other battery cartridges and chargers may cause injury and/or fire.
Symbols: The followings show the symbols which may be used for the equipment. Be sure that you understand their meaning before use.
- Read the instruction manual.
- Take particular care and attention.
- Optical Radiation (UV and IR). Minimize exposure to eyes or skin.
- Do not stare at operating lamp.
- Do not use the appliance in the rain or snow when using with AC power.
- Breaker restart button.
SAFETY WARNINGS
IMPORTANT SAFETY INSTRUCTIONS
WARNING – When using flash-lights or lanterns, additional precautions should always be followed, including the following:
- When the appliance is not in use, always switch it off, and unplug/remove the battery cartridge from the appliance.
- Do not cover the lamp, or clog the vent of the appliance with cloth or carton, etc. Otherwise it may cause a flame.
- When using the appliance with AC power, do not use the appliance in damp or wet locations.
- Do not expose the appliance to rain or snow. Never wash it in water.
- Do not use the appliance in explosive atmospheres, such as in the presence of flammable liquids, gases, or dust.
- Appliance plugs must match the outlet. Never modify the plugs in any way. The use of unmodified plugs and matching outlets will reduce the risk of electric shock.
- When operating the appliance, avoid body contact with earthed or grounded surfaces such as pipes, radiators, microwave ovens, or refrigerators. There is an increased risk of electric shock if your body is earthed or grounded.
- Do not abuse the cord. Never use the cord for carrying, pulling, or unplugging the appliance. Keep cord away from heat, oil, sharp edges or moving parts. Damaged or entangled cords increase the risk of electric shock.
- When operating the appliance outdoors, use an extension cord suitable for outdoor use. The use of a cord suitable for outdoor use reduces the risk of electric shock.
- If the external flexible cable or cord of this luminaire is damaged, it shall be replaced by a special cord or cord exclusively available from the manufacturer or his service agent.
- Do not stare at the source of light directly.
- Do not handle the plug with a wet or greasy hand.
- Always place the appliance on a level and stable place. Otherwise, a falling accident may occur.
- Always place the appliance in an upright position.
- The light source contained in this luminaire shall only be replaced by the manufacturer or his service agent or a similarly qualified person.
- Do not leave the power cord disconnected from the appliance while the power is supplied from an outlet. Doing so might cause an electric shock.
- Do not use the carrying handle for any other purpose than carrying the appliance, such as hoisting.
- Do not expose the appliance to sparks or corrosive atmosphere, etc.
- To reduce the risk of injury, close supervision is necessary when a product is used near children.
- Do not contact hot parts.
- Unplug from outlet when not in use and before servicing or cleaning.
- Do not operate any product with a damaged
(cord or) plug, or after the product malfunctions or is dropped or damaged in any manner. Return product to the nearest authorized service facility for examination, repair, or electrical or mechanical adjustment. - Connect to a properly grounded outlet only. See Grounding Instructions.
- The outlet is live whenever the product is plugged in. The outlet is not switched on or off by the switch.
- Use only extension cords which have plugs and receptacles which accept the product’s plug. Replace damaged extension cords.
- Make sure your extension cord is in good condition. When using an extension cord, be sure to use one heavy enough to carry the current your product will draw. An undersized extension cord will cause a drop in line voltage resulting in loss of power and overheating. Table 1 shows the correct size to use depending on cord length and nameplate ampere rating. If in doubt, use the next heavier gauge. The smaller the gauge number, the heavier the cord.
- Don’t Abuse Cord – Never carry the product by the cord or yank it to disconnect from the receptacle. Keep cord from heat, oil, and sharp edges.
- Do not insert foreign objects into this product.
- Servicing a product requires extreme care and knowledge of the system and should
be done only by qualified service personnel. Replacement parts for a product must be identical to those parts in the product. - Store product indoors when not in use.
- Keep out of reach of children.
- Do not clean this product with a water spray or the like. Follow manufacturer cleaning instructions.
Table 1: Minimum gage for cord
| Volts | The total length of cord in feet | ||||
| 120V | 25 ft. | 50 ft. | 100 ft. | 150 ft. | |
| 220V – 240V | 50 ft. | 100 ft. | 200 ft. | 300 ft. | |
| Ampere rating | |||||
| More Than | Not More Than | AWG | |||
| 0 A | 6 A | 16 | 16 | 14 | 12 |
| 6 A | 10 A | ||||
| 10 A | 12 A | 16 | 16 | 14 | 12 |
| 12 A | 16 A | 14 | 12 | Not Recommended | |
GROUNDING INSTRUCTIONS
This product must be grounded. In the event of malfunction or breakdown, grounding provides a path of least resistance for electric current to reduce the risk of electric shock. This product is equipped with a cord having an equipment-grounding conductor and a grounding plug. The plug must be plugged into an appropriate outlet that is properly installed and grounded in accordance with all local codes and ordinances.
DANGER
Improper connection of the equipment-grounding conductor can result in a risk of electric shock. The conductor with insulation having an outer surface that is green with or without yellow stripes is the equipment-grounding conductor. If repair or replacement of the cord or plug is necessary, do not connect the equipment-ground-ing conductor to a live terminal. Check with a qualified electrician or serviceman if the grounding instructions are not completely understood, or if in doubt as to whether the product is properly grounded. Do not modify the plug provided with the product if it will not fit the outlet, have a proper outlet installed by a qualified electrician. A qualified electrician should be consulted if there is any doubt as to whether an outlet box is properly grounded.
Battery tool use and care
- Prevent unintentional starting. Ensure the switch is in the off-position before connecting to the battery pack, picking up, or carrying the appliance. Carrying the appliance with your finger on the switch or energizing appliance that has the switch on invites accidents.
- Disconnect the battery pack from the appliance before making any adjustments, changing accessories, or storing appliances. Such preventive safety measures reduce the risk of starting the appliance accidentally.
- Recharge only with the charger specified by the manufacturer. A charger that is suitable for one type of battery pack may create a risk of fire when used with another battery pack.
- Use power tools only with specifically designated battery packs. The use of any other battery packs may create a risk of injury and fire.
- When the battery pack is not in use, keep it away from other metal objects, like paper clips, coins, keys, nails, screws, or other small metal objects, that can make a connection from one terminal to another. Shorting the battery terminals together may cause burns or a fire.
- Under abusive conditions, liquid may be ejected from the battery; avoid contact. If contact accidentally occurs, flush with water. If liquid contacts the eyes, additionally seek medical help. Liquid ejected from the battery may cause irritation or burns.
- Do not use a battery pack or tool that is damaged or modified. Damaged or modified batteries may exhibit unpredictable behavior resulting in fire, explosion, or risk of injury.
- Do not expose a battery pack or tool to fire or excessive temperature. Exposure to fire or temperatures above 130 °C may cause an explosion.
- Follow all charging instructions and do not charge the battery pack or tool outside the temperature range specified in the instructions. Charging improperly or at temperatures outside the specified range may damage the battery and increase the risk of fire.
- Have servicing performed by a qualified repair person using only identical replacement parts. This will ensure that the safety of the product is maintained.
- Do not modify or attempt to repair the appliance or the battery pack except as indicated in the instructions for use and care.
SERVICE
- This appliance service must be performed only by qualified repair personnel. Service or maintenance performed by unqualified personnel could result in a risk of injury.
- When servicing this appliance, use only identical replacement parts. Use of unauthorized parts or failure to follow maintenance instructions may create a risk of electric shock or injury.
- Do not incinerate this appliance, even if it is severely damaged. The batteries can explode in a fire. Dispose of the appliance in accordance with the local regulations.
Important safety instructions for battery cartridge
- Before using the battery cartridge, read all instructions and cautionary markings on (1) battery charger, (2) battery, and (3) product using the battery.
- Do not disassemble or tamper with the battery cartridge. It may result in a fire, excessive heat, or explosion.
- If the operating time has become excessively shorter, stop operating immediately. It may result in a risk of overheating, possible burns, and even an explosion.
- If electrolyte gets into your eyes, rinse them out with clear water and seek medical attention right away. It may result in loss of your eyesight.
- Do not short the battery cartridge:
- Do not touch the terminals with any conductive material.
- Avoid storing battery cartridge in a container with other metal objects such as nails, coins, etc.
- Do not expose the battery cartridge to water or rain. A battery short can cause a large current flow, overheating, possible burns, and even a breakdown.
- Do not store and use the tool and battery cartridge in locations where the temperature may reach or exceed 50 °C (122 °F).
- Do not incinerate the battery cartridge even if it is severely damaged or is completely worn out. The battery cartridge can explode in a fire.
- Do not nail, cut, crush, throw, drop the battery cartridge, or hit a hard object to the battery cartridge. Such conduct may result in a fire, excessive heat, or explosion.
- Do not use a damaged battery.
- The contained lithium-ion batteries are subject to the Dangerous Goods Legislation requirements.
- For commercial transports e.g. by third parties or forwarding agents, the special requirements on packaging and labeling must be observed.
- For the preparation of the item being shipped, consulting an expert for hazardous material is required. Please also observe possibly more detailed national regulations.
- Tape or mask off open contacts and pack up the battery in such a manner that it cannot move around in the packaging.
- When disposing of the battery cartridge, remove it from the tool and dispose of it in a safe place. Follow your local regulations relating to the disposal of batteries.
- Use the batteries only with the products specified by Makita. Installing the batteries to non-compliant products may result in a fire, excessive heat, explosion, or leak of electrolyte.
- If the tool is not used for a long period of time, the battery must be removed from the tool.
- During and after use, the battery cartridge may take on heat which can cause burns or low-temperature burns. Pay attention to the handling of hot battery cartridges.
- Do not touch the terminal of the tool immediately after use as it may get hot enough to cause burns.
- Do not allow chips, dust, or soil to stuck into the terminals, holes, and grooves of the battery cartridge. It may result in poor performance or breakdown of the tool or battery cartridge.
- Unless the tool supports the use of near
high-voltage electrical power lines, do not use the battery cartridge near high-voltage electrical power lines. - It may result in a malfunction or breakdown of the tool or battery cartridge.
Keep the battery away from children.
SAVE THESE INSTRUCTIONS
CAUTION
Only use genuine Makita batteries. Use of non-genuine Makita batteries, or batteries that have been altered, may result in the battery bursting causing fires, personal injury, and damage. It will also void the Makita warranty for the Makita tool and charger.
Tips for maintaining maximum battery life
- Charge the battery cartridge before completely discharged. Always stop tool operation and charge the battery cartridge when you notice less tool power.
- Never recharge a fully charged battery cartridge. Overcharging shortens the battery service life.
- Charge the battery cartridge at room temperature at 10 °C – 40 °C (50 °F – 104 °F). Let a hot battery cartridge cool down before charging it.
- When not using the battery cartridge, remove it from the tool or the charger.
- Charge the battery cartridge if you do not use it for a long period (more than six months).
FCC caution
For the United States
This device complies with Part 15 of the FCC Rules. Operation is subject to the following two conditions:
- this device may not cause harmful interference, and
- this device must accept any interference received, including interference that may cause undesired operation.
Changes or modifications not expressly approved by the party responsible for compliance could void the user’s authority to operate the equipment.
Note: This equipment has been tested and found to comply with the limits for a Class B digital device, pursuant to part 15 of the FCC Rules. These limits are designed to provide reasonable protection against harmful interference in a residential installation. This equipment generates, uses, and can radiate radio frequency energy and, if not installed and used in accordance with the instructions, may cause harmful interference to radio communications. However, there is no guarantee that interference will not occur in a particular installation. If this equipment does cause harmful interference to radio or television reception, which can be determined by turning the equipment off and on, the user is encouraged to try to correct the interference by one or more of the following measures:- Reorient or relocate the receiving antenna.
- Increase the separation between the equipment and receiver.
- Connect the equipment into an outlet on a circuit different from that to which the receiver is connected.
- Consult the dealer or an experienced radio/TV technician for help.
ICES-005 standard
For Canada CAN ICES-005(B)/NMB-005(B)
PARTS DESCRIPTION

| 1 | Carrying handle | 2 | Brightness indicator | 3 | Brightness change button |
| 4 | Power switch button | 5 | Lighting area change button | 6 | Hole for padlock |
| 7 | Battery cover | 8 | Cover lock | 9 | Power cord (optional accessory) |
| 10 | Hook for the power cord | 11 | Socket cover | 12 | AC outlet |
| 13 | Breaker restart button | 14 | AC inlet | – | – |
FUNCTIONAL DESCRIPTION
CAUTION: Always be sure that the appliance is switched off and the battery cartridge is removed before adjusting or checking the function on the appliance.
Installing or removing the battery cartridge
CAUTION
- Always switch off the appliance before installing or removing the battery cartridge.
- Hold the appliance and the battery cartridge firmly when installing or removing the battery cartridge. Failure to hold the appliance and the battery cartridge firmly may cause them to slip off your hands and result in damage to the appliance and battery cartridge and a personal injury.
- Be careful not to trap finger(s) between the appliance and battery cartridge when loading battery cartridge as well as between the appliance and the battery cover when closing the battery cover.
To install the battery cartridge, release the cover lock, and open the battery cover.

- Cover lock
- Battery cover
To install the battery cartridge, align the tongue on the battery cartridge with the groove in the housing and slip it into place. Insert it all the way until it locks in place with a little click. Then close the battery cover.

- Button
- Battery cartridge
To remove the battery cartridge, slide it from the appliance while sliding the button on the front of the cartridge.
CAUTION
- Always install the battery cartridge fully. If not, it may accidentally fall out of the appliance, causing injury to you or someone around you.
- Do not install the battery cartridge forcibly. If the cartridge does not slide in easily, it is not being inserted correctly.
NOTE: Up to two battery cartridges can be installed, although the appliance uses one battery cartridge for operation.
Indicating the remaining battery capacity
Only for battery cartridges with the indicator

- Indicator lamps
- Check button
Press the check button on the battery cartridge to indicate the remaining battery capacity. The indicator lamps light up for a few seconds.

NOTE
- Depending on the conditions of use and the ambient temperature, the indication may differ slightly from the actual capacity.
- The first (far left) indicator lamp will blink when the battery protection system works.
Appliance/battery protection system
The appliance is equipped with a protection system. This system automatically cuts off power to extend appliance and battery life. The appliance will automatically stop during operation if the appliance or battery is placed under one of the following conditions.
Overload protection
When the appliance is operated in a manner that causes it to draw an abnormally high current, the appliance automatically stops without any indication. In this situation, remove and install the battery cartridge when using DC power, or push the breaker restart button when using AC power. Then turn the appliance on to restart.

- Breaker restart button
Over-discharge protection
When the battery capacity becomes low, the LED lights go out except for a part of the LEDs as illustrated. Then approximately five to ten minutes later, the system automatically cuts off power. In this situation, remove the battery cartridge from the appliance and charge it.

Hole for padlock

For anti-theft of battery cartridges, the hole for the padlock is provided.
Hole for padlock
OPERATION
CAUTION: This appliance is intended for commercial use. Do not use the appliance for household purposes.
Turning on/off the appliance

Press the power switch button to turn on the appliance. Press the power switch button again to turn off the appliance.
Power switch button
NOTE: The appliance turns on in the same mode as the last setting.
Changing brightness
Press the brightness change button while the appliance is operating. The brightness decreases every time you press the brightness change button. The brightness will return to the highest when operating in the lowest brightness.

Brightness change button
Changing lighting area
Press the lighting area change button while the appliance is operating.

Lighting area change button
The lighting area changes every time you press the lighting area change button as illustrated.

Using AC power
WARNING
- Never use the appliance when the cord or plug is damaged.
- Do not handle the plug with a wet or greasy hand.
- Do not leave the power cord disconnected from the appliance while the power is supplied from the mains. Small children may put the live plugin in their mouth and cause injury.
- Do not put the live plug or cord into your mouth. Doing so might cause an electric shock.
- Make sure that the voltage rating of the main power supply corresponds with that of the appliance.
- An outlet that is plugged must be grounded.
When using the appliance with AC power, use the power cord supplied with the appliance. Insert the plug to the AC inlet of the appliance and then insert the other end into an outlet.

- Power cord
- Socket cover (AC inlet)
- Plug (for the appliance)
- Plug (for an outlet)
CAUTION
- Be sure to insert the plug into the appliance first, then insert the other end into an outlet.
- Always close the socket cover firmly when the power cord is not plugged.
NOTE
- Even operating in DC power, the appliance automatically changes to AC power when the power cord is plugged in.
- The AC power does not charge the battery inserted into the appliance.
- The shape of the AC inlet, AC outlet, and power cord plug varies from country to country.
Interconnected use
CAUTION
- Do not connect any appliance other than DML810 to the AC outlet.
- Always use the power cord supplied with the appliance.
- Do not interconnect appliances beyond the maximum number of inter-connectable appliances specified in the instruction.
When using the appliance interconnected with other appliances, connect them with the power cord. Insert the plug into the AC inlet of the appliance to be powered, and then insert the other end to the AC outlet of the appliance to power.

AC outlet
NOTE
When using the appliances interconnected, operations such as turning on / off, changing brightness, and changing lighting areas are not linked. Each appliance needs to be operated.
Organizing the power cord
Coil the power cord on the hook for the power cord tightly.

- Power cord
- Hook for the power cord
MAKITA LIMITED WARRANTY
Please refer to the annexed warranty sheet for the most current warranty terms applicable to this product. If the annexed warranty sheet is not available, refer to the warranty details set forth on the below website for your respective country.
- United States of America: www.makitatools.com
- Canada: www.makita.ca
- Other countries: www.makita.com