Makita MR052 Job Site Radio Instruction Manual
makita MR052 Job Site Radio
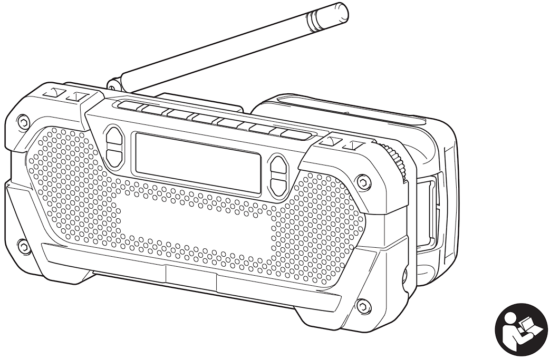

Instruction manual
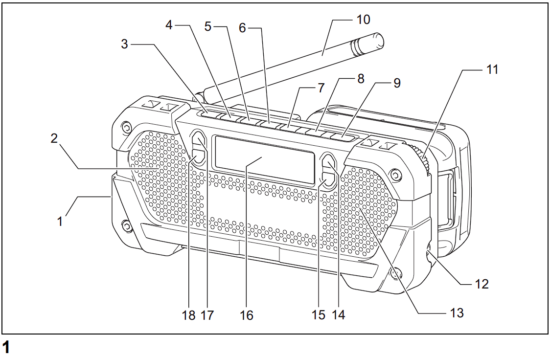


LOCATION OF CONTROLS
Explanation of general view
- AUXILIARY INPUT JACK
- LEFT LOUDSPEAKER
- PRESET MEMORY 1
- PRESET MEMORY 2
- PRESET MEMORY 3
- PRESET MEMORY 4
- PRESET MEMORY 5
- BAND
- POWER
- ROD ANTENNA
- TUNING KNOB
- EARPHONE JACK
- RIGHT LOUDSPEAKER
- VOLUME UP
- VOLUME DOWN
- LCD DISPLAY
- SEARCH UP
- SEARCH DOWN
- Battery cartridge
- Button
- Red indicator
- Hook
- Indicator lamps
- Check button
Symbols
The following show the symbols used for the equipment. Be sure that you understand their meaning before use.
| Read instruction manual. | |
| Always recycle batteries | |
| Only for EU countries Do not dispose of electric equipment or battery pack together with household waste material! In observance of the European Directives, on Waste Electric and Electronic Equipment and Batteries and Accumulators and Waste Batteries and Accumulators and their implementation in accordance with national laws, electric equipment and batteries and battery pack(s) that have reached the end of their life must be collected separately and returned to an environmentally compatible recycling facility. |


IMPORTANT SAFETY INSTRUCTIONS
When using electric tools, basic safety precautions should always be followed to reduce the risk of fire, electric shock, and personal injury, including the following:

- Read this instruction manual and the charger instruction manual carefully before use.
- Clean only with dry cloth.
- Do not block any ventilation opening. Install in accordance with the manufacturer’s instruction.
- Do not install near any heat sources such as radiators, heat registers, stoves, or other apparatus (including amplifiers) that produce heat.
- Only use attachments/accessories specified by the manufacturer.
- Unplug this apparatus during lighting storms or when unused for long periods of time.
- A battery operated radio with integral batteries or a separate battery pack must be recharged only with the specified charger for the battery.
A charger that may be suitable for one type of battery may create a risk of fire when used with another battery. - Use battery operated radio only with specifically designated battery packs. Use of any other batteries may create a risk of fire.
- When battery pack is not in use, keep it away from other metal objects like: paper clips, coins, keys, nails, screws, or other small metal
objects that can make a connection from one terminal to another. Shorting the battery terminals together may cause sparks, burns, or a fire. - . Avoid body contact with grounded surfaces such as pipes, radiators, ranges and refrigerators. There is an increased risk of electric shock if your body is grounded.
Danger of explosion if battery is incorrectly replaced. Replace only with the same or equivalent type.
Batteries shall not be exposed to excessive heat such as sunshine, fire or the like. For a Portable Sound System, a warning that excessive sound pressure from earphones and headphones can cause hearing loss.
SAVE THESE INSTRUCTIONS.
Important safety instructions for battery cartridge
- Before using battery cartridge, read all instructions and cautionary markings on battery charger, battery, and product using battery.
- Do not disassemble battery cartridge.
- If operating time has become excessively shorter, stop operating immediately. It may result in a risk of overheating, possible
burns and even an explosion. - If electrolyte gets into your eyes, rinse them out with clear water and seek medical attention right away. It may result in loss of
your eyesight. - Do not short the battery cartridge:
(1) Do not touch the terminals with any conductive material.
(2) Avoid storing battery cartridge in a container with other metal objects such as nails, coins, etc.
(3) Do not expose battery cartridge to water or rain. A battery short can cause a large current flow, overheating, possible burns and even a breakdown. - Do not store the tool and battery cartridge in locations where the temperature may reach or exceed 50 °C (122 °F).
- Do not incinerate the battery cartridge even if it is severely damaged or is completely worn out. The battery cartridge can explode in a fire.
- Be careful not to drop or strike battery.
- Do not use a damaged battery.
- Follow your local regulations relating to disposal of battery.
Only use genuine Makita batteries. Use of non-genuine Makita batteries, or batteries that have been altered, may result in the battery bursting causing fires, personal injury and damage. It will also void the Makita warranty for the Makita tool and charger.
Tips for maintaining maximum battery life
- Charge the battery cartridge before completely discharged. Always stop tool operation and charge the battery cartridge when you notice less tool power.
- Never recharge a fully charged battery cartridge. Overcharging shortens the battery service life.
- Charge the battery cartridge with room temperature at 10 °C – 40 °C (50 °F – 104 °F). Let a hot battery cartridge cool down before charging it.
Features
- Digital Tuning AM/FM Stereo Receiver
- LCD Display with white color backlight
- Power On/Off Switch
- Band Selector (AM/FM)
- Automatic Broadcasting Searching (Search Up/Down)
- Digital Volume Control (Volume Up/Down)
- Preset Memories (5 for AM, 5 for FM)
- Rotary Tuning Knob
- Loudspeaker ø36 mm 2 pcs
- Earphones Jack
- Auxiliary Input Jack
- FM Rod Antenna
- Built-in AM Antenna
- Operated by 10.8 V Rechargeable Li-ion battery cartridge
- Low Battery Indication
- Low Battery Protection
- Accessories: Shoulder Strap
General Specification
| Item | Standard | |
| Applicable Battery Type | BL1015, BL1020B, BL1040B | |
| Power Source | DC 10.8 V | |
| Current Consumption | 450 mA max | |
| Tuning Frequency Range | AM | 522 to 1,710 KHz 9 KHz Step |
| FM | 87.5 to 108 MHz 0.5 MHz Step (manual), 1 MHz Step (automatic) | |
| No. of Preset Memory | AM | 5 |
| FM | 5 | |
| Speaker Output Power per channel | 1.2 W max | |
| Earphone Output Power per channel | 20 mW max | |
| AUX Input | Impedance 22 K ohm 150 mVrms (L&R channel) | |
| AM Antenna | Ferrite bar ø8 mm x 100 mm | |
| FM Rod Antenna | (L) 110 mm | |
| Speaker | ø36 mm 16 ohm 2 W, 2 pieces | |
| LCD Display | TN type, view area 55 mm x 16 mm | |
| Applicable Environment | Indoor use | |
| Operating Time (At speaker output = 50 mW + 50 mW) (Approximately) |
With BL1015 | 11 hours |
| With BL1020B | 15 hours | |
| With BL1040B | 30 hours | |
| Dimensions (L x W x H) | Without battery | 169 mm x 58 mm x 74 mm |
| With BL1015, BL1020B | 169 mm x 73 mm x 74 mm | |
| With BL1040B | 169 mm x 92 mm x 74 mm | |
| Net Weight | Without battery | 0.35 kg |
| With BL1015, BL1020B | 0.56 kg | |
| With BL1040B | 0.72 kg | |
FUNCTIONAL DESCRIPTION
Installing or removing battery cartridge (Fig. 2)
To remove the battery cartridge (19), slide it from the radio while sliding the button (20) on the front of the cartridge. To install the battery cartridge, align the tongue on the battery cartridge with the groove in the housing and slip it into place. Insert it all the way until it locks in place with a little click. If you can see the red indicator (21) on the upper side of the button, it is not locked completely.
Hook (Fig. 3)
The hook (22) is convenient for hanging the Cordless Radio temporarily.
OPERATION
HOW TO LISTEN RADIO BROADCASTING
- Press POWER (9) button to switch on the radio unit. (Fig. 1 & 5) The receiving frequency is showed on LCD DISPLAY (16). (Fig. 1 & 4)
- Press BAND (8) button to select FM or AM band. (Fig. 1)
- For FM broadcasting listening, rotate the direction of ROD ANTENNA (10) to have a better performance of reception. For AM broadcasting
listening, as the AM antenna is built-in the radio, rotate the direction of radio unit to get a better performance of reception. (Fig. 1 & 6) - For manual tuning, press SEARCH UP (17) or SEARCH DOWN (18) button once to tune up or tune down the receiving frequency by one
step, or rotate the TUNING KNOB (11) to have a faster tune up/ down. (Fig. 1 & 5) - For automatic tuning, press and hold the SEARCH UP (17) or SEARCH DOWN (18) button for 3 seconds, the receiving frequency
increases or decreases by one step automatically. When broadcasting is received, the searching stops 5 seconds for short listening and then restart searching. If you want to listen the broadcasting, press any buttons (except for power button) once to stop searching. (Fig. 1) - In FM band, if stereo broadcasting is received, the “STEREO” icon is displayed. Under poor reception circumstance, to reduce the reception noise by switching off the stereo function. Press and hold the BAND (8) button for 3 seconds to enter FM Stereo setting mode. Then press BAND (8) button again to switch “Stereo On” or “Stereo Off”. (Fig. 1 & 4)
- Press VOLUME UP (14) or VOLUME DOWN (15) button to adjust the sound level. (Fig. 1)
- To listen to the radio by earphones (not included), plug a diameter 3.5 mm earphone’s plug into EARPHONE JACK (12) completely. The built-in speakers are disconnected automatically and no sound is output. (Fig. 1 & 7)
- When the battery is soon used up, low battery indicator appears on the LCD DISPLAY (16). (Fig. 4)
- To turn off the radio, press POWER (9) button once. (Fig. 1 & 5)
- The radio unit integrates with memory IC, all settings (volume level, last receiving frequency and preset memories) are saved automatically before the battery is removed.
HOW TO STORE THE PRESET MEMORY
- Choose the receiving frequency that to be stored.
- Press and hold one of the PRESET MEMORY (3) – (7) buttons for 3 seconds, the chosen frequency is stored into that memory location.
The “MEMORY” icon and the chosen memory location no. are shown on the display. (Fig. 1 & 4) - There are 5 preset memories location for each AM and FM band.
- To recall the preset memory, simply press one of the PRESET MEMORY buttons once.
HOW TO PLAY MUSIC THROUGH AUXILIARY JACK
1. Press POWER (9) button to switch on the radio unit. (Fig. 1 & 5) 2. Prepare an audio signal cable (not included), both ends with diameter 3.5 mm stereo plug. 3. One end of cable is plugged into the earphone jack of your play device, another end is inserted into the AUXILIARY INPUT JACK (1) of the radio unit. (Fig. 1 & 8) 4. When the jack is plugged, the letters “AU” are displayed on LCD DISPLAY (16) and the radio unit switches to AUX mode automatically. 5. Adjust the volume of play device and the volume control of the radio unit for a suitable output sound level.
Indicating the remaining battery capacity (Fig. 9)
Only for battery cartridges with “B” at the end of the model number
Press the check button (24) on the battery cartridge to indicate the remaining battery capacity. The indicator lamps (23) light up for few seconds.
NOTE: Depending on the conditions of use and the ambient temperature, the indication may differ slightly from the actual capacity.

