KENWOOD TYPE HDM80 Hand Blender Instructions


KENWOOD TYPE HDM80 Hand Blender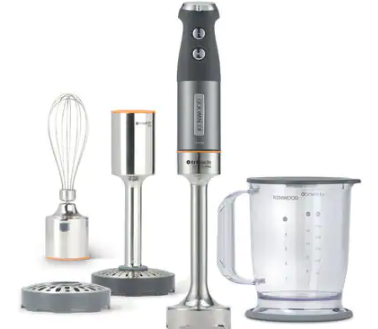

overview

safety
- Read these instructions carefully and retain for future reference.
- Remove all packaging and any labels.
- If the plug or cord is damaged it must, for safety reasons, be replaced by Kenwood or an authorised Kenwood repairer in order to avoid a hazard.
- Never touch the blades while the machine is plugged in.
- Keep fingers, hair, clothing and utensils away from moving parts.
- Unplug after use and before changing attachments.
- Never blend hot oil or fat.
- For safest use it is recommended to let hot liquids cool to room temperature before blending.
- Never use a damaged hand blender. Get it checked or repaired: see ‘service and customer care’.
- Never put the power handle in water or let the cord or plug get wet – you could get an electric shock.
- Never let the cord touch hot surfaces or hang down where a child could grab it.
- Never use an unauthorised attachment.
- Always disconnect the hand blender from the power supply if it is left unattended and before assembling, disassembling or cleaning.
- Appliances can be used by persons with reduced physical, sensory or mental capabilities or lack of experience and knowledge if they have been given supervision or instruction concerning use of the appliance in a safe way and if they understand the hazards involved.
- This appliance shall not be used by children. Keep the appliance and its cord out of reach of children.
- Children should be supervised to ensure that they do not play with the appliance.
- Only use the appliance for its intended domestic use. Kenwood will not accept any liability if the appliance is subject to improper use, or failure to comply with hese instructions.
- The rated power is based on the chopper attachment. Other attachments may draw less power.
important - With heavy mixtures to ensure long life of your machine, do not use your hand blender for longer than 50 seconds in any 4 minute period.
- Do not use the whisk or frother/foaming attachments for longer than 3 minutes in any 10 minute period.
chopper attachment - Do not touch the sharp blades.
- Remove the chopper blade before emptying the bowl.
- Never remove the cover until the chopper lade has completely stopped.
- Always hold the chopper blade by the finger grip away from the cutting blades, both when handling and cleaning.
before plugging in - Make sure your electricity supply is the same as the one shown on the hand blender.
- This appliance conforms to EC Regulation 1935/2004 on materials and articles intended to come into contact with food.
before using for the first time - Throw away the blade cover from the chopper blade as it is there to protect the blade during manufacture and transit only. Take care as the blades are very sharp.
- Wash all parts – see “care and cleaning”.
key
hand blender
- variable speed control
- ON button
- Turbo button
- power handle
- blender shaft with fixed triblade.
- blade cover
beaker (if supplied) - beaker lid
- beaker
- rubber ring base
A SOUP XL PRO (if supplied) - bk soup XL PRO
- bl blade cover
whisk (if supplied) - bm whisk collar
- bn wire whisk
- frother/foaming tool (if supplied)
- frother/foaming tool
- chopper (if supplied)
- chopper cover
- inger grip
- chopper blade
- bowl
- rubber ring base
- bowl lid
- Metal masherpro™ (if supplied)
- masher collar
- asher shaft
- fine screen
- coarse screen
- masher paddle
| recommended usage chart | ||||
| Ingredient/ recipe | Container | Speed | Processing Time ✻ | Max Capacity |
| Hand blender | ||||
| Soups | 2 litre saucepan | Turbo | 25 secs | 1 litre |
| Mayonnaise | 1 litre beaker | Turbo | 45-60 secs | 4 Eggs 600ml Oil |
| Baby Food | 1 litre beaker | Turbo | 30-40 secs | 300g |
| Smoothies/ Milkshakes |
1 litre beaker | Turbo | 30 secs | 800ml |
| Soup XL PRO | ||||
| Soups | 4 litre saucepan | Turbo | 25 secs | 2 litre |
| Whisk | ||||
| Egg Whites | Large glass bowl | Turbo | 2-3 mins | 4 (150g) |
| Cream | Large glass bowl | Turbo | 2-2 ½ mins | 400ml |
| Chopper attachment | ||||
| Meat | Chopper bowl | Turbo | 10-15 secs | 250g |
| Herbs | Chopper bowl | Turbo | 5-10 secs | 30g |
| Nuts | Chopper bowl | Turbo | 10-15 secs | 200g |
| Bread | Chopper bowl | Turbo | 5-10 secs | 1 slice |
| Onions | Chopper bowl | Pulse | – | 200g |
| Biscuits | Chopper bowl | Turbo | 15 secs | 140g |
| Pate | Chopper bowl | Turbo | 5-10 secs | 150g |
| Prune Marinade 50g Small soft prunes 400g Runny honey 35g Water
Add the ingredients to the chopper bowl in the order stated above. Fit the lid and refrigerate overnight. |
Chopper bowl |
Turbo |
3 secs |
485g |
| recommended usage chart | ||||
| Ingredient/ recipe |
Container | Speed | Processing Time ✻ |
Max Capacity |
| Metal Masher Pro – Coarse Screen | ||||
| Cooked vegetables (potatoes, swede, carrots and yams) |
Large saucepan/ Large bowl |
minimum |
30-40 secs |
600-800g |
| Metal Masher Pro – Fine Screen | ||||
| Cooked Potatoes | Large saucepan/ Large bowl |
minimum | 30-40 secs | 600-800g |
| Soft Fruits Raspberries Apricots |
Large bowl 1 litre saucepan |
minimum minimum |
30-40 secs 30-40 secs |
500g 400g (softened in water) |
| Frother/foaming Tool | ||||
| Cold Milk | 1 litre beaker | minimum | 15-20 secs | 400ml |
| Warm Milk – heated in saucepan until simmering |
1 litre beaker | minimum | 15-20 secs | 300ml |
| (Cold skimmed milk produces the best froth) | ||||
| Fruit based foam | 1 litre beaker | minimum | 30 secs | (200g Fruit Puree + 200ml water) |
- This is for guidance only and will vary depending on the exact recipe and ingredients being processed.
to use the hand blender
- You can blend soups, sauces, milk shakes, mayonnaise and baby food etc.
for beaker blending (if beaker supplied)
- Fit the rubber ring base 9 on the bottom of the beaker. (This stops the beaker sliding on the worktop).
- Do not fill the beaker more than 2⁄3 full.
- After blending you can fit the lid 7 to the top of the beaker.
Note
If no beaker is supplied in your pack, select a suitably sized container. We would recommend a tall, straight sided vessel with a diameter slightly larger than the foot of the hand blender to allow movement of the ingredients but tall enough to prevent splashing
for saucepan blending
- For safest use it is recommended to take the pan off the heat and let hot liquids cool to room temperature before blending.
- Use the soup XL PRO (if supplied) to quickly process soups etc., directly in the saucepan. Alternatively use the hand blender.
Do not use the soup blender to process uncooked vegetables.
- Remove the blade cover 6 or bl from the end of the blender shaft/ soup XL PRO.
- Fit the power handle inside the blender shaft 1 and turn clockwise to lock.
- Plug in.
- Place the food into the beaker or a similar container, then holding the beaker steady: Select the required speed using the variable speed control then press the ON button. Select a low speed for slower blending and to minimise splashing and a higher speed or Turbo for faster blending (refer to recommended usage chart).
- To avoid splashing, place the blade in the food before switching on.
- Do not let liquid get above the join between the power handle and blender shaft.
- Move the blade through the food and use a mashing or stirring action to incorporate the mixture.
- Your hand blender is not suitable for ice crushing.
- If your blender gets blocked, unplug before clearing.
- After use release the ON or Turbo button. Unplug and turn the power handle anticlockwise to remove the blender shaft from the power handle.
to use the whisk- You can whip light ingredients such as egg whites; cream and instant desserts.
- Do not whisk heavier mixtures such as fat and sugar – you’ll damage the whisk.
- Push the wire whisk into the whisk collar 2.
- Fit the power handle to the whisk collar, turn clockwise to lock.
- Place your food in a bowl.
- Plug in and press the ON button. To whisk on a faster speed, select a higher speed or press the Turbo button. Move the whisk clockwise. To reduce splashing, select a low speed then press the ON button.
- Do not let liquid get above the whisk wires.
- After use release the ON or Turbo button, unplug and dismantle.
to use frother/foaming tool (if supplied)
- Never add ingredients whilst the appliance is operating.
- Take care when blending hot liquids, do not process more than 300mls in the beaker.
- Do not process more than 400mls of cold milk in the beaker as it may overflow as it froths and thickens.
- Fit the frother/foaming tool shaft to the power handle. Turn the power handle clockwise to lock.
- Start mixing on a low speed and increase the speed if required.
- To avoid splashing place the frother/foaming tool in the food to be processed before switching on. Always ensure that the bottom of the frother/foaming tool is fully submersed in the ingredients whilst processing.
- Always add the liquid ingredients first.
- Always mash fruit to a smooth puree before adding.
- If using syrups and powder mixes add them just before mixing to prevent them from sinking to the bottom.
- For best results, all liquid ingredients should be as cold as possible.
- Milk drinks will taste better if the milk is ice cold. The colder the milk, the thicker and more frothy the drink. Skimmed milk will produce a frothier drink than semi skimmed or full fat milk.
- Never try to mix frozen fruit or crush ice.
- Break up large lumps of ice cream before frothing.
to use the chopper (if supplied) - You can chop meat, vegetables, herbs, bread, biscuits and nuts.
- Do not chop hard foods such as coffee beans, ice cubes, spices or chocolate – you’ll damage the blade.
- Remove any bones and cut food into 1-2cm (1⁄2-1”) cubes.
- Fit the rubber ring base bt on the bottom of the chopper bowl. (This stops the bowl sliding on the worktop.)
- Fit the chopper blade over the pin in the bowl 3.
- Add your food.
- Fit the chopper cover, turn and lock 4.
- Fit the power handle to the chopper cover 5 – turn clockwise to lock.
- Plug in. Hold the bowl steady. Then press the Turbo button. Alternatively press the Turbo button in short bursts to achieve a pulsing action.
- After use, unplug and dismantle.
Metal Masherpro™ (if supplied)
important
- Never use the masher in a saucepan over direct heat. Always remove the saucepan from the heat and allow to cool slightly.
- Do not tap the masher on the side of the cooking vessel during or after mashing. Use a spatula to scrape excess food away.
- For best results when mashing never fill a saucepan etc., more than half full with food.
- Cook hard vegetables and fruit and drain first before mashing.
- Fit the masher collar to the masher shaft by turning in a clockwise direction until it locks in position 6.
- Fit either the coarse or fine screen to the masher shaft – turn clockwise to lock 7.
- Turn the masher upside down and fit the paddle over the central hub and turn anti-clockwise to secure 8. (If the collar is not fitted then the paddle will not secure in place).
- Fit the power handle to the masher assembly – turn clockwise to lock.
- Plug in.
- Place the masher in the saucepan or bowl etc. Select a low speed on the variable control and then press the ON button (refer to recommended usage chart).
- Move the masher in an up and down movement throughout the mix until the desired result is achieved. Increase the speed if required.
- After use release the ON button and unplug.
- Turn the power handle anticlockwise and remove the masher assembly.
- Remove the paddle from the masher by turning clockwise.
- Remove the screen by turning anticlockwise and then lift off.
- Unscrew the collar from the masher shaft. optional attachment (not supplied in pack) Mini chopper – refer to “service and customer care” section to order.
care and cleaning
- Always switch off and unplug before cleaning.
- Do not touch the sharp blades.
- Some foods, eg carrot, may discolour the plastic. Rubbing with a cloth dipped in vegetable oil may help to remove discolouration.
- Do not use abrasives.
care and cleaning guide
| Item | Suitable for dishwashing |
Do Not immerse in Water | Handwash
|
Wipe with a damp cloth | ||
| Power handle | 8 | 4 | 8 | 4 | ||
| Blender shaft ❋ | 8 | 4 | 8 | 4 | ||
| soup XL PRO ❋ | 8 | 4 | 8 | 4 | ||
| frother/foaming tool ❋ |
8 | 4 | 8 | 4 | ||
| Beaker | 4 | 8 | 4 | 4 | ||
| Beaker lid | 4 | 8 | 4 | 4 | ||
| Beaker rubber ring base |
4 | 8 | 4 | 4 | ||
| Blade cover | 8 | 8 | 4 | 4 | ||
| Chopper cover | 8 | 4 | 8 | 4 | ||
| Chopper bowl | 4 | 8 | 4 | 4 | ||
| Chopper blade | 4 | 8 | 4 | 4 | ||
| Chopper bowl lid | 4 | 8 | 4 | 4 | ||
| Chopper bowl rubber ring base |
4 | 8 | 4 | 4 | ||
| Whisk collar | 8 | 4 | 8 | 4 | ||
| Whisk | 4 | 8 | 4 | 4 | ||
| Masher shaft | 8 | 4 | 8 | 4 | ||
| Masher paddle | 4 | 8 | 4 | 4 | ||
| Masher collar | 8 | 4 | 8 | 4 | ||
| Masher | 4 | 8 | 4 | 4 | ||
hand blender shaft/soup XL PRO
either
- Part fill the beaker or a similar container with warm soapy water. Plug into the power supply, then insert the hand blender shaft or soup blender and switch on.
- Unplug, then dry or Wash the blades under running water, then dry thoroughly.
- Never immerse in water or allow liquid inside the shaft. If water does get inside, drain and allow to dry before use.
- Do not dishwash. hint on cleaning the masher foot/shaft and screens
- If food has been allowed to dry onto the masher attachment, remove the paddle. Soak the paddle and bottom of the masher shaft in warm water to soften and then wash thoroughly.
- Never immerse the masher shaft in water or allow liquid inside the shaft. If water does get inside, drain and allow to dry before use. important – do not allow the masher collar to get wet.
service and customer care
- If you experience any problems with the operation of your appliance, before requesting assistance refer to the “troubleshooting guide” section in the manual or visit www.kenwoodworld.com.
- Please note that your product is covered by a warranty, which complies with all legal provisions concerning any existing warranty and consumer rights in the country where the product was purchased.
- If your Kenwood product malfunctions or you find any defects, please send it or bring it to an authorised KENWOOD Service Centre. To find up to date details of your nearest authorised KENWOOD Service centre visit www.kenwoodworld.com or the website specific to your Country.
- Designed and engineered by Kenwood in the UK.
- Made in China.
IMPORTANT INFORMATION FOR CORRECT DISPOSAL OF THE PRODUCT IN ACCORDANCE WITH THE EUROPEAN DIRECTIVE ON WASTE ELECTRICAL AND ELECTRONIC EQUIPMENT (WEEE) At the end of its working life, the product must not be disposed of as urban waste. It must be taken to a special local authority differentiated waste collection centre or to a dealer providing this service. Disposing of a household appliance separately avoids possible negative consequences for the environment and health deriving from inappropriate disposal and enables the constituent materials to be recovered to obtain significant savings in energy and resources. As a reminder of the need to dispose of household appliances separately, the product is marked with a crossed-out wheeled dustbin.
troubleshooting guide
| Problem | Cause | Solution |
| The hand blender will not operate | No Power | Check hand blender plugged in. |
| Hand Blender not assembled correctly | Check attachments securely locked to power handle. | |
| Hand blender starts to slow or labour during processing. | Speed selected too low
Recommended operating time exceeded. |
Increase speed
Do not operate the hand blender for longer than 50 seconds in any 4 minute period for heavy mixture or the whisk and frother/foaming tool for 3 minutes in any 10 minute period. |
| Excessive splashing during processing | Speed selected too high. | Select a lower speed initially and increase as the mixture thickens.
Select an appropriate sized container. Place the blades into the food before switching on. |
| Container, bowl or pan too shallow or too small for ingredients being processed. | ||
| Masher paddle will not remove from masher assembly | Masher collar not connected to masher shaft. | Ensure that masher collar is connected to masher shaft. |
| Power handle gets hot during operation. | The unit may have been used for an extended period of time. | Allow the unit to cool fully before using again. |
| The mixture is not | The speed of the unit | Gradually increase the |
| blending. | may not be appropriate | speed and blend until |
| for the ingredients being | desired result achieved. | |
| blended. |