Electrolux E5HB1-51GG Explore 5 Hand Blender User Guide

User Guide

 |
|


HOW TO USE THE PRODUCT


INSTRUCTION MANUAL
Graphics and drawings in this manual are solely for illustration purposes and are subject to variations from the actual product.
Read all instructions carefully before using the appliance for the first time.
Keep this manual for future reference.
COMPONENTS
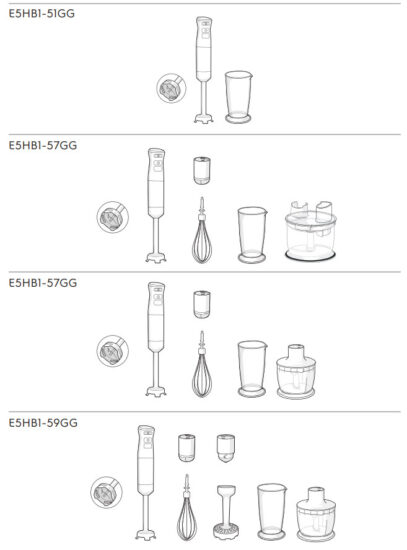
| A. ON/OFF button B. TURBO button C. Speed selector D. Handheld part E1. Stainless steel mixing foot E2. Blade assembly F. Power cord G1. Beaker* G2. Beaker storage lid* H1. Whisk holder* H2. Whisk* I1. Chopper bowl lid* |
I2. Chopper blade* I3. Chopper bowl* I4. Chopper bowl storage lid* J1. Potato masher* J2. Masher blades* K1. Feed tower* K2. Feed tower pusher* K3. All-purpose bowl lid* K4. All-purpose bowl* K5. Multi knife* K6. Fine shredding/cutting disc* K7. Coarse shredding/cutting disc* K8. Spindle* * Specifications vary by model (please refer to page 4 for details) |
SAFETY ADVICE
- Remove and safely discard any packaging materials before using the appliance.
- This appliance is not intended for use by persons (including children) with reduced physical, sensory or mental capabilities, or lack of experience and knowledge unless they have been given supervision or instructions concerning the use of the appliance by a person responsible for their safety.
- Keep the appliance and its power cord out of reach of children. Children should be supervised to ensure that they do not play with the appliance.
- Cleaning and maintenance should not be performed by children unless they are supervised.
- The appliance can only be connected to a power supply whose voltage and frequency comply with the specifications on the rating plate.
- Never use or pick up the appliance if the power cord is damaged and/or housing is damaged.
- If the appliance or the power cord is damaged, it must be replaced by Electrolux or its service agent in order to avoid hazards.
- Do not immerse the appliance, its power cord, or plug in water or any other liquid.
- Do not use or place the appliance near the edge of the table or counter, near hot gas, stove, electric burner, or heated oven.
- Always place the appliance on a flat, level, and dry surface.
- Always switch off the appliance and disconnect it from the power supply if it is left unattended and before changing the accessories, cleaning, or maintenance.
- The blades and inserts are very sharp. The danger of injury. Care shall be taken when changing accessories, after use, and during cleaning and maintenance.
- Never touch the blades or inserts with your hand or any utensils while the appliance is connected with the power supply and/or during operation.
- Do not attempt to remove the blade assembly.
- Keep hands and utensils away from the appliance during operation to avoid the risk of severe injury to persons or damage to the appliance.
- Do not operate the appliance without food or liquid in the chopper or the beaker.
- Never operate the chopper without the lid.
- The appliance and accessories may become hot during operation. It is recommended that the appliance be allowed to cool down before cleaning or storage.
- Do not use the appliance continuously for more than 30 seconds when processing a heavy load. Do not use the appliance continuously for more than 60 seconds in normal use. Allow the appliance to cool down before restarting.
- The appliance cannot be used for chopping ice or blending hard and dry substances, such as nuts or candy; except with specific accessories provided with the appliance, otherwise the blade could be blunt.
- Do not use this appliance to stir paint. Danger could result in an explosion!
- Do not let the power cord come into contact with hot surfaces or hang over the edge of a table or counter.
- Never use accessories or parts made by other manufacturers not recommended or sold by Electrolux as it may cause a risk of injury to persons.
- This appliance is for indoor use only.
- This appliance is intended for domestic use only. Electrolux will not accept any liability for possible damage caused by improper or incorrect use.
BEFORE FIRST USE
- Before using your appliance, remove all packing material, plastic, labels, stickers, or tags that may be attached to the motor base, bowls, or attachments. Clean the product before using it for the first time. (Please refer to the “CLEANING AND CARE“ section for cleaning instructions.
USING THE MIXING FOOT - Insert the mixing foot into the handheld part, turn the handheld part clockwise and lock it into position.
- Insert the stick mixer deep into the beaker, plug it into the main outlet, and press the ON/OFF button or TURBO button to start. Make sure the beaker is no more than 2/3 full.
If you do not use the beaker, do not immerse the mixing foot more than 2/3 of its length. Move stickmixer lightly up and down to ensure the best processing of content. - Adjust the normal speed, by moving the speed selector left (for a lower speed) or right (for a higher speed).
Release the ON/OFF or TURBO button to stop mixing. When processing normal load, the appliance can be used continuously for 60 seconds. Allow the appliance to cool for 1 minute before restarting. To disassemble, turn the handheld part anti-clockwise.
CAUTION!
Allow the mixing foot to cool down after processing hot ingredients or liquid.USING THE CHOPPER* - Place the chopper bowl on a clean, level surface. Put the chopper blade into the shaft at the base of the chopper bowl.
- Place food into the chopper bowl. The amount of food to be chopped cannot exceed the maximum amount as indicated on the chopper bowl. Close the chopper bowl lid.
- Insert the handheld part into the chopper bowl lid and turn clockwise (A) to lock into position. Plug into a power outlet and press the ON/OFF button or TURBO button to start.
Release to stop. To disassemble, turn the handheld part anti-clockwise.USING THE WHISK* - Attach the whisk to the whisk holder and then assemble the whisk assembly with the handheld part. Turn the handheld part clockwise to lock in position. Plug into a power outlet and press the ON/OFF button or TURBO button to start. Release to stop. To disassemble, turn the handheld part anti-clockwise.USING THE POTATO MASHER*
- Insert the masher blades into the potato masher. Attach the potato masher to the handheld part, and turn clockwise until locked into position. Plug into a power outlet and press the ON/OFF button or TURBO button to start.Release to stop. To disassemble, turn the handheld part anti-clockwise.
Note: Boiled potatoes should be smashed at maximum speed for 60 seconds.
USING THE FOOD PROCESSOR*
- Place the food processor bowl on a flat surface. Make sure that the non-slip ring is properly placed.
- Using shredding/cutting discs: Place the spindle on the spigot in the center of the all-purpose bowl. Select desired shredding/cutting disc and place it on the spindle.
Using the multi knife: Fit the multi knife over the spigot inside the all-purpose bowl.
Caution: The blades and inserts are very sharp! - Put the ingredients in the bowl. (Do not exceed the maximum filling volume: 500 ml.) Close the lid and lock it into position and insert the feed tower pusher into the feed tower. It is recommended to put smaller food through the feed tower in order to avoid sticking/ blocking under the multi-knife.
- Insert the handheld part into the opening of the lid and lock it into position. Plug into the main outlet, and select the speed by moving the sliding speed selector. Press the ON/OFF button to start and release it to stop. For extra power, press the TURBO button.
To remove the handheld part from the all-purpose bowl, press the release button.
Caution: Never remove the lid before the blades and inserts have completely stopped. - Further ingredients can be added during operation through the feed tower. Close the feed tower immediately after, to avoid splashing. Use the feed tower pusher exclusively to compress the cutting items!
CLEANING AND CARE
- Before cleaning, switch off the appliance and wait till the appliance has stopped completely before unplugging from the main outlet.
- Wash all parts, except for the motor base, in warm soapy water. All parts, except for the whisk holder, chopper bowl lid, and storage lid, can be washed on the top rack of your dishwasher. Dry each part thoroughly before use. (you may place the multi knife in an upright position with blades facing downwards to allow it to drain thoroughly.)
Warning! Never immerse the handheld part, plug, cord, whisk holder, and chopper bowl lid in water or any other fluid. - The handheld part, whisk holder, and chopper bowl lid should only be cleaned with a soft damp cloth, then dried with a cloth.
Note: Do not use abrasive cleaners or scouring pads to clean the surfaces of your appliance.
Ensure that all parts of the appliance are clean and completely dry before storage.
To avoid the crazing of the chopper bowl, always rinse the chopper bowl with only clean water right after usage. This is to prevent acids or essential oils from the ingredients that may attack the plastic material. After rinsing the chopper bowl, it can be washed by hand with detergent, or placed into the dishwasher for cleaning.
Avoid leaving the ready dishes (e.g. soup, smoothie, juice) in the chopper bowl for a long time, especially when acidic ingredients (e.g. lime, lemon) are processed.
Always rinse the chopper bowl thoroughly with only clean water before placing it in the dishwasher.
However, if crazing would appear, the effect is purely cosmetic and it does not have any impact on the integrity of the chopper bowl.
PROCESSING QUANTITIES AND PROCESSING TIMES
ACCESSORY: METAL MIXING FOOT AND BEAKER
| RECIPE | INGREDIENTS | QUANTITY | TIME | SPEED |
| Pineapple-apricots Smoothie | Pineapple in slices | 250 g | 60 sec | Turbo |
| Dried Apricots | 40 g | |||
| Yoghurt | 300 g | |||
| Raspberries Smoothie | Frozen raspberries | 250 g | 60 sec | Turbo |
| Banana | ½ pcs | |||
| Water | 100 g | |||
| Caster sugar | 1 Tbs | |||
| 300 g |
WHISKING/WHIPPING QUANTITIES AND PROCESSING TIMES
ACCESSORY: WHISK*
| INGREDIENTS | QUANTITY | TIME | SPEED |
| Cream | 500 g | 50-70 sec | Turbo |
| Egg whites | 4 units | 60 sec | Turbo |
| Note: It is possible to use the whisk for whipping cream in the beaker, as long as the temperature of the cream is between 4 and 8 Degree Celcius. For whisking eggs, please use a 1.5 Litre bowl. | |||
CHOPPING QUANTITIES AND PROCESSING TIMES
ACCESSORY: CHOPPER*
| INGREDIENTS | QUANTITY | QUALITY | TIME | QUALITY | TIME | QUALITY | TIME | SPEED |
| Carrots | 100-200 g | Coarse | – | Medium | 5-10 sec | Fine | 10-20 sec | Turbo |
| Onions | 100-200 g | 3-5 sec | 5-10 sec | 10-20 sec | ||||
| Almonds | 100-200 g | 3-5 sec | 7-10 sec | 10-20 sec | ||||
| Meat | 100-200 g | – | – | 5 sec | ||||
| Ice | 100-200 g | – | 5 Pulses ON for 3 sec, OFF for 2 sec |
10 Pulses ON for 3 sec, OFF for 2 sec | ||||
| Red dates + honey |
Red dates (sliced) 60 g Honey 120 g |
30 sec | – | – |
Note: We recommend using fresh honey at room temperature. Do not use chilled honey.
MASHING QUANTITIES AND PROCESSING TIMES
ACCESSORY: POTATO MASHER*
| INGREDIENTS | QUANTITY | TIME | SPEED |
| Cooked-potato pieces, and cooked-pumpkin pieces (size 20 x 20 x 20 mm) | 300 g | 30 sec | High speed |
TROUBLESHOOTING
| PROBLEM | POSSIBLE CAUSE | SOLUTION |
| The blades are not turning when the appliance is in operation. | There is too much food in the beaker. | Split the food into 2 batches or more. |
| The size of the food is too big. | Reduce the size of the food. | |
| There are food stuck around the blades. | Use a spatula to gently scrape away the food around the blade. | |
| The chopper does not work. | The chopper lid is not correctly fastened. | Ensure that the chopper bowl lid and the chopper bowl are properly assembled. |
| The mixing foot/whisk assembly does not work. | The mixing foot/whisk assembly is not correctly assembled. |
Ensure that the mixing foot/whisk assembly is correctly assembled and locked in position. |
| The appliance sounds like it is not able to process the load. | The speed may be incorrect. | Please refer to the processing guide for the respective accessories. |
| Slices are slanted or uneven. | The food is light, it jumps during slicing. |
Load food in the filler hole. Place stopper onto food and apply pressure. Then start. |
| Some food remained on the disc after processing. | It is normal for small pieces to remain after processing. |
Always clear any blocked food from shredding/cutting disc manually. |
| The motor slows down when using the multi knife. | The amount of meat may exceed maximum capacity. |
Remove the meat and process in two batches. |
| Too much fat in the meat. | Note that for best result trim the meat of fat before processing. | |
| The motor does not work. | The appliance is not connected to the mains outlet. |
Make sure to plug in the appliance before operation. |
| The appliance vibrates/moves during operation. | The non-slip ring is wet. | Make sure the non-slip ring at the bottom of the all- purpose bowl or the blender jug is clean and dry. |
DISPOSAL
Recycle the materials with the symbol
Do not dispose of appliances marked with the symbol


CUSTOMER CARE AND SERVICE
When contacting Service, ensure that you have the following data available: Model, PNC, and Serial Number.
The information can be found on the rating plate.
Due to the Electrolux policy of continual product development; specifications, colors, and details of our products and those mentioned in this manual are subject to change without notice.
| KOREA
Electrolux Korea limited 9F, Pine Avenue B, 100 Euljiro, Jung-gu, Seoul, Korea 04551 Korea Tel : +82 2 6020-2200 Fax: +82 2 6020-2271~3 Customer Care Services: +82 1566-1238 Email: Website: www.electrolux.co.kr |
INDONESIA
PT. Electrolux Indonesia Electrolux Building Jl.Abdul Muis No. 34, Petojo Selatan, Gambir Jakarta Pusat 10160 Indonesia Tel: 021 – 50817300 Fax: 021 – 50817399 Customer Care Services: 0804 111 999 SMS: 0812 8088 8863 Email: Website: www.electrolux.co.id |
| PHILIPPINES
Electrolux Philippines, Inc. 10th Floor. W5th Avenue Building 5th Avenue Corner 32nd Street Bonifacio Global City, Taguig Philippines 1634 Trunkline: +63 2 737 4756 Domestic Toll Free: 1 800 10 845 care 2273 Customer Care Services: +63 2 845 care 2273 Email: Website: www.electrolux.com.ph |
THAILAND
Electrolux Thailand Co Ltd Electrolux Building 14th Floor 1910 New Petchburi Road Bangkapi, Huay Kwang Bangkok 10310 Thailand Tel: +66 2 725 9100 Fax: +66 2 725 9299 Customer Care Services: +66 2 725 9000 Email: Website: www.electrolux.co.th |
| VIETNAM
Electrolux Vietnam Ltd Floor 9th, A&B Tower 76 Le Lai Street Ben Thanh Ward – District 1 Ho Chi Minh City Vietnam Tel: +84 8 3910 5465 Fax: +84 8 3910 5470 Customer Care Services: 1800-58-8899 Email: Website: www.electrolux.vn |
MALAYSIA
Electrolux Home Appliances Sdn Bhd Lot C6, No. 28, Jalan 15/22, Taman Perindustrian Tiong Nam, 40200 Shah Alam, Selangor Malaysia Customer Care Services Tel: +60 3 5525 0800 Customer Care Services Fax: +60 3 5524 2521 Email: Website: www.electrolux.com.my |
| SINGAPORE
Electrolux SEA Pte Ltd 1 Fusionopolis Place, Galaxis #07-10 (West Lobby) Singapore 138522 Customer Care Services: +65 6727 3699 Fax: +65 6727 3611 Email: Website: www.electrolux.com.sg |
AUSTRALIA
Electrolux Home Products Pty Ltd ABN 51 004 762 341 163 O’Riordan Street, Mascot, NSW 2020, Australia Customer Service Phone: 1300 365 305 Website: www.electrolux.com |
| NEW ZEALAND
Electrolux Small Appliances A division of Electrolux (NZ) Limited 3-5 Niall Burgess Road, Mt. Wellington, Auckland, New Zealand Phone: (09) 9573 2220 Customer Service Phone: 0508 730 730 Website: www.electrolux.com | |