Bosch NGMP058UC 30 Inch Gas Cooktop with 5 Sealed Burners Instruction Manual


BOSCH NGMP058UC 30 Inch Gas Cooktop with 5 Sealed Burners

IMPORTANT SAFETY
Here you can find explanations of the safety signal words used in this manual.
WARNING
This indicates that death or serious injuries may occur as a result of the non-observance of this warning.
CAUTION
This indicates that minor or moderate injuries may occur as a result of the non-observance of this warning.
NOTICE:
This indicates that damage to the appliance or property may occur as a result of non-compliance with this advisory. Note: This alerts you to important information and/or tips.
General information
- Read this manual carefully.
- Keep the manual and the product information in a safe
- place for future reference or for the next owner.
- Do not connect the appliance if it has been damaged in transit.
General safety instructions
IMPORTANT: THE APPLIANCE MUST BE INSTALLED BY A QUALIFIED INSTALLER. IMPORTANT: SAVE THESE INSTRUCTIONS FOR THE LOCAL ELECTRICAL INSPECTOR’S USE. OWNER: PLEASE RETAIN THESE INSTRUCTIONS FOR FUTURE REFERENCE.INSTALLER: LEAVE THESE INSTRUCTIONS WITH THE APPLIANCE AFTER INSTALLATION IS COMPLETE. Examine the appliance after unpacking it. In the event of transport damage, do not plug it in.
WARNING
If the information in this manual is not followed exactly, fire or shock may result causing property damage or personal injury. Do not repair, replace or remove any part of the appliance unless specifically recommended in the manuals. Improper installation, service or maintenance can cause injury or property damage. - Refer to this manual for guidance.
- All other servicing should be done by an authorized service provider. Disconnect electrical and gas supply before servicing. When installing a cooktop over a single oven, be sure to follow the instructions in both the oven’s and the cooktop’s installation manuals.
- You can find a list of approved combinations of cooktop and oven in the Approved Combination Matrix of your cooktop, or you can contact Customer Service for the latest list of approved combinations. Do not try to install your cooktop over any oven that is not stated in that list. Never modify or alter the construction of the appliance. The appliance should only be used if installed by a qualified technician in accordance with these installation instructions. The manufacturer is not responsible for any damage resulting from incorrect installation. To eliminate the risk of burns or fire by reaching over heated surface units, cabinet storage space located above the surface units should be avoided.
- If cabinet storage is to be provided, the risk can be reduced by installing a hood that projects horizontally a minimum of 5″ (127 mm) beyond the bottom of the cabinet.
- Verify that cabinets above the cooktop are a maximum of 13″ (330 mm) deep.
WARNING
Remove all tape and packaging before using the appliance. - Destroy the packaging after unpacking the appliance.
- Dispose of packaging in an environmentally responsible manner.
- Never allow children to play with packaging material.
- Store small parts safely as they can be a choking hazard.
Electrical safety
- Installer – show the owner the location of the circuit breaker or fuse. Mark it for easy reference.
- If required by the National Electrical Code (or Canadian Electrical Code), this appliance must be installed on a separate branch circuit.
- Local codes vary. The installer is responsible for ensuring that the installation, connections, and grounding comply with all applicable codes. The manufacturer is not responsible for any issues associated with the improper installation of this product.
- The appliance must be electrically grounded in accordance with local codes or, in the absence of local codes, with the National Electrical Code, NFPA 70 latest edition or, in Canada, the Canadian Electric Code, CSA C22.1-02.
- Be sure your appliance is properly installed and grounded by a qualified technician. Installation, electrical connections and grounding must comply with all applicable codes.
- Do not use an extension cord.
- Do not use an adapter.
- Refer to the rating plate for more information.
WARNING
Before installing, turn the power OFF at the service panel. - lock service panel to prevent power from being turned ON accidentally. For appliances equipped with a cord and plug, do not cut or remove the ground prong.
- It must be plugged into a matching grounding-type receptacle to avoid electrical shock.
- If there is any doubt as to whether the wall receptacle is properly grounded, the customer should have it checked by a qualified electrician.
GROUNDING INSTRUCTIONS - This appliance must be grounded.
- Grounding reduces the risk of electric shock by providing a safe pathway for electric current in the event of a short circuit.
- Be sure your appliance is properly installed and grounded by a qualified technician.
- Installation, electrical connections and grounding must comply with all applicable codes. Before you plug in an electrical cord, be sure all controls are in the OFF position. Before you turn on power supply, make sure all controls are in the OFF position.
Requirements for gas supply: - Install a gas shutoff valve near the appliance. It must be easily accessible in an emergency.
- Leak testing must be conducted by the installer according to the instructions in this manual.
- The appliance and its individual shutoff valve must be disconnected from the gas supply piping system during any pressure testing at pressures in excess of ½ psi (3.5 kPa).
- The appliance must be isolated from the gas supply piping system by closing its individual manual shutoff valve during any pressure testing of the gas supply piping system at test pressures equal to or less than ½ psi (3.5 kPa).
- The minimum supply pressure must be 1″ water column above the manifold pressure printed on the rating label. The maximum supply pressure must not exceed 14.0 inches water column (34.9 Millibars).
- A metal flex line or fixed metal pipe shall be used to connect gas to the appliance. If a metal gas line cannot be used, consult your local certified electrician or local electric codes for proper grounding.
IMPORTANT SAFETY NOTICE: Burning gas cooking fuel generates some by-products which are on the list of substances which are known by the State of California to cause cancer or reproductive harm. To minimize exposure to these substances, always operate this unit according to the instructions contained in this booklet and provide good ventilation.
IMPORTANT SAFETY INSTRUCTIONS
- READ AND SAVE THESE INSTRUCTIONS
- Propane gas installation
- The propane gas tank must be equipped with its own high pressure regulator. In addition, the regulator supplied with this unit must also be used.
- The appliance is shipped from the factory for use with natural gas. It must be converted for use with propane. A qualified technician or certified installer must do the conversion.
- For use with propane, the appliance must be converted per the LP conversion instructions
For Massachusetts installations - Installation must be performed by a qualified or licensed contractor, plumber or gas fitter qualified or licensed by the state, province or region where this appliance is being installed.
- The shut-off valve must be a “T” handle gas cock.
- A flexible gas connector must not be longer than
36 inches. Installer – show the owner where the gas shut-off valve is located.
Ventilation recommendations
We strongly recommend the installation of a ventilation hood above this appliance. The hood must be installed according to instructions furnished with the hood.
WARNING
The appliance should not be installed with a ventilation system that blows air downward toward the burners. This type of ventilation system may cause ignition and combustion problems with the gas cooking appliance resulting in personal injury or unintended operation.
High altitude installation
This appliance has been tested for operation up to an altitude of 10,100 ft (3,080 m) elevation above sea level. For altitudes above 2,000 ft (610 m) elevation above sea level, burner flame adjustments may be necessary. Burners should be checked at the lowest setting, if the flame is not stable the simmer should be increased until the flame is stable. This can be done by adjusting the bypass screw in the valve. If flame performance is satisfied
Before you begin
Parts included
After unpacking all the parts, check for any damage in transit and for completeness of delivery.
- Cooktop
- Foam tape
- Hold-down brackets (4)
- Screws, #10-32 x 2½” (63.8 mm), (4)
- Sheet metal screws, #8 x 3/8″ (9.5 mm), (4)
- Washers (4)
- Burner grates (3)
- Burners (5)
- Burner caps (6)
- Pressure regulator
- LP gas conversion kit
Tools and parts needed
Prepare these tools and accessories before you start to install your appliance.
- Pencil
- Measuring tape
- Crosshead screwdriver
- Drill with bit 1/4″ (6 mm)
- Jigsaw
- Adjustable wrench
- Teflon® tape – gas rated
- Flathead screwdriver, 1/8″
- Note: Additional materials may be necessary for installation in solid surface countertops. Contact the countertop manufacturer.
General requirements
Ensure that the following requirements are met when planning the installation of your appliance.
- Plan the installation of the unit so that the power cord, gas shut-off valve and gas pressure regulator are accessible from the front of the cabinet.
- Make sure the gas supply line does not interfere with the back of the appliance.
- The cabinet in which the cooktop is installed must be properly secured, level and stable.
- Any laminated coverings and glue on cabinets next to the cooktop must be made of non-flammable and heat-resistant materials.
- This appliance cannot be installed above refrigerators, washing machines, dishwashers or similar.
- If an oven is installed underneath the cooktop, the thickness specified for the countertop surface may exceed the minimum thickness stated in these instructions. Observe the information in the oven’s installation instructions.
Cabinet requirements
Ensure that the cabinetry at the installation location meets the requirements for a safe installation.

| a | min. 13″ (330 mm) for installation next to oven min. 13″ (330 mm) |
| b | min. 13″ (330 mm) for installation next to oven min. 13″ (330 mm) |
| c | min. 30″ (762 mm) clearance between the top of the cooking surface and the bottom of combustible constructions |
| d | min 3″ (76 mm); for installation in kitchen islands, min. 4″ (100 mm) |
| e | For 30″ cooktops: min. 30″ (760 mm) centered over cooktop |
| e | For 36″ cooktops: min. 36″ (914 mm) centered over cooktop |
| f | min. 18″ (458 mm) |
| g | max. 13″ (330 mm) |
| h | min. 1¾” (48 mm); for installation in kitchen islands, min. 4″ (100 mm) |
Countertop requirements
Ensure that the countertop into which the cooktop is to be installed meets these requirements for a safe installation.
Gas requirements
Ensure that the requirements for the gas supply are met. The cooktop is shipped from the factory for use with natural gas. For use with LP conversion, a certified technician or installer must do the conversion. Supply pressure:
- Natural Gas: 7 inches water column (17.4 Millibars)
- Propane Gas: 11 inches water column (27.4 Millibars)
- The propane gas tank must be equipped with its own high-pressure regulator in addition to the pressure regulator supplied with this unit.
Electrical requirements
Ensure that the following electrical requirements are met.
CAUTION
Do not use an extension cord with this appliance.
- This appliance requires a 60 Hz, 15 Amp, 120 V/AC connection.
- The appliance is equipped with a 40″ (1000 mm) power cord.
- The power connection must remain accessible from the front of the cabinet after the installation is complete.
Prepare installation space
Prepare installation space Create the cutout in the countertop according to the instructions.
General countertop requirements:
- The angle of the cut surface to the countertop must be 90°.
- With multi-layered countertops, secure strips laterally in the cutout if necessary.
- After creating the cutout, remove all shavings.
- Seal the cut surfaces in a heat- and water-resistant manner.
- If there is no oven beneath the cooktop, install a noncombustible floor with a 3/8″ (10 mm) space between the floor and the bottom of the cooktop. The distance from the intermediate floor to the power supply connection for the appliance must be at least 3/8″ (10 mm).
- Observe the minimum distance between device underside and cabinet surfaces of ⅜” (10 mm).
- dimensions for 30″ cooktops Refer to these measurements for the models stated here.


Installation procedure
Follow these instructions to install the cooktop on the countertop
- Use protective gloves when installing the appliance.
CAUTION
The appliance is heavy. - It is recommended that two people install this appliance.
Preparing the cooktop - Place the cooktop face down on a soft and stable surface.
- Apply the included foam sealing tape around the edges of the underside of the appliance.
- Attach the hold-down brackets to the underside of the cooktop with the provided short screws and washers. Do not tighten the screws.


Installing the pressure regulator
WARNING
Do not attempt any adjustment of the pressure regulator, except when converting to propane. Adjustments could lead to leaks or cause incorrect gas pressure to the appliance.
- Identify the parts of the pressure regulator.
- Appliance manifold connection
- Conversion nut
- Pressure regulator
- Install the pressure regulator supplied with the cooktop to the appliance manifold connection. Apply Teflon® tape on the threads of the manifold pipe.
- Turn the pressure regulator to hand tighten plus ¼ turn, not exceeding 1 turn for alignment.
- When the regulator is securely installed on the manifold pipe, the conversion nut will be easily accessible.
- WARNING Make sure the used gas connection line is not connected to the gas supply, before carrying out the following steps. Connect a ½” metal flex gas line or fixed metal pipe connection to the pressure regulator. Always install a new gas connection.

Securing the cooktop to the countertop
The cooktop must be secured from below using the hold-down brackets provided.
WARNING
Before installing, turn power OFF at the service panel.
- Lock service panel to prevent power from being turned ON accidentally.
- Rotate the hold-down brackets so that the appliance can be placed in the cutout.
- CAUTION Do not let the cooktop drop into place.
- Make sure that the cooktop is supported along the edges when carefully placing it into the cutout. Turn the cooktop over carefully making sure not to damage the pressure regulator and gas line. Place the cooktop carefully into the countertop cutout, pushing it towards the front of the cutout. Make sure the cooktop is centered between the left and right edges of the cutout.
Insert the 2½” clamping screws into the hold-down bracket and secure the cooktop to the countertop. Protect delicate countertops by placing a wooden disk underneath. Tighten the screws to the cooktop . Note: Do not use silicone to glue the cooktop to the countertop surface.

- Cooktop rough-in box
- The arrow on the pressure regulator shows the direction of
- gas flow
- Pressure regulator
- ½” female pipe threads
- Metal flex gas line
- Power cord (40″/1 m)
- 120 V receptacle
- Gas cut-off valve
- Gas supply line connection fitting
- Floor

Connecting the gas supply line
Ensure the following requirements are met before you try to connect the appliance to the gas supply:
- The appliance is shipped from the factory for use with natural gas. If you want to use propane gas it must be converted. A qualified technician or installer must do the conversion.
- Before connecting the appliance, please check whether the local connection conditions such as gas type and gas pressure match the appliance settings.
- Make sure the gas supply is turned off at the manual shutoff valve before connecting the appliance.
- The gas connection must be in a location that permits access to the manual shut-off valve and which, if applicable, is visible after opening the door of the cabinet.
- The metal flex gas line must not come into contact with moving parts of the fitted unit (e.g. drawers) or be laid in areas where it could become trapped or damaged.
- The metal flex gas line must not come into contact with a cooktop, oven, dishwasher, refrigerator, washing machine, hot water pipe, radiator or any other appliance installed in the vicinity of the gas cooktop.
- The metal flex gas line must not be subject to rubbing, vibrations, kinking or any other kind of deformation. It should be checked along its entire length with the cooktop in the installation position.
Checking the gas line for leaks
Important notes for gas connection:
- The appliance and its individual shutoff valve must be disconnected from the gas supply piping system during any pressure testing at pressures in excess of ½ psi
- The appliance must be isolated from the gas supply piping system by closing its individual manual shutoff valve during any pressure testing of the gas supply piping system at test pressures equal to or less than ½ psi (3.5 kPa).
- Turn on gas.
- Apply a soap solution or non-corrosive leak detection fluid to all joints and fittings in the gas connection between the shut-off valve and the cooktop. Also check gas fittings and joints in the cooktop if the connections may have been disturbed during installation. Bubbles appearing around fittings and connections indicate a leak.
- If a leak appears, turn off the supply line gas shut-off valve and tighten the connections.
- Retest for leaks by turning on the supply line gas shutoff valve. a When the leak check is complete and no bubbles appear, the test is complete.
- Wipe off all soap solution or detection fluid residue.
Connecting the electrical supply
CAUTION
Before you plug in the electrical cord, make sure that the gas shut-off valve and all burner controls are in the OFF position. - Connect the plug of the electrical cord to a grounded power outlet. The outlet must be accessible after the installation of the appliance is complete.
Assembling the burner parts
The burner parts must be properly placed for the cooktop to function properly.
Note
If the burner parts are not properly placed, one or more of the following problems may occur:
- The burner flames are too high.
- Flames shoot out of the burners.
- The burners do not ignite.
- The burner flames light unevenly.
- The burners emit gas odor.
. Assemble the burner parts according to the illustration.

Check to make sure that there is no gap between the burner parts. You may gently try to move the burner parts from side to side to check if they are properly seated.

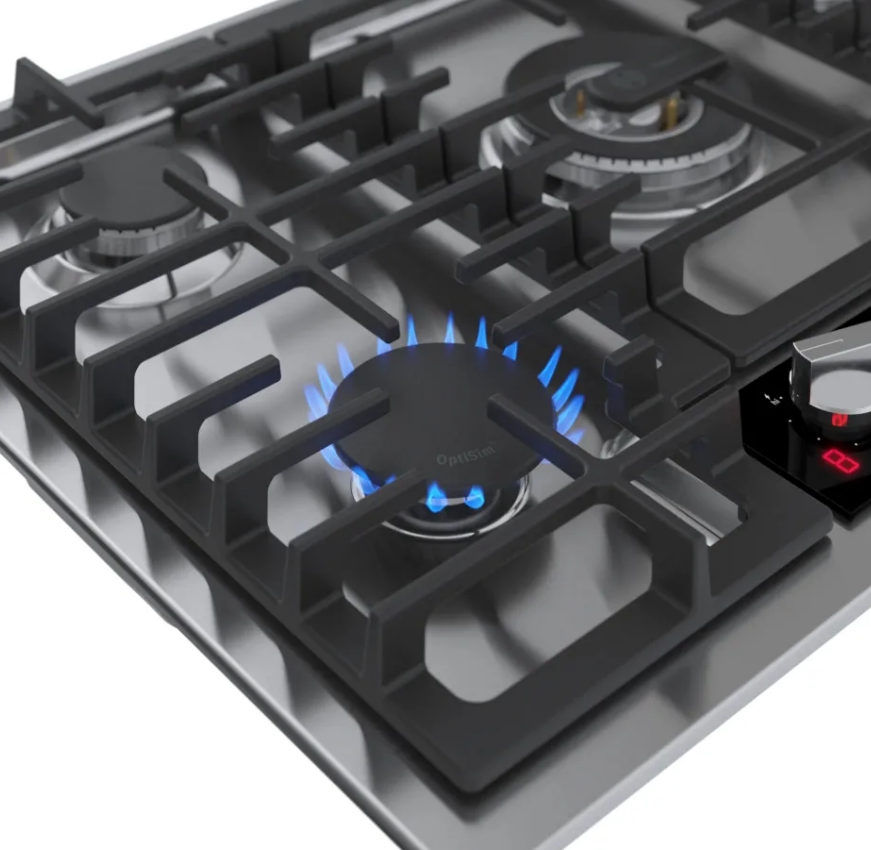
OptiSim® feature
The OptiSim® burner cap has been designed to work with the small burner at the front left position of the cooktop. It is used to provide optimal simmering for delicate sauces while minimizing the risk of scorching. Installing the OptiSim® burner cap
- Place the burner cap on the burner base, so that the lower protrusion locks in place in the center of the burner base. a When properly installed the OptiSim® burner cap will extend beyond the burner base and raised surface.
Installing the burner grates
WARNING
Improperly positioned grates can cause flare-ups. - Position all grates properly on the cooktop whenever the cooktop is in use to properly support pots and avoid spills.
- Make sure each of the four feet of the grates is placed into the corresponding dimples on the cooktop surface.
- Do not use a grate if the rubber feet are missing or damaged.
- NGMP058UC
- NGMP658UC
Checking the installation
Check if your unit is working properly after you have completed the installation steps.
WARNING
Before you turn on the power supply, make sure all controls are in the OFF position. Requirement: The burner caps are properly positioned. - Verify that the electric igniters are working.
- Check the flame characteristics.
The flame should be blue with a minimal yellow tip on the outer cone.


Conversion to LP gas
Your appliance is equipped for use with natural gas on delivery. It can be changed to LP gas supply. The components required for conversion to LP Gas are contained in the conversion kit included with this appliance, or are available from Customer Service. Customer Service”, Page 15 Only a licensed specialist is authorized to switch the appliance to another gas type. Before carrying out the conversion, turn off the electricity and gas supply.
Converting the pressure regulator
- Locate the pressure regulator on the bottom right end of the appliance. Remove the hexagon shaped cap from the regulator. Make sure not to dislodge the gasket on the cap or the spring inside the regulator.
- Grasp the plastic button stem firmly and pull it forcefully from the metal cap . The stem snaps snugly into an indent in the cap and may require a strong pull to remove. It may be helpful to gently “rock” the plastic stem while pulling it from the metal cap.
- Rotate the stem 180° .
- The button end of the stem is away from the cap.
- The letters “LP” on the stem are upside down when the cap is set flat on its head.
- Snap the stem back in place in this position inserting it into the indent in the metal cap .


IMPORTANT: Attach the metallic sticker included with the conversion kit to the bottom of the appliance as shown. This sticker provides notice that the appliance has been converted for use with LP gas. It should be located near the appliance rating plate.
“Rating plate location”
7. If you change the type of gas back to natural gas at a later point, remove the sticker.
Replacing the orifices
- Remove all burner grates, burner caps and burner bases.
- Replace the orifices with a 7 mm socket wrench. See
Burner chart - Normal burner with one orifice Dual-flame burner, first orifice Dual-flame burner, second orifice It is important to make sure that the orifices do not become detached during removal or fastening. They must be properly tightened to ensure that there are no leaks. The primary air does not have to be adjusted.
- Fasten the orifices and replace the burner caps to the corresponding burners.
- Put the burner grates in place.
- Save the orifices removed from the appliance for future use.
Adjusting the gas valves- Turn the control knobs to position off.
- Carefully lift off the burner grates, remove the burner caps and the burner bases.
- Pull off the control knobs.
- Remove the main top from the cooktop.
- Remove the electronics pack from the control panel.
- Remove the white disks from the valve stems.

Adjust the black T10 star head setting screw with a T10 star head screwdriver. Refer to the burner chart for the correct setting of the setting screws (M).
- “Burner chart”, Page 15
- Use setting for LP Gas. The setting screws must be tightened properly.
- Use setting for natural gas. The setting screws must finish flush with the fitting.
The dual-flame burner has 2 setting screws. - Replace the white disks and the electronics pack.
- Reinstall the main top and the control knobs.
- Place the burner caps and the burner grates back in position.
- Turn the control knob between the highest and lowest setting. Make sure the flame does not go out and there are no flashbacks. Note: In the event of damage, the valve must be completely replaced.

Burner chart
| Burner cap | Gas type | Pressure in inch wc | Orifice | BTU/h | kW | M (valve ad- justment screw setting) |
| Small | Natural gas | 6 | 77 | 3,400 | 1.00 |
|
| burner | Propane gas | 10 | 54 | 3,400 | 1.00 | |
| Large | Natural gas | 6 | 133 | 10,300 | 3.00 |
|
| burner | Propane gas | 10 | 93 | 10,300 | 3.00 | |
| Medium | Natural gas | 6 | 102 | 6,000 | 1.75 |
|
| burner | Propane gas | 10 | 71 | 6,000 | 1.75 | |
| Dual- flame burner | Natural gas Propane gas | 6 10 |
NG: ¢ outer: 170 ¢ inner: 55 |
18,000 11,100 |
5.30 3.30 |
|
| PG: ¢ outer: 95 ¢ inner: 39 |
Customer Service
If you have any questions on use, are unable to eliminate an issue in the appliance yourself, or the appliance needs to be repaired, please contact our Customer Service. With any warranty repair, we will make sure your appliance is repaired by an authorized service provider using genuine replacement parts. We use only genuine replacement parts for all repairs. Detailed information on the warranty period and terms of warranty can be found in the Statement of Limited Product Warranty, from your retailer, or on our website. If you contact Customer Service, you will need the model number (E-Nr.) and the production number (FD) of your appliance.
USA:
1-800-944-2904
www.bosch-home.com/us/owner-support/get-support
www.bosch-home.com/us/shop
Model number (E-Nr.) and production
number (FD) You can find the model number (E-Nr.) and the production number (FD) on the appliance’s rating plate. Making a note of your appliance’s details and the Customer Service telephone number will enable you to find them again quickly.
6.2 Rating plate location
- You can find the rating plate of your appliance:
- On the appliance certificate.
- on the underside of the appliance
