Bosch MUZ4GM3 Grinding Mill Instruction Manual


BOSCH MUZ4GM3 Grinding Mill Instruction

Intended use
This accessory is designed for the MUM4 food processor. Follow the operating instructions for the food processor. Never use the accessory for other appliances. Only use matching parts together.
This accessory is suitable for grinding all sorts of grain (except maize) as well as poppy seeds, linseeds, sesame seeds, buck-wheat, herbs, spices and coffee.
The accessory must not be used for processing other objects or substances.
Important safety information
- Never reach into the filling tray.
- The accessory must be completely assembled before use. Never assemble the accessory on the base unit. The accessory should only be used in the intended operating position. Before attach-ing or removing the accessory, wait until the drive has come to a standstill and pull out the mains plug.
Caution!
Check that there are no foreign objects in the feed chute or housing. Do not insert objects (e.g. knives, spoons) into the feed chute or housing. Please only use clean ingredients for grinding or the appli-ance could be damaged by metal parts, sand or stones. The ingre-dients must be dry. Never immerse individual parts (except the filling tray) in liquids, never hold under running water and do not clean in the dishwasher. Do not operate accessory at no load.
Important! It is essential to clean the accessory thoroughly after each use or after it has not been used for an extended period. X “Cleaning and maintenance” see page 11
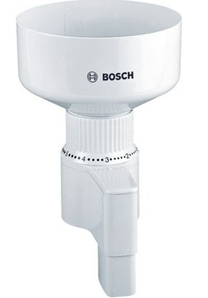
Overview

Fig. A
- Housing
- Setting ring
- Marking Ä
- Scale for grinding level
1 = fine
6 = coarse - Marking <
- Marking t
- Discharge chute
- Drive coupling
- Grinding cone
- Grinding ring
a Marking - Filling tray
a Scale for fill level
Before using for the first time Before the new accessory can be used, it must be fully unpacked, cleaned and checked.
Caution! Never operate a damaged accessory!
- Remove all accessories from the packaging and dispose of all packing materials.
- Check that all the parts are present and examine them for obvious damage. X Fig. A
- Thoroughly clean and dry all parts before using for the first time. X “Clean-ing and maintenance” see page 11
Symbols and markings
| Symbol | Bedeutung |
| Vorsicht! Rotierende Werk- zeuge. Nicht in den Füll- schacht greifen. | |
| Markierung zum Ablesen der Einstellung | |
| Entnehmen / Einsetzen des Mahlrings | |
| 1 …. 6 | Skala für Mahlgrad Stufe 1 (fein) bis 6 (grob) |
| Achtung! Blockierung.des Mahlwerks. | |
| Einsetzen des Mahlrings |


Preparation
- Place the base unit on a flat, clean surface.
- Insert the bowl with lid.
- Press the Release button and move the swivel arm to position 2. Remove the protective drive cover.
Assembling the mill
Image sequence
- Turn the setting ring in an anticlockwise direction to the stop. Markings Ä and t must match up exactly. Place the grinding cone on the square shaft in the housing and press right down.
- Insert the grinding ring in the housing. Markings Ü, Ä und t must match up exactly.
Note: It is only possible to insert and remove the grinding ring properly when in this position. - Press the grinding ring down lightly and turn the setting ring in a clockwise direction until the scale for the grinding level is reached.
Attach the filling tray. - Use
W Risk of injury
Never reach into the feed chute.
Caution! - Never use the mill when empty.
- The ingredients must be dry or the grinding unit may stick.
- Do not process more than 2 kg of ingredients in a single operation. Then allow the appliance to cool down for at least 1 h.


- Fit the mill. The discharge chute is pointing to the right.
- Rotate the mill as far as possible in a clockwise direction.
- Add the ingredients to the filling tray. Max. quantity: 750 g. The scale on the filling tray acts as a guide here. The values given are for wheat.
- Plug the mains plug into the mains. Set the rotary switch to setting 4.
- Select the grinding level by turning the setting ring to a value between 1 (fine) and 6 (coarse). Hold the mill with one hand while doing so.
Caution!
- Never turn the setting ring beyond the scale to the marking <. The grinding unit will otherwise be blocked and the mill damaged.
- Only adjust the grinding level in small steps. When using a fine grinding level, make sure that the mill does not become blocked.
- The flour trickles down into the bowl through the discharge chute.
- Turn the rotary switch to y. Wait until the drive comes to a standstill. Disconnect the mains plug.
- Rotate the mill in an anti-clockwise direction and remove.
Take the mill apart and clean all parts directly after use. X “Cleaning and maintenance” see page 11
Grinding performance
The values listed in the table below are guide values for processing on setting 4 and depend e.g. on the moisture level or crop season (summer or winter).
| Getreideart | Mahlleistung bei Einstellung
1 (fein) 6 (grob) | |
| Weizen | 80 g/min | 270 g/min |
| Roggen | 70 g/min | 230 g/min |
| Buchweizen | 80 g/min | 190 g/min |
| Nacktgerste | 80 g/min | 300 g/min |
| Nackthafer | 50 g/min | 170 g/min |
| Hirse | 80 g/min | 200 g/min |
| Reis | 70 g/min | 190 g/min |
| Leinsamen* | 15 g/min | – |
| Mohn* | 70 g/min | – |
Linseeds and poppy seeds contain oil. If the setting is too fine, the grinding performance will below. You will ge a better result if these seeds are frozen prior to grinding. If linseeds are to be used in baking, they can be ground quickly and very finely by first mixing them with grain.
Cleaning and maintenance
The attachments and accessories used must be thoroughly cleaned after each use. In the case of oily ingredients, e.g. linseeds, the mill should be cleaned after each use.
Caution!

- Do not use any cleaning agents contain-ing alcohol or spirits.
- Do not use any sharp, pointed or metal objects.
- Do not use abrasive cloths or cleaning agents.
- Never immerse individual parts (except the filling tray) in liquids, never hold under running water and do not clean in the dishwasher.
In Fig. E you will find a summary of how to clean the individual parts. - Clean the mill as described under
„Assembling the mill“ but in reverse order. X “Assembling the mill” see page 10 - Only clean the grinding ring and grinding cone with a dry brush.
- Do not clean the housing in rinsing water. Only wipe the outside with a damp cloth.
- Move the discharge chute out of the way for cleaning.
- Store the mill in a dry place.
Tips
Dry storage
Moist grains produce abnormal levels of heat. This is clearly indicated when the grinding zone of the steel cone grinder becomes clogged, so preventing fine grinding. If the appliance has difficulty
in fine-grinding the grain, this may indicate that the grain is too moist. Therefore store the ingredients uncovered in a dry place or in a jute sack. The storage temperature must not exceed 40° C.
Note: Grain is a natural “preserved food” and hygroscopic. Users must therefore always be reminded that it should be stored dry.
Moisture test
A simple test is to crush the ingredients between two hard objects. Unsuitable,
i.e. excessively moist ingredients, can
be flattened like oats and will not crack.
If necessary, dry again. Another way of testing this is to put some of the ingredi-ents in the freezer for several hours and then immediately process them on a fine grinding setting. If the frozen grain can be ground finely, this is a clear indication that it was previously too moist.
Overload protection
An installed predetermined breaking point protects the drive from damage. The drive coupling will break if an overload occurs (e.g. moist ingredients or foreign object in the grinder). A replacement drive coupling is available from a dealer or customer service (order no. 00031003). The drive coupling can easily be removed and replaced.
Image sequence
- Turn the setting ring in a clockwise direction to the marking <. The grinding unit is blocked.
- Grasp the drive coupling by its faces with flat-nosed pliers, rotate clockwise and remove (bayonet fixing).
Subject to change without notice.
