Sony AC Adaptor/Charger Instructions


Sony AC Adaptor/Charger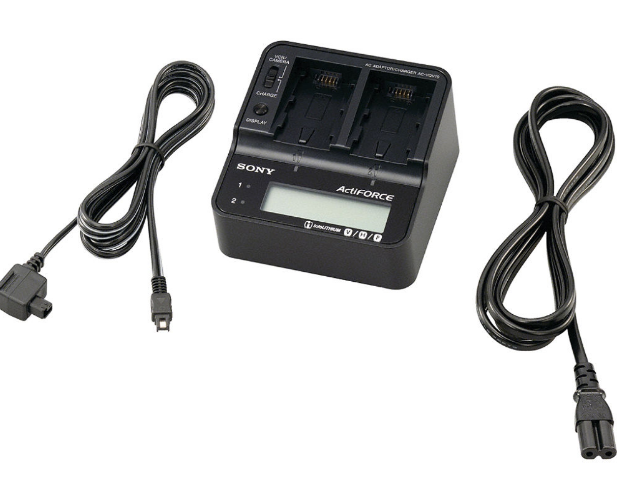

Included items
- AC Adaptor/Charger (AC-VQ1051) (1)
- AC Power cord (1)
- Connecting cord (DK-215) (1)
- Connecting cord (DK-415) (1)
- Set of printed documentation
Identifying the parts
- Terminal shutter
- Slot
- DC IN connector
- DC OUT connector
- CHARGE lamp
- Slot
- CHARGE lamp
- Output change switch 9 Charging mode change switch
- Display window
- Slot indicator lamp
- DISPLAY change button
- Display window
- “InfoLITHIUM” indicator
- WAITING indicator
- WARNING indicator
- TIME TO CHG (charge) indicator
- Time/LOG indicator
- BATTERY LIFE indicator
- VCR/CAMERA indicator
- Normal charge indicator
- Full charge indicator
- Battery life indicator

The AC-VQ1051 AC Adaptor/Charger can be used as follows
- For operating Sony equipment (video cameras, etc.,) use the connecting cords included with this unit.
- For charging Sony rechargeable battery packs (L series).
- You can set the level of charge completion to “Full charge” or “Normal charge” with the charging mode change switch. If you want to use the battery pack quickly, set to “Normal charge” to complete charging in the normal charged state.
- When “InfoLITHIUM” battery packs are attached to this unit, the following functions are available.
- Quick charging Faster than charging with your video camera, etc.
- “BATTERY LOG” and charging information can be displayed.
- Usage history and charging status of the battery pack is displayed.
- Total charging time, charge count, last use year and month
- Battery life, remaining time until charging is complete
- This unit is for charging lithium ion battery packs. It cannot be used to recharge Ni-Cd or Ni-MH batteries.
- This unit cannot be used with some model video cameras or other equipment. Confirm the compatibility of your equipment before use.
What is “InfoLITHIUM”?
“InfoLITHIUM” is a lithium ion battery pack which can exchange data on battery consumption with compatible electronic equipment. We recommend that you use an “InfoLITHIUM” battery pack (L series) with electronic equipment that has the mark. “InfoLITHIUM” is a trademark of Sony Group Corporation.
What is “BATTERY LOG”?
“BATTERY LOG” displays the usage history it recorded in the battery pack.
- Total charging time
- Charge count
- Last use year and month (Displays are approximate. Depending on the battery pack, the contents of the display are limited.)
Notes on the BATTERY LIFE indicator (Read carefully before use)
While charging the battery pack, this unit shows the status of charging and information of the battery pack so long as the following conditions are met.
- You are using an “InfoLITHIUM” battery pack.
- Your video camera, etc. is compatible with “InfoLITHIUM”. Check that your battery pack has the mark. Check in the operating instructions supplied with your video equipment whether it is “InfoLITHIUM” compatible.If you use the battery pack with more than one video camera, etc. that is compatible with “InfoLITHIUM”, information is “BATTERY LOG” is available with the rechargeable battery packs NP-F970, NP-F770 and NP-F570. Other battery packs may not be compatible or may display limited information.
To Operate Video Equipment
For details of connection, refer to the operating instructions of the video camera etc.
- Set the output change switch to VCR/CAMERA.
- Connect the AC power cord to this unit.
- Connect the AC power cord to a wall outlet. There is a beep and the display window comes on.
- Connect the connecting cord to the DC OUT connector of this unit.
- Connect the connecting cord to the video camera.For the direction in which to fit the connecting cord, refer to the operating instructions of video camera, etc. When using the connecting cord DK-215 When using the connecting cord DK-415
Notes
- Setting the output change switch to CHARGE while operating the video camera, etc. cuts the power supply to the video camera.
- You cannot charge a battery pack attached to this unit when this unit is in VCR/CAMERA mode.
- Move this unit away from your video camera, etc. if the image is distorted.
- The connecting cord DK-415 can be used with equipment compatible with the rechargeable battery pack (L series). Confirm the compatibility of your equipment before use.
- The illustration shows connection to an HDR-AX2000 digital HD video camera recorder.
To Charge the Battery Pack
- Set the charging mode change switch to “NORMAL CHARGE” or “FULL CHARGE”. If you want to charge the battery pack until full charging is complete, set the charging mode change switch to “FULL CHARGE”. If you want to finish charging when normal charging is complete, set it to “NORMAL CHARGE”. For details, refer to “Switching the charging mode”.
- Set the output change switch to CHARGE.
- Connect the AC power cord to this unit.
- Connect the AC power cord to a wall outlet.
- here is a beep and the display window comes on. 5 Attach the battery pack. Refer to “To attach the battery pack”. When charging starts, the battery life indicator in the display window blinks in sequence and the CHARGE lamp lights up.
- When charging is complete, remove the battery pack. This unit finishes charging on the charging level that you set with the charging mode change switch. When the CHARGE lamp turns off, charging is complete. For details about charge completion, refer to “Switching the charging mode”.
Refer to “To remove the battery pack” when removing the battery pack.
Switching the charging mode
There are two levels of charge completion: “Normal charge” and “Full charge”. You can change the charging mode with the charging mode change switch on this unit.
- NORMAL CHARGE When charge is completed, the battery life indicator is displayed as illustrated on the right. The condition of the battery pack can be better maintained, but the battery life will be slightly shorter than when in the full charged state.
- FULL CHARGE When charging is complete in the full charged state, the battery life indicator is displayed as illustrated on the right. The battery life will be slightly longer than when in the normal charged state, but the charging time will also be longer.


Attaching two battery packs simultaneously
You can attach two battery packs in this unit at the same time. You can charge just one battery pack as well. Charging starts with the battery pack installed in Slot . When two battery packs are attached but not simultaneously, charging starts with the battery pack attached first regardless of whether it is in Slot or .
Notes
- Two battery backs can be attached, but they cannot be charged at normal charging simultaneously.
- When the charging mode change switch is set to “FULL CHARGE”, this unit completes normal charging in the order that the battery packs were attached and then completes full charging for both battery packs simultaneously.
To attach the battery pack
- Place the battery pack on this unit with the facing the terminal shutter.
- Slide the battery pack in the direction of the arrow.Press the battery pack until the terminal shutter is completely concealed.
To remove the battery pack
Slide the battery pack in the direction of the arrow and lift it straight out.
Notes
- Do not pick this unit up by holding the battery pack.
- Be sure not to hit the terminal shutter. When attaching the battery pack, be particularly careful not to hit the battery pack against it.
- Be careful not to pinch your fingers while attaching or removing the battery pack.
Charging time
Quick Charge
- The times shown are for charging an empty battery pack, using this unit at an ambient temperature of 25 °C (77 °F).
- The charging time may differ depending on the condition of the battery pack and the ambient temperature.
To use the battery pack quickly
You can use the battery pack even if you remove it from this unit before charging is completed. However, a shorter charging time means a shorter useable time.
Notes
- If the CHARGE lamp does not light up or blink, check that the battery pack is correctly attached to this unit. If it is not correctly attached, it will not be charged.
- Quick charging is only performed with “InfoLITHIUM” battery packs.
- When the charging mode change switch is set to “NORMAL CHARGE”, this unit finishes charging when normal charging is complete.
- You can change the charging mode before each charging is complete.
- Unplug this unit from the wall outlet after use. To disconnect the cord, pull it out by the plug. Never pull the cord itself.If anything goes wrong during charging, the CHARGE lamp blinks and “WARNING” appears on the display. For details, see “Troubleshooting”.
To Check Charging
When charging starts, the battery life lights up in the display window. The battery life displayed is the approximate time remaining for recording images using the viewfinder. The battery life is shorter if the LCD display is used. The battery life may not be displayed with certain video cameras. For details, refer to “Notes on the BATTERY LIFE indicator”. There are two methods of switching the contents of the display window during charging. There are two methods of switching the contents of the display window: display changing automatically and display changing each time you press the DISPLAY change button. The slot indicator lamp corresponds to the slot number. Following is an example of installing a battery pack in Slot followed by another in Slot . Changing the contents of the display window automatically during charging.
- Battery life
- The battery life of the first attached battery pack.
- This is the battery life when attached to the “InfoLITHIUM” compatible video camera, etc. last used.
- Battery life
- The battery life of the subsequently attached battery pack.
- Charging time
- The total remaining time until full charging of the battery packs installed in Slot and Slot is complete.
- When the charging mode change switch is set to “NORMAL CHARGE”, the remaining time until normal charging is complete is displayed.

Press the DISPLAY change button during charging. During charging, “BATTERY LOG” can be displayed by pressing the DISPLAY change button. The contents of the display window change each time you press the DISPLAY change button as follows. About five seconds after pressing the DISPLAY change button, battery life is displayed and then this automatically switches between the battery life and the remaining time until charging is complete.

- Total charging time
- The total charging time of the first attached battery pack. Displays the approximate total charging time from first charging. The minimum displayed is 5 hours.
- Total charge count
- The number of times the first attached battery pack has been charged.
- Displays the approximate number of times the battery pack has been charged since its first charging. The minimum displayed is 5 times, and the count is displayed in multiples of five. Top-up
- charges and suspended charges may not be counted.
- Year and month of last use
- The year and month when the first attached battery pack was last used.
- Displays “Month” followed by “Year” (last two digits of the year). If used with a video camera that has no calendar set, “– –” is displayed.
- Total charging time
- The total charging time of the subsequently attached battery pack.
- Total charge count
- The number of times the subsequently attached battery pack has been charged.
- Year and month of last use
- The year and month when the subsequently attached battery pack was last used.
Press the DISPLAY change button after charging is complete
After charging is complete, the display does not change automatically. The contents of the display window change each time you press the DISPLAY change button as follows. About five seconds after pressing the DISPLAY change button, returns to the display shown in .

- Charging is complete. When the charging mode change switch is set to “NORMAL CHARGE”, the battery life indicator shows “NORMAL”.
Battery life - The battery life of the first attached battery pack.
Battery life - The battery life of the subsequently attached battery pack.
Total charging time - The total charging time of the first attached battery pack.
Total charge count - The number of times the first attached battery pack has been charged.
Year and month of last use - The year and month when the first attached battery pack was last used.
Total charging time - The total charging time of the subsequently attached battery pack.
Total charge count - The number of times the subsequently attached battery pack has been charged.
Year and month of last use - The year and month when the subsequently attached battery pack was last used.
Notes

- The time display is an approximate time when charging at 25 °C (77 °F). It may differ from the actual time depending on the environment. Also, depending on the condition of the battery, a time may not be displayed. This is not a malfunction.
- It may take some time for the time to be displayed after starting the charging.
- The time display and remaining battery life of the battery pack on the side not being charged may take some time to appear.
- To display the battery life of a new battery pack, first attach it to your video camera and use it for about 20 seconds, and then charge it with this unit.
- If you attach a fully charged battery pack to this unit, “TIME TO CHG FULL 1h” may appear on the display. This is not a malfunction.
- In the following cases, the time/LOG display may show “– –” or the time display may be out. This is not a malfunction.
- There is a difference between the time display and actual charging time. (Even if this happens, continue charging until fully charged.)
- When charging a battery other than an “InfoLITHIUM” battery pack (Battery life display and other functions are not available.)
- When last use year and month are unclear. (When you attach the battery pack to a video camera but do not turn on the power of the video camera, or the calendar function of the video camera is not setup, etc.)
- If the battery pack is removed from this unit after normal charging is complete but before full charging is complete. (It takes about one hour from when normal charging is complete to when full charging is complete.)
- When charging a battery pack that has not been used for a long time. (Fully charge once first.)
- When two battery packs are attached to this unit, similar symptoms may appear if either one of the batteries is in the above condition.
- “BATTERY LOG” display is available with the rechargeable battery packs NP-F970, NP-F770 and NP-F570. With other battery packs, the contents of the display are limited.
Specifications
- Input 100 V – 240 V AC 50 Hz/60 Hz 22 W 12 V/24 V DC
- Output 8.4 V DC 2.0 A (VCR/CAMERA) 8.4 V DC 1.6 A (CHARGE)
- Operating temperature 0 °C to 40 °C (32 °F to 104 °F)
- Storage temperature –20 °C to +60 °C (–4 °F to +140 °F)
- Dimensions (Approx.) 123 mm × 53 mm × 135 mm (w/h/d) (4 7/8 in. × 2 1/8 in. × 5 3/8 in.) (excluding the projecting parts)
- Mass Approx. 400 g (14.1 oz.)
Design and specifications are subject to change without notice.
Note
This unit supports worldwide voltages 100 V to 240 V. Do not use an electronic voltage transformer, as this may cause a malfunction.NOT FOR RESIDENTIAL OR CONSUMER USE
Troubleshooting
Video equipment does not work.
- The power plug is disconnected from the wall outlet (wall socket).
- Insert into a wall outlet.
- The connector cable is not properly connected.
- Connect properly.
- The output change switch is set to CHARGE.
- Set the output change switch to VCR/CAMERA.
- The battery pack does not charge.
- The output change switch is set to VCR/CAMERA.
- Set the output change switch to CHARGE.
- Power immediately turns off even though there is sufficient battery life remaining, or the displayed battery life differs from the actual battery life.
- Run down the battery pack and then fully charge it again.
- The battery life will be correctly displayed.
- Charging is performed at lower temperature than the recommended charging temperature range.
- The display shown below may appear if a battery pack with a low temperature is attached, or if charging is performed at a lower temperature than the recommended charging temperature range. Although charging can still be performed in these cases, if this situation continues, this unit will switch to the standby state (refer to the following item) or charging will be not performed properly in order to protect the battery pack. We recommend charging the battery pack at 10 ºC to 30 ºC (50 ºF to 86 ºF).

The CHARGE lamp blinks in the following two ways. Blinks quickly: Turns on and off repeatedly every 0.15 seconds Blinks slowly: Turns on and off repeatedly every 1.5 seconds When the CHARGE lamp blinks, read the following and take suitable action depending on how the CHARGE lamp blinks. When the CHARGE lamp keeps blinking slowly and “WAITING” is displayed in the display window. Charging is temporarily stopped. This unit is in the standby state. If the room temperature or the battery temperature is out of the appropriate temperature range, charging stops automatically.
When the room temperature returns to the appropriate range, the CHARGE lamp lights up and charging restarts. We recommend charging the battery pack at 10 °C to 30 °C (50 °F to 86 °F).

When the CHARGE lamp keeps blinking quickly and “WARNING” is displayed in the display window. When charging the battery pack for the first time in one of the following situations, the CHARGE lamp may blink quickly. If this happens, remove the battery pack from this unit, reattach it and charge it again. When the battery pack has been left for a long time When the battery pack has been left attached to the camera for a long time Immediately after purchase If “WARNING” is still displayed, check by following the steps below.