Makita WST05 Miter Saw Stand Instruction Manual


Miter saw stand Instruction manual


1

2

3

4

5

6
Models:
LS0714, LS0815, LS1013, LS1016, LS1017, LS1018, LS1019, LS1212, LS1214, LS1216, LS1219, LS1030N, LS1040, LS1220, LS1221, BLS713, DLS713, DLS714, DLS110, DLS111, DLS112, MT230, M243, MLS100, MLS101, M2300, LH1040, LH1200FL, LH1201FL Inclusive of models followed by F, L and FL, if any.
Preparation
Note: Check contents of package for the following components. Please inform Makita service center of any part missing in the package immediately.
- Miter saw stand (1 unit)
- Hex wrench 5 (1 pc.)
- Hex wrench 6 (1 pc.)
- Wrench 10-13 (1 pc.)
- Wheel assembly (1 unit)
- hex nut 8 (1 pc.), flat washer 8 (1 pc.), wheel (2 pcs.), flat washer 12 (3 pcs.), wheel axis (1 pc.) - Foot arm (1 unit)
- Working table (2 units)
- Front foot R (1 unit)
- Front foot L (1 unit)
- Hex socket bolt M6 x 40 (4 pcs.)
- Hex socket bolt M8 x 10 (2 pcs.)
- Flat washer 6 (4 pcs.)
- Hex nut 6 (4 pcs.)
- Support (1 pc.)
- Hex bolt M8 x 50 (4 pcs.)
- Hex nut 8 (4 pcs.)
- Flat washer 8 (8 pcs.)
- Screw plate (2 pcs.)
Symbols


- Read and thoroughly understand this manual and the instruction manual of the tool you use before performing the following.
- Before installing a tool on this stand, always switch off and unplug the tool.
- The stand should be bolted in a stable and level surface using the right angle brackets provided on two of four feet.
- Use only with Makita model indicated in the instruction manual.
- Use only the handle to avoid pinched fingers when raising or folding the stand.
- Before operating the tool, secure it to stand using bolts.
- Do not use the stand on uneven or unstable surface.
- Do not climb, sit or stand on the stand.
- When setting up the miter saw stand in the upright position or folding it, be sure to securely keep pressing the pipe of miter saw stand with your foot until it locks.
- When storing miter saw stand, never lean it against the wall or the like lengthwise or sideways.
- Never pull the locking lever without holding the handle.
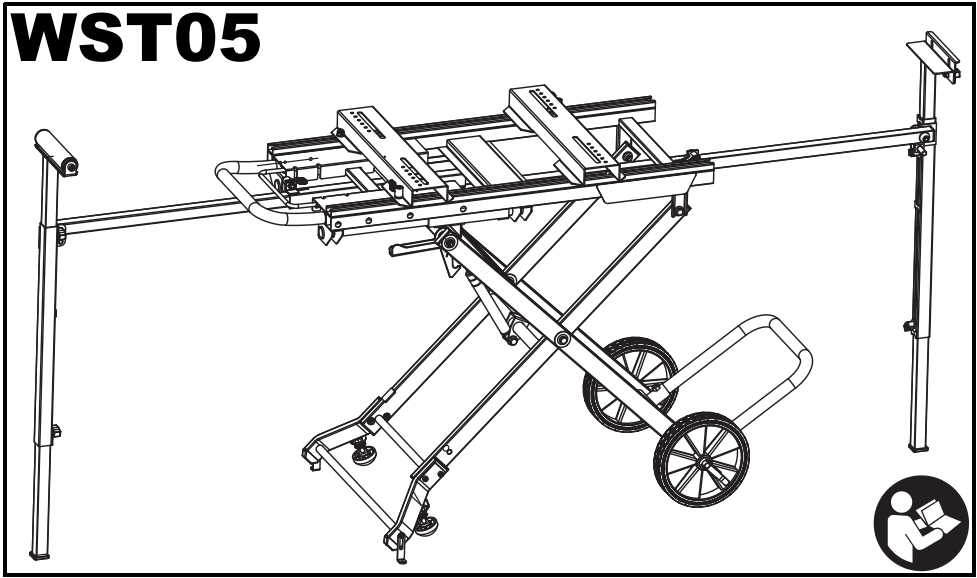
Assembling miter saw stand: (Fig. 1)
(1) Front foot (2 units)
- Place the stand assembly upright.
- Secure the front foot R (11) to the stand leg with screw plate (10), hex bolt M6 x 40 (9) (2 pcs), flat washer 6 (12) (2 pcs) and hex nut 6 (13) (2 pcs).
- Insert the support (14) into the holes on the front foot R.
- Secure the front foot L (11-1) by repeating the above procedure.
(2) Wheel assembly
- Remove the whole parts from the wheel axis.
- Place the flat washer (4), wheel (3) and flat washer (4) on wheel axis (5) in order. Then slide the wheel axis (5) into the leg (15). Place the flat washer (4), wheel (3) and flat washer (2) on the other side of the wheel axis. Secure the lever on the wheel axis end, and then tighten the hex nut 8 (1).
- Check the wheels turn properly after loosening the lever. If the wheels do not turn, it shows the hex nut 8 is excessively tightened. When using a miter saw stand, secure the lever to fix the wheels.
(3) Foot arm (1 unit)
Insert the foot arm (7) into the ports of the leg and secure them by hex socket bolt M8 x 10 (8) (2 pcs). When securing the foot arm, insert it in a proper direction. Otherwise the foot arm cannot be secured.
(4) Working table (2 units)
Slide the working tables (6) into the slots on the stand and secure them to the desired position by the lever (16). The lever can be adjusted to a different angle by picking the lever up and turning it at a desired angle.
Installing miter saw on the miter saw stand: (Fig. 2)
Loosen the levers (16). Place a miter saw so that the bolt holes in the miter saw base overlap holes on the working table. Secure the miter saw stand with hex bolt M8 x 50 (17) (4 pcs), flat washer 8 (18) (8 pcs) and hex nut 8 (19) (4 pcs). Secure the levers (16). Note: Use small holes in the working tables as scales to set the miter saw properly.
Setting up: (Fig. 3)
- Hold down the handle (23) and place your foot on the support (14).
- Release the locking lever (22).
- Pull up the handle (23) with both hands until the red indicator passes the height level “2” or “3”.
- To stabilize the stand, loosen the round nut (25) and turn the adjusting feet (24). Retighten the round nut (25) after the setting.
Folding: (Fig. 4)
- Place your foot on the support (14).
- Slightly pull up the handle (23) with both hands and pull the release lever (26).
- Lower the handle (23) under the height level 1. The locking lever (22) locks the handle by itself.
Setting the extension arms: (Fig. 5 & 6)
- Turn the lever (27) which has the same functions as the lever (16) toward the miter saw.
- Pull out the extension arm (28) to your desired length.
- Tighten the lever (27).
- Pull out the pin (29) and pivot the leg. Make sure that the pin locks the leg.
- Loosen the clamping screw on the leg, pull out the leg pipe (32) until it reaches the floor and retighten the clamping screw (31).
- Loosen the clamping screw (31) for the support, raise or lower the support until the top edge of the support reaches the miter saw table height. Retighten the clamping screw (31).
- When using the stopper (34) for repetitive cuts, loosen the clamping screws (33) and raise the stopper (34). Retighten the clamping screws (33) to secure the stopper (34).
Storing the extension arm: (Fig. 5 & 6)
Follow the procedure of “Setting the extension arms” in reverse.