KENWOOD TYPE FDM30 Multipro Compact Food processor Instructions


KENWOOD TYPE FDM30 Multipro Compact Food Processor


Safety
- Read these instructions carefully and retain for future
- Remove all packaging and any
- If the cord is damaged it must, for safety reasons, be replaced by KENWOOD or an authorized KENWOOD
- The blades and discs are very sharp, handle with Always hold by the finger grip at the top, away from the cutting edge, both when handling and cleaning.
- DO NOT process hot
- Do not lift or carry the processor by the handle – or the handle may break resulting in injury.
- Always remove the knife blade before pouring contents from the
- Keep hands and utensils out of the processor bowl and blender goblet whilst connected to the power supply.
- Switch off and unplug:
- before fitting or removing parts;
- when not in use;
- before cleaning.
- Never use your fingers to push food down the feed Always use the pusher supplied.
- Never fit the blade assembly to the power unit without the blender goblet or mill jar fitted.
- Before removing the lid from the bowl, blender or multi mill from the power unit:
- switch off;
- wait until the attachment/blades have completely stopped;
- be careful not to unscrew the blender goblet or mill jar from the blade assembly.
- Do not use the lid to operate the processor, always use the on/off speed
- This appliance will be damaged and may cause injury if the interlock mechanism is subjected to excessive force.
- Always unplug your food processor when not in
- Never use an authorized
- Never leave the appliance unattended when it is
- Never use a damaged Get it checked or repaired: see “service and customer care”.
- Never let the power unit, cord or plug get
- Do not let excess cord hang over the edge of a table or worktop or touch hot surfaces.
- Do not exceed the maximum capacities stated in the recommended speed chart.
- Children should be supervised to ensure that they do not play with the
- This appliance shall not be used by Keep the appliance and its cord out of reach of children.
- Appliances can be used by persons with reduced physical, sensory or mental capabilities or lack of experience and knowledge if they have been given supervision or instruction concerning use of the appliance in a safe way and if they understand the hazards involved.
- Only use the appliance for its intended domestic use. Kenwood will not accept any liability if the appliance is subject to improper use, or failure to comply with these instructions.
- Misuse of your processor, blender or mill can result in
- The maximum rating is based on the attachment that draws the greatest load. Other attachments may draw less power.
Blender
- DO NOT process hot ingredients.
- SCALD RISK: Hot ingredients must be allowed to cool to room temperature before placing in the goblet or before blending.
- Always take care when handling the blade assembly and avoid touching the cutting edge of the blades when cleaning.
- Only operate the blender with the lid in
- Only use the goblet with the blade assembly
- Never run the blender
- To ensure the long life of your blender, do not run it for longer than 60
- Smoothie recipes – never blend frozen ingredients that have formed a solid mass during freezing, break it up before adding to the goblet.
Mill Attachments
- Never fit the blade assembly to the power unit without the jar/lid
- Never unscrew the jar/lid while the mill is fitted to your
- Do not touch the sharp blades – Keep the blade assembly away from
- Never remove the mill until the blades have completely
- The appliance will not work if the mill is incorrectly
- Do not process hot ingredients in the mill allow to cool down to room temperature before processing.
Multi Mill
- To ensure the long life of your multi mill, never run for longer than 30 seconds. Switch off as soon as you have got the right consistency.
- The processing of spices is not recommended as they may damage the plastic parts.
Grinding Mill
- To ensure the long life of your grinding mill, never run for longer than 60 seconds. Switch off as soon as you have got the right consistency.
- Do not process turmeric root as it is too hard and may damage the
Slicing/Grating Disc
- Never remove the lid until the cutting disc has completely
- Handle the cutting discs with care – they are extremely
Centrifugal Juicer
- Do not use the juicer if the filter is
- The cutting blades on the base of the filter drum are very sharp, take care when handling and cleaning the drum.
- Only use the pusher Never put your fingers in the feed tube. Unplug before unblocking the feed tube.
Before removing the lid, switch off and wait for the filter to stop
Before Plugging In
- Make sure your electricity supply is the same as the one shown on the underside of your appliance.
- This appliance conforms to EC Regulation 1935/2004 on materials and articles intended to come into contact with food.
Before Using for the First Time
- Remove the plastic blade covers from the knife blade.
Take care the blades are very sharp. These covers should be discarded as they are to protect the blade during manufacture and transit only - ash the parts see “care and cleaning”.
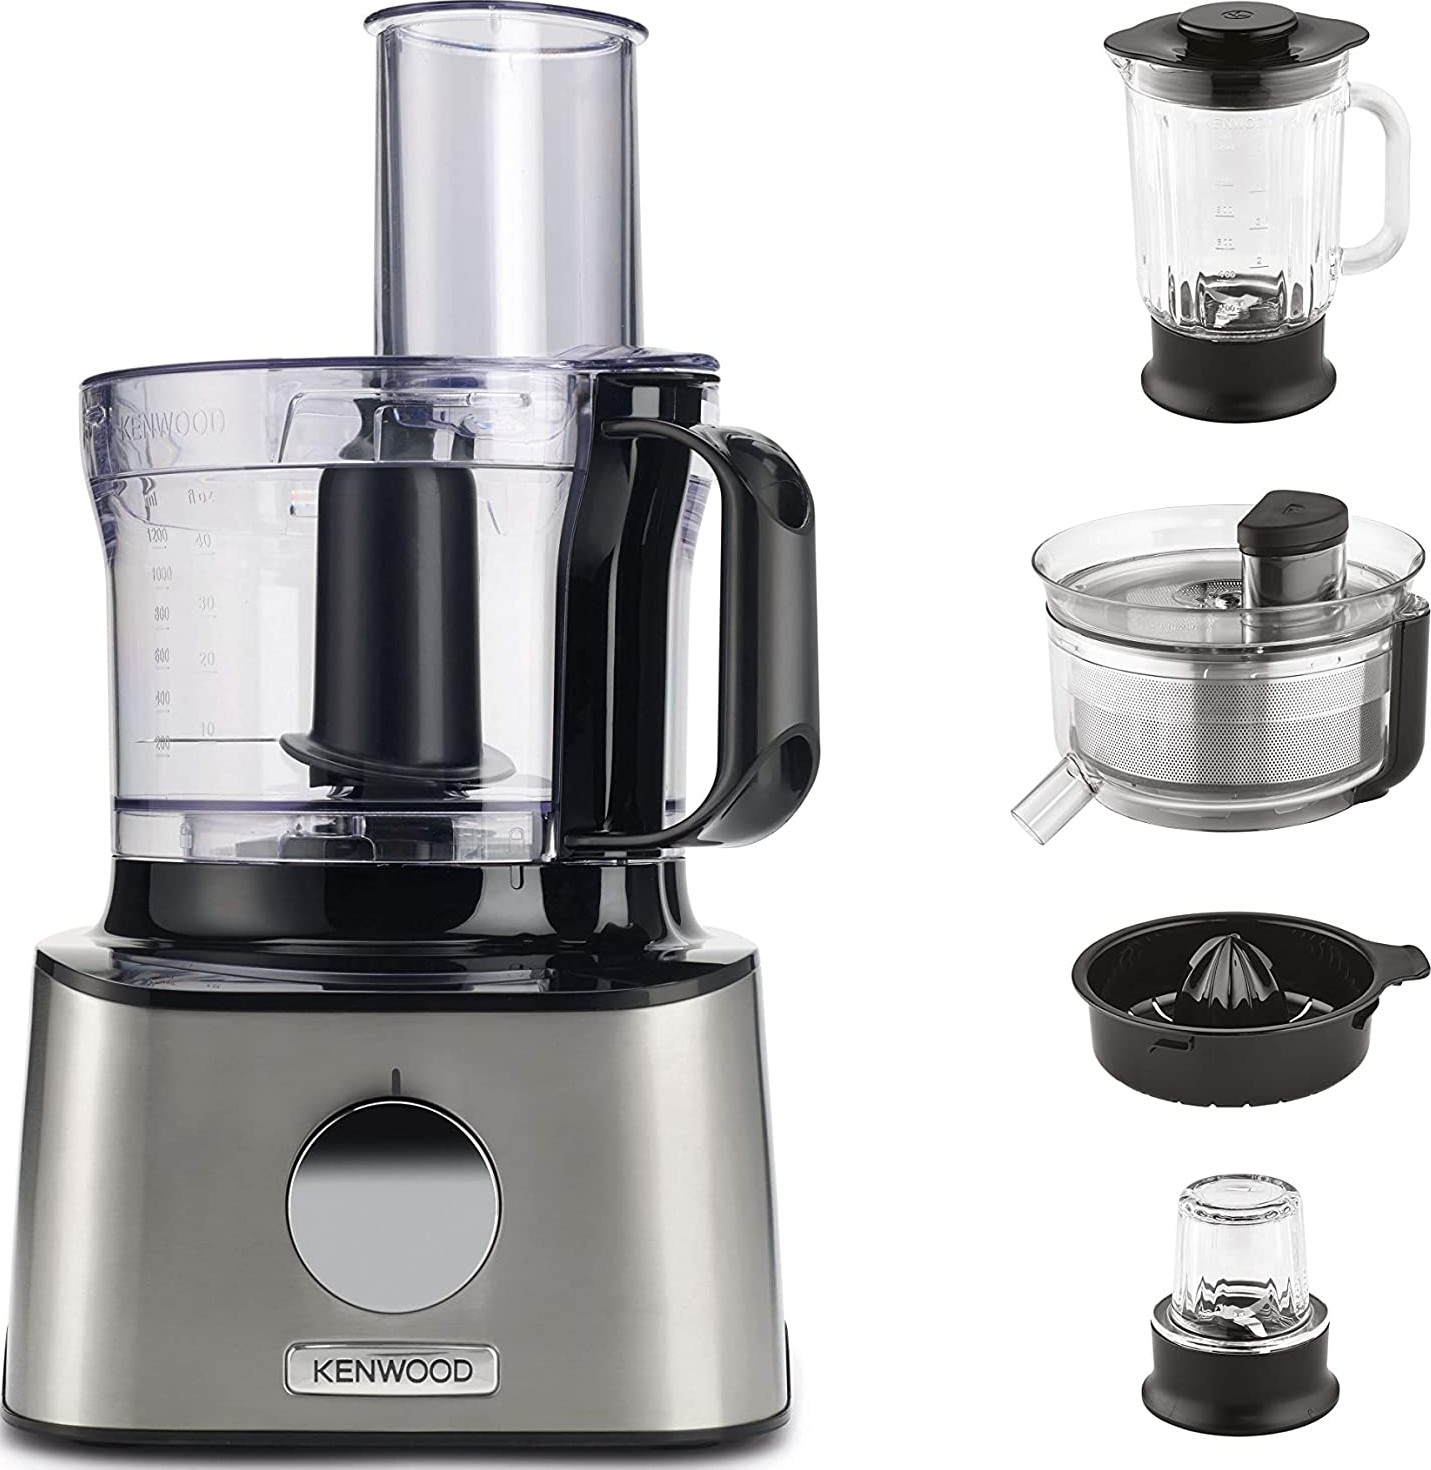
Key Processor
- pusher
- feed tube
- lid
- bowl
- detachable drive shaft
- power unit
- speed/pulse control
- safety interlocks
- cord storage (at back)
A – plastic blender (if supplied)
- blade assembly
- sealing ring
- goblet
- filler cap
- lid
B – glass blender (if supplied)
- blade assembly
- sealing ring
- goblet
- filler cap
- lid
C – standard attachments
- knife blade
- dough tool
- dual whisk
- 4mm slicing/grating disc
- 2mm slicing/grating disc
- extra fine grating disc
attachments
Not all of the attachments listed below may be included with your food processor. Attachments are dependent upon the model variant. Refer to “service and customer care” section for information on how to buy an attachment not included in pack.
D – optional attachments
- citrus juicer (if supplied)
- centrifugal juicer (if supplied)
multi mill (if supplied)
- jar
- sealing ring
- blade assembly
grinding mill (if supplied)
- mill lid
- grinding mill blade assembly
To Use Your Food Processor
- Fit the detachable drive shaft onto the power unit 1.
- Then fit the bowl by aligning the on the bowl with the on the power unit, turn clockwise 2 until it locks .
- Fit an attachment over the bowl drive
- Always fit the bowl and attachment onto the processor before adding ingredients.
- Fit the lid 3 – ensuring the top of the drive shaft/tool locates into the center of the lid.
- not use the lid to operate the processor, always use the on/off speed control.
- Plug in, switch on and select a (Refer to the recommended speed chart).
- The processor will not operate if the bowl or lid are not fitted correctly into the interlock. Check that the feed tube and bowl handle are situated to the right front hand corner.
- Use the pulse (P) for short The pulse will operate for as long as the control is held in position.
- Reverse the above procedure to remove the lid, attachments and bowl.
- Always switch off and unplug before removing the lid.
- Your processor is not suitable for crushing or grinding coffee beans, or converting granulated sugar to caster sugar.
- When adding almond essence or flavoring to mixtures avoid contact with the plastic as this may result in permanent marking.
- Plastic blender (if supplied) to use your blender
- Fit the sealing ring into the blade assembly- ensuring the seal is located correctly in the grooved area.
- Leaking will occur if the seal is damaged or incorrectly fitted.
- Hold the underside of the blade assembly and insert the blades into the goblet – turn anti-clockwise until it is secure
Refer to the graphics on the underside of the blade assembly as follows:- unlocked position
- locked position
The blender will not operate if incorrectly assembled. - Put your ingredients into the
- Fit the lid onto the goblet and turn clockwise 5 until it clicks. Fit the filler cap.
- Place the blender onto the power unit, align the on the blender with the on the power unit and turn clockwise 6 to lock .
- The appliance will not operate if the blender is incorrectly fitted to the interlock.
- Select a speed (refer to the recommended speed chart) or use the pulse control.
- Glass blender (if supplied)
to use your blender
- Fit the sealing ring into the blade unit – ensuring the seal is located correctly in the grooved area.
- Leaking will occur if the seal is damaged or incorrectly fitted.
- Screw the goblet onto the blade assembly 4. Refer to the graphics on the underside of the blade unit as follows:
- unlocked position
- locked position
The blender will not operate if incorrectly assembled.
- Put your ingredients into the
- Fit the lid to the goblet and push down to secure
Fit the filler cap.
- Place the blender onto the power unit, align the on the blender with the on the power unit and turn clockwise 6 to lock .
- The appliance will not operate if the blender is incorrectly fitted to the interlock.
Select a speed (refer to the recommended speed chart) or use the pulse control.
Multi Mill (If Supplied)
Use the multi mill for processing nuts, coffee beans and purées.
- Put the ingredients into the jar .
- Fit the sealing ring co into the blade assembly .
- Turn the blade assembly upside Lower it into the jar, blades down.
- Screw the blade assembly onto the jar until finger tight
Refer to the graphics on the underside of the blade assembly as follows:
- unlocked position
- locked position
- Place the multi mill onto the power unit, align the on the mini multi mill with the on the power unit and turn clockwise 8 to lock .
- Switch onto maximum speed or use the pulse
Grinding Mill (if supplied)
Use the grinding mill for processing dry ingredients such as coffee beans and for grinding spices such as:-Black peppercorns, cardamom seeds, cumin seeds, coriander seeds, fennel seeds, fresh ginger root, garlic cloves and fresh chilies.
To Use Your Grinding Mill
- Place your ingredients into the blade assembly.
- Fit the lid and turn clockwise to lock 9.
- Place the mill onto the power unit and turn clockwise to lock
- Select a speed or use the pulse.
| Recommended Speed Chart | |||||
| tool/ attachment | function | recommended speed | processing time (secs) | maximum capacities | hints and tips |
| Knife blade | All in one cake mixes | 2 | 10 | 1.2kg/2lb 11oz total weight |
|
| Pastry – rubbing fat into flour (use fat straight from the fridge and cut into 2cm cubes) Adding water to combine pastry ingredients | 2 1 – 2 |
10 10-20 |
300g/11oz flour weight | ||
| Chopping fish and lean meat Pâtés and terrines | 2 | 10-30 | 400g/14oz max lean beef | ||
| Chopping vegetables | Pulse | 5-10 | 100g/4oz | ||
| Chopping nuts | 2 | 30-60 | 100g/4oz | ||
| Pureeing soft fruit, cooked fruit and vegetables | 2 | 10-30 | 500g/1lb 2oz | ||
| Cold soups | Start at low speed and increase to maximum | 30-60 | 1 liter/35 flog. | ||
| Milkshakes/batters | 15-30 | 500ml | |||
| Whisk | Egg whites | 2 | 60 | 6 (200g) | Important
|
| Whipping cream | 2 | 30 | 500ml/1pt | ||
| Dough tool | Yeasted mixes | 2 | 60 | 340g/12oz flour weight |
|
| Discs – grating | Use for cheese, carrots, potatoes and foods of a similar texture. | 2 | – | Do not fill above the maximum 1.2L marked on the bowl |
|
| Discs – slicing | Use for cheese, carrots, potatoes, cabbage, cucumber, courgetti, beetroot and onions. | 2 | – | ||
| Discs – extra fine grating | Grates Parmesan cheese | 2 | – | ||
| Citrus Juicer (if supplied) | Use to squeeze the juice from citrus fruits e.g. oranges, lemons, limes and grapefruits). | 1 | – | – |
|
| tool/ attachment | function | recommended speed | processing time (secs) | maximum capacities | hints and tips |
| Blender | Cold liquids and drinks | 2 | 60 | 1.2 liter |
|
| Do not process hot ingredients | |||||
| Milkshake/Cold milk based mixtures | 2 | 15 | 1 liter | ||
| Multi mill (if supplied) | Herbs | 2 | 10 | 10g/½ oz |
|
| Nuts | 2 | 10 – 30 | 50g/2oz | ||
| Coffee beans | 2 | 30 | 50g/2oz | ||
| Uncooked meat (beef steak) cut into 2cm cubes | 2 | 5 | 50g/2oz | ||
| Grinding mill (if supplied) | Processing spices | 2 | 30 – 60 |
50g/2oz |
|
| Grinding coffee beans | 2 | 50g/2oz | |||
| Chopping nuts | Pulse | – | 50g/2oz | ||
| Processing garlic cloves, fresh chilies and root ginger | Pulse | – | 30g/1oz | ||
| Centrifugal juicer (if supplied) | Hard fruit and vegetables carrots and apples | 2 | 800g/1lb 12oz |
| |
| Soft fruit tomatoes and grapes | 1 | 500g/1lb 2oz | |||
Using the attachments
Refer to recommended speed chart for each attachment.
Knife blade
Follow the instructions under “to use your food processor”.
Dough tool
Use for yeasted dough mixes.
Follow the instructions under “to use your food processor”
Dual whisk
Use for light mixtures only eg egg whites, cream, evaporated milk and for whisking eggs and sugar for fatless sponges. Heavier mixtures such as fat and flour will damage it.
Using the whisk
- Fit the bowl onto the power unit, add the detachable drive
- Push each beater securely into the drive
- Fit the whisk by carefully turning until it drops over the drive
- Add the
- Fit the lid – ensuring the end of the shaft locates into the center of the lid.
- Switch
Discs
To use the discs.
Follow the instructions under “to use your food processor”.
To use the cutting discs
- Fit the bowl onto the power unit, add the detachable drive
- Holding by the center grip, place the disc onto the drive shaft with the appropriate side
- Fit the
- Put the food in the feed
- Switch on and push down evenly with the pusher – never put your fingers in the feed tube.
Citrus juicer (if supplied)
Use the citrus juicer to squeeze the juice from citrus fruits (e.g. oranges, lemons, limes and grapefruits).
- cone
- sieve
To use the citrus juicer
- Fit the drive shaft and bowl onto the power
- Fit the sieve into the bowl – ensuring the sieve handle is locked into position directly over the bowl handle.
- Place the cone over the drive shaft turning until it drops all the way down.
- Cut the fruit in Then switch on and press the fruit onto the cone.
- The citrus juicer will not operate if the sieve is not locked correctly.
Centrifugal juicer (if supplied)
Use the centrifugal juicer for making juice from firm fruit and vegetables.
- pusher
- centrifugal
- lid
- pulp
- remover
- filter
- drum
- bowl
- juicing spout
To use the centrifugal juicer
- Place the juicer bowl with the spout onto the power unit, align the on the bowl with the on the power unit and turn clockwise until it locks .
- Place the pulp remover into the filter drum – ensuring the tabs locate with the slots in the bottom of the drum .
- Fit the filter drum N.
- Place the attachment lid onto the bowl and turn until it locks . Your juicer will not operate if the bowl or lid are not fitted correctly into the interlock
- Place a suitable glass or jug under the juice
- Cut the food to fit the feed
- Switch on and push down evenly with the pusher – never put your fingers in the feed tube. Process fully before adding more.
- After adding the last piece, let the juicer run for a further 30 seconds to extract all the juice from the filter drum. important
- If the juicer starts to vibrate, switch off and empty the pulp from the drum. (The juicer vibrates if the pulp becomes unevenly distributed).
- Maximum capacity that can be processed at one time is 800g of fruit or vegetables.
- Some very hard foods may make your juicer slow down or stop. If this happens switch off and unblock the filter.
- Switch off and clear the pulp collector regularly during
Care and Cleaning
- Always switch off and unplug before
- Handle the blade and cutting discs with care – they are extremely sharp.
- Some foods may discolor the This is perfectly normal and will not harm the plastic or affect the flavor of your food. Rub with a cloth dipped in vegetable oil to remove the discoloration.
Power unit
- Wipe with a damp cloth, then Ensure that the interlock area is clear of food debris.
- Do not immerse the power unit in
- Store excess cord in the storage area at the back of the power unit 9.
Blender and multi mill
- Empty the goblet/jar, unscrew the blender blade assembly by turning to the unlock position to release.
- Wash the goblet/jar by
- Remove and wash the sealing
- Do not touch the sharp blades – brush them clean using hot soapy water, then rinse thoroughly under the tap. Do not immerse the blade assembly in
- Leave to dry upside
Grinding mill
- Remove the lid from the blade assembly by turning in an anticlockwise direction.
- Wash the lid by
- Do not touch the sharp blades – brush them clean using hot soapy water, then rinse thoroughly under the tap. Do not immerse the blade assembly in
- Leave to dry upside
Dual whisk
- Detach the beaters from the drive head by gently pulling them free. Wash in warm soapy water.
- Wipe the drive head with a damp cloth, then
Do not immerse the drive head in water. all other parts - Wash by hand, then
- Alternatively they can be washed in your dishwasher
| Item | Suitable for Dishwashing |
| main bowl, lid, pusher | ✓ |
| knife blade, dough tool | ✓ |
| detachable drive shaft | ✓ |
| discs | ✓ |
| whisk beaters Do not immerse the drive head in water |
✓ |
| citrus juicer | ✓ |
| centrifugal juicer | ✓ |
| blender goblet, lid, filler cap | ✓ |
| grinding mill lid | ✓ |
| blade assembly and seal for blender and multi mill | × |
| grinding mill blade assembly | × |
| spatula | ✓ |
service and customer care
- If you experience any problems with the operation of your appliance, before requesting assistance refer to the “troubleshooting guide” section in the manual or visit kenwoodworld.com.
- Please note that your product is covered by a warranty, which complies with all legal provisions concerning any existing warranty and consumer rights in the country where the product was purchased.
- If your Kenwood product malfunctions or you find any defects, please send it or bring it to an authorized KENWOOD Service To find up to date details of your nearest authorized KENWOOD Service center visit www.kenwoodworld.com or the website specific to your Country.
- Designed and engineered by Kenwood in the
- Made in
IMPORTANT INFORMATION FOR CORRECT DISPOSAL OF THE PRODUCT IN ACCORDANCE WITH THE EUROPEAN DIRECTIVE ON WASTE ELECTRICAL AND ELECTRONIC EQUIPMENT (WEEE)
At the end of its working life, the product must not be disposed of as urban waste. It must be taken to a special local authority differentiated waste collection center or to a dealer providing this service. Disposing of a household appliance separately avoids possible negative consequences for the environment and health deriving from inappropriate disposal and enables the constituent materials to be recovered to obtain significant savings in energy and resources. As a reminder of the need to dispose of household appliances separately, the product is marked with a crossed-out wheeled dustbin.
Troubleshooting
| Troubleshooting Guide | ||
| Problem | Cause | Solution |
| The processor will not operate. | No Power. Bowl not fitted to power unit correctly. Bowl lid not locked on correctly. |
Check processor is plugged in. Check bowl is located correctly and the handle is situated towards the right front hand corner. Check that the lid interlock is located correctly into the handle area. The processor will not work if the bowl and lid are fitted incorrectly. If none of the above check the fuse/circuit breaker in your home. |
| Blender or mill will not operate. | Blender or mill not locked on correctly. Blender or mill not assembled correctly. |
The blender or mill will not operate if fitted incorrectly to the interlock. Check blade assembly is fully tightened into the goblet/jar. |
| Processor stops during processing. | Processor overloaded/maximum capacities exceeded. Lid unlocked. |
Check maximum capacities stated in the recommended speed chart. Check lid is locked correctly. |
| Blender or multi mill leaking from blade assembly base. | Seal missing. Seal incorrectly fitted. Seal damaged. |
Check seal is fitted correctly and not damaged. To obtain a replacement seal see “service & customer care”. |
| Poor performance of tools/attachments. | Refer to hints in relevant “using the attachment” section. Check attachments are assembled correctly. | |