Makita DMR115 Job Site Radio Instruction Manual


makita DMR115 Job Site Radio
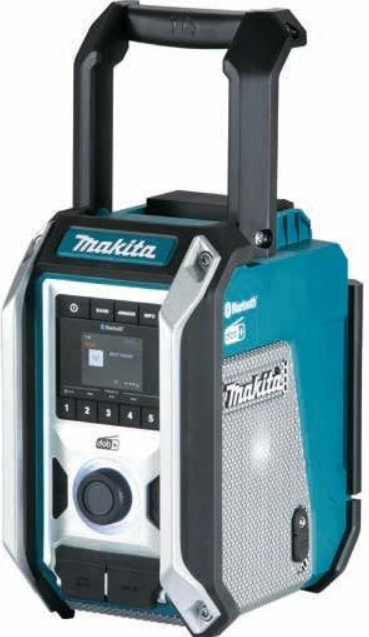

EXPLANATION OF GENERAL VIEW

- Handle/Built-in antenna(DAB/FM)
- Battery compartment locker
- Battery compartment cover (covering battery cartridge)
- Speaker
- DC IN socket
- Subwoofer
- Power button
- Band button
- Advanced setting button
- Info button
- LED light
- Preset 3/Play/Pause button
- Preset 5 button
- Preset 4/Next track/Fast-forward button
- Volume/Tuning control/Select knob
- EQ control button
- AUX IN socket
- USB power supply port
- Auto tune button
- EQ mode LED indicator
- Preset 2/Previous track/Rewind button
- Preset 1/Bluetooth pairing button
- LCD display
- Battery compartment
- Micro USB port for software upgrade
SYMBOLS
The following show the symbols used for the equipment. Be sure that you understand their meaning before use.
Read instruction manual.
Only for EU countries. Do not dispose of electric equipment or battery pack together with household waste material! In observance of the European Directives, on Waste Electric and Electronic Equipment and Batteries and Accumulators and Waste Batteries and Accumulators and their implementation in accordance with national laws, electric equipment and batteries and battery pack(s) that have reached the end their life must be collected separately and returned to an environmentally compatible recycling facility.
IMPORTANT SAFETY INSTRUCTIONS
WARNING:
When using electric tools, basic safety precautions should always be followed to reduce the risk of fire, electric shock, and personal injury, including the following:
Read this instruction manual and the charger instruction manual carefully before use.
- Clean only with dry cloth.
- Do not install near any heat sources such as radiators, heat registers, stoves, or other apparatus (including amplifiers) that produce heat.
- Only use attachments/accessories specified by the manufacturer.
- Unplug this apparatus during lighting storms or when unused for long periods of time.
- A battery operated radio with integral batteries or a separate battery pack must be recharged only with the specified charger for the battery. A charger that may be suitable for one type of battery may create a risk of fire when used with another battery.
- Use battery operated radio only with specifically designated battery packs. Use of any other batteries may create a risk of fire.
- When battery pack is not in use, keep it away from other metal objects like: paper clips, coins, keys, nails, screws, or other small metal objects that can make a connection from one terminal to another. Shorting the battery terminals together may cause sparks, burns, or a fire.
- Avoid body contact with grounded surfaces such as pipes, radiators, ranges and refrigerators. There is an increased risk of electric shock if your body is grounded.
- Under abusive conditions, liquid may be ejected from the battery; avoid contact. If contact accidentally occurs, flush with water. If liquid contacts eyes, additionally seek medical help. Liquid ejected from the battery may cause irritation or burns.
- Do not use a battery pack or tool that is damaged or modified. Damaged or modified batteries may exhibit unpredictable behaviour resulting in fire, explosion or risk of injury.
- Do not expose a battery pack or tool to fire
or excessive temperature. Exposure to fire or temperature above 130 °C(266°F) may cause explosion. - Follow all charging instructions and do not charge the battery pack or tool outside the temperature range specified in the instructions. Charging improperly or at temperatures outside the specified range may damage the battery and increase the risk of fire.
- The MAINS plug is used as the disconnect device, and it shall remain readily operable.
- Do not use the product at a high volume for any extended period. To avoid hearing damage, use the product at moderate volume level.
- (For products with LCD display only) LCD displays include liquid which may cause irritation and poisoning. If the liquid enters the eyes, mouth or skin, rinse it with water and call a doctor.
- Do not expose the product to rain or wet conditions. Water entering the product will increase the risk of electric shock.
- This product is not intended for use by persons (including children) with reduced physical, sensory or mental capabilities, or lack of experience and knowledge, unless they have been given supervision or instruction concerning use of the product by a person responsible for their safety. Children should be supervised to ensure that they do not play with the product. Store the product out of the reach of children.
SAVE THESE INSTRUCTIONS
SPECIFIC SAFETY RULES
FOR BATTERY CARTRIDGE
- Before using battery cartridge, read all instructions and cautionary markings on (1) battery charger, (2) battery, and (3) product using battery.
- Do not disassemble battery cartridge.
- . If operating time has become excessively shorter, stop operating immediately. It may result in a risk of overheating, possible burns and even an explosion.
- If electrolyte gets into your eyes, rinse them out with clear water and seek medical attention right away. It may result in loss of your eyesight.
- Do not short the battery cartridge:
Do not touch the terminals with any conductive material.
Avoid storing battery cartridge in a container with other metal objects such as nails, coins, etc. - Do not expose battery cartridge to water or rain. A battery short can cause a large current flow, overheating, possible burns and even a breakdown.
- Do not store the tool and battery cartridge in locations where the temperature may reach or exceed 50°C (122°F).
7. Do not incinerate the battery cartridge even if it is severely damaged or is completely worn out. The battery cartridge can explode in a fire.
8. Be careful not to drop or strike battery.
9. Do not use a damaged battery.
10. To avoid risk, the manual of replaceable the battery should be read before use. And the max discharging current of the battery should be greater than or equal to 8A.
11. The contained lithium-ion-batteries are subject to the Dangerous Goods Legislation requirements. For commercial transports e.g. by third parties, forwarding agents, special requirement on packaging and labeling must be observed.
For preparation of the item being shipped, consulting an expert for hazardous material is required. Please also observe possibly more detailed national regulations.
Tape or mask off open contacts and pack up the battery in such a manner that it cannot move around in the packaging.
12. When disposing the battery cartridge, remove
it from the tool and dispose of it in a safe place. Follow your local regulations relating to disposal of battery.
13. Use the batteries only with the products specified by Makita. Installing the batteries to non-compliant products may result in a fire, excessive heat, explosion, or leak of electrolyte.
If the tool is not used for a long period of time, the battery must be removed from the tool.
CAUTION:
- Danger of explosion if battery is incorrectly replaced.
- Replace only with the same or equivalent type.
- Only use genuine Makita batteries. Use of non- genuine Makita batteries, or batteries that have been altered, may result in the battery bursting causing fires, personal injury and damage. It will also void the Makita warranty for the Makita tool and charger.
Tips for maintaining maximum battery life
- Charge the battery cartridge before completely discharged. Always stop tool operation and charge the battery cartridge when you notice less tool power.
- Never recharge a fully charged battery cartridge. Overcharging shortens the battery service life.
- Charge the battery cartridge with room temperature at 10°C – 40°C (50°F – 104°F). Let a hot battery cartridge cool down before charging it.
- Charge the battery cartridge if you do not use it for a long period (more than six months).
OPERATING TIME
The suitable battery packs for this radio listed as the following table. The following table indicates the operating time on a single charge.
Battery capacity |
Battery cartridge voltage | AT SPEAKERS OUTPUT = 100mW Unit: Hour (Approximately) | |||
| 10.8V –12Vmax | 14.4V | 18V | In Radio or AUX | In Bluetooth + USB Charging | |
1.3 Ah |
BL1415 | 3.5 | 0.7 | ||
| BL1815 | 4.0 | 1.0 | |||
1.5 Ah |
BL1015 BL1016 | 5.5 | 0.8 | ||
| BL1415N BL1415NA | 4.5 | 0.9 | |||
| BL1815N | 5.0 | 1.2 | |||
|
2.0 Ah |
BL1020B BL1021B | 7.0 | 1.0 | ||
| BL1820 BL1820B | 6.5 | 1.6 | |||
|
3.0 Ah |
BL1430 BL1430B BL1430A | 8.0 |
1.6 | ||
| BL1830 BL1830B | 9.0 | 2.3 | |||
|
4.0 Ah |
BL1040B BL1041B | 14 | 2.1 | ||
| BL1440 | 12 | 2.5 | |||
| BL1840 BL1840B | 13 | 3.2 | |||
5.0Ah |
BL1450 | 15 | 3.0 | ||
| BL1850 BL1850B | 16 | 4.2 | |||
6.0 Ah |
BL1460B BL1460A | 16 | 3.3 | ||
| BL1860B | 20 | 5.0 | |||
WARNING:
Only use the battery cartridges listed above. Use of any other battery cartridges may cause injury and/or fire.
NOTE:
- Table regarding to the battery operating time above is for reference.
- The actual operating time may differ with the type of the battery, charging condition, or usage environment.
- Some of the battery cartridges and chargers listed above may not be available depending on your region of residence.
INSTALLATION AND POWER SUPPLY
CAUTION:

- Be careful not to pinch your fingers when opening and closing the battery cover.
- Return the battery compartment locker to the original position, after installing or removing battery cartridge. If not, battery cartridge may accidentally fall out of the radio, causing injury to you or someone around you.
- Always close and lock the battery compartment locker before moving the radio.
- Always switch off the radio before installing or removing the battery cartridge.
- Be careful not to drop or strike the radio. Broken shell may slash your finger or stab your body. Damaged radio may exhibit unpredictable behaviour resulting in fire, explosion or risk of injury.
IMPORTANT: - Reduced power, distortion, “stuttering sound” or when “ Battery Low” appears on the display are all the signs that the main battery pack needs to be replaced.
- The battery cartridge can’t be charged via the supplied AC power adaptor.
- The battery cartridge is not included as standard accessories.
Installing or removing slide battery cartridge


- To install the battery cartridge, align the tongue on the battery cartridge with the groove in the housing and slip it into place. Always insert it all the way until it locks in place with a little click.
- If you can see the red indicator on the upper side of the button, it is not locked completely. Install it fully until the red indicator cannot be seen. If not, it may accidentally fall out of the radio, causing injury to you or someone around you.
- Do not use force when installing the battery cartridge. If the cartridge does not slide in easily, it is not being inserted correctly.
- To remove the battery cartridge, slide it from the radio while sliding the button on the front of the cartridge.
Indicating the remaining battery capacity
- Only for battery cartridges with “B” at the end of the model number.

- Indicator lamps
- Check button
- Press the check button on the battery cartridge to indicate the remaining battery capacity. The indicator lamps light up for few seconds.
- 14.4V/18V batteries

- 10.8V-12V max batteries
NOTE:
Depending on the conditions of use and the ambient temperature, the indication may differ slightly from the actual capacity.

Using supplied AC power adaptor
Remove the rubber protector and insert the adaptor plug into the DC socket on the right hand side of the radio. Plug the adaptor into a standard mains socket outlet. Whenever the adaptor is used, the battery pack is automatically disconnected.
CAUTION:
- Always disconnected the AC power adaptor completely before moving the radio. If the AC adaptor is not removed, it may cause an electric shock.
- Never pull and/or drag the cord of the adaptor. If not, the radio may accidentally fall down, causing injury to you or someone around you.
IMPORTANT: - The mains adaptor is used as the means of connecting the radio to the mains supply. The mains socket used for the radio must remain accessible during normal use.
- In order to disconnect the radio, the mains adaptor should be removed from the mains outlet completely.
- Use the AC power adaptor supplied with the product or specified by Makita only.
- Do not hold the power supply cable and plug by your mouth. Doing so might cause an electric shock.
- Do not touch the power plug with wet or greasy hands.
- Damaged or entangled cords increase the risk of electric shock. If the cord is damaged, have it replaced by our authorized service center in order to avoid a safety hazard. Do not use it before repair.
- After use, always store AC power adaptor out of the reach of children. If Children play with the cord, they may suffer injury.
Charging with USB power supply port
There is the USB port at the front side of the radio. You can charge USB device trough the USB port.
- Connect the USB device, such as a MP3, or CD player, with USB cable available in the market.
- Press the Power button to switch on your radio.
- No matter if the radio is AC powered or battery powered, the radio can charge the USB device when the radio is switched on and in DAB/FM radio mode, or BT mode, or AUX mode, which is appeared when an external audio source is connected.
NOTE:
- The maximum volume of the output power speaker will decrease when your USB is charging.
- The USB socket can provide max 5V/2.4A of electrical current.
IMPORTANT: - Before connecting USB device to the charger, always backup your data of USB device. Otherwise your data may lose by any possibility.
- The charger may not supply power to some USB devices.
- When not using or after charging, remove the USB cable and close the cover.
- Do not connect power source to USB port. Otherwise there is risk of fire. The USB port is only intended for charging lower voltage device. Always place the cover onto the USB port when not charging the lower voltage device.
- Do not insert a nail, wire, etc. into USB power supply port. Otherwise a circuit short may cause smoke and fire.
- Do not connect this USB socket with your PC USB port, as it is highly possible that it may cause breakdown of the units.
LISTENING TO THE RADIO
This radio has three tuning methods- Scan tuning, Manual tuning and Memory presets recall.
Selecting a station – DAB
Note:
The DAB antenna is built into the handle. When operating the radio, please straighten the handle properly above the radio to get better reception.
- Press the Power button to switch on your radio.
- Select the DAB mode by pressing the Band button.
- Press the Tuning Control knob to enter the list of the stations. Or you can also press the Advanced setting button and then rotate the Tuning Control knob to select “Station List”. Press the Tuning Control knob to enter the list of the stations.
- Rotate the Tuning Control knob to scroll through the list of available stations. Press the Tuning Control knob to select the station.
- Adjust the desired volume by rotating the Volume knob.
Display modes – DAB
- Your radio has a range of display options in the DAB mode.
- Press the Info button to cycle through the different options.
- Dynamic Label :Supplementary data services in text form (up to 128 characters) running alongside the DAB or DAB+ radio programme. Displays scrolling text messages
- Segment such as artist/track name, phone in number, etc.
- Program type : Displays the type of station being listened to such as Pop, Classic, News etc.
- Multiplex name : Displays the name of the DAB multiplex to which the current station belong
- Frequency and channel :Displays the frequency and channel number for the cu rrently tuned DAB station. .
- Signal error/strength : Displays the signal error and strength for the station being listened to. A lower error number indicates a better quality of radio signal.
- Bit rate/Audio type : Displays the digital audio bit rate and audio type for the currently tuned DAB station.
- Date : Displays the current date.
If a DAB broadcast provides a slideshow image, this may be viewed full-screen by pressing and holding the Tuning Control knob. If the broadcast being received is in stereo, then the stereo speaker symbol will be shown at the bottom of the display.
Finding new stations – DAB
From time to time, new DAB radio stations may become available. Or you may have moved to a different part of the country. In this case you may need to activate your radio to scan for new stations. To allow the radio to find the available stations, it is recommended to carry out a full scan of the entire DAB Band III frequencies.
- Press the Power button to switch on your radio.
- Press the Band button to select DAB radio mode.
- Press the Auto tune button to initiate the scan. The display will show “Scanning” and your radio will perform a scan of the DAB Band III frequencies. As new stations are found the station counter will increase and stations will be added to the list. The bar graph indicates the progress of the scan.
Manual tuning – DAB
Manual tuning allows you to tune your radio to a particular DAB frequency in Band III. This function can also be used to assist the positioning of the antenna or the radio so as to optimize reception for a specific channel or frequency.
- When in DAB mode, press the Advanced setting button to enter the menu setting.
- Rotate the Tuning Control knob to select “Manual Tune”. Press the Tuning Control knob to enter the manual tuning mode.
- Rotate the Tuning Control knob to select the desired DAB channel. Press Tuning Control knob to confirm the chosen frequency.
Dynamic Range Control (DRC) – DAB
DRC feature can make quieter sounds easier to hear when your radio is used in a noisy environment by reducing the dynamic range of the audio signal. There are three levels of compression:
- 1 Maximum compression applied
- 1/2 Medium compression applied
- 0 No compression applied.
- When in DAB mode, press the Advanced setting button to enter the menu setting.
- Rotate the Tuning Control knob to select “DRC”. Then press the Tuning Control knob to enter the setting. The display will show the current DRC value.
- Rotate the Tuning Control knob to select desired DRC setting.
- Press the Tuning Control knob to confirm the setting.
Station order setup – DAB
Your radio has 3 station order settings from which you can choose. The station order settings are alphanumeric, ensemble and valid station.
- When in DAB mode, press the Advanced setting button to enter the menu setting.
- Rotate the Tuning Control knob to select “Station order”, then press the Tuning Control knob to enter the setting.
- Rotate the Tuning Control knob to select the following options and press the Tuning Control knob to confirm the setting.
Alphanumeric : Sorts the station list alpha-numerically 0…9 A…Z.
Ensemble : Organizes the station list by DAB multiplex.
Valid : Shows only those stations for which a signal can be found.
Scan Tuning – FM
Note:
The FM antenna is built into the handle. When operating the radio, please straighten the handle properly above the radio to get better reception.
- Press the Power button to switch on your radio.
- Press the Band button to select FM radio mode.
- Press the Auto tune button and the radio will search and stop automatically when it finds a radio station.
- After a few seconds the display will update. The display will show the frequency of the signal found. If the signal is strong enough and there is RDS data present then the radio will display the station name.
- To find other station, press the Auto tune button as before.
- When the end of the waveband is reached your radio will recommence tuning from the opposite end of the waveband.
- Rotate the Volume knob to adjust the sound level as required.
Note:
The volume should not be too large. To prevent possible hearing damage, do not listen at high volume levels for long periods. - To switch off your radio press the Power button.
Manual tuning – FM
- Press the Power button to switch on your radio.
- Press the Band button to select FM radio mode.
- Press the Tuning control knob to switch to the tuning control mode.
- Rotate the Tuning control knob to find your desired station.
- To adjust the volume, press the Tuning control knob again to switch to the volume control mode.
- Rotate the Volume knob to adjust the sound level as required.
Display modes – FM (RDS)
Your radio has a range of display options for FM radio mode. The RDS indicator at the bottom of the display shows that there is some RDS data present in the broadcast being received. The stereo speaker display shows that the radio is receiving a stereo broadcast. Repeatedly press the Info button to view the RDS (Radio Data System) information of the station you are listening to.
- Radio text : Displays radio text message such as new items etc.
- Program type : Displays the type of station being listened to such as Pop, Classic, News, etc
- Frequency : Displays the frequency of the FM signal. (If no RDS information is available, the display will be shown “No
- Audio mode : Displays the current audio mode
- Date : Displays the current date.
FM scan zone
When using FM mode, your radio can be set to scan either local stations or to scan all stations including distant radio stations.
- When in FM mode, press the Advanced setting button to enter the menu setting.
- Rotate the Tuning control knob to select “Scan zone”. Press the Tuning control knob to enter the setting. The current audio setting is indicated with a tick.
- Rotate the Tuning control knob to select “Local”
(Strong stations only) or “Distant” (All stations). The distant option will allow the radio to find weaker signals when scanning. - Press Tuning control knob to confirm the setting. The local or distant setting is stored in the radio and remains in force until changed or until a system reset.
Stereo/Mono setting – FM
If the FM radio station being listened to has a weak signal, some hiss may be audible. It is possible to reduce this hiss by forcing the radio to play the station in mono rather than stereo.
- Ensure your radio is in FM mode and tune to the required FM station.
- Press the Advanced setting button to enter the menu setting.
- Rotate the Tuning control knob to select “Audio Setting”. Press the Tuning control knob to enter the setting. The current audio setting is indicated with a tick.
- Rotate the Tuning control knob to select “Forced Mono” or “Stereo Allowed”. Press Tuning control knob to confirm the setting.
Presetting stations in DAB and FM modes
There are 5 preset stations each for DAB and FM radio. They are used in the same way for each waveband.
- Press the Power button to switch on your radio.
- Press the Band button to select the desired waveband. Tune to the required radio station as previously described.
- Press and hold the required Preset button until the display shows “Preset 1 saved” (for example). will be shown at the bottom of the display. The station is then stored in the selected preset button. Repeat this procedure for the remaining presets as you wish.
- Preset stations which have already been stored may be overwritten by following the above procedure if required.
Recalling a preset in DAB and FM modes
- Press the Power button to switch on your radio.
- Press the Band button to select DAB or FM radio mode.
- Momentarily press the required Preset button to tune to your radio to one of the stations stored in the preset memory.
MISCELLANEOUS SETTINGS
Automatically updating the clock
You may specify that the radio sets its clock from DAB or FM radio broadcasts. After a power failure, the radio will then set its clock in the next time that you turn on the radio in DAB or FM mode.
- With your radio switched on, press the Advanced setting button to access the menu for the current mode.
- Rotate the Tuning control knob to select “Time/Date”. Press the Tuning control knob to enter the setting.
- Rotate the Tuning control knob to select “Auto Update”. Press the Tuning control knob to enter the auto-update menu.
- Rotate the Tuning control knob to choose an update option from “from Any”, “from DAB” or “from FM” as required. Press the Tuning control knob to confirm your choice. The current setting will be marked with a tick.
Setting the clock format
- With your radio switched on, press the Advanced setting button to access the menu for the current mode.
- Rotate the Tuning control knob to select “Time/Date”. Press the Tuning control knob to enter the setting.
- Rotate the Tuning control knob to select “Set 12/24 Hour”. Press the Tuning control knob to enter the clock format setting. The current clock display format is marked with a tick.
- Rotate the Tuning control knob to select 12 or 24 hour format. Press the Tuning control knob to confirm your setting. If the 12 hour clock format is chosen, the radio will display a 12 hour clock with an AM or PM indicator.
Setting the date format
- With your radio switched on, press the Advanced setting button to access the menu for the current mode.
- Rotate the Tuning control knob to select “Time/Date”. Press the Tuning control knob to enter the setting.
- Rotate the Tuning control knob to select “Set Date Format”. Press the Tuning control knob to enter the setting.
- Rotate the Tuning control knob to select “DD-MM-YYYY” or “MM-DD-YYYY” date format. Press the Tuning control knob to confirm the setting.
Loudness
You can get compensation on lower and higher frequency for your radio by adjusting the loudness function.
- With your radio switched on, press the Advanced setting button to access the menu for the current mode.
- Rotate the Tuning control knob to select “Loudness”. Press the Tuning control knob to enter the setting.
- Rotate the Tuning control knob to select “On” to turn on the loudness function. To turn off the loudness function, select “Off”. Press the Tuning control knob to confirm the setting.
Language options
There are eight language options available in the radio: English, German, Italian, French, Dutch, Danish, Norwegian and Polish.
- With your radio switched on, press the Advanced setting button to access the menu for the current mode.
- Rotate the Tuning control knob to select “Language”. Press the Tuning control knob to enter the setting.
- Rotate the Tuning control knob to choose your desired language. Press the Tuning control knob to confirm your setting.
Factory reset
If you wish to completely reset your radio to its initial state this may be performed by following this procedure. By performing a factory reset, all user entered settings will be erased.
- With your radio switched on, press the Advanced setting button to access the menu for the current mode.
- Rotate the Tuning control knob to select “Factory Reset”. Press the Tuning control knob to enter the setting.
- Rotate the Tuning control knob to select “Yes” or “No”. If you do not wish to carry out a system reset, select “No” and then press the Tuning control knob to confirm the setting. With “Yes” selected, press the Tuning control knob. A full reset will be performed. The station list and presets will be erased. All settings will be set to their default values.
In case of malfunction due to electrostatic discharge, reset the product (reconnection of power source may be required) to resume normal operation.
Micro USB port for software upgrade
Software updates for your radio may be available in the future. As software updates become available software and information on how to update your radio can be found at Makita website.
- Using the micro USB cable (not supplied) to connect the USB socket in the battery compartment and your PC.
- With your radio switched on, press the Advanced setting button to access the menu for the current mode.
- Rotate the Tuning control knob to select “Software Update”. Press the Tuning control knob to enter the setting.
- Rotate the Tuning control knob to select “Yes” or “No”. If you do not wish to carry out a software upgrade, select “No” and press the Tuning control knob to confirm the setting. With “Yes” selected, press the Tuning control knob. The display will show “Waiting for PC wizard”. Go to the website to download the latest software. Follow the on-screen instructions
on your PC provided with the upgrade software to complete the software upgrade.
Note:
Please use AC power adaptor as main power when upgrading software. Do not switch off the power to the radio until the update operation is complete and the radio has restarted, otherwise the unit may become permanently damaged.
Software version
- With your radio switched on, press the Advanced setting button to access the menu for the current mode.
- Rotate the Tuning control knob to select “Software Version”. Press the Tuning control knob to display the software version.
Equalizer function
There are 7 kinds of color LED indicators around the Tuning control knob to indicate different EQ modes.
- Press the Power button to switch on your radio.
- Press the EQ control button to enter the EQ setting menu.
- Rotate the Tuning control knob to select your required mode. Then press the Tuning control knob to confirm the selection.
| EQ mode | LED indicator |
| Flat | White |
| Jazz | Blue |
| Rock | Red |
| Classic | Brown |
| Pop | Pink |
| News | Yellow |
| MY EQ | Green |
Set up My EQ profile
- Press the EQ control button to enter the EQ setting menu.
- Rotate the Tuning control knob to select “MY EQ Setup”. Then press the Tuning control knob to enter the setting menu
- Rotate the Tuning control knob to select “Treble” setting. Press the Tuning control knob to enter the setting. Rotate the Tuning control knob to select your required treble level. Press the Tuning control knob to confirm the setting.
- Rotate the Tuning control knob to select “Middle” setting. Press the Tuning control knob to enter the setting. Rotate the Tuning control knob to select your required middle level. Press the Tuning control knob to confirm the setting.
- Rotate the Tuning control knob to select “Bass” setting. Press the Tuning control knob to enter the setting. Rotate the Tuning control knob to select your required bass level. Press the Tuning control knob to confirm the setting.
Note:
When using the equalizer to emphasize the bass and listening at high volume levels, it may cause sound cracking and distortion. In this case, adjust the radio volume appropriately.
LISTENING TO MUSIC VIA BLUETOOTH STREAMING
You need to pair your Bluetooth device with the radio before you can auto-link to play/stream Bluetooth music through the radio. Pairing creates a ‘bond’ so two devices can recognize each other.
Note:
- To have the better sound quality, we recommend setting the volume to more than two-thirds level on your Bluetooth device and then adjust the volume on the radio as required.
- The radio can memorize up to 8 sets of paired device, when the memory exceed this amount, the oldest pairing history will be over written.
Pairing your Bluetooth device for the first time
- Press the Power button to turn on the radio. Press the Band button to select Bluetooth mode. The display will appear “BT Pair” and the Preset buttons (1-5) flash white light to show the radio is discoverable.
- Activate Bluetooth on your device according to the device’s user manual to link to the radio. Locate the Bluetooth device list and select the device named “DMR115” (With some mobiles which are equipped with earlier versions than BT2.1 Bluetooth device, you may need to input the pass code “0000”).
- Once connected, there will be a confirmation tone sound. The Preset buttons (1-5) will remain in solid white. You can simply select and play any music from your source device. Volume control can be adjusted from your source device, or directly from the radio.
- Use the controls on your Bluetooth-enabled device or on the radio to play/pause and navigate tracks.
Note:
- If 2 Bluetooth devices, pairing for the first time, both search for the radio, it will show its availability on both devices. However, if one device links with this unit first, then the other Bluetooth device won’t find it on the list.
- If your Bluetooth device is temporarily disconnected to the radio, then you need to manually reconnect your device again to the radio.
- If “DMR115” shows in your Bluetooth device list but your device cannot connect with it, please delete the item from your list and pair the device with the radio again following the steps described previously.
- Optimum Bluetooth streaming range is roughly
10 meters (30 feet) (line of sight) to the radio but distance up to 30 meters (100 feet) are possible. - Physical obstacles, other wireless devices or electromagnetic devices may affect the connection quality.
- Bluetooth connectivity performance may vary depending on the connected Bluetooth devices. Please refer to the Bluetooth capabilities of your device before connecting to the radio. All features may not be supported on some paired Bluetooth devices.
Playing audio files in Bluetooth mode
When you have successfully connected the radio with the chosen Bluetooth device you can start to play your music using the controls on your connected Bluetooth device.
- Once playing has started, adjust the volume to the required setting using the Volume knob on the radio or on your enabled Bluetooth device.
- Use the controls on your Bluetooth source device to play/pause and navigate tracks. Alternatively, control the playback using Play/Pause, Next track, Previous track buttons on your radio.
- Press and hold the Fast-forward or Rewind button to move through the current track. Release the button when the desired point is reached.
Note:
- Some player applications or devices may not respond to all of these controls.
- Some mobile phones may temporarily disconnect from the radio when you make or receive calls. Some devices may temporarily mute their Bluetooth audio streaming when they receive text messages, emails or for other reasons unrelated to audio streaming. Such behavior is a function of the connected device and does not indicate a fault with the radio.
Playing a previously-paired Bluetooth source device
If your Bluetooth device already paired with the radio previously, the unit will memorize your Bluetooth device and it attempts to reconnect with a device in memory which is last connected. If the last connected device is not available, the radio will be discoverable.
Disconnecting your Bluetooth device
Press and hold the Bluetooth pairing button for 2-3 seconds until “BT Pair” is shown on the display or turn off Bluetooth on your Bluetooth device to disable the connection.
You can also press the Band button to select any mode other than Bluetooth mode to disable the connection.
Deleting Bluetooth paired device memory
To clear the memory of all paired devices, press and hold the Bluetooth pairing button more than 7 seconds until “Clearing” shows on the display.
AUXILIARY INPUT SOCKET
A 3.5mm Auxiliary input socket is provided at the front of your radio to permit an audio signal to be fed into the unit from an external audio device such as a MP3 or CD player.
- Connect an external audio source (for example, MP3 or CD player) to the AUX IN socket.
- Press the Power button to switch on your radio.
- Repeatedly press and release the Band button until “AUX IN” is displayed.
- To have the better sound quality, we recommend setting the volume to more than two-thirds level on your audio device and then adjust the volume on the radio as required.
Note:
Audio cord is not included as standard accessories.
MAINTENANCE
CAUTION:
- Never use gasoline, benzine, thinner, alcohol or the like. Discoloration, deformation or cracks may result.
- Do not wash the radio with water.
SPECIFICATIONS
| Power requirements | |
| AC power adaptor | DC 12V 2.5A, center pin positive |
| Battery | Slide battery: 10.8V-18V |
|
Frequency coverage |
FM87.50-108MHz (0.05MHz/step) DAB/DAB+ 174.928-239.200 MHz |
| DAB/DAB+ Channel block | DAB (Band III) 5A-13F |
| Compatible standard | DAB/DAB+ |
Bluetooth® (The Bluetooth® word mark and logos are registered trademarks owned by Bluetooth SIG, Inc.) | |
| Bluetooth version | 5.0 Certified |
| Bluetooth Profiles | A2DP/SCMS-T/AVRCP |
| Transmission Power | Power Class2 |
|
Transmisson Range |
Optimum: Max.10 meters (33 feet) Possible: Max.30 meters (100 feet) (varies according to usage conditions) |
| Bluetooth Codec | SBC, AAC |
| Maximum radio-frequency power | BT EDR: 1.91dBm BT LE: 0.21dBm |
| Operating Frequency | 2402MHz~2480MHz |
| Circuit feature | |
| Loudspeaker | 2.5 inches 8 ohm x 2 4 inches 6 ohm x1 |
|
Output power |
10.8V-12Vmax: 2W x 2 + 10W 14.4V: 3W x 2 + 15W 18V: 5W x 2 + 25W |
| Input terminal | 3.5mm dia. (AUX IN) |
| Antenna system | DAB/FM: Built-in antenna |
| Dimensions (L x W x H) | 268 x 164 x 295 mm |
| Weight | 4.8 KG (without battery) |