Dewalt DWHT77100-XJ 30M Laser Distance Measurer User Manual


DEWALT DWHT77100-XJ 30M Laser Distance Measurer


User Safety
- WARNING: Carefully read the Safety Instructions and Product Manual before using this product. The person responsible for the product must ensure that all users understand and adhere to these instructions.
- WARNING: The following label information is placed on your laser tool to inform you of the laser class for your convenience and safety.
The DWHT77100 tools emit a visible laser beam, as shown in Figure A 1 . The laser beam emitted is Laser Class 2 per IEC 60825‑1. - WARNING: While the laser tool is in operation, be careful not to expose your eyes to the emitting laser beam (red light source). Exposure to a laser beam for an extended time period may be hazardous to your eyes. Do not look into the beam with optical aids.
- WARNING: To reduce the risk of injury, user must read the Product User manual, Laser Safety manual, and Battery Safety information.
- CAUTION: Use of controls or adjustments or performance of procedures other than those specified herein may result in hazardous radiation exposure.
Battery Safety
WARNING: Batteries can explode or leak and cause serious injury or fire. To reduce the risk:
- ALWAYS follow all instructions and warnings on the battery label and package.
- DO NOT short any battery terminals.
- DO NOT charge alkaline batteries.
- DO NOT mix old and new batteries. Replace all of them at the same time with new batteries of the same brand and type.
- DO NOT mix battery chemistries.
- DO NOT dispose of batteries in fire.
- ALWAYS keep batteries out of reach of children.
- ALWAYS remove batteries if the device will not be used for several months.
- NOTE: Ensure that the recommended batteries are used.
NOTE: Ensure the batteries are inserted in the correct manner, with the correct polarity.
Setup (Load Batteries)
- Locate the battery compartment latch on the back of the tool (Figure D 2 ).
- Using your finger, pull the latch up to unlock and remove the battery door (Figure E 1 and 2 ).
- Insert two AAA batteries, making sure to position the ‑ and + ends of each battery as noted inside the battery compartment (Figure E 3 ).
- Slide the pins at the bottom of the battery door into the notches in the battery compartment (Figure E 4 ).
- Push the battery door down until it snaps in place (Figure E 5 ).
When the tool is ON, the battery level appears in the display window (Figure C 1 ).
SETUP LDM
Turn On Tool
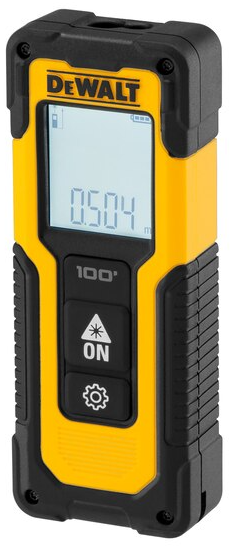
Click On (Figure A 3 ) to turn on the tool.
Changing the Reference Location The tool will measure the distance from the bottom (Figure F 1 ) or top (Figure F 2 ) of the tool to the wall or object.
Changing the Unit of Measure
Once the current measurement is taken (the device is not in Continuous Measure mode), you can change the unit of measure from decimal ft (6.21 ft) to fractional ft (6’02″9/16), fractional ft to meters (1.894 m), meters to inches (74 9/16 in), or inches to decimal ft.
- To change the measurement unit, hold the gear button (Figure A 4 ) for three seconds to enter the units menu. Press the on button to confirm your reference location. Once confirmed, the current unit of measurement will be displayed, press the gear to change units and the on button to confirm.
OPERATION
Measuring Distance to a Wall or Object
- Point the laser (Figure A 1 ) toward the wall or object whose distance you need to measure (Figure F).
- Press On button (Figure A 3 ) to measure the distance from the tool to the wall or object. Refer to Setup LDM to change the reference location and / or unit
of measurement. - At the bottom of the display window (Figure A 2 ), view the current measurement (Figure C 3 ), which will keep changing as you move the tool.
To record the measurement click On. To record another measurement, click On again. Then repeat steps 1‑3.
Measuring Area
You can measure the area of a wall, floor, or object.
- Press the gear button (Figure A 4 ) once to show the area icon (Figure B 1 ) on the display window (Figure A 2 ).
Measure the length.
- Position the tool at one end of the target and point the laser dot across the length. (Figure G 1 shows where to position the tool if measuring from the top of the tool.)
- Press On to display the length measurement on the first line of the display window.
Measure the width.
- Point the top of the tool at one side of the target (wall, floor, or object).
- Position the tool at one end of the target and point the laser dot across the width. (Figure G 2 shows where to position the tool if you are measuring from the top of the tool.)
- Press On to display the width measurement at the top of the display window.
View the Area measurement at the bottom of the display window (Figure E 3 ).
Measuring Volume
You can measure the volume of a room or object.
- Press the gear button (Figure A 4 ) three times to show the indirect measurement height on the display window
(Figure E 3 ).
Measure the width.
- Point the top of the tool at one side of the target (room or object).
- Position the tool at one end of the target and point the laser dot across the width. (Figure H 1 ) shows where to position the tool if you are measuring from the top of the tool.)
- Press to display the width measurement at the top of the display window.
Measure the length.
- Position the tool at one end of the target and point the laser dot across the length. (Figure H 2 ) shows where to position the tool if you are measuring from the top of the tool.)
- Press On to display the length measurement on the second line of the display window.
Measure the height.
- Position the tool at one end of the target and point the laser dot across the height.
- Press On to display the height measurement on the third line of the display window.
View the Volume measurement at the bottom of the display window (Figure C 3 ).
Measuring the Height of a Tall Object
If you need to measure the height of a tall object (e.g., a tall building), you can calculate the height based on the distances from the same point to 2 or 3 points on the object. The tool will use the Pythagorean Theorem (A2+B2=C2) to calculate the height.
Measure a distance with two measurements
You can use the distance to two points on a tall object (Indirect Height) to determine its height (Figure I1).
- Point the tool’s laser (Figure A 1 ) toward a wall or object, and not toward anyone’s eyes.
- Press On button (Figure A 3 ) to turn the tool on and display the red laser dot.
- Press the gear button (Figure A 4 ) three times to show pythagoras (Figure B 1 ) on the display window.
- Position the tool opposite the bottom of the building or object whose height you need to measure (Figure I2).
- Aim the laser at the highest point of the building or object (Figure I2).
- Press On button (Figure A 3 ) to measure the distance.
- From the same point, aim the laser straight ahead toward the lowest point of the building or object (Figure I3).
- Press On button (Figure A 3 ) to measure the distance.
- On the bottom line of the screen, view the height of the building or object.
Measure a distance with three measurements
You can use the distance to three points on a tall object to determine its height (Figure J1).
- Point the tool’s laser (Figure A 1 ) toward a wall or object, and not toward anyone’s eyes.
- Press On button (Figure A 3 ) to turn the tool on and display the red laser dot.
- Press the gear button (Figure A 4 ) four times to show pythagoras on the display window (Figure C 7 ).
- Position the tool opposite the approximate center of the vertical height to be measured (Figure J2).
- Aim the laser at the highest point of the building or object (Figure J2).
- Press On button (Figure A 3 ) to measure the distance.
- From the same point, aim the laser straight ahead toward the center of the building or object (Figure J3).
- Press On button (Figure A 3 ) to measure the distance.
- From the same point, aim the laser at the lowest point of the building or object (Figure J4).
- Press On button (Figure A 3 ) to measure the distance.
- On the bottom line of the screen, view the height of the building or object.
Adding Measurements
You can add two measurements to get a total measurement of the two distances.
- Press gear button (Figure A 4 ) to show the addition icon on the display window (Figure C 4 )
- Press On button (Figure A 3 ) to measure the distance from the tool to the wall or object.
- Press the On button to record the first measurement on the top line.
- Point the laser (Figure A 1 ) toward the next wall or object.
- Press the On button to record the second measurement on the middle line.
- View the total of the two measurements at the bottom of the display window (Figure C 3 ).
Subtracting Measurements
You can subtract one measurement from another.
- Press gear button (Figure A 4 ) to show the subtraction icon on the display window (Figure C 3 ).
- Point the laser at the top of the tool laser (Figure A 1 ) toward the wall or object whose distance you need to measure.
- Press On button (Figure A 3 ) to measure the distance from the tool to the wall or object.
- Press the On button to record the first measurement on the top line.
- Point the laser at the top of the tool toward the next wall or object.
- Press the On button to record the second measurement on the middle line.
- View the difference of the two measurements at the bottom of the display window (Figure C 3 ).
NOTE: If Second measurement is larger than first: IC 601 will be displayed for a negative number. Please switch measurement points so first measurement is larger than second
Turning Off the Tool
The tool can be turned off in either of these ways:
- Press and hold the on button (Figure A 3 ) for several seconds (until the display window clears).
- If you do not use the tool for 180 seconds, it will automatically turn off.
THREE-YEAR LIMITED WARRANTY
DEWALT will repair, without charge, any defects due to faulty materials or workmanship for three years from the date of purchase. This warranty does not cover part failure due to normal wear or tool abuse. For further detail of warranty coverage and warranty repair information, visit www.DEWALT.com or call 1–800–4‑DEWALT (1–800–433–9258). This warranty does not apply to accessories or damage caused where repairs have been made or attempted by others. This warranty gives you specific legal rights and you may have other rights which vary in certain states or provinces.
In addition to the warranty, DEWALT tools are covered by our:
1 YEAR FREE SERVICE
DEWALT will maintain the tool and replace worn parts caused by normal use, for free, any time during the first year after purchase.
90 DAY MONEY-BACK GUARANTEE
If you are not completely satisfied with the performance of your DEWALT Power Tool, Laser, or Nailer for any reason, you can return it within 90 days from the date of purchase with a receipt for a full refund ‑ no questions asked.
- RECONDITIONED PRODUCT: Reconditioned product is covered under the 1 Year Free Service Warranty. The 90 Day Money Back Guarantee and the Three Year Limited Warranty do not apply to reconditioned product.
- FREE WARNING LABEL REPLACEMENT: If your warning labels become illegible or are missing, call 1‑800‑4‑DEWALT or visit your local service center for a free replacement.
Protecting the Environment
Separate collection. This product must not be disposed of with normal household waste. Should you find one day that your DEWALT product needs replacement, or if it is of no further use to you, do not dispose of it with household waste. Make this product available for separate collection. Separate collection of used products and packaging allows materials to be recycled and used again. Re‑use of recycled materials helps prevent environmental pollution and reduces the demand for
raw materials.
Local regulations may provide for separate collection of electrical products from the household, at municipal waste sites or by the retailer when you purchase a new product.
DEWALT provides a facility for the collection and recycling of DEWALT products once they have reached the end of their working life. To take advantage of this service please return your product to any authorised repair agent who will collect them on our behalf.
You can check the location of your nearest authorised repair agent by contacting your local DEWALT office at the address indicated in this manual. Alternatively, a list of authorised DEWALT repair agents and full details of our after‑sales service and contacts are available on the Internet at: www.2helpU.com.
Batteries
- When disposing batteries, think of the protection of the environment.
- Check with your local authorities for an environmentally safe way of battery disposal.
Error Codes
If INFO appears on the display window with a Code number, perform the corresponding Corrective Action.
| Code | Description | Corrective Action |
| IC101 | Received signal too high | Target is too reflective. Use the target plate or change the target surface. |
| IC201 | Too much background light | Reduce the background light on the target area. |
| IC302 | Temperature out of range | Allow device too warm or cool and repeat measurement |
| IC303 | Distance not in range or signal too low | Adjust range, if within range change target surface |
| IC401 | Battery too low for measurements | Recharge battery or change batteries if non‑rechargeable |
| IC505 | Hardware error | Switch the device on/off several times. If error still occurs, return device to Service Center or Distributor |
| IC601 | Negative number | Measure longer distance before shorter distance for positive result |
| IC604 | Invalid measurement for calculation | Remeasure distances, hypotenuse must be larger than sides of triangle |
Specifications
| Range | .2 m to 30 m |
| Measuring Accuracy* | ± 3 mm* |
| Resolution** | 1 mm** |
| Laser Class | Class 2 (IEC/EN60825‑1: 2014) |
| Laser Type | ≤1.0 mW @ 620‑690nm |
| Backlight Automatic Switch‑off | After 20s |
| Laser | After 120s |
| Unit Automatic Switch‑off | After 180s |
| Continuous Measuring | Yes |
| Area/Volume | Yes |
| Battery Life (2 x AAA) | Up to 3000 Measurements |
| Dimension (H x D x W) | 120 x 48.5 x 26 mm |
| Weight (with Batteries) | 100 g |
| Storage Temperature Range | ‑10 ° C ~ +60 C |
| Operating Temperature Range | 0 ° C ~ +40 ° C |
Measuring Accuracy depends on the current conditions:
| |