Huawei MateView Real Color Monitor User Guide
HUAWEI MateView Real Color Monitor User Guide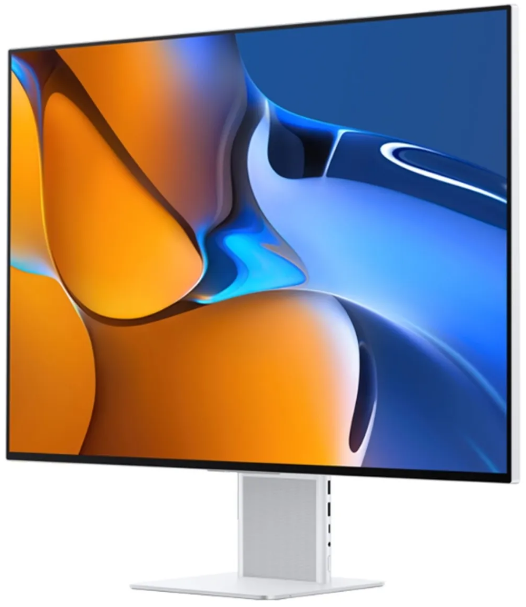

About This Document
Please read this document before you begin using the device.
Some components mentioned in the document may not be included with the device, and need to be purchased separately. Some features described in this document are only available when used together with other components. The figures and Graphical User Interfaces (GUIs) in this document may differ from reality, and all figures are for reference only.
Appearance and Ports
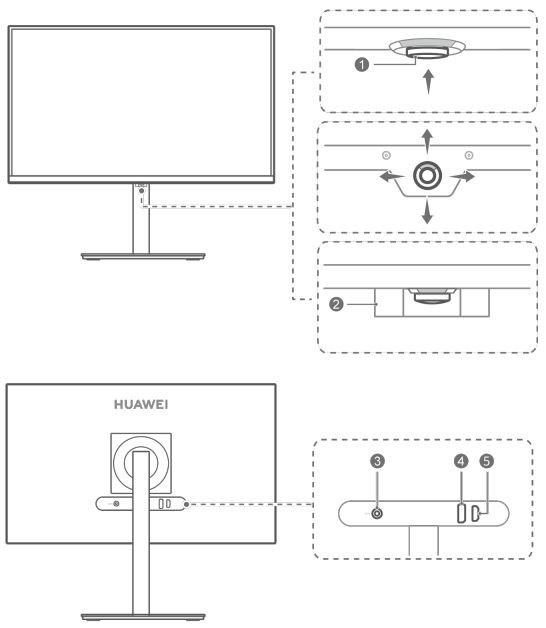

| No. | Button |
| 1 | Five-way joystick • Press upward to power on the device. Press and hold for more than 2 seconds to power off the device. • Press upward, forward, backward, leftward, or rightward when the device is powered on, to open the menu. Press forward, backward, leftward, or rightward to configure the settings. For details, please refer to Using the Five-Way Joystick to Power on/off and Configure the Settings. |
| No. | Button |
| 2 | Five-way joystick protective case* Protects the five-way joystick from damage during initial assembly. |
| 3 | Power port Connects to a power adapter to supply power to the monitor. |
| 4 | DisplayPort (DP) Connects to a device, such as a computer, via the DP. |
| 5 | HDMI port Connects to a device, such as a computer, via the HDMI port. |

Assembling and Disassembling the Monitor
Configuring SSN-CAA:

- Place the carton horizontally with the foam arrow facing upwards, open the carton, and take out the device and foam.
- Remove the base from the foam.
- Lift the display post slightly, and attach the base to the bottom of the post. When youhear a click, it means that the base has been correctly attached.
- Hold the assembled monitor with both hands, and place it on a flat desk. Feel free to adjust the tilt angle to suit your needs.
- To disassemble the monitor, place it on the desk, push the quick-release tab on the base inwards with one hand, and hold the post with the other hand to push the base outwards.
Configuring SSN-CBA:

- Place the carton horizontally with the foam arrow facing upwards, open the carton, and take out the device and foam.
- Remove the base support from the foam, and use screws to connect the base to the support.
- Tilt the upper end of the base support so that it fits into the slot on the back of the monitor, and press the base support downwards until you hear a clicking sound, which indicates that the base support has been correctly attached.
- Hold the assembled monitor with both hands, and place it on a flat desk. Feel free to adjust the tilt angle, swivel angle, and height to suit your needs.
- To disassemble the monitor, place it on the desk, push the quick release button on theback of the monitor upwards, and lift the bottom of the support.
Configuring SSN-CAABZ:

- Place the carton horizontally with the foam arrow facing upwards, open the carton, and take out the device and foam.
- Remove the base from the foam.
- Lift the display post slightly, and attach the base to the bottom of the post. When youhear a click, it means that the base has been correctly attached.
- Hold the assembled monitor with both hands, and place it on a flat desk. Feel free to adjust the tilt angle to suit your needs.
- To disassemble the monitor, place it on the desk, push the quick-release tab on the base inwards with one hand, and hold the post with the other hand to push the base outwards.
Configuring SSN-CBABZ:

- Place the carton horizontally with the foam arrow facing upwards, open the carton, and take out the device and foam.
- Remove the base support from the foam, and use screws to connect the base to the support.
- Tilt the upper end of the base support so that it fits into the slot on the back of the monitor, and press the base support downwards until you hear a clicking sound, which indicates that the base support has been correctly attached.
- Hold the assembled monitor with both hands, and place it on a flat desk. Feel free to adjust the tilt angle, swivel angle, and height to suit your needs.
- To disassemble the monitor, place it on the desk, push the quick release button on theback of the monitor upwards, and lift the bottom of the support.
Pivot

Erect the monitor, adjust the height and tilt angle of the screen to the maximum, face the screen, and rotate the screen 90 degrees clockwise until the screen is in portrait mode.
Connecting the Monitor to a Device (such 9 as a computer)

- Connect one end of a DP or HDMI cable to the DP or HDMI port on the monitor, and connect the other end to the DP or HDMI port on a computer.
- Connect other cables, such as power cables, between the monitor and computer, and then power on both devices. If the computer screen is displayed on the monitor, it indicates that the connection is successful.
Using the Five-Way Joystick to Power 10 On/Off and Configure the Settings

The monitor’s five-way joystick can be used to power the monitor on/off and configure thesettings.
Powering the monitor on/off
- Powering on: Press the joystick upward. Once the brand logo appears on the monitor screen, the indicator will turn on and the monitor will be powered on.
- Powering off: Press and hold the joystick upward for more than 2 seconds. The indicatorwill turn off and the monitor will power off.
Configuring the settings:
- With the monitor powered on, press the five-way joystick upward when facing the monitor, to open the menu.
- On the menu screen, operate the five-way joystick as instructed when facing the monitor,to change the settings:


Menu Options for the Monitor
| Level-1 Menu | Level-2 Menu | Description |
| P3 color | P3 color is recommended for users who usually browse images in the P3 color gamut, or those who prefer bright colors. | |
| sRGB color | sRGB color is recommended for when you browse images on a computer. | |
| HDR color | HDR color mode features HDR color correction, and is recommended for when you watch videos. | |
| Game | Game mode is recommended for when you play games. | |
| eBook | eBook mode is recommended for when you read, as it provides a paper-like display. | |
| Custom | You can set the display effects on your own. | |
| Brightness | The value ranges from 0 to 100. | |
| Contrast | The value ranges from 0 to 100. | |
| Sharpness | The value ranges from 0 to 100. | |
| Eye Comfort | You can enable or disable Eye Comfort mode. This feature is only available in Custom, sRGB color, and P3 color modes, and is disabled in other picture modes by default. | |
| Color temp | You can set the color temperature to Cool, Neutral,Standard, or Warm. You can also set Red, Green, and Blue to any value between 0 and 100 in Custom. |


| Level-1 Menu | Level-2 Menu | Description |
| Scaling | You can set the scaling to Full screen or Scaled. | |
| HDMI | You can select the corresponding input source based on the cable connecting the monitor to any other devices. | |
| DP | ||
| Refresh rate | In gaming scenarios, you can configure auxiliary settings. After enabling this feature, you’ll be able choose to display the refresh rate in the top left or right corner of the screen. | |
| Crosshairs | After enabling this feature, you’ll be able to set the crosshair displayed on the screen as red or green, or reset its position. | |
| AMD FreeSync | This feature can be enabled or disabled. After enabling this feature, you can enjoy a smooth gaming experience free of screen distortion. | |
| Response time | This feature can be enabled or disabled. After enabling this feature, you’ll be able to set the response time to Standard, Fast, or Super-fast. | |
| Up | The upper option on the OSD shortcut menu is set to Brightness by default. You can also change it to another setting, such as Picture mode, Response time, Input source, or Contrast. | |
| Down | The lower option on the OSD shortcut menu is set to Picture mode by default. You can also change it to another setting, such as Brightness, Response time, Input source, or Contrast. | |
| Language | You can set the menu language to simplified Chinese, American English, Japanese, or another language. | |
| Menu settings | Menu transparency: You can set the menu transparency to any value between 1 and 8. A larger value indicates a higher transparency. | |
| Menu timeout: You can set how long the menu will display to any value between 10 seconds and 100 seconds. | ||
| Level-1 Menu | Level-2 Menu | Description |
| Scaling | You can set the scaling to Full screen or Scaled. | |
| Input source | HDMI | You can select the corresponding input source based on the cable connecting the monitor to any other devices. |
| DP | ||
| Game assist | Refresh rate | In gaming scenarios, you can configure auxiliary settings. After enabling this feature, you’ll be able choose to display the refresh rate in the top left or right corner of the screen. |
| Crosshairs | After enabling this feature, you’ll be able to set the crosshair displayed on the screen as red or green, or reset its position. | |
| AMD FreeSync | This feature can be enabled or disabled. After enabling this feature, you can enjoy a smooth gaming experience free of screen distortion. | |
| Response time | This feature can be enabled or disabled. After enabling this feature, you’ll be able to set the response time to Standard, Fast, or Super-fast. | |
| Shortcuts |
Up | The upper option on the OSD shortcut menu is set to Brightness by default. You can also change it to another setting, such as Picture mode, Response time, Input source, or Contrast. |
| Down | The lower option on the OSD shortcut menu is set to Picture mode by default. You can also change it to another setting, such as Brightness, Response time, Input source, or Contrast. | |
| Settings |
Language | You can set the menu language to simplified Chinese, American English, Japanese, or another language. |
| Menu settings | Menu transparency: You can set the menu transparency to any value between 1 and 8. A larger value indicates a higher transparency. | |
| Menu timeout: You can set how long the menu will display to any value between 10 seconds and 100 seconds. |


| Level-1 Menu | Level-2 Menu | Description |
| LED power button | On in standby: Once this feature is enabled, the indicator on the monitor will flash white in Standby mode. | |
| Off in standby: Once this feature is enabled, the indicator on the monitor will turn off in Standby mode. | ||
| About | Allows you to view the monitor’s SN, firmware version, picture mode, resolution, refresh rate, and input source. | |
| Eco mode | This mode can be enabled or disabled. This feature is disabled by default. Enabling this feature will reduce power consumption. After enabling Eco mode, you won’t be able to apply certain settings, such as Brightness. | |
| Factory reset | Restores the menu to its factory settings. |
FAQs
Unable to power on the display
- Check whether the display is powered on.
- Check whether the power adapter is correctly connected to the display and the power supply.
There are no images on the display
- Check whether all of the cables are correctly connected.
- Check whether the display and the tower are powered on.
- Check whether the DP or HDMI signal cable is damaged.
- If the preceding issues do not occur, restart the display and the tower, then check whetherthe images can be properly displayed on the screen.
The screen is too dark or too bright
- Open the settings menu on the display and adjust the screen brightness and contrast.
The screen color is abnormal
- Check whether the DP or HDMI signal cable is damaged. For example, the pins may be bent.
- Open the settings menu on the display and adjust the color temperature.
Safety information
This section contains important information about the operation of your device. It also contains information about how to use the device safely. Read this information carefully before using your device.
Electronic device
Do not use your device if using the device is prohibited. Do not use the device if doing so causes danger or interference with other electronic devices.
Interference with medical equipment
- Follow rules and regulations set forth by hospitals and health care facilities. Do not use your device where prohibited.
- Some wireless devices may čcì the performance of hearing aids or pacemakers. Consult your service provider for more information.
- Pacemaker manufacturers recommend that a minimum distance of 15 cm be maintained between a device and a pacemaker to prevent potential interference with the pacemaker. If using a pacemaker, hold the device on the side opposite the pacemaker and do not carry the device in your front pocket.
- Please consult your doctor and the device manufacturer to determine if using your device may interfere with the operation of your medical device.
Areas with flammables and explosives
- Do not use the device where flammables or explosives are stored (in a gas station, oil depot, or chemical plant, for example). Using your device in these environments increases the risk of explosion or fire. In addition, follow the instructions indicated in text or symbols.
- Do not store or transport the device in containers with flammable liquids, gases, or explosives.
Operating environment
- Avoid dusty, damp, or dirty environments. Avoid magnetic fields. Using the device in these environments may result in circuit malfunctions.
- Before connecting and disconnecting cables, stop using the device and disconnect it fromthe power supply. Ensure that your hands are dry during operation.
- During thunderstorms, power off your device and remove all cables connected to it to protect against lightning strikes.
- Do not use your device during thunderstorms to protect your device against any danger caused by lightning.
- Ideal operating temperatures are 0 °C to 35 °C. Ideal storage temperatures are -10 °C to +45 °C. Extreme heat or cold may damage your device or accessories.
To protect your device or accessories from fire or electrical shock hazards, avoid rain and moisture. - Keep the device away from sources of heat and fire, such as a heater, microwave oven, stove, water heater, radiator, or candle.
- Stop using your device or applications for a while if the device is overheated. If skin is exposed to an overheated device for an extended period, low temperature burn symptoms,such as red spots and darker pigmentation, may occur.
- Do not allow children or pets to bite or suck the device or accessories. Doing so may resultin damage or explosion.
- Observe local laws and regulations, and respect the privacy and legal rights of others.
- Do not place any object, such as a candle or a water container, on the device. If any foreign object or liquid enters the device, immediately stop using it, power it off, and remove all cables connected to it. Then, contact a Huawei authorized service center.
- Place this device in a place where it can be kept stable at all times. Otherwise, the devicemay fall over and may cause serious personal injury or death.

- Always use cabinets or brackets recommended by the manufacturer of this equipment.
- Always use furniture that securely supports the device and always ensure that the devicedoes not protrude from the edge of the supporting furniture.
- Never place the device in an unstable position, and never place it on high furniture, such as cabinets or bookcases.
- Always route the wires and cables connected to the device so that they do not trip, pull, or grab.
- Do not place fabric or other materials between this equipment and supporting furniture.
- Always make children aware of the dangers of climbing furniture to reach the device or its controls.
- Do not place objects, such as toys, that may induce children to climb on top of the deviceor on the furniture where the device is placed.
- Follow the same safety precautions if existing equipment needs to be retained and repositioned.
Child safety
- Comply with all precautions with regard to child safety. Letting children play with the device or its accessories may be dangerous. The device includes detachable parts that maypresent a choking hazard. Keep away from children.
- The device and its accessories are not intended for use by children. Children should only usethe device with adult supervision.
Accessories
- Using an unapproved or incompatible power adapter, charger or battery may cause fire, explosion or other hazards.
- Choose only accessories approved for use with this model by the device manufacturer. Theuse of any other types of accessories may void the warranty, may violate local regulations and laws, and may be dangerous. Please contact your retailer for information about the availability of approved accessories in your area.
Power adapter safety
- The power plug is intended to serve as a disconnect device.
- For pluggable devices, the socket-outlet shall be installed near the devices and shall beeasily accessible.
- Unplug the power adapter from electrical outlets and the device when not in use.
- If the power cable is damaged (for example, the cord is exposed or broken), or the plug loosens, stop using it at once. Continued use may lead to electric shocks, short circuits, orfire.
- Do not touch the power cord with wet hands or pull the power cord to disconnect the power adapter.
- Do not touch the device or the power adapter with wet hands. Doing so may lead to short circuits, malfunctions, or electric shocks.
- Ensure that the power adaptor meets the requirements of Annex Q of IEC/EN 62368-1 and has been tested and approved according to national or local standards.
Cleaning and maintenance
- Keep the device and accessories dry. Do not attempt to dry it with an external heat source, such as a microwave oven or hair dryer.
- Do not expose your device or accessories to extreme heat or cold. These environments may interfere with proper function and may lead to fire or explosion.
- Avoid collision, which may lead to device malfunctions, overheating, fire or explosion.
- Before you clean or maintain the device, stop using it, stop all applications, and disconnect all cables connected to it.
- Do not use any chemical detergent, powder, or other chemical agents (such as alcohol and benzene) to clean the device or accessories. These substances may cause damage to parts or present a fià hazard. Use a clean, soft, and dry cloth to clean the device and accessories.
- Do not dismantle or remanufacture the device and its accessories. This voids the warranty and releases the manufacturer from liability for damage. In case of damage, contact a Huawei authorized service center for assistance or repair.
- If the device screen is broken in a collision, immediately stop using the device. Do not touch or attempt to remove the broken parts. Promptly contact a Huawei authorized service center.
Disposal and recycling information

The symbol on the product, battery, literature, or packaging means that the products and batteries should be taken to separate waste collection points designated by local authorities at the end of the lifespan. This will ensure that EEE waste is recycled and treated in a manner that conserves valuable materials and protects human health and the environment.
For more information, please contact your local authorities, retailer, or household waste disposal service or visit the website https://consumer.huawei.com/en/.
Reduction of hazardous substances
This device and its electrical accessories comply with local applicable rules on the restriction of the use of certain hazardous substances in electrical and electronic equipment, such as EUREACH regulation, RoHS and Batteries (where included) directive. For declarations of conformity about
REACH and RoHS, please visit the website https://consumer.huawei.com/certification
Legal Notice
Copyright © Huawei 2022. All rights reserved.
The product described in this manual may include copyrighted software of Huawei and possible licensors. Customers shall not in any manner reproduce, distribute, modify, decompile, disassemble, decrypt, extract, reverse engineer, lease, assign, or sublicense the said software, unless such restrictions are prohibited by applicable laws or such actions are approved by respective copyright holders.
Trademarks and Permissions
The terms HDMI and HDMI High-Definition Multimedia Interface, and the HDMI Logo are trademarks or registered trademarks of HDMI Licensing Administrator, Inc. in the United States and other countries.
Other trademarks, product, service and company names mentioned may be the property of their respective owners.
Open Source Software Notice
For details about the Open Source Software Notice, please visit
https://consumer.huawei.com/en/support/content/en-us15892133/.
Notice
Some features of the product and its accessories described herein rely on the software installed, capacities and settings of local network, and therefore may not be activated or maybe limited by local network operators or network service providers.
Thus, the descriptions herein may not exactly match the product or its accessories which youpurchase.
Huawei reserves the right to change or modify any information or specifications contained inthis manual without prior notice and without any liability.
DISCLAIMER
ALL CONTENTS OF THIS MANUAL ARE PROVIDED “AS IS”. EXCEPT AS REQUIRED BY APPLICABLE LAWS, NO WARRANTIES OF ANY KIND, EITHER EXPRESS OR IMPLIED, INCLUDING BUT NOT LIMITED TO, THE IMPLIED WARRANTIES OF MERCHANTABILITY ANDFITNESS FOR A PARTICULAR PURPOSE, ARE MADE IN RELATION TO THE ACCURACY, RELIABILITY OR CONTENTS OF THIS MANUAL. TO THE MAXIMUM EXTENT PERMITTED BY APPLICABLE LAW, IN NO EVENT SHALL HUAWEIBE LIABLE FOR ANY SPECIAL, INCIDENTAL, INDIRECT, OR CONSEQUENTIAL DAMAGES, OR LOSS OF PROFITS, BUSINESS, REVENUE, DATA, GOODWILL SAVINGS OR ANTICIPATED SAVINGS REGARDLESS OF WHETHER SUCH LOSSES ARE FORESEEABLE OR NOT.
THE MAXIMUM LIABILITY (THIS LIMITATION SHALL NOT APPLY TO LIABILITY FOR PERSONAL INJURY TO THE EXTENT APPLICABLE LAW PROHIBITS SUCH A LIMITATION) OF HUAWEI ARISING FROM THE USE OF THE PRODUCT DESCRIBED IN THIS MANUAL SHALL BE LIMITED TO THE AMOUNT PAID BY CUSTOMERS FOR THE PURCHASE OF THIS PRODUCT.
Import and Export Regulations
Customers shall comply with all applicable export or import laws and regulations and be responsible to obtain all necessary governmental permits and licenses in order to export, re- export or import the product mentioned in this manual including the software and technicaldata therein.
Privacy Policy
To better understand how we protect your personal information, please see the privacy policyat https://consumer.huawei.com/privacy-policy.
For More Help
Visit https://consumer.huawei.com/en/support for the most up-to-date contact informationfor your country or region.
ALL PICTURES AND ILLUSTRATIONS IN THIS GUIDE, INCLUDING BUT NOT LIMITED TO THEDEVICE COLOR, SIZE, AND DISPLAY CONTENT, ARE FOR YOUR REFERENCE ONLY. THE ACTUAL DEVICE MAY VARY. NOTHING IN THIS GUIDE CONSTITUTES A WARRANTY OF ANYKIND, EXPRESS OR IMPLIED.