Bosch GMS 100 M Professional Metal Detector Instruction Manual


BOSCH GMS 100 M Professional Metal Detector

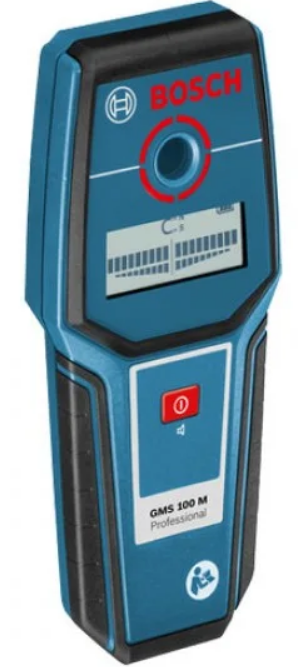
Product Features
The numbering of the product features shown refers to the illustration of the measuring tool on the graphic page.


- Illuminated ring
- Marking hole
- Display
- On/Off button
- Contact pads
- Sensor area
- Type plate
- Battery lid
- Latch of battery lid
- Fixture for carrying strap
- Carrying strap
- Protective pouch*
The accessories illustrated or described are not included as standard delivery.
Display Elements

- Switched-off audio signal indicator
- Warning-function indicator
- Indication of the object type “Non-magnetic metal”
- Indication of the object type “Magnetic metal”
- Indication of the object type “Live conductor”
- Temperature control indicator
- Battery indicator
- Main scale
- Fine scale
Technical Data
- depending on operating mode, material and size of the objects, as well Nas material and condition of the base material
- less scanning depth for wires/conductors that are not “live”
- In terms of accuracy and scanning depth, the measurement result can be inferior in case of unfavourable surface quality of the base material.
- Please observe the article number on the type plate of your measuring tool. The trade names of the individual measuring tools may vary.
Assembly
Inserting/Replacing the Battery
- Alkali-manganese batteries are recommended for the measuring tool.
- To open the battery lid 8, press the latch 9 in the direction of the arrow and fold up the battery lid. Insert the supplied battery. Pay attention that the polarity is correct, according to the representation on the inside of the battery lid.
- The battery indicator g always indicates the current battery status:
- Battery fully charged
- Battery has 2/3 of its capacity or less
- Battery has 1/3 of its capacity or less
- Please change battery
- If the measuring tool is not used for a long period of time, the battery must be removed. The battery can corrode or discharge itself over long periods.
Operation
- Protect the measuring tool against moisture and direct sun light.
- Do not subject the measuring tool to extreme temperatures or variations in temperature. In case of large variations in temperature, allow the measuring tool to adjust to the ambient temperature before switching it on. In case of extreme temperatures or variations in temperature, the accuracy of the measuring tool and the display indication can be impaired.
- Use or operation of transmitting systems, such as WLAN, UMTS, radar, transmitter masts or microwaves, in the close proximity can influence the measuring function.
Initial Operation
Switching On and Off
- Before switching the measuring tool on, make sure that the sensor area 6 is not moist. If required, dry the measuring tool using a soft cloth.
- If the measuring tool was subject to an extreme temperature change, allow it to adjust to the ambient temperature before switching on.
- To switch on the measuring tool, press the On/Off button 4.
- To switch off the measuring tool, press the On/Off button 4 again.
- When no button on the measuring tool is pressed for approx. 5 minutes and when no objects are detected, the measuring tool automatically switches off to save the battery.
Switching the Audio Signal On/Off
When the measuring tool is switched on, the audio signal can be switched on or off by pressing the On/Off button 4 for a few seconds. When the audio signal is switched off, indication a appears on the display.
Method of Operation
The measuring tool checks the base material of sensor area 6 in measurement direction z to the max. detection depth (see “Technical Data”). Objects are detected that differ from the material of the wall. Always move the measuring tool in a straight line over the surface applying slight pressure, without lifting it off or changing the pressure. During measurement, the contact pads 5 must always have contact to the surface.

Measuring Procedure
- After switching on, the illuminated ring 1 lights up green. Position the measuring tool against the surface being detected and move it toward the x- and y-axis. When the measuring tool comes closer to an object, the amplitude in the main scale h increases and ring 1 lights up yellow; when it is moved away from the object, the amplitude decreases. The main scale h indicates the maximal amplitude above the object; ring 1 lights up red and an audio signal sounds. For small or deeply embedded objects, ring 1 can continue to light up yellow, while there is no audio signal.
- Wide objects are not indicated by the illuminated ring or the audio signal throughout their complete width.
- As soon as the measuring tool has localised an object below MN the centre of the sensor, the fine scale i is activated.
- To localise the object more precisely, move the measuring tool repeatedly (3x) back and forth over the object.
- The fine scale i indicates a maximum amplitude when the object is positioned precisely below the centre of the sensor, independent thereof how many bars are displayed in the main scale h.
- When very small or deeply embedded objects are being sought and main scale h reacts only slightly, move the measuring tool repeatedly over the object in horizontal (x-axis) and vertical (y-axis) direction. Observe the amplitude of fine scale i.
- Before drilling, sawing or routing into a wall, protect yourself against hazards by using other information sources. As the measuring results can be influenced through ambient conditions or the wall material, there may be a hazard even though the indicator does not indicate an object in the sensor range (no audio signal or beep and the illuminated ring 1 lit green).
Metal
When the detected metal object is of magnetic metal (e.g. iron), the symbol d is indicated on display 3. For non-magnetic metals, the symbol c is indicated. In order to differentiate between metal types, the measuring tool must be positioned above the detected metal object (ring 1 is lit red and fine scale i indicates a high amplitude). Note: For reinforcement steel mesh and steel in the examined base material, an amplitude is indicated over the complete surface of the main scale h. For reinforcement steel mesh, it is typical that the symbol d for magnetic metal is indicated on the display directly above the iron rods, whereas between the iron rods, the symbol c for non-magnetic metal will appear.
Power Cable
When a “live” conductor is detected, indication e appears on the display 3. Move the measuring tool repeatedly over the area to localise the “live” conductor more precisely. After moving over the “live” conductor several times, it can be indicated very accurately. When the measuring tool is very close to the conductor, the illuminated ring 1 rapidly flashes red and the audio signal beeps swiftly.
Notes:
- “Live” conductors can be detected easier when power consumers (e.g. lamps, machines) are connected to the sought conductor and switched on.
- Under certain conditions (such as below metal surfaces or behind surfaces with high water content), “live” conductors cannot be securely detected. The signal strength of a “live” conductor depends on the position of the cable. Therefore, apply further measurements in close proximity or use other information sources to check if a “live” conductor exists.
- Voltage-free conductors can be detected as metal objects. This does not apply for stranded conductors (contrary to solid conductors or cable).
- Static electricity can lead to electric lines being indicated inaccurately, e.g. over a large area, or not at all. To improve the indication, place your free hand flat on the wall next to the measuring tool, in order to remove the static electricity.
Working Advice
The measuring values can be impaired through certain ambient conditions. These include, e.g. the proximity of devices that produce strong electric, magnetic or electromagnetic fields, moisture, metallic building materials, foil-laminated insulation materials or conductive wallpaper or tiles. Therefore, also observe other information sources (e.g. construction plans) before drilling, sawing or routing into walls, ceilings or floors.
Marking Objects
If required, detected objects can be marked. Perform a measurement as usual. Once you have found the boundaries or the centre of an object, mark the sought location through the marking hole 2.
Temperature Control
The measuring tool is equipped with a temperature control indicator, as accurate measurements are only possible as long as the temperature within the measuring tool remains constant. When the temperature control indicator f lights up, the measuring tool is not within the operating temperature range or was subject to large variations in temperature. Switch the measuring tool off and allow it to adjust to the ambient temperature before switching it on again.
Warning Function
When indicator b lights up on the display, the measurement must be restarted. Remove the measuring tool from the wall and place it on the base material at a different location. When indicator b flashes on display 3, send the measuring tool to an authorised customer services agent.
Recalibration
- When the main scale h indicates a continuously high amplitude, even though there is no object near the measuring tool, the measuring tool can be manually recalibrated.
- Switch the measuring tool off.
- Remove all objects near the measuring tool that could be detected, including your wrist watch or rings made of metal, and hold the measuring tool up.
- Pay attention that battery indicator g indicates at least 1/3 capacity:
- Switch the measuring tool on again. When the measuring tool starts, immediately press and hold the the On/Off button
- Hold the On/Off button until the illuminated ring 1 slowly flashes red, indicating the calibration of the measuring tool.
- When the calibration was successful, ring 1 lights up green and the measuring tool automatically ready for operation again.
- Note: If the measuring tool does not automatically start, repeat the recalibration. If the measuring tool still does not start, send it to an authorised customer services agent.
Maintenance and Service
Maintenance and Cleaning
- Check the measuring tool each time before use. In case Nof visible damage or loose components inside the measuring tool, safe function can no longer be ensured.
- Keep the measuring tool clean and dry at all times to ensure proper and safe working.
- Do not immerse the measuring tool in water or other fluids.
- Wipe away debris or contamination with a dry, soft cloth. Do not use cleaning agents or solvents.
- In order not to affect the measuring function, decals/stickers or name plates, especially metal ones, may not be attached in the sensor area 6 on the front or back side of the measuring tool.
- Do not remove the contact pads 5 on the backside of the
After-sales Service and Application Service
Our after-sales service responds to your questions concerning maintenance and repair of your product as well as spare parts. Exploded views and information on spare parts can also be found under: www.bosch-pt.com Bosch’s application service team will gladly answer questions concerning our products and their accessories. In all correspondence and spare parts orders, please always include the 10-digit article number given on the nameplate of the product.
Great Britain
- Robert Bosch Ltd. (B.S.C.)
- P.O. Box 98
- Broadwater Park
- North Orbital Road
- Denham
- Uxbridge
- UB 9 5HJ
- At www.bosch-pt.co.uk you can order spare parts or arrange the collection of a product in need of servicing or repair.
- Tel. Service: (0344) 7360109
- E-Mail: [email protected]
Ireland
- Origo Ltd.
- Unit 23 Magna Drive
- Magna Business Park
- City West
- Dublin 24
- Tel. Service: (01) 4666700
- Fax: (01) 4666888
- Australia, New Zealand and Pacific Islands
- Robert Bosch Australia Pty. Ltd.
- Power Tools
- Locked Bag 66
- Clayton South VIC 3169
- Customer Contact Center
Inside Australia:
- Phone: (01300) 307044
- Fax: (01300) 307045
- Inside New Zealand:
- Phone: (0800) 543353
- Fax: (0800) 428570
- Outside AU and NZ:
- Phone: +61 3 95415555
- www.bosch.com.au
- Republic of South Africa
Customer service
- Hotline: (011) 6519600
- Gauteng – BSC Service Centre
- 35 Roper Street, New Centre
Johannesburg
- Tel.: (011) 4939375
- Fax: (011) 4930126
- E-Mail: [email protected]
KZN – BSC Service Centre
- Unit E, Almar Centre
- 143 Crompton Street
- Pinetown
- Tel.: (031) 7012120
- Fax: (031) 7012446
- E-Mail: [email protected]
- Western Cape – BSC Service Centre
Democracy Way, Prosperity Park
- Milnerton
- Tel.: (021) 5512577
- Fax: (021) 5513223
- E-Mail: [email protected]
- Bosch Headquarters
- Midrand, Gauteng
- Tel.: (011) 6519600
- Fax: (011) 6519880
- E-Mail: [email protected]
Disposal
Measuring tools, accessories and packaging should be sorted for environmental-friendly recycling. Do not dispose of measuring tools and batteries/rechargeable batteries into household waste!
Only for EC countries:
According to the European Guideline 2012/19/EU, measuring tools that are no longer usable, and according to the European Guideline 2006/66/EC, defective or used battery packs/batteries must be collected separately and disposed of in an environmentally correct manner. Batteries no longer suitable for use can be directly returned at:
Great Britain
- Robert Bosch Ltd. (B.S.C.)
- P.O. Box 98
- Broadwater Park
- North Orbital Road
- Denham
- Uxbridge
- UB 9 5HJ
- At www.bosch-pt.co.uk you can order spare parts or arrange the collection of a product in need of servicing or repair.
- Tel. Service: (0344) 7360109
- E-Mail: [email protected]
- Subject to change without notice.