Bosch 06033D1000 EasyVac 3 All-Purpose Vacuum Cleaner Instruction Manual


BOSCH 06033D1000 EasyVac 3 All-Purpose Vacuum Cleaner

Safety Notes
Read all safety warnings and all instructions. Failure to follow the warnings and instructions may result in electric shock, fire and/or serious injury.
Save these instructions.
- This vacuum cleaner is not intended for use by children and persons with reduced physical, sensory or mental capabilities, or lack of expe-rience and knowledge. Otherwise, there is a danger of operating errors and injuries.
- Supervise children. This will ensure that children do not play with the vac-uum cleaner.
WARNING
- Do not vacuum materials that are harmful to one’s health, e. g. dust from beech or oak wood, masonry dust, asbestos. These materials are considered carcinogenic. Inform yourself about the valid regulations/laws for your country concerning the handling of materials that are hazardous to one’s health.
- Use the vacuum cleaner only when you fully understand and can perform all functions without limitation, or have received appropriate instructions. A thorough introduction reduces operating errors and injuries.
- The vacuum cleaner is suitable only for vacuuming dry materials. The penetration of liquids increases the risk of an electric shock.
- Use the socket only for the purposes specified in the operating instructions. The vacuum cleaner may only be used and stored indoors. The penetration of rain or moisture into the vacuum cleaner lid increases the risk of an electric shock.
- When operating the vacuum cleaner in damp environ-ments, use a residual current device (RCD). Using a re-sidual current device (RCD) reduces the risk of an electric shock.
- Connect the vacuum cleaner to a properly earthed mains supply. The socket outlet and the extension cable must have an operative protective conductor.
- Before each use, check the vacuum cleaner, cable and plug. Do not use the vacuum cleaner when defects are detected. Do not open the vacuum cleaner yourself and have it repaired only by qualified personnel using orig-inal spare parts. Damaged vacuum cleaner, cables and plugs increase the risk of an electric shock.
- Before maintaining or cleaning the vacuum cleaner, making any adjustments, changing accessories or plac-ing the vacuum cleaner aside, remove the plug from the socket outlet. This safety measure prevents accidental starting of the vacuum cleaner.
- Provide for good ventilation at the working place.
- Have the vacuum cleaner repaired only through quali-fied specialists and only using original spare parts. This ensures that the safety of your vacuum cleaner is maintained.
- Before restarting, check the proper condition of the vacuum hose. When doing this, leave the vacuum hose mounted to the vacuum cleaner to prevent dust from coming out. Otherwise, you could possibly inhale dust.
- Do not clean the vacuum cleaner with a water jet point-ed directly at it. The penetration of water into the vacuum cleaner lid increases the risk of an electric shock.
- Products sold in GB only: Your product is fitted with a BS 1363/A approved electric plug with internal fuse (ASTA approved to BS 1362).
If the plug is not suitable for your socket outlets, it should be cut off and an appropriate plug fitted in its place by an authorised customer service agent. The replacement plug should have the same fuse rating as the original plug. The severed plug must be disposed of to avoid a possible shock hazard and should never be inserted into a mains socket elsewhere. Products sold in AUS and NZ only: Use a residual current device (RCD) with a rated residual current of 30 mA or less.
Symbols
The following symbols could have a meaning for the use of your vacuum cleaner. Please take note of the symbols and their meaning. The correct interpretation of the symbols will help you to use the vacuum cleaner in a better and safer manner.
Product Description and Specifications
Intended Use
The vacuum cleaner is intended for vacuuming dry materials that are not harmful to one’s health, and it is especially suita-ble for vacuuming dust and chips on power tools. The vacuum cleaner is intended only for private use and not for professional use. Use the vacuum cleaner only when you fully understand and can perform all functions without limitation, or have received appropriate instructions.
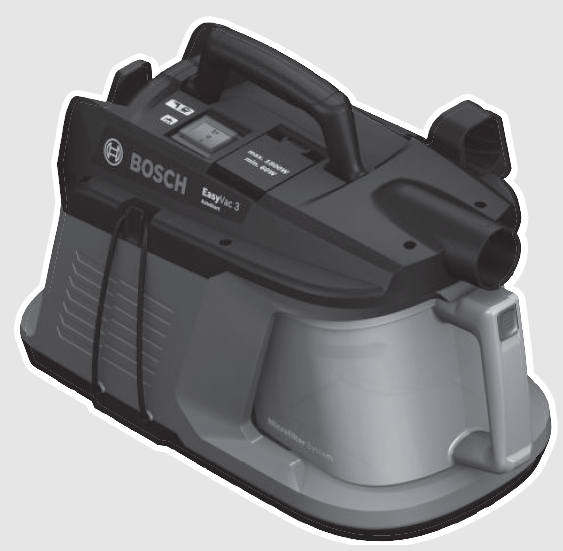
Product Features
The numbering of the product features refers to the illustra-tion of the vacuum cleaner on the graphics page.
- Vacuum-hose holder
- Mode selector switch
- Cable holder
- Socket for power tool
- Carrying handle
- Holder for crevice nozzle/floor nozzle 7 Hose connection piece
- Release button for dust cup
- Dust cup
- Vacuum hose
- Curved nozzle*
- Extraction adapter
- Crevice nozzle
- Floor nozzle
- snap-fastener
- Connection flange
- Lid of the dust cup
- Dust bag
- Dust bag holder
- Air diffuser
- Fabric filter
- Flat-pleated filter
- Exhaust air cover
- Permanent filter
*Accessories shown or described are not part of the standard de-livery scope of the product. A complete overview of accessories can be found in our accessories program.
Technical Data
| Dry vacuum cleaner | EasyVac 3 | |
| Article number | 0 603 3D1 0.. | |
| Rated voltage | V | 220–240 |
| Rated power input | W | 700 |
| Frequency | Hz | 50/60 |
| Container volume (gross) | l | 2.1 |
| Vacuum (turbine), max. | mbar | 240 |
| Airflow (turbine), max. | l/s | 35 |
| Weight according to EPTA- Procedure 01:2014 |
kg |
4.3 |
| Protection class | /I |
The values given are valid for nominal voltages [U] of 230 V. For lower voltage and models for specific countries, these values can vary.
Noise/Vibration Information
Sound emission values determined according to EN 60335-2-69. Typically the A-weighted sound pressure level of the vacuum cleaner is 73 dB(A). Uncertainty K=3 dB. The noise level when working can exceed 80 dB(A). Wear hearing protection! Vibration total values ah (triax vector sum) and uncertainty K determined according to EN 60335-2-69: ah < 2.5 m/s2, K = 1.5 m/s2.
Assembly


Before any work on the vacuum cleaner itself, pull the mains plug.
- Insert the vacuum hose 10 into the hose connection piece 7 and turn it all the way in clockwise direction.
- Mounting VAC Accessories The vacuum hose 10 is equipped with a clip system, with which the VAC accessories (extraction adapter 12, curved nozzle 11) can be connected.
Fitting the extraction adapter or curved nozzle (see figure B):
- Fit the extraction adapter 12 or the curved nozzle 11 to the vacuum hose 10 until the two snap fasteners 15 of the vac-uum hose click into place.
- To disassemble, press both snap-fasteners 15 inward and pull the components apart.
Mounting the suction nozzles
- Then attach the required vacuuming accessory (floor nozzle, crevice nozzle, etc.) firmly to the curved nozzle 11 or the extraction adapter 12.
Replacing/Inserting the Dust Bag (see figures C1 – C4)
For vacuuming fine dust, which is generated when working with sanders, drills or fine saw blades, you should use a dust bag (accessory). This makes the dust easier to dispose of. Chips, which are generated when working with larger saws, or coarser dirt can be vacuumed without using a dust bag. When doing so, you should clean the fabric filter 21 occasionally (see “Cleaning the Filter Assembly”, page 13).
Replacing/Inserting the Dust Bag (Accessory)
- Press the release button 8 and pull the dust cup 9 out of the vacuum cleaner.
- Grip the lid 17 at the connection flange 16 and remove the lid from the dust cup.
- Turn the lid 17 over.
- Put the dust bag 18 over the connection flange 16 of the vacuum cleaner and turn the cardboard flaps under the dust bag holder 19.
- Press the lid 17 back onto the dust cup 9 and then slide the dust cup back into the vacuum cleaner until it clicks into place.
- To remove a full dust bag 18, twist it off the connection flange 16 in a downward direction – without turning the lid 17 over.
Operation
Before any work on the vacuum cleaner itself, pull the mains plug.
Starting Operation
- Observe correct mains voltage! The voltage of the pow-er source must agree with the voltage specified on the nameplate of the vacuum cleaner. Equipment marked with 230 V can also be operated with 220 V.
- Only use an undamaged filter (no cracks, small holes, etc.). Replace a damaged filter immediately.
To save energy, only switch the vacuum cleaner on when us-ing it. To ensure optimal vacuuming performance, always complete-ly unwind the vacuum hose 10 from the vacuum cleaner lid .
Vacuuming of deposited dust
- To switch on the vacuum cleaner, set the mode selector switch 2 to the “Vacuuming” symbol.
- To switch off the vacuum cleaner, set the mode selector switch 2 to the “Off” symbol.
Extraction of dust resulting from running power tools (see figure D) A socket outlet with earthing contact 4 is integrated in the vacuum cleaner. An external power tool can be connected there. Observe the maximal allowable load of the connected power tool.
- Fit the extraction adapter 12 (see “Fitting the extraction adapter or curved nozzle”, page 12).
- Insert the extraction adapter 12 into the dust extraction outlet for the power tool.
Note: When working with power tools that have a low air feed into the vacuum hose (e.g. jigsaws, sanders, etc.), the air dif-fuser 20 of the vacuum hose 10 must be opened. This will im-prove the total output of the vacuum cleaner and the power tool.
To do so, turn the ring above the air diffuser 20 until the max-imum opening is produced.
- To activate the automatic start/stop of the vacuum cleaner, set the mode selector switch 2 to the “Automatic Start/Stop” symbol.
- To start the operation of the vac, switch on the power tool connected to the socket 4. The vacuum cleaner starts au-tomatically.
- Switch the power tool off to end the vacuuming. The delayed action shutdown of the Automatic Start/Stop continues to run for up to 6 seconds in order to extract re-sidual dust from the vacuum hose.
- To switch off the vacuum cleaner, set the mode selector switch 2 to the “Off” symbol.
Maintenance and Service
Maintenance and Cleaning
- Before any work on the vacuum cleaner itself, pull the mains plug.
- For safe and proper working, always keep the vacuum cleaner and ventilation slots clean.
If the replacement of the supply cord is necessary, this has to be done by Bosch or an authorized Bosch service agent in or-der to avoid a safety hazard.
Cleaning the Filter Assembly (see figures E1–E3)
- Press the release button 8 and pull the dust cup 9 out of the vacuum cleaner.
- Remove the fabric filter 21 along with its filter basket and brush down the fabric filter with a soft brush.
- Grasp the flat-fold filter 22 by the bars and remove it to-gether with its filter basket. Brush down the flat-fold filter using a soft brush or rinse it out under running water and leave it to dry thoroughly.
- Re-insert the cleaned filters, ensuring that they are seated correctly and securely.
Cleaning the Dust Cup
- Wipe the dust cup 9 from time to time using conventional, non-abrasive detergent and then leave it to dry thoroughly.
Cleaning the permanent filter (see figure F)
Clean the permanent filter 24 from time to time in order to en-sure that the vacuum cleaner continues to perform optimally.
- Open the exhaust air cover 23 and remove the permanent filter 24.
- Rinse out the permanent filter 24 under running water and then leave it to dry thoroughly.
- Re-insert the cleaned filter, ensuring that it is seated cor-rectly and securely. Close the exhaust air cover again.
Malfunctions
In the case of insufficient vacuuming performance, check the following:
- Is the hose system clogged?
- Are the filters clogged with dust?
- Is the dust cup 9 full?
- Is the dust bag 18 full?
The vacuum cleaner switches off on overheating. Proceed as follows:
- Leave the vacuum cleaner to cool down for 60 min.
- Briefly remove the mains plug from the socket and then re-insert it.
- Make sure that the container 9 and dust bag 18 are empty and that the vacuum hose 10, filter 21/22 and permanent filter 24 are not blocked.
Emptying at regular intervals ensures optimum vacuuming performance. If the vacuuming performance is not achieved thereafter, take the vacuum cleaner to customer service.
Storage (see figure G)
- Open the elastic bands of the vacuum-hose holder 1 and wrap the vacuum hose 10 around the vacuum cleaner. Hook the elastic bands back in.
- Put the vacuuming accessories in the bracket 6 provided for this purpose on the vacuum cleaner.
- Wind the mains cable around the cable holder 3.
- Carry the vacuum cleaner only by the carrying handle 5.
After-sales Service and Application Service
Our after-sales service responds to your questions concern-ing maintenance and repair of your product as well as spare parts. Exploded views and information on spare parts can al-so be found under: www.bosch-pt.com Bosch’s application service team will gladly answer questions concerning our products and their accessories. In all correspondence and spare parts orders, please always include the 10-digit article number given on the nameplate of the product.
Great Britain
Robert Bosch Ltd. (B.S.C.) P.O. Box 98 Broadwater Park North Orbital Road Denham Uxbridge UB 9 5HJ
At www.bosch-pt.co.uk you can order spare parts or arrange the collection of a product in need of servicing or repair. Tel. Service: (0344) 7360109
E-Mail:
Ireland
Origo Ltd. Unit 23 Magna Drive Magna Business Park City West Dublin 24
Tel. Service: (01) 4666700
Fax: (01) 4666888
Australia, New Zealand and Pacific Islands
Robert Bosch Australia Pty. Ltd. Power Tools Locked Bag 66 Clayton South VIC 3169 Customer Contact Center
Inside Australia:
Phone: (01300) 307044
Fax: (01300) 307045
Inside New Zealand:
Phone: (0800) 543353
Fax: (0800) 428570
Outside AU and NZ:
Phone: +61 3 95415555
www.bosch.com.au
Republic of South Africa Customer service
Hotline: (011) 6519600
Gauteng – BSC Service Centre
35 Roper Street, New Centre Johannesburg
Tel.: (011) 4939375
Fax: (011) 4930126
E-Mail:
KZN – BSC Service Centre
Unit E, Almar Centre 143 Crompton Street Pinetown
Tel.: (031) 7012120
Fax: (031) 7012446
E-Mail:
Western Cape – BSC Service Centre Democracy Way, Prosperity Park Milnerton
Tel.: (021) 5512577
Fax: (021) 5513223
E-Mail:
Bosch Headquarters Midrand, Gauteng
Tel.: (011) 6519600
Fax: (011) 6519880
E-Mail:
Disposal
The vacuum cleaner, accessories and packaging should be sorted for environmental-friendly recycling. Do not dispose of the vacuum cleaner into household waste!
Only for EC countries:
According to the European Directive 2012/19/EU on Waste Electrical and Elec-tronic Equipment and its implementation in-to national law, vacuum cleaners that are no longer usable must be collected separately and disposed of in an environmentally friendly manner.