Acer one 8 T2 8 inch Android Tablet User Guide
acer one 8 T2 8 inch AndroidTablet User Guide

(!) Important This manual contains proprietary information that is protected by copyright laws. The information contained in this manual is subject to change without notice. Images provided herein are for reference only and may contain information or features that do not apply to your computer. Acer Group shall not be liable for technical or editorial errors or omissions contained in this manual.
Acer one 8 T2 Information
AAdapter Information
Input: AC 100-240V, 50/60Hz, 0.35A
Output: 5V 1.5A
Model: Acer one 8 T2
Processor: MT8765V/WA 1.5GHZ
Operating System: Android 10.0
RAM: 2GB DDR3
Storage: 32GB, support Micro SD up to 64 GB
Screen: 8.0 inch 1280 X 800
Display: IPS Screen and 10 points touch screen
Music: MP3, AAC, WAV, OGG, etc
Video: MP4, OGM, 3GP, AVI. Etc
Picture: JPG, JPEG, PNG, etc.
Battery: 4000mAh, 3.7V
Adapter: DC 5V, 1.5A
Camera: Front 0.3 MP, Rear 2.0 MP
Wi-Fi: IEEE 802.11 a/b/g/n, 2.4Ghz
Bluetooth: BT 4.0
Others: GPS, FM
Ports: Micro TF/SDHC, Micro USB, 3.5mm Headphone
Dimensions: L208.4mm x W124.5mm x H9.65mm
Weight: 326g (tablet only
Specifications and this manual are subject to change without prior notice. Conforms to AEEE directive.
This product complies with the European CE Directives 2014/53 / EU(Electromagnetic Compatibility Directive).
This device complies with the Directive on Control of Waste Electrical and Electronic Equipment. Google, Android, Google Play and other brands Google Inc. is the trademark of the foundation.
Simplified Compliance Statement Acer declares that the radio equipment type plate is in compliance with the directive 2014/53 /EU. The full text of the EU declaration of conformity is available on the Internet at:
General View
In this user manual, the specifications given in the visuals and the parts indicated in the box contents may differ according to the model. The images are representative
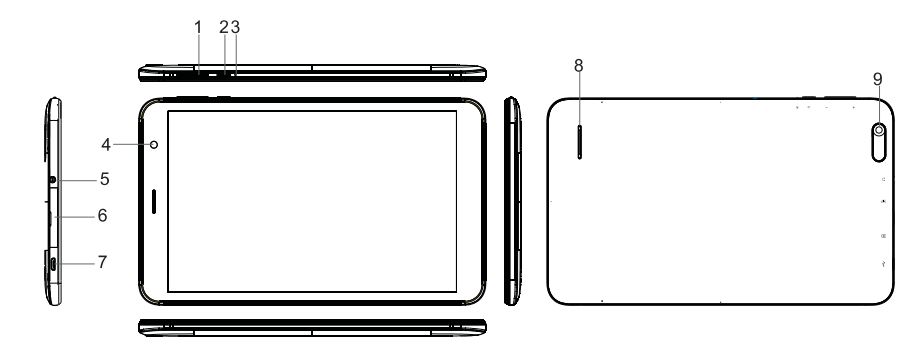

- Volume +/ Volume
- Power button
- RESET
- Front Camera
- Headphone
- Micro SD&SIM Card
- Micro USB
- Speaker
- Rear Camera
Troubleshooting
If you detect an unusual condition on your device, you can try to solve the problem in the description of the table.

Home Page
Main interface as below picture 2.2-1, long press the blank and it will popup windows to set wallpaper, folder, widgets, and shortcut.

Disposal of your device in an environmentally friendly manner This symbol on the product or on its packaging indicates that the product must not be treated as household waste. Instead of and delivered to the current collection point which recycles electronic equipment. This product is correct, you will be able to prevent the potential negative consequences of environment and human health arising from waste treatment of the product. Recycling of materials will help to conserve natural resources. For more information about recycling this product, please contact your local municipality, the household waste disposal service or the shop where you purchased the product. Suggestions for Energy Saving When you do not use it, turn off the device like wi-fi, blue tooth. If necessary, disable unnecessary sounds such as application notification and key sound. Depending on what you need, reducing the brightness and volume will enable you to use energy efficiently. Proper Battery Disposal(For countries with separate collection systems) The marking on the battery, the guide and the luggage compartment indicate that this pile of battery should not be disposed with other household waste. Hg, Cd or Pb chemical symbols indicate that the battery contains mercury, cadmium or lead above the reference values specified in EC Directive 2006/66. The battery supplied with this product can not be changed by the user. For detailed information on replacement, please contact your service provider. Do not try to remove the battery or throw it into the fire. Do not disassemble, crush or punch. If you intend to dispose of the product, necessary measures will be taken in the field of waste
Quick Start Guide
Keys Function
Keys Function Description

USB Connection
MID storage configuration Before transmitting documents, you have to conduct storage configuration for your MID:
- Connect the MID and computer by USB cable, the reminder column will show the remind information.
- Open the reminder board; please view the MID status and reminder to learn how to open the board.
- In the reminder board, click the “USB for file transfer”, it will as below Picture 2.3-1, then click “File transfers”.
- Now the USB is connected successfully.

Copy the document into memory card
- Connect the MID to computer with USB cable.
- As MID storage configuration, it is connected with computer successfully.
- Open the “My computer” in your computer, check the items in “MTP devices”.
- Copy the documents you need into “MTP devices”.
- After copying finishes, unplug the USB can.
Quick Setting
Swipe-down gesture from the top of the screen, there are nine shortcuts icons, such as Wi-Fi, Bluetooth, Auto-rotate, and so on. In the full Quick Settings list you can also tap the edit button at the bottom right to rearrange the tiles or replace them with others, as Picture 2.4-1. The optional extras list is pretty minimal: Just Hotspot, Data saver and Invert colors. But dabble to create custom Quick Settings tiles for their apps, which will definitely make things a lot more interesting in the coming mouths.

Swipe-down gesture from the top of the screen, Long press push message to see a switch, operate it to open and close the future of this app so all notifications as Picture

Basic Setting
Network and Internet
Reset Wi-Fi Bluetooth
Click icon in right top of Picture , select Reset Wi-Fi Bluetooth

Bluetooth
Bluetooth function operation
- Click setting application in main menu interface
- Click Bluetooth and open it.
- If somebody open Bluetooth in your surroundings, click search device in right above, then MID will automatically search the Bluetooth device nearby.
- Click the available Bluetooth device, it will popup request window, enter into related password, and match the device to connect.
- After match successfully, choose the operation you want to, click

Apps & notification
APPS Click setting application in Apps.2.Select application, after enter, you can manage and delete installed application.

Notification
Open settings; click Notification

Important You should only remove programs if you are familiar with the Android operating system.
Storage

Open setting function; click Storage
Internal storage Internal storage is MID local NAND storage, as Picture 3.4-2, if you need to check the storage content, you can check it in main menu.

SD card
Click SD card to check the storage content

Safely remove or format SD card
- Click
- Click Settings
- After the above two steps you can choose what you want to do, remove or format TF card
Note: Removing TF card safely can protect TF card and increase its lifetime.
Security & location
Lock the touch screen by unlock icon or password to protect your MID. Note: After setting screen locked, you should enter the pass code each time when you start-up or screen is locked
Set unlocked picture
- Click setting application in main interface.
- Click security.
- Click screen lock.
- Choose pattern in text setting area.
- Click next following the remind message.
- The unlocked pattern board pop up, there are nine touch spots, connect 4 points from vertical, horizontal or diagonal direction. move your finger from the screen when finish. T he system will record yours new unlock pattern.
Click continue.
When you see the reminder, enter the unlock pattern, then click confirm. Set unlock PIN code
- Click setting application in main interface.
- Click security.
- Click screen lock.
- Choose PIN in text setting area.
- Enter new PIN code(numbers) and click continue.
- Enter new PIN code again and click confirm.
Set unlock password
- Click setting application in main interface.
- Click safe.
- Click screen locked.
- Set password in text setting area.
- Set new password(letters and numbers) and then click continue.
- Enter the password again and the click confirm.
Location service
Click setting, select Location
System Language and Input Method

Click setting, select language and input method, choose language , then click Add language, select the language you want to add from the language list, as Picture 3.6-1.B ack to language preferences page , you can drag the language you want to set to the first to switch language.


Multi-Media
Music
Enter into music player: in menu or desktop click music

Important
Back up your contacts before making any changes. Tap the Menu button and select Import/Export. You may then Export your contact list to your tablet’s internal memory, or other options depending on installed applications.
Photo Gallery
Photo gallery application can auto search photos and video files in SD card, and photo gallery will classify these photos and videos in folder. You can apply photo gallery to view and edit photos, set the photos as wallpaper and watch the video.
View pictures
- Click gallery application in main interface.
- Enter into gallery, click the folder you want to view.
- Click the picture you want to view, the system will play it in full screen mode automatically.
- The pictures can be zoom in and zoom out, put two fingers on the screen, the separate the fingers (gather up the fingers,
the picture will be zoom in) or double click the screen.
Note: when you browse the pictures, slide left or right to view more pictures.
Edit and set pictures
When check the pictures in full screen mode, click menu key to display menu selection, you can choose the selection you need to edit and setting pictures.
Slide Show
- Open a picture, use virtual key to click menu key, display menu selection.
- Click slide show, it will auto loop play
Crop
- Click menu key to display menu selection.
- Then click crop, click and drag related area to adjust the cropper.
- Click cropper and drag it inside and outside to adjust the image.
- After adjust the size you want, click crop.
- If you wish to give up to crop, click cancel to return to picture browse.
Edit
- Click menu key, display the menu selection.
- Click edit.
- Adjust the brightness, style, color, ant alias setting in selection.
- Click save.
- If you want to give up edit, click return key, click not to return to picture browse.
Camera
In the main interface or desktop, click camera application procedure

Installation of Procedures
Installation
Install the third party application procedure
- Click “file manager” application procedure; choose the application procedure you need to install.
- Hold the application procedure you need to install.
- It popup install, click install apk.
- Finish the installation as guide, it will operate.
Note: T he third party procedure searched from internet to use on the system are all suffixed with .apk.
Important
Some applications may require payment before you can download them. You will need to have a Google Wallet account in order to pay for these applications.
Uninstall
Uninstall application procedure
- Click setting icon in main interface.
- Click apps, list all the application procedures installed in the system.
- Click the APK you want to uninstall, click uninstall.
- Click confirm to finish uninstallation.
GOING ONLINE
Managing Wi-Fi connections If you did not connect to a Wi-Fi network when you first started your tablet, or want to connect to a new network, tap APPS >Settings > Wi-Fi to manage your connection settings. If Wi-Fi is not on, tap the Wi-Fi ON switch and wait for your tablet to detect nearby networks. Tap the name of your network and enter security password, if needed. Alternatively, open Quick Settings by swiping down from the top-right of the screen and tap the Wi-Fi button to toggle on and off the Wi-Fi connection. Browsing the internet In order to browse the internet with your tablet, you must be connected to a network with a connection to the internet.
Using the browser
To start browsing, tap the Chrome icon on the Home screen, or tap APPS and then Chrome. To enter a website address, tap the address box at the top of the page. Enter the address using the keyboard and tap Go. To navigate forward and backward in your browser history, tap the forward and backward arrows next to the search bar. To refresh the webpage tap the refresh icon between the search bar and browser history arrows. To view your bookmarks, adjust browser settings, and perform other tasks, tap the Menu icon.
Chrome enables you to open multiple tabs. When a page is open, tap the small New tab button. Simply tap one of the open tabs across the top of the screen to switch pages.

Pinch to zoom in or out of pages. Tap and hold an item on a page to open a contextual menu.

Setting up the Email application
The Email application enables you to access email from most popular providers. Most accounts can be set up in two steps. Tap APPS and then tap Email to start setting up your email access. Enter your email address and password tap Manual setup to enter the parameters manually or simply tap Next to finish the setup process. The combined inbox feature of your tablet allows you to view emails from multiple accounts in a single inbox.
Google services
Note Applications may not be available in all countries and regions. You must activate a Google account before using Google services. The first time you access Google services, you must read and accept the Terms of Service. The contents and design of Google Play vary by region. For example, in some regions, you can also browse for and purchase movies, books, magazines, or music. Updates may add new categories or change how to navigate Google Play at any time.
Setting up your Google email
- Make sure your tablet is connected to the internet.
- Tap APPS and then Gmail .
If you did not enter a Gmail account address and password when you first started your tablet, follow the instructions.
Composing an email
- Make sure your tablet is connected to the internet.
- Tap APPS and then Gmail .
- Tap .
- Enter the recipient’s email address, the subject and message.
- When you are finished composing your message, tap
Voice Search
Note Voice Search is available only in selected regions.
With voice actions, you can send emails, find directions to locations, search the internet and even send a note to yourself using your voice. In Chrome, tap the microphone icon in the address bar for voice searches. When the Speak now prompt displays, state your command or query then press the red microphone button. Your command displays in the search box. Tap Go on the keyboard to complete the command or query.

Play Store
Tap Play Store from the home screen or APPS menu to open Google Play. Here you can obtain a variety of add-on programs and applications to enhance the functionality of your tablet. You can browse Google Play by category or tap the search icon to search for a specific application.

For the best user experience, you are advised to not download apps that use 3D graphics. Once you have selected an application, tap the Install button to download and install the application. You will be told which services (contact information, wireless access, GPS, etc.) the application requires access in order to function correctly. If none of these services seem unusual, tap Accept & download to proceed with the installation. You may keep track of the download progress from both the app’s page and the device’s notification area.

Important
Some applications may require payment before you can download them. You will need to have a Google Wallet account in order to pay for these applications.
Using downloaded applications
Once you’ve downloaded and installed an application, you may find it in the APPS or WIDGETS menus. Certain applications provide both an app and widget, or only provide a widget (with no application icon). See Personalizing the Home screen on page 15.
Uninstalling downloaded applications
Once you’ve downloaded and installed an application, you may uninstall the application from APPS > Settings > Apps , then select the app you wish to uninstall and tap Uninstall . Deleting an app icon from the Home screen only deletes the shortcut.
Note Pre-installed apps cannot be uninstalled.
Important
This will erase all your personal information, any contacts stored on your tablet and any programs you installed.
WARRANTY CONDITI NS
OPERATING MANAGEMENT: Your product is guaranteed2 years. To request support. contact the customer service at 0811 482 202. You within be asked the detective part and the original invoice stating the product regulator. We may ask you for photos of your appliance.
FAILURE TO PACKING:
It it appeared, after unpacking the product or device vice preventing the use of the product in its expected configuration, contact the customer service with in 72 hours worked. D IS C L A IME R O F WA R R A NT Y D IS C L A IME R O F WA R R A NT Y R E L AT E D T O T HE O R IG IN O F D A MA G E S T he guarantee does not apply in case of accidental physical damage, it does not cover such damage and failures that resulted:
- improper installation (of a bad installation) or a mis us e or poor maintenance of the product.
- improper us e of the material or not complying with the ins tructionsin the user manual.
- lightning, flood, fire, power s urge, s hock, poor ventilation, a fall, dis coloration due to the action of light, burning,
humidity, excessive heating without humidifier, or irregular ground or insects . - repairs made and /or working on the hardware and /or opening of it by an unauthorized peers on by the manufacturer.
- maintenance, repair or replacement of parts due to normal usury or failure to maintain.
- modification of the construction and original features of the guaranteed product.
- corrosion, oxidation, a bad connection nor an external power supply problem. E X C L US IO N O F WA R R A NT IE S R E L AT ING T O T HE NAT UR E O F D A MA G E S (IND IR E C T S D A MA G E S ) T he guarantee covers only the right to repair or replace the guaranteed product. C consequently, the indirect damage resulting from the failure or damage not covered by warranty, including:
- Commas sioningcos ts , adjusting, cleaning;
- Damage of any kind resulting from the unavailability of the product guaranteed during the period between deterioration and failure and repair or the replacement of the product guaranteed.
OTHE REXCLUSIONS
- Damage and faults under specificexclus ions in the warranty manufacture guaranteed product, as mentioned in the product instructions for us e;
- The aesthetic damage;
- The products guarantee that the customer is not able to return or those who returned without their accessories .
PIXEL POLICY
In accordance with the IS O 13406-2 norm, a product is considered defective when the number of dead or lit pixels is over 3.
Declaration of conformity EU
Market Maker Brand Licensing, hereby declares that this equipment, conforms to the essential requirements and other relevant provisions of Directive 2014/53/UE .T he declaration of Conformity can be viewed at the following address :
This device complies with part 15 of the FCC Rules. Operation is subject to the condition that (1) this device may not cause harmful interference, and (2) this device must accept any interference received, including interference that may cause undesired operation. Changes or modifications not expressly approved by the party responsible for compliance could void the user’s authority to operate the equipment. Changes or modifications not expressly approved by the party responsible for compliance could void the user’s authority to operate the equipment.
NOTE: This equipment has been tested and found to comply with the limits for a Class B digital device, pursuant to Part 15 of the FCC Rules. These limits are designed to provide reasonable protection against harmful interference in a residential installation. This equipment generates, uses and can radiate radio frequency energy and, if not installed and used in accordance with the instructions, may cause harmful interference to radio communications. However, there is no guarantee that interference will not occur in a particular installation. If this equipment does cause harmful interference to radio or television reception, which can be determined by turning the equipment off and on, the user is encouraged to try to correct the interference by one or more of the following measures:
— Reorient or relocate the receiving antenna.
— Increase the separation between the equipment and receiver.
— Connect the equipment into an outlet on a circuit different from that to which the receiver is connected.
— Consult the dealer or an experienced radio/TV technician for help. The device has been evaluated to meet general RF exposure requirement. The device can be used in portable exposure condition without restriction.
Specific absorption rate (SAR): This Tablet meets the government’s requirements for exposure to radio waves. The guidelines are based on standards developed by independent scientific organizations through periodic and thorough evaluation of scientific studies. The standards include a margin of safety designed to ensure the safety of all people regardless of their age or health. The FCC Statement of Exposure to RF and the SAR limit for the United States (FCC) is 1.6 W/kg average for each gram of tissue. This device was tested for typical operations of use on the body, with the back of the phone at 0mm from the body. To maintain compliance with FCC RF exposure requirements, use accessories that maintain a distance of 0mm between the user’s body and the back of the phone. The use of belt clips, covers and similar accessories must not contain metallic components in their assembly. The use of accessories that do not meet these requirements may not meet FCC RF exposure requirements and should be avoided. Functioning in the body This device was tested for typical operations of use in the body. To comply with RF exposure requirements, a minimum separation distance of 0mm must be maintained between the user’s body and the telephone, including the antenna. Third-party accessories such as belt clips. covers and similar accessories used with this device should not contain metallic components, accessories that do not meet these RF exposure requirements and should be avoided from use on the body. Use only the supplied antenna or an approved antenna.
http://www.mms-support.net/OTA/ECD_MMBL_BDL1064PR001.pdf Google, Android, Google P lay and other marks are trademarks of Google L L C ; Oreo is a trademark of Mondelez International, Inc. group.
Manufacturer’s Name: Acer Incorporated Address: 8F, 88, Sec. 1, Hsin Tai Wu Rd, Hsichih, Taipei Hsien, Taiwan This device was tested for typical body operations. To comply with RF exposure requirements, a minimum separation distance of 5mm must be maintained between the user’s body and the Smart Phone, including the antenna. Third-party belt-clips, holsters, and similar accessories used by this device should not contain any metallic components. Body operations that do not meet these requirements may not comply with RF exposure requirements and should be avoided. Use only the supplied or an approved antenna. This device in compliance with the essential requirements and other relevant provisions of Directive 2014/53/EU. All essential radio test suites have been carried out.
- Use careful with the earphone maybe possible excessive sound pressure from earphones and headphones can cause hearing loss.
- CAUTION : RISK OF EXPLOSION IF BATTERY IS REPLACED BY AN INCORRECT TYPE. DISPOSE OF USED BATTERIES ACCORDING TO THE INSTRUCTIONS
- The product shall only be connected to a USB interface of version USB 2.0
- Adapter shall be installed near the equipment and shall be easily accessible.
- The plug considered as disconnect device of adapter
- The device complies with RF specifications when the device used at 5mm form your body(SAR limit 2.0 W/Kg for 10-g).
- Operating Temperature: -10° C to +40° C

RF Specification:


EU Declaration of Conformity
We,
Acer Incorporated (8F, 88, Sec. 1, Hsin Tai Wu Rd, Hsichih,Taipei Hsien,Taiwan) hereby declares that this Tablet is in compliance with the essential requirements and other relevant provisions of Directive 2014/53/EU.
According to Article 10(2) of Directive 2014/53/EU, the Acer one 8 T2 can be used in Europe but with restriction.