Bosch GAS 18V-10 L Professional Cordless Dust Extractor Instruction Manual

HEAVY-DUTY


Safety information for vacuum cleaners

- This vacuum cleaner is not intended for use by children or persons with physical, sensory or mental impairments. It should not be used by persons who have insufficient
experience and knowledge.
Otherwise, there is a risk of operating errors and injuries.
- Supervise children. This will ensure that children do not play with the vacuum cleaner.
Do not vacuum beech or oak wood dust or asbestos. Only vacuum rock dust in conjunction with dust extraction systems has been explicitly approved for use with GAS 18V-10L by Bosch. These substances are classified as carcinogenic.

If you notice a foam or water leak, switch off the vacuum cleaner im- mediately and empty the container. Otherwise, the vacuum cleaner can become damaged.
NOTE: The vacuum cleaner must only be stored indoors.
NOTE: Clean the float regularly and check whether it is damaged. Otherwise, the equipment may not function properly.
Ensure that the workplace is well ventilated.
The vacuum cleaner should be repaired exclusively by a qualified professional using only genuine spare parts. This will ensure that the safety of the vacuum cleaner is maintained.
- Before using the equipment for the first time, check that the vacuum hose is in perfect condition. Leave the vacuum hose fitted to the vacuum cleaner while doing this so that no dust escapes accidentally. Otherwise, you may end up inhaling dust particles.
- Do not clean the vacuum cleaner by spraying a jet of water directly at it. Water entering the top of the vacuum cleaner will increase the risk of electric shock.
- In case of damage and improper use of the battery, vapors may be emitted. The battery can set alight or explode. Ensure the area is well ventilated and seek medical attention should you experience any adverse effects. The vapors may irritate the respiratory system.
- If used incorrectly or if the battery is damaged, flammable liquid may be ejected from the battery. Contact with this liquid should be avoided. If contact accidentally occurs, rinse off with water. If the liquid comes into contact with your eyes, seek additional medical attention. Liquid ejected from the battery may cause irritation or burns.
- The battery can be damaged by pointed objects such as nails or screwdrivers or by force applied externally. An internal short circuit may occur, causing the battery to burn, smoke, explode or overheat.
- When the battery is not in use, keep it away from paper clips, coins, keys, nails, screws, or other small metal objects that could make a connection from one terminal to another. A short circuit between the battery terminals may cause burns or a fire.
- Do not open the battery. There is a risk of short-circuiting.
- Only use the battery with products from the manufacturer. This is the only way in which you can protect the battery against dangerous overload.
- Do not work with the dust extractor if you are carrying it by the strap.
- Use the carrying strap only in conjunction with the dust extractor.


Symbols
The following symbols may provide you with important information pertaining to the use of your dust extractor. Please take note of these symbols and their meaning. Correctly interpreting the symbols will help you to operate the dust extractor more effectively and safely.
Symbols and their meaning
| WARNING! Read all the safety and general instructions. Failure to observe the safety information and follow instructions may result in electric shock, fire, and/or serious injury. | |
| Dust extractor from dust class L in accordance with IEC/EN 60335-2-69 for the dry extraction of harmful dust with an exposure limit > 1 mg/m 3 | |
| WARNING! The dust extractor contains dust particles that pose a risk to health. Emptying and maintenance procedures, including the disposal of dust containers, should only be carried out by professionals. Suitable protective equipment is required. Do not operate the dust extractor without the complete filter system. Otherwise, you are putting your health at risk. |


Product Description and Specifications
Intended Use
The tool is intended for collecting, vacuuming, conveying, and separating non-flammable dry dust types, non-flammable liquids, and a mixture of water and air. The dust extraction capability of the dust extractor has been tested and corresponds to dust class L. It is suitable for the increased demands in professional use, e.g. in trade, industry, and workshops.
Dust extractors from dust class L in accordance with IEC/ EN 60335-2-69 may only be used to vacuum and extract harmful dust with an exposure limit of > 1 mg/m³.
Only use the dust extractor if you can fully evaluate all functions and carry them out without restrictions, or if you have received corresponding instructions.
Rotational Airflow
The bagless filter system removes the need to use dust bags.
Dirt is collected on the inside wall of the container.
Product Features
The numbering of the components shown refers to the diagram of the dust extractor on the graphics page.
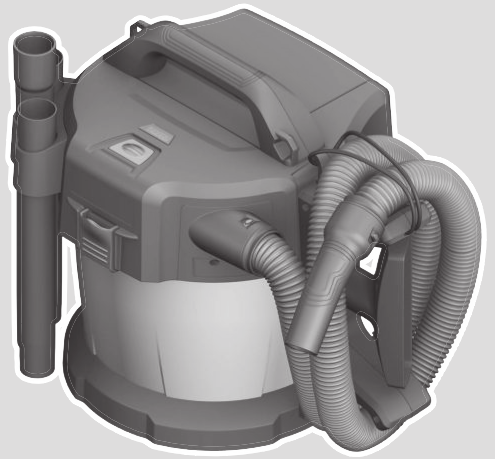
| (1) Container (2) Catch the top part of the dust extractor (3) On/off button (4) Battery charge indicator (5) Top part of dust extractor (6) Carrying handle (7) Adapter for vacuum hose/floor nozzle bracket (8) Hose adapter (9) Fastening eyes (10) Adapter for suction tube/crevice nozzle bracket (11) Battery compartment cover release button (12) Battery compartment cover (13) Vacuum hose (14) Dust extraction adapter (15) Curved nozzle (16) Crevice nozzle (17) Floor nozzle |
(18) Suction tube (19) Battery bay (20) Battery A) (21) Battery release button (22) Bracket for suction tube and crevice nozzle (23) Bracket for vacuum hose and floor nozzle (24) Fixing bolt for the bracket (23) (25) Snap fastener (26) False air intake (27) Filter (28) Filter holder (29) Retaining strap of the vacuum hose (30) Carrying strap A) (31) Roller A) (32) Roller adapter (33) Fastening screws (34) Screen (35) Bracket for battery compartment cover |
A) Accessories shown or described are not included with the product as standard. You can find the complete selection of accessories in our accessories range.
Technical data
| Cordless wet/dry dust extractor | GAS 18V-10 L 3 601 JC6 3. | |
| Article number | ||
| Voltage | V | 18 |
| Rated power input | W | 260 |
| Protection class | IP X4 | |
| Container volume (gross) | I | 10 |
| The net volume (liquid) | I | 6 |
| Max. vacuum’) | ||
| – Dust extractor’) | hPa | 90 |
| – Turbine | hPa | 115 |
| Max. flow rate) | ||
| – Dust extractor’) | I/s m3/h |
24 86 |
| – Turbine | I/s m3/h |
34 122 |
| Dust class | L | |
| Weight according to EPTA-Procedure 01:2014 | kg | 5.1-6.1c) |
| Recommended ambient tern- perature during charging | °C | 0 to +35 |
| Cordless wet/dry dust extractor | GAS 18V•10 L | |
| Permitted ambient temperature during operation’) and during storage | °C | -20 to +50 |
| Recommended rechargeable batteries | GBA 18V… ProCORE18V… | |
| Recommended chargers | GAL 18… GAX 18… GAL 36… | |
| Operating time per battery charge | min/Ah | 4 |
A) measured at 20−25 °C with battery GBA 18V 6.3Ah
B) measured with vacuum hose (13) and curved nozzle (15)
C) Depends on battery in use
D) Limited performance at temperatures <0 °C
Noise/vibration information
Noise emission values were determined according to
EN 60335-2-69.
Typically the A-weighted sound pressure level of the dust extractor is 79 dB(A). Uncertainty K = 2 dB. The noise level when working can exceed 80 dB(A).
Wear hearing protection!
Vibration total values ah (triax vector sum) and uncertainty K determined according to EN 60335-2-69: ah < 2.5 m/s 2 , K = 1.5 m/s 2 .
Assembly
Charging the Battery
Use only the chargers listed in the technical data.
Only these chargers are matched to the lithium-ion battery of your dust extractor.
Note: The battery is supplied partially charged. To ensure full battery capacity, fully charge the battery in the charger before using your power tool for the first time.
The lithium-ion battery can be charged at any time without reducing its service life. Interrupting the charging process does not damage the battery. The lithium-ion battery is protected against deep discharge by the “Electronic Cell Protection (ECP)”. A protective circuit switches the cordless dust extractor off when the battery is drained.
Do not continue to press the on/off button after the dust extractor has automatically switched itself off.
This can damage the battery. A significantly reduced operating time after charging indicates that the battery has deteriorated and must be replaced. Follow the instructions on correct disposal.
Battery charge indicator
The green LEDs on the battery charge indicator indicate the state of charge of the battery. For safety reasons, it is only possible to check the state of charge when the power tool is not in operation. Press the button for the battery charge indicator


Battery model GBA 18V…

| LEDs | Capacity |
| 3× continuous green light | 60−100 % |
| 2× continuous green light | 30−60 % |
| 1× continuous green light | 5−30 % |
| 1× flashing green light | 0−5 % |
Battery model ProCORE18V…

| LEDs | Capacity |
| 5× continuous green light | 80−100 % |
| 4× continuous green light | 60−80 % |
| 3× continuous green light | 40−60 % |
| 2× continuous green light | 20−40 % |
| 1× continuous green light | 5−20 % |
| 1× flashing green light | 0−5 % |
Inserting and Removing the Battery (see figures A1−A2)
Do not use force to insert the battery. The battery is designed in such a way that it can only be inserted into the product when it is in the right position.
Keep the battery compartment and the battery bay clean and dry at all times to ensure good, safe operation.
– Press the release button (11) to open the battery compartment cover (12).
– Slide the battery (20) into the battery bay (19) until it audibly clicks into place.
– To remove the battery (20), press the release button (21) on the battery and pull it out of the battery bay (19).
– Close the battery compartment cover (12). Changing the Battery Compartment Cover (see figures A3−A5) If you wish to use a ProCORE18V 12Ah battery, the battery compartment cover (12) can then no longer be closed. In this case, the battery compartment cover (12) can be replaced with a screen (34) designed for this purpose.
In damp or wet conditions, the dust extractor may only be used with the battery compartment cover closed.
Removing the Battery Compartment Cover (see figure A3)
Remove the battery (20) from the battery bay (19). Remove the two fastening screws (33) (ST4×12) with a cross-headed screwdriver PH1 and take off the battery compartment cover (12).
Inserting the Screen (see figure A4)
Press the battery compartment cover bracket (35) downwards and slide it onto the screen (34). Removing the Screen (see figure A5) Apply a slot screwdriver, push the screen (34) a little way towards the rear, and remove the screen. When doing so, press the battery compartment cover bracket (35) downwards.
Fitting the Brackets for Extractor Accessories (see figure B)
– Slide the bracket (22) for the suction tube and crevice nozzle firmly into the adapter (10) provided for it from above until it clicks into place.
– Slide the bracket (23) for the vacuum hose and floor nozzle firmly into the adapter (7) provided for it from above and tighten the fixing bolts (24).
Fitting the vacuum hose (see figure C)
– Insert the vacuum hose (13) into the hose adapter (8) until both snap fasteners (25) of the vacuum hose click into place.
Note: The friction generated by the dust in the vacuum hose and accessory during extraction causes an electrostatic charge that the user may experience as static discharge (depending on environmental factors and their physiological state).
Fitting the Vacuuming Accessories
The vacuum hose (13) is equipped with a clip system that can be used to connect vacuuming accessories (dust extraction adapter (14), curved nozzle (15)). Fitting the extraction adapter or curved nozzle (see figure D) – Fit the extraction adapter (14) or the curved nozzle (15) to the vacuum hose (13) until the two snap fasteners (25) on the vacuum hose audibly click into place.
– To remove the adapter, press the snap fasteners (25) inwards and pull apart the components.
Fitting the Nozzles and Tubes
– If required, place the suction tubes (18) firmly inside one another and then attach them firmly to the curved nozzle (1B5).
– Attach the floor nozzle (17) or the crevice nozzle (16) firmly to the suction tube (18) or the curved nozzle (15).
Attaching the Carrying Strap (see figure E)
Click the snap hooks of the carrying strap (30) into the lugs (9) of the dust extractor.
Fitting the Rollers (see figure F)
Insert the 4 fastening pins on the rollers (31) into the roller adapters (32) until they audibly click into place. Other rollers can also be used as per the EN 12529 standard (11 mm fastening pin diameter).
- Check the functionality of the roller brakes before using the dust extractor.
Operation
- Remove the battery before cleaning or performing maintenance on the dust extractor, making tool adjustments, changing accessories or placing the dust extractor in storage. This safety measure prevents the dust extractor from being started accidentally.
- Ensure that the work area is clean and tidy to minimize the risk of tripping.
Start-up - The dust extractor must not be used without a filter.
- Before extraction, ensure that the filter unit is securely fitted.
- Before extraction, ensure that the battery compartment cover is securely closed.
- Please inform yourself about the applicable regulations/laws on how to handle harmful types of dust in your country.
- Only vacuum rock dust with the power tool and dust extraction system combination is explicitly identified, for which it has been proven that the legal thresholds are not exceeded. You can find this evidence at http://www.bosch-professional.com/dust.
The dust extractor must categorically not be used in potentially explosive areas.
To ensure optimum suction power, you must always fully unwind the vacuum hose (13) from the vacuum hose bracket (23). For safety reasons, the dust extractor does not switch on if the on/off button (3) is held down for longer than five seconds. - Do not use damaged filters (e.g. no cracks, small holes, etc.). Replace any damaged filters immediately.
Dry Vacuuming
Vacuuming up Dust Deposits
– To switch on the dust extractor, briefly press the on/off button (3).
– To switch off the dust extractor, press the on/off button (3) again.
Extracting dust that accumulates from working power tools (see figure G)
- There must be a sufficient air exchange rate (L) in the room when the exhaust air comes back into the room. Be aware of the corresponding national regulations.
– Fit the dust extraction adapter (14) or the curved nozzle (15) (see “Fitting the extraction adapter or curved nozzle (see figure D)”, page 17).
– Insert the extraction adapter (14) or the curved nozzle (15) into the power tool’s dust extraction outlet. Only when using the dust extraction adapter (14):
Note: When working with power tools that have a low air feed into the vacuum hose (e.g. jigsaws, sanders, etc.), the false air intake (26) of the dust extraction adapter (14) must be opened. This will improve the total output of the dust extractor and the power tool. To do this, turn the ring above the false air intake (26) until the opening is at its maximum size.
Wet Vacuuming
- Do not use the vacuum cleaner to vacuum combustible or explosive liquids, such as petrol, oil, alcohol, or solvents. Do not vacuum hot or burning dust. Do not operate the vacuum cleaner in areas subject to explosion hazards. Dust, vapors, and liquids can ignite or explode.
Before wet vacuuming:
– Empty the container (1).
– Clean the filter (27) and fit it back into the dust extractor (see “Cleaning/replacing filters (see figures I1–I2)”, page 19).
The dust extractor is equipped with a float. Extraction is stopped when the maximum filling level is reached.
After wet vacuuming, always:
– Empty the container (1).
– Empty the water from the filter (27).
To prevent mold growth after wet vacuuming:
– Remove the dust extractor lid (5) and leave it to dry thoroughly.
– Remove the filter (27) and also leave this to dry thoroughly (see “Cleaning/replacing filters (see figures I1– I2)”, page 19).
Maintenance and Servicing
Maintenance and Cleaning
- Remove the battery before cleaning or performing maintenance on the dust extractor, making tool adjustments, changing accessories, or placing the dust extractor in storage. This safety measure prevents the dust extractor from being started accidentally.
- To ensure safe and efficient operation, always keep the dust extractor and the ventilation slots clean.
For the user to carry out maintenance, the dust extractor needs to be disassembled, cleaned, and maintained as far as this is possible without endangering maintenance personnel or other persons. Before disassembly, the dust extractor should be cleaned to prevent any potential hazards. The room/enclosure in which the dust extractor is disassembled should be well ventilated. Wear personal protective equipment while carrying out maintenance. After completing maintenance, the maintenance area should be cleaned. An inspection regarding the dust extraction capability must be carried out at least once a year by the manufacturer or someone who has been trained, e.g. to check for filter damage, that the dust extractor is tight and that the control unit is functioning correctly.
Class L dust extractors that were located in dirty environments should have their exteriors, as well as all their components, cleaned or treated with sealant. When performing maintenance and repair work, all dirty parts that cannot be cleaned satisfactorily must be disposed of. Such parts must be disposed of in impermeable bags in accordance with the valid provisions for disposing of such waste.
– Clean the housing of the dust extractor occasionally with a damp cloth.
– Clean dirty charging pins using a dry cloth.
Cleaning the container (see figures H1–H2)
Clean the container (1) after each use in order to ensure that the dust extractor continues to perform optimally.
– Open the catches (2) and remove the dust extractor lid (5).
– Shake out the container (1) over a suitable waste bin.
– If necessary, clean the container with a damp cloth. Clean the filter if required (see “Cleaning/replacing filters (see figures I1–I2)”, page 19).
– Replace the dust extractor lid (5) and close the catches (2).
Cleaning/replacing filters (see figures I1–I2)
Suction power is dependent on the condition of the filter. Therefore, the filter should be cleaned regularly. Replace any damaged filters immediately.
– Open the catches (2) and remove the dust extractor lid (5).
– Turn the filter (27) as far as it will go in the direction of rotation and remove it from the filter bracket (28).
– If the filter is dry: Tap the filter (27) on the side of a suitable waste bin.
When doing so, ensure that you do not damage the flaps on the filter.
To achieve maximum suction power, brush down the flaps of the filter using a soft brush.
or If the filter is wet:
Rinse the filter (27) under running water and then leave it to dry thoroughly.
or Replace the filter (27) if it is damaged.
– Position the filter (27) over the filter bracket (28) and turn it as far as it will go in the direction of rotation
– Replace the dust extractor lid (5) and close the catches (2). Make sure that the catches engage firmly.

Faults
If the suction power is insufficient, check:
– Is the container (1) full?+
(see “Cleaning the container (see figures H1–H2)”, page 19).
– Is the filter (27) clogged with dust?
(see “Cleaning/replacing filters (see figures I1–I2)”, page 19).
– Is the battery capacity too weak?
(see “Charging the battery”, page 16). Regularly emptying the container (1) and cleaning the filter (27) will ensure optimum suction power.
If suction power is not achieved after that, the dust extractor should be sent to the after-sales service.
Storage (see figure J)
– Insert the suction tubes (18) into the brackets (22).
– Insert the crevice nozzle (16) into a suction tube (18).
– Insert the floor nozzle (17) into the bracket (23).
– Wind the vacuum hose (13) around the bracket (23) from below and fasten the retaining strap (29).
– Only ever carry the dust extractor by the carrying handle (6) or by the carrying strap (if present).
– Store the dust extractor in a dry room and secure it so that it cannot be used by unauthorized persons.
After-Sales Service and Application Service
Our after-sales service responds to your questions concerning the maintenance and repair of your product as well as spare parts. You can find explosion drawings and information on spare parts at: www.bosch-pt.com
The Bosch product use advice team will be happy to help you with any questions about our products and their accessories.
In all correspondence and spare parts orders, please always include the 10‑digit article number given on the nameplate of the product.
Australia, New Zealand, and Pacific Islands
Robert Bosch Australia Pty. Ltd.
Power Tools
Locked Bag 66
Clayton South VIC 3169
Customer Contact Center
Inside Australia: Phone: (01300) 307044
Fax: (01300) 307045
Inside New Zealand:
Phone: (0800) 543353
Fax: (0800) 428570
Outside AU and NZ:
Phone: +61 3 95415555
www.bosch-pt.com.au
www.bosch-pt.co.NZ
Great Britain
Robert Bosch Ltd. (B.S.C.)
P.O. Box 98
Broadwater Park
North Orbital Road
Denham Uxbridge
UB 9 5HJ
At www.bosch-pt.co.uk you can order spare parts or arrange the collection of a product in need of servicing or repair.
Tel. Service: (0344) 7360109
E-Mail:
Ireland
Origo Ltd.
Unit 23 Magna Drive
Magna Business Park
City West
Dublin 24
Tel. Service: (01) 4666700
Fax: (01) 4666888
Republic of South Africa Customer service
Hotline: (011) 6519600
Gauteng – BSC Service Centre
35 Roper Street, New Centre
Johannesburg
Tel.: (011) 4939375
Fax: (011) 4930126
E-Mail:
KZN – BSC Service Centre
Unit E, Almar Centre
143 Crompton Street
Pinetown
Tel.: (031) 7012120
Fax: (031) 7012446
E-Mail:
Western Cape – BSC Service Centre
Democracy Way, Prosperity Park
Milnerton
Tel.: (021) 5512577
Fax: (021) 5513223
E-Mail:
Bosch Headquarters
Midrand, Gauteng
Tel.: (011) 6519600
Fax: (011) 6519880
E-Mail:
Armenia, Azerbaijan, Georgia
Robert Bosch Ltd.
David Agmashenebeli ave. 61
0102 Tbilisi, Georgia
Tel. +995322510073
www.bosch.com
Kyrgyzstan, Mongolia, Tajikistan, Turkmenistan, Uzbekistan
TOO “Robert Bosch” Power Tools, After Sales Service Muratbaev Ave., 180 050012, Almaty, Kazakhstan Service Email: Official Website: www.bosch.com, www.bosch-pt.com
Transport
The contained lithium-ion batteries are subject to the Dangerous Goods Legislation requirements. The batteries are suitable for road transport by the user without further restrictions.
When shipping by third parties (e.g.: by air transport or forwarding agency), special requirements on packaging and labeling must be observed. For the preparation of the item being shipped, consulting an expert for hazardous material is required.
Dispatch battery packs only when the housing is undamaged. Tape or mask off open contacts and pack up the battery in such a manner that it cannot move around in the packaging. Please also observe the possibility of more detailed national regulations.
Disposal
Dust extractors, batteries, accessories, and packaging should be sorted for environmentally friendly recycling. Do not dispose of dust extractors or battery packs/batteries with household waste.
Only for EU countries:
According to European Directive 2012/19/EU, dust extractors that are no longer usable, and according to European Directive 2006/66/EC, defective or used battery packs/batteries, must be collected separately and disposed of in an environmentally correct manner.
Battery packs/batteries:
Li-ion: Please observe the notes in the section on transport (see “Transport”, page 20).


| GAS18V10L | 3 601 JC6 3.. | 2006/42/EC 2014/30/EU 2011/65/EU |
60335-1:2012+A11:2014 +A13:2017 60335-2-69:2012 55014-1:2017 55014-2:2015 50581:2012 | |
| * Robert Bosch Power Tools GmbH (PT/ECS) 70538 Stuttgart GERMANY | ||||
| Henk Becker Chairman of Executive Management |
Helmut Heinzelmann Head of Product Certification | |||


Robert Bosch Power Tools GmbH, 70538 Stuttgart, GERMANY Stuttgart, 28.11.2019
Robert Bosch Power Tools GmbH
70538 Stuttgart
GERMANY
www.bosch-pt.com
1 609 92A 5KE (2020.04) T / 213
