Bosch TKA 3A Coffee Machine Instruction Manual


BOSCH TKA 3A Coffee Machine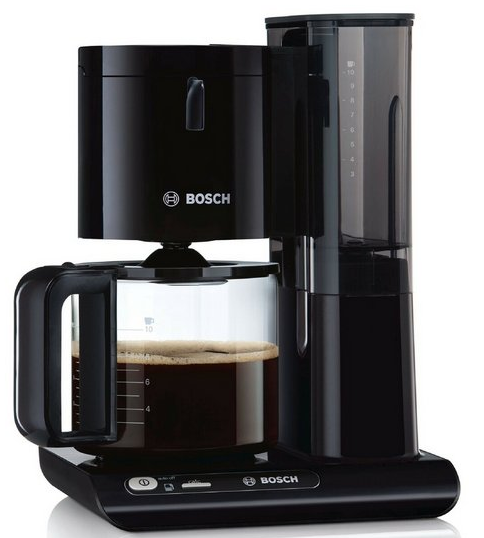

Safety instructions
Please read and follow the operating instructions carefully and keep them for later reference. Enclose these instructions when you give this appliance to someone else. This appliance is designed for the preparation of normal household quantities in the home, or in household-like, non-commercial environments. Household-like environments include staff kitchens in shops, offices, agricultural and other small businesses or for use by guests at bed-and-breakfast establishments, small hotels and similar residential facilities.
The danger of electric shock
Connect and operate the appliance only according to the type plate specifications. To avoid potential hazards, repairs such as replacing a damaged cable must only be carried out by our customer service personnel. This appliance can be used by children aged from 8 years and above and by persons with reduced physical, sensory or mental capabilities or lack of experience and knowledge if they have been given supervision or instruction concerning use of the appliance in a safe way and if they understand the hazards involved. Keep children under 8 years of age away from the appliance and connecting cable and do not allow them to use the appliance. Children shall not play with the appliance. Cleaning and user maintenance shall not be made by children unless they are older than 8 years and supervised. Never immerse the appliance or mains cable in water. Never leave the appliance unattended while it is switched on! Use only if power cord and appliance show no signs of damage. Should a fault occur, pull the plug or disconnect from the mains immediately.
Risk of burns and fire
During operation only grasp the parts of the appliance and the glass jug by the handles provided. Do not place the appliance on or near hot surfaces, e.g. hobs. Never cover the parking zone for the jug.
Risk of suffocation
Do not allow children to play with packaging material.
Parts and operating controls

- Water tank with fill level indicator
- Lid, removable (dishwasher-safe)
- Storage compartment (coffee pot handle)
- Filter holder, swiveling (dishwasher-safe)
- Drip stop
- Glass carafe with lid (dishwasher-safe)
- ON/OFF switch
- Hotplate
- Cable storage compartment
General information
- Fill water tank 1 with clean, cold water only. Never add milk or beverages such as tea or coffee since this will damage the appliance.
- Never exceed the “10” marking when you fill the tank 1 with water.
- Use coffee with a medium grind (approx. 7 g per cup).
- Do not brew less than the minimum amount of three cups since the coffee will not have the desired strength and temperature (1 cup = approx. 125 ml).
- Never remove the glass carafe 6 while the machine is brewing coffee since this may cause the filter holder 4 to overflow.
- Make sure that glass carafe’s lid is closed when you place the carafe 6 on the coffee machine.
- Do not use other carafes since the special drip protector will block the coffee from flowing into the receptacle.
- Some water accumulation on the filter holder 4 is normal; it does not indicate that the coffee machine is defective.
Before using for the first time
- Remove any stickers or film.
- Pull enough of the power cable out of the storage compartment 9 and plug in.
- Remove coffee pot handle from storage compartment and rotate forwards.
- To clean, open the lid 2 and fill water tank 1 with nine cups of water. Close the lid 2, insert the glass carafe 6 and press the ON/OFF switch 7 to switch on and start the cleaning process.
- Repeat the cleaning process. Note: You may notice a “new machine” smell; this is normal. If this is the case, fill with a vinegar solution (2 cups of vinegar for 6 cups of water) and run the cleaning program. Next, rinse the machine twice with nine cups of water.
- Clean the carafe thoroughly
Brewing coffee
- Fill water tank 1 with water, taking note of the marking.
- Swivel out the filter holder 4.
- Insert a 1×4 paper filter in the filter holder 4 and add the desired amount of coffee.
- Swivel back the filter holder 4 and let it click into place.
- Place the glass carafe 6 with the lid closed underneath the filter holder 4.
- Press the ON/OFF switch 7 to start the brewing cycle.
Note: The appliance has an automatic auto-off (power save) function, which switches it off after a period of about 40 minutes. Important: When the brewing process is complete, wait a moment until all the coffee has run through the filter and into the carafe.
Coffee-making tips
- Store ground coffee in a cool place; you can also freeze it.
- Once a package of coffee has been opened, close it tightly to maintain its aroma.
- How the coffee beans are roasted affects their taste and aroma.
- Darker roast = more flavor
- Lighter roast = more acidity
Cleaning
Never immerse the device in water or place it in the dishwasher! Don’t steam-clean the appliance. Unplug the appliance before cleaning it.
- Clean all parts that came into contact with coffee after each use.
- Clean the coffee machine’s exterior with a damp cloth; do not use strong or abrasive cleaning agents.
- Wipe out the water tank 1; do not use a hard brush.
- All detachable parts are dishwasher-safe.
Descaling
The appliance must be descaled regularly, but at the latest when
- the brewing time becomes more prolonged
- excessive steam is emitted
- the appliance makes more noise.
Regular descaling
- makes your appliance last longer
- ensures proper function
- prevents excessive steam
- speeds up the brewing process
- saves energy
Descale the machine with a commercial descaling agent.
- Switch off the machine and allow it to cool.
- Place the glass carafe 6 with the lid closed on the coffee machine.
- Prepare the descaling solution according to the manufacturer’s instructions and pour it into water tank 1.
- Leave the solution in the machine for 5 minutes and then switch the machine on.
- Switch off the machine after one minute and wait a further 10 minutes.
- Repeat this procedure at least three times, more often if there is a large amount of limescale.
- Allow the remaining descaling solution to run through.
- After descaling, run two brewing cycles with clean water but without coffee. Do not fill the tank with more than 6 cups of water.
- Wash all parts and the glass carafe thoroughly
Troubleshooting
The machine takes noticeably longer or switches itself off before the brewing process is complete. ÆÆThe machine needs descaling. Descale the machine as per the instructions.
Tip: Descale the appliance more frequently if the water has a high lime content.