18V-5 C Robert Bosch Power Tools GmbH Instructions
Bosch 18V-5 C GPB Professional Instructions


Safety instructions

Failure to observe the safety and general instructions may result in electric shock, fire and/or serious injury.
Keep all the safety and general instructions for future reference.
- Always check the radio, cable and plug before use. Stop using the radio if you discover any damage. Do not open the radio or plug yourself, and have them repaired only by a qualified specialist using only original replacement parts. Damaged radios, cables and plugs increase the risk of electric shock.
- The mains plug must be plugged in to an easily accessible plug socket with a protective earth contact.
- The mains plug must match the plug socket. Never modify the plug in any way. Do not use any adapter plugs with radios. Unmodified plugs and matching plug sockets will reduce the risk of electric shock.
- Completely unwind the mains cable when operating the radio via mains supply. Otherwise the mains cable can heat up.
- Do not misuse the cable, for example by using it to carry, hang up or unplug the radio. Keep the cable away from heat, oil, sharp edges and moving parts. Damaged or entangled cords increase the risk of electric shock.

- Do not open the battery. There is a risk of short-circuiting.
- In case of damage and improper use of the battery, vapours may be emitted. The battery can set alight or explode. Ensure the area is well ventilated and seek medical attention should you experience any adverse effects. The vapours may irritate the respiratory system.
- If used incorrectly or if the battery is damaged, flammable liquid may be ejected from the battery. Contact with this liquid should be avoided. If contact accidentally occurs, rinse off with water. If the liquid comes into contact with your eyes, seek additional medical attention. Liquid ejected from the battery may cause irritation or burns.
- The battery can be damaged by pointed objects such as nails or screwdrivers or by force applied externally. An internal short circuit may occur, causing the battery to burn, smoke, explode or overheat.
- When the battery is not in use, keep it away from paper clips, coins, keys, nails, screws or other small metal objects that could make a connection from one terminal to another. A short circuit between the battery terminals may cause burns or a fire.
- Only use the battery with products from the manufacturer. This is the only way in which you can protect the battery against dangerous overload.
- Only charge the batteries using chargers recommended by the manufacturer. A charger that is suitable for one type of battery may pose a fire risk when used with a different battery.

Products sold in GB only:
Your product is fitted with an BS 1363/A approved electric plug with internal fuse (ASTA approved to BS 1362).
If the plug is not suitable for your socket outlets, it should be cut off and an appropriate plug fitted in its place by an authorised customer service agent. The replacement plug should have the same fuse rating as the original plug. The severed plug must be disposed of to avoid a possible shock hazard and should never be inserted into a mains socket elsewhere.
The Bluetooth® word mark and logos are registered trademarks owned by Bluetooth SIG, Inc. and any use of such marks by Robert Bosch Power Tools GmbH is under license.
Product Description and Specifications
Please observe the illustrations at the beginning of this operating manual.
Product Features
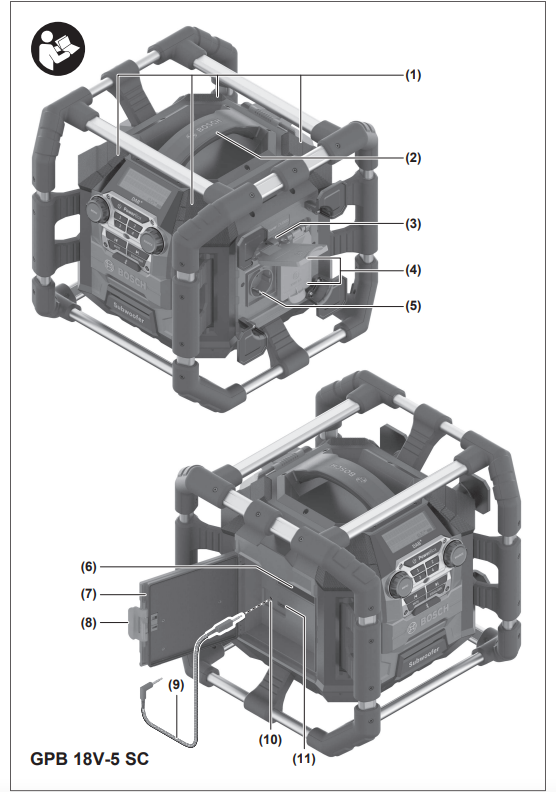
The numbering of the product features refers to the illustration of the radio on the graphics page.
- Speaker
- Carrying handle
- Alternating current connection control light
- Alternating current connection cover cap
- Alternating current connection plug socket (Power Outlets)
- Storage compartment
- Media compartment cover (Digital Media Bay)
- Locking lever for media compartment cover
- AUX cable
- AUX IN socket
- USB charging socket
- Mute button
- Seek button (scan down)
- Clock button (GPB 18V‑5 C)
- On/off button
- Display
- Preset buttons
- Source button
- Seek button (scan up)
- Equaliser button
- Bluetooth® button
- Menu button (GPB 18V‑5 SC)
- Battery compartment cover locking mechanism
- Battery compartment cover (back-up batteries)
- Rechargeable battery release buttona)
- Rechargeable batterya)
- Rechargeable battery cover (Battery Bay)
- Locking lever for rechargeable battery cover
- Rechargeable battery holder
- Rod antenna
a)Accessories shown or described are not included with the product as standard. You can find the complete selection of accessories in our accessories range.
Display Elements
(a) Radio frequency indicator (GPB 18V‑5 C)
(b) Battery charge indicator
(c) Preset space indicator
(d) Treble/bass indicator (GPB 18V‑5 C)
(e) Stereo indicator
(f) Mute indicator
(g) Bluetooth® indicator
(h) Audio source indicator
(i) Equalizer (sound pre-set) indicator
(j) Time indication
(k) Multi-function indicator (GPB 18V‑5 SC)
Technical Data

A) Depends on battery in use
Radio Energy Supply
Power can be supplied to the radio via a mains connection or a lithium-ion rechargeable battery (26).
When the battery is used for power supply, only the functions audio operation and power supply of external devices via the integrated USB connection are available.
Operation via Mains Connection
- Pay attention to the mains voltage. The voltage of the power source must match the voltage specified on the type plate of the radio. Radios marked with 230 V can also be operated with 220 V.
Operation with Battery Pack
- Use only the chargers listed in the technical data. Only these chargers are matched to the lithium-ion rechargeable battery of your radio.
Note: The use of rechargeable batteries unsuitable for your radio can lead to malfunctions or damage to the radio. The lithium-ion battery is protected against deep discharge by “Electronic Cell Protection (ECP)”. A protective circuit switches the radio off when the rechargeable battery is drained.
- Do not switch the radio back on after it has been switched off by the protective circuit. This can damage the battery.
Replacing a Rechargeable Battery
Disengage the locking lever (28) of the battery cover and open the battery cover (27) flap.
To remove a rechargeable battery, press the battery release button (25) and pull the rechargeable battery out of the battery compartment. Do not use force to do this.
To insert a rechargeable battery, push it into the battery holder (29) such that the connections of the rechargeable battery are in line with the connections of the battery holder. Allow the rechargeable battery to engage. Close the battery cover (27) and lock it.
Battery Charge Indicator
When the rechargeable battery is inserted, you can see the state of charge of the battery (26) in the display. When the rechargeable battery is removed, you can see this on the battery itself.
Battery Charge Indicator in the Display
The battery charge indicator (b) will appear in the display as soon as a rechargeable battery with sufficient voltage is inserted and the radio is not connected to the mains supply.

Battery Charge Indicator on the Rechargeable Battery
If the rechargeable battery is removed from the radio, its state of charge may be indicated by the green LEDs of the battery charge indicator on the rechargeable battery.
Press the button for the battery charge indicator or to show the state of charge.
If no LED lights up after pressing the button for the battery charge indicator, then the battery is defective and must be replaced.
Battery model GBA 18V…

Battery model ProCORE18V…

Inserting/Changing Back-up Batteries
To save the time and other settings on the radio, back-up batteries must be inserted. Using alkaline manganese batteries is recommended for this purpose.
Disengage the locking lever (28) of the battery cover and open the battery cover (27) flap.
If required, remove the rechargeable battery (26).
To open the battery compartment cover (24), press on the locking mechanism (23) and remove the battery compartment cover. Insert the back-up batteries supplied.
When inserting the batteries, ensure that the polarity is correct according to the illustration on the inside of the battery compartment.
Replace the battery compartment cover (24).
“REPLACE AA BATTERY WHEN UNIT NO LONGER KEEPS CORRECT TIME”: Change the back-up batteries when the radio no longer saves the time.
Always replace all the batteries at the same time. Only use batteries from the same manufacturer and which have the same capacity.
- Take the back-up batteries out of the radio if you are not using it for a prolonged period of time. When stored in the radio for longer periods, the back-up batteries can corrode and discharge themselves.
Operation
- Protect the radio against direct water contact. Water entering the radio increases the risk of an electric shock.
- Keep the covers of the battery compartment, media compartment and alternating current connections closed whenever possible. The closed covers protect the radio against water and dust.
Audio Operation
Switching On and Off
To switch on the radio, press the on/off button (15). The display (16) is activated and the audio source that was set the last time the radio was switched off is played back.
To switch off the radio, press the on/off button (15) again.
The current setting of the audio source will be saved.
Adjusting the Volume
After the radio is switched on, the volume is always set to low.
To increase the volume, turn the clock button (14) (GPB 18V‑5 C) or the menu button (22) (GPB 18V‑5 SC) clockwise; to reduce the volume, turn anticlockwise.
The volume setting will appear in the display with a value between 0 and 30. Before adjusting or changing a radio station, set the volume to a low setting; before starting an external audio source, set the volume to a medium setting. To switch off the sound, you can briefly press the mute button (12). The mute indicator (f) will appear in the display.
To switch on the sound again, either briefly press the mute button again or turn the clock button (14) (GPB 18V‑5 C) or the menu button (22) (GPB 18V‑5 SC) clockwise.
Adjusting the Sound
An equalizer is integrated in the radio for optimal sound reproduction.
The treble and bass setting can be manually changed or sound pre-sets for various music styles can be used. You can choose from the pre-programmed settings JAZZ, ROCK, POP and CLASSIC, as well as the individually programmable setting CUSTOM. The sound settings are saved separately for each audio source.
To select one of the stored sound pre-sets, press the equalizer button (20) briefly as many times as needed until the required setting appears on the sound pre-set indicator (i) in the display.
Changing the Setting CUSTOM:
- You can adjust the treble and the bass within a range of −5 to +5.
- Press the equaliser button (20) for longer than 0.5 seconds. CUSTOM appears on the sound pre-set indicator (i) in the display.
- GPB 18V‑5 C: TRE is shown on the treble/bass indicator (d); the current treble value flashes. Turn the clock button (14) to change the treble. Press the clock button (14) to save the set value.
BAS and the current bass value will now be shown on the treble/bass indicator (d). Change and save the bass setting in the same way as described for the treble. - GPB 18V‑5 SC: <Treble> and the current value of the treble will be shown on the multi-function indicator (k). Turn the menu button (22) to change the treble. Press the menu button (22) to save the set value.
<Bass> and the current bass value will now be shown on the multi-function indicator (k). Change and save the bass setting in the same way as described for the treble. - After saving the bass setting or 10 seconds after last using the clock button (14)/menu button (22), the radio will return to the standard display screen.
Selecting an Audio Source
To select an audio source, press the source button (18) until the required internal or external audio source is shown in the display:
- DAB: Digital radio via DAB+ (GPB 18V‑5 SC),
- FM: Analogue radio via FM,
- AUX: External audio source (e.g. CD player) via the 3.5- mm socket AUX IN (10) in the media compartment,

The current audio source can be seen on the audio source indicator (h) or Bluetooth® indicator (g).
Setting/Saving DAB+ Radio Stations (GPB 18V‑5 SC)
To select the audio source DAB+ radio stations, press the source button (18) as many times as needed until DAB appears on the audio source indicator (h).
After a short initialisation, the last set radio station will be played back.
Each station name appears on the top line of the multi-function indicator (k). The additional information shown on the bottom line of the multi-function indicator can be set with the menu function.
- To switch the station, turn the source button (18) until the required station is shown in the display. Press the source button (18) to confirm the selection. The radio will switch to the selected station.
Alternatively, you can press the seek button (scan down) (13) or the seek button (scan up) (19) to switch the station. - To save a set station, press the preset button (17) of the required preset space until the number of the preset space appears on the preset indicator (c).
- To start playback of a saved station, briefly press one of the preset buttons (17). The number of the preset space will appear on the preset indicator (c).
Note: In the event of reception problems, you can manually start the DAB+ station search. To do this, either select <Auto Scan> from the menu or press the seek button (scan down) (13) and the seek button (scan up) (19) simultaneously. After the station search is complete, four stations will be saved in preset spaces 1 to 4. Stations that have already been saved will be overwritten here.
If no DAB+ radio stations can be found, <No DAB Station – Please Auto Scan> will appear on the multi-function indicator (k).
Setting/Saving FM Radio Stations
To select the audio source FM radio stations, press the source button (18) as many times as needed until FM appears on the audio source indicator (h).
GPB 18V‑5 C: During adjustment, the radio frequency appears on the time indicator (j) and then on the radio frequency indicator (a).
GPB 18V-5 SC: The frequency of each current station will appear on the top line of the multi-function indicator (k). The additional information shown on the bottom line of the multifunction indicator can be set with the menu function.
If there is sufficiently good reception of a suitable signal, the radio will automatically switch to stereo reception, and the stereo indicator (e) will appear in the display.
- To set a specific station, turn the source button (18) until the required frequency or the required station is shown in the display.
- To search for the next station with high signal strength, briefly press the seek button (scan down) (13) or the seek button (scan up) (19). The next station found is shown in the display and played back.
- To search for all stations with high signal strength, press the seek button (scan down) (13) or the seek button (scan up) (19) for longer than 0.5 s. Any station found is played back for 5 s, then the search is continued until the end of the frequency band. To cancel the station search, briefly press the seek button (scan down) (13) or the seek button (scan up) (19).
- To save a set station, press the preset button (17) of the required storage space until the number of the storage space appears on the storage space indicator (c).
- To automatically search for and save the stations with the best reception, press the seek button (scan down) (13) and the seek button (scan up) (19) simultaneously. The radio will check all receivable stations and save the four stations with the best reception in preset spaces 1 to 4. Please note that stations that have already been saved will be overwritten here where necessary. Once the search has finished, the station saved in preset space 1 will be played back.
- To start playback of a saved station, briefly press one of the preset buttons (17). The number of the storage space will appear on the storage space indicator (c).
Setting the Rod Antenna
The radio is supplied with a fitted rod antenna (30). For FM radio operation, point the rod antenna in the direction that enables the best reception.
If the reception is insufficient, position the radio at a different location that enables better reception.
Note: When operating the radio in the direct vicinity of radio-communication equipment or radio transceivers, or other electronic equipment, the radio reception can be subject to interference.
Connecting External Audio Sources via AUX
Disengage the locking lever (8) and open the cover (7) of the media compartment. Insert the 3.5‑mm connector for the AUX cable (9) into the AUX IN socket (10). Connect the AUX cable to a suitable audio source.
To play back the AUX audio source, press the source button (18) until AUX appears on the audio source indicator (h).
After removing the AUX cable connector, close the cover (7) of the media compartment again and lock it to protect against dirt.
If it fits, you can also place an audio source connected via AUX in the storage compartment (6).
If one of the preset buttons (17) is pressed during AUX operation, the radio will switch to the station that was saved in the last used radio operating mode.
Playing Back/Controlling External Audio Sources via Bluetooth®
To play back an audio source (e.g. smartphone) via Bluetooth®, either press the source button (18) until the Bluetooth® indicator (g) appears in the display, or briefly press the Bluetooth® button (21) regardless of the current audio source.
If the radio has already been connected to an external audio source via Bluetooth® and if this audio source is available, a connection to this audio source will automatically be established. As soon as the connection is established, the Bluetooth® indicator (g) will light up continuously. GPB 18V‑5 SC: The name of the device connected via Bluetooth® is displayed on the top line of the multi-function indicator (k). The text from the connected device appears on the bottom line.
If a connection cannot be established within two minutes, the connection set-up will be cancelled and the Bluetooth® indicator (g) will flash continuously.
GPB 18V‑5 SC: <Not Connected> will appear on the multifunction indicator (k).
The radio will shut off automatically after another 17 minutes without a connection being established.
Establishing a new Bluetooth® connection:
- To establish a connection to a new external audio source, press the Bluetooth® (21) button for longer than 0.5 seconds. This is also possible during a search process, if there is an existing connection or when operating with another audio source.
- The radio will start the search process. During the search process, the Bluetooth® indicator (g) will flash.
- Activate the connection via the external audio source. For smartphones, that is generally possible via the settings in the Bluetooth® menu. The radio will appear as an available source under the name GPB 18V-5 C xxxx or GPB 18V-5 SC xxxx. Please observe the operating instructions for your audio source/smartphone.
- As soon as a connection is established via Bluetooth®, the Bluetooth® indicator (g) will light up continuously.
The audio source connected via Bluetooth® can also be controlled via the radio:
- To select a track and to start playback, briefly press the seek button (scan up) (19) or the seek button (scan down) (13) until the required track has been reached. Playback of the selected track is started automatically.
- To interrupt playback, press the mute button (12). The mute indicator (f) appears in the display.
- To continue playback, press the mute button (12) again, change the volume or press the seek button (scan up) (19) or the seek button (scan down) (13).
- To fast-forward or rewind within a track, press and hold the seek (scan up) button (19) or the seek (scan down) button (13) until the required place in the track has been reached.
If one of the preset buttons (17) is pressed during operation via Bluetooth®, the radio will switch to the station that was saved in the last used radio operating mode.
Setting the Time Indication (GPB 18V‑5 C)
To access the time indication menu, briefly press the clock button (14).
You can choose between 12-hour <12H> and 24- hour <24H> time formats; you can also set the hours and minutes.
Navigating in the menu:
- Change menu settings: Turn the clock button (14).
- Save menu settings: Press the clock button.
- After saving the minutes setting or 10 seconds after last using the clock button, the radio will return to audio operation.
Change the back-up batteries when the radio no longer saves the time.
Reset Function (GPB 18V‑5 C)
To return all settings on the radio to factory settings (reset), press the clock button (14) for longer than 0.5 seconds. <RS> appears in the display.
Turn the clock button (14) to select between resetting <YES> and returning to the current settings <NO>. Confirm your selection by pressing the clock button.
Changing Menu Settings (GPB 18V‑5 SC)
To access the menu function, press the menu button (22).
Navigating in the menu:
- To scroll through a menu: Turn the menu button (22).
- To select and save a menu setting: Press the menu button (22).
- To switch to a submenu: Press the menu button (22).
- To switch from a submenu back to a higher menu: Press the seek button (scan down) (13). If the highest menu level has been reached, the radio will return to audio operation.
To leave the menu function on any level and return to audio operation, press the seek button (scan down) (13) for longer than 1 second. Alternatively, the radio will automatically switch back to audio operation 10 seconds after the last press of a button.
If menu settings are no longer being saved when you switch off the radio, replace the back-up batteries.
Menu Options (GPB 18V‑5 SC)
The menu selection is partially dependent on the audio operating mode of the radio.
Within the menus, the name of each menu is displayed on the top line of the multi-function indicator (k), and the selectable setting on the bottom line.
<Set Time>
Time menu: You can choose between 12-hour <12 Hour Mode> and 24-hour <24 Hour Mode> time formats, and adjust the time manually. If a radio station that transmits the time is selected with the DAB audio source, this time is automatically adopted.
<Reset All>
Reset menu: You can reset all menu settings to factory settings <Yes> or return to the current settings <No>.
<Auto Scan> (with DAB audio source)
Automatic station search menu: You can start an automatic station search.
<Manual Tune> (with DAB audio source)
Manual set-up menu: You can set the required frequency manually.
<Display Type> (with DAB audio source)
Display mode menu: You can choose what text will appear on the bottom line of the multi-function indicator (k):
- The information broadcast by the radio station <Dynamic Label>,
- The frequency of the station <Frequency>,
- The signal strength <Signal Strength>,
- The program type broadcast by the radio station <Program Type>.
<Display Type> (with FM audio source)
Display mode menu: You can choose what text will appear on the bottom line of the multi-function indicator (k):
- The information broadcast by the radio station <Radio Text>,
- The station name <Program Service>,
- The program type broadcast by the radio station <Program Type>.
Power Supply of External Devices
USB Port
The USB port can be used to charge devices that can be powered via USB (e.g. various mobile phones). The maximum charging current is 2,1 A.
Disengage the locking lever (8) and open the cover (7) of the media compartment. Using a corresponding USB cable, connect the USB port of the external device to the USB charging socket (11) (USB) of the radio.
In operation with a rechargeable battery, the external device will only be charged if the radio is switched on.
If it fits, you can place the external device in the storage compartment (6) while charging. If the external device heats up while charging, leave the cover (7) of the media compartment open to protect the external device against overheating.
Once the charging process is complete or you have removed the USB cable, close the cover (7) again to protect the radio against dirt.
Alternating Current Connection
You can operate other external electrical devices using the alternating current connections. Plug sockets can vary depending on country-specific standards.
Power can only be supplied to external devices using the alternating current connection when the radio is connected to the mains; it is not possible using an inserted battery. If the radio is connected to the mains supply, the green control light (3) will light up to confirm this.
The total maximum permitted current consumption of all connected electrical devices must not exceed the value stated in the following table (also see the labelling on the housing under the cover caps (4)):

Open the cover cap (4) of the alternating current connection and insert the plug of the external electrical device into a plug socket (5) on the radio.
Working Advice
Recommendations for Optimal Handling of the Battery
Protect the battery against moisture and water.
Only store the battery within a temperature range of −20 to 50 °C. Do not leave the battery in your car in the summer, for example.
Occasionally clean the ventilation slots on the battery using a soft brush that is clean and dry.
A significantly reduced operating time after charging indicates that the battery has deteriorated and must be replaced. Follow the instructions on correct disposal.
Maintenance and Service
Maintenance and Cleaning
Keep the radio clean to ensure good, safe operation. In order to avoid safety hazards, if the power supply cord needs to be replaced, this must be done by Bosch or by an after-sales service centre that is authorised to repair Bosch power tools.
Wipe off any dirt using a damp, soft cloth. Do not use any detergents or solvents.
After-Sales Service and Application Service
Our after-sales service responds to your questions concerning maintenance and repair of your product as well as spare parts. You can find explosion drawings and information on spare parts at: www.bosch-pt.com
The Bosch product use advice team will be happy to help you with any questions about our products and their accessories.
In all correspondence and spare parts orders, please always include the 10‑digit article number given on the nameplate of the product.
Great Britain
Robert Bosch Ltd. (B.S.C.)
P.O. Box 98
Broadwater Park
North Orbital Road
Denham Uxbridge
UB 9 5HJ
At www.bosch-pt.co.uk you can order spare parts or arrange the collection of a product in need of servicing or repair.
Tel. Service: (0344) 7360109
E-Mail:
You can find further service addresses at
www.bosch-pt.com/serviceaddresses
Transport
The recommended lithium-ion batteries are subject to legislation on the transport of dangerous goods. The user can transport the batteries by road without further requirements.
When shipping by third parties (e.g.: by air transport or forwarding agency), special requirements on packaging and labelling must be observed. For preparation of the item being shipped, consulting an expert for hazardous material is required.
Dispatch battery packs only when the housing is undamaged. Tape or mask off open contacts and pack up the battery in such a manner that it cannot move around in the packaging. Please also observe the possibility of more detailed national regulations.
Disposal


Only for EU countries:
According to the Directive 2012/19/EU on waste electrical and electronic equipment and its transposition into national law, radios that are no longer usable, and, according to the Directive 2006/66/EC, defective or drained batteries must be collected separately and disposed of in an environmentally correct manner.
If disposed incorrectly, waste electrical and electronic equipment may have harmful effects on the environment and human health, due to the potential presence of hazardous substances.
Only for United Kingdom:
According to Waste Electrical and Electronic Equipment Regulations 2013 (2013/3113) and the Waste Batteries and Accumulators Regulations 2009 (2009/890), electrical and electronic equipment that is no longer usable must be collected separately and disposed of in an environmentally friendly manner.
Battery packs/batteries:
Li-ion:
Please observe the notes in the section on transport (see “Transport”, page 21).

Hereby, Robert Bosch Power Tools GmbH declares that the radio equipment type GPB 18V‑5 C/GPB 18V‑5 SC is in compliance with Directive 2014/53/EU. The full text of the EU declaration of conformity is available at the following internet address:

Declaration of Conformity
Hereby, Robert Bosch Limited as authorised representative acting on behalf of Robert Bosch Power Tools GmbH declares that the radio equipment type GPB 18V‑5 SC is in compliance with the Radio Equipment Regulations 2017. The full text of the declaration of conformity is available at the following internet address:
Robert Bosch Power Tools GmbH
70538 Stuttgart
GERMANY
1 609 92A 7T0 (2022.05) T / 243

Bosch Power Tools
1 609 92A 7T0 | (27.05.2022)