Sharp R-270 MICROWAVE OVEN Instruction Manual


SHARP R-270 MICROWAVE OVEN

TO REPLACE THE MAINS PLUG
The wires in the mains cable are colour coded as shown:
- Green and yellow stripes = EARTH
- Blue = NEUTRAL
- Brown = LIVE
As the colours in the mains lead of your oven may not correspond with the coloured marking identifying the terminals in your plug, connect the wires as described:
- The green and yellow wire to the plug terminal marked E or or coloured green or coloured green and yellow.
- The blue wire to the plug terminal marked N or coloured black or coloured blue.
- The brown wire to the plug terminal marked L or coloured red or coloured brown.
Make sure the terminal screws are tight and the cable is held securely by the cable grip where it enters the plug.
Like most appliances in your home, your oven must be connected to a single phase 230-240V~, 50Hz alternating current supply.
If you do not make the proper electrical connections you might damage the oven or injure yourself.
Neither SHARP nor the supplier will be liable if this happens.
WARNING: THIS APPLIANCE MUST BE EARTHED
If you have any doubts about your electrical supply ask a qualified electrician.
IMPORTANT
- The fuse from the cut-off plug should be removed and the plug disposed of in a safe manner.
- Under no circumstances should the cut-off plug be inserted into a socket outlet as a serious electric shock may occur.
- The plug must not be used without the fuse cover fitted.
If you have any doubt about your microwave oven obtain the help of a qualified electrician. When replacing the plug please ensure that you use a BSI or ASTA approved plug to BS1363, this should be fitted with a brown coloured 13 amp fuse approved by BSI or ASTA to BSI 362. If you have any doubt about electrical connection seek the help of a qualified electrician.
OVEN AND ACCESSORIES
OVEN


- Oven lamp
- Control panel
- Door opening button
- Waveguide cover (DO NOT REMOVE)
- Oven cavity
- Coupling
- Door latches
- Door hinges
- Door seals and sealing surfaces
- Power cord
- Ventilation openings
- Outer cabinet
ACCESSORIES
Check to make sure the following accessories are provided:
- Turntable
- Roller stay
- Place the roller stay in the coupling on the oven floor, then place the turntable on to the roller stay, ensuring it is located firmly.
- To avoid turntable damage, ensure dishes or containers are lifted clear of the turn-table rim when removing them from the oven.
NOTES:
- The waveguide cover is fragile. Care should be taken when cleaning inside the oven to ensure that it is not damaged.
- Always operate the oven with the turntable and roller stay fitted correctly. This promotes thorough, even cooking. A badly fitted turntable may rattle, may not rotate properly and could cause damage to the oven.
- The turntable rotates clockwise or anti-clockwise. The rotary direction may change each time you start the oven. This does not affect cooking performance.
- When you order accessories, please quote both the PART NAME and MODEL NUMBER to your dealer or SHARP approved service facility.
WARNING:
The door, outer cabinet, oven cavity, turntable and dishes will become very hot during operation. To prevent burns, always use thick oven gloves.
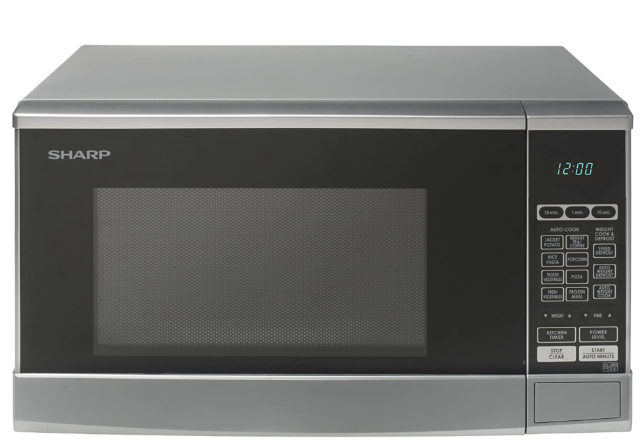
CONTROL PANEL

- DIGITAL DISPLAY
- TIME keys
- WEIGHT COOK & DEFROST key
- LESS/MORE TIME keys
- POWER LEVEL key
- START/AUTO MINUTE key
- STOP/CLEAR key
- KITCHEN TIMER key
- WEIGHT keys
- AUTO COOK key
IMPORTANT SAFETY INSTRUCTIONS
READ CAREFULLY AND KEEP FOR FUTURE REFERENCE
- This oven is designed to be used on a countertop only. It is not designed to be built into a kitchen unit. Do not place the oven in a cabinet.
- The oven door may become hot during cooking. Place or mount the oven so that the bottom of the oven is 85 cm or more above the floor. Keep children away from the door to prevent them burning themselves.
- WARNING: Do not touch the turntable directly after cooking as t maybe hot.
- Ensure there is a minimum of free space above the oven of 30 cm.
- This appliance can be used by children aged from 8 years and above and persons with reduced physical, sensory or mental capabilities or lack of experience and knowledge if they have been given supervision or instruction concerning use of the appliance in a safe way and understand the hazards involved. Children shall not play with the appliance. Cleaning and user maintenance shall not be made by children unless they are older than 8 and supervised
- Keep the appliance and its cord out of reach of children less than 8 years.
- WARNING: Only allow children to use the oven with-out supervision when adequate instructions have been given so that the child is able to use the oven in a safe way and understands the hazards of improper use.
- WARNING: Accessible parts may become hot during use. Young children should be kept away.
- WARNING: If the door or door seals are damaged, the oven must not be operated until it has been repaired by a competent person.
- WARNING: Never adjust, repair or modify the oven yourself. It is hazardous for anyone other than a competent person to carry out any service or repair operation which involves the removal of a cover which gives protection against exposure to microwave energy.
- If the power supply cord of this appliance is damaged, it must be replaced with a special cord. The exchange must be made by an authorised SHARP service agent.
- WARNING: Liquids and other foods must not be heated in sealed containers since they are liable to explode.
- Microwave heating of beverages can result in delayed eruptive boiling, therefore care must be taken when handling the container.
- Do not cook eggs in their shells, and whole hard boiled eggs should not be heated in microwave ovens since they may explode even after microwave cooking has ended. To cook or reheat eggs which have not been scrambled or mixed, pierce the yolks and the whites, or the eggs may explode. Shell and slice hard boiled eggs before reheating them in the microwave oven.
- Utensils should be checked to ensure that they are suitable for use in the oven. See page GB-28. Use only microwave safe containers and utensils on microwave modes.
- The contents of feeding bottles and baby food jars must be stirred or shaken and the temperature checked be-fore consumption, in order to avoid burns.
- The door, outer cabinet, oven cavity, dishes, accessories will become very hot during operation.
- Care should be taken to avoid touching these areas. To prevent burns, always use thick oven gloves. Before cleaning make sure they are not hot. When heating food in plastic or paper containers, keep an eye on the oven due to the possibility of ignition.
- If smoke is emitted, switch off or unplug the appliance and keep the door closed in order to stifle any flames.
- Clean the oven at regular intervals and remove any food deposits.
- Failure to maintain the oven in a clean condition could lead to deterioration of the surface that could adverse-ly affect the life of the appliance and possibly result in a hazardous situation.
- Do not use harsh abrasive cleaners or sharp metal scrapers to clean the glass on the oven door since they can scratch the surface, which may result in shattering of the glass.
- Steam cleaner is not to be used.
- See instructions for cleaning door seals, cavities and adjacent parts on page GB-31.
- This appliance is intended to be used in household and similar applications such as:
- staff kitchen areas in shops, offices and other working environments;
- by clients in hotels, motels and other residential type environments;
- farm houses;
- bed and breakfast type environments.
- WARNING: The appliance and its accessible parts be-come hot during use. Care should be taken to avoid touching heating elements. Children less than 8 years of age shall be kept away unless continuously supervised.
- During use the appliance becomes hot. Care should be taken to avoid touching heating elements inside the oven.
- Accessible parts may become hot during use. Young children should be kept away.
To avoid the danger of fire
- The microwave oven should not be left unattended during operation. Power levels that are too high, or cooking times that are too long, may overheat foods resulting in a fire.
- The electrical outlet must be readily accessible so that the unit can be unplugged easily in an emergency.
- The AC power supply must be 230-240V~, 50Hz, with a 13A distribution line fuse, or a 13A distribution circuit breaker.
- A separate circuit serving only this appliance should be provided.
- Do not place the oven in areas where heat is generated. For example, close to a conventional oven.
- Do not install the oven in an area of high humidity or where moisture may collect.
- Do not store or use the oven outdoors.
- Clean the waveguide cover, the oven cavity, the turntable and turntable support after use. These must be dry and free from grease. Built-up grease may overheat and begin to smoke or catch fire.
- Do not place flammable materials near the oven or ventilation openings.
- Do not block the ventilation openings.
- Remove all metallic seals, wire twists, etc., from food and food packages. Arcing on metallic surfaces may cause a fire.
- Do not use the microwave oven to heat oil for deep frying. The temperature cannot be controlled and the oil may catch fire.
- To make popcorn, use only special microwave popcorn makers.
- Do not store food or any other items inside the oven.
- Check the settings after you start the oven to ensure the oven is operating as desired.
- To avoid overheating and fire, special care must be taken when cooking or reheating foods with a high sugar or fat content, for example, sausage rolls, pies or Christ-mas pudding.
- See the corresponding hints in the operation manual.
To avoid the possibility of injury
- WARNING:
Do not operate the oven if it is damaged or malfunctioning. Check the following before use:- The door; make sure the door closes properly and en-sure it is not misaligned or warped.
- The hinges and safety door latches; check to make sure they are not broken or loose.
- The door seals and sealing surfaces; ensure that they have not been damaged.
- Inside the oven cavity or on the door; make sure there are no dents.
- The power supply cord and plug; ensure that they are not damaged.
- Do not operate the oven with the door open or alter the door safety latches in any way.
- Do not operate the oven if there is an object between the door seals and sealing surfaces.
- Do not allow grease or dirt to build up on the door seals and adjacent parts. Clean the oven at regular intervals and remove any food deposits. Follow the instructions for “Care and Cleaning’’ on page GB-31.
- Individuals with PACEMAKERS should check with their doctor or the manufacturer of the pacemaker for pre-cautions regarding microwave ovens.
To avoid the possibility of electric shock
- Under no circumstances should you remove the outer cabinet.
- Never spill or insert any objects into the door lock open-ings or ventilation openings. In the event of a spill, turn off and unplug the oven immediately, and call an authorised SHARP service agent.
- Do not immerse the power supply cord or plug in water or any other liquid.
- Do not let the power supply cord hang over the edge of a table or work surface.
- Keep the power supply cord away from heated surfaces, including the rear of the oven.
- Do not attempt to replace the oven lamp yourself or allow anyone who is not an electrician authorised by SHARP to do so. If the oven lamp fails, please consult your dealer or an authorised SHARP service agent.
To avoid the possibility of explosion and sudden boiling
- Never use sealed containers. Remove seals and lids be-fore use. Sealed containers can explode due to a build up of pressure even after the oven has been turned off .
- Take care when microwaving liquids. Use a wide mouthed container to allow bubbles to escape. Never heat liquids in narrow necked containers such as baby bottles, as this may result in the con-tents erupting from the container when heated and cause burns.
To prevent sudden eruption of boiling liquid and possible scalding:- Do not use excessive amount of time.
- Stir liquid prior to heating/reheating.
- It is advisable to insert a glass rod or similar utensil (not metal) into the liquid whilst reheating.
- Let liquid stand for at least 20 seconds in the oven at the end of cooking time to prevent delayed eruptive boiling.
- Pierce the skin of such foods as potatoes, sausages and fruit before cooking, or they may explode.
To avoid the possibility of burns
- Use pot holders or oven gloves when removing food from the oven to prevent burns.
- Always open containers, popcorn makers, oven cooking bags, etc., away from the face and hands to avoid steam burns and eruption of boiling.
- To avoid burns, always test food temperature and stir before serving and pay special attention to the temperature of food and drink given to babies, children or the elderly. Temperature of the container is not a true indication of the temperature of the food or drink; always check the food temperature.
- Always stand back from the oven door when opening it to avoid burns from escaping steam and heat.
- Slice stuffed baked foods after heating to release steam and avoid burns.
To avoid misuse by children
- Do not lean or swing on the oven door.
- Children should be taught all important safety instructions: use of pot holders, careful removal of food coverings; paying special attention to packaging (e.g. self-heating materials) designed to make food crisp, as they may be extra hot.
Other warnings
- Never modify the oven in any way.
- Do not move the oven while it is in operation.
- This oven is for home food preparation only and may only be used for cooking food. It is not suitable for commercial or laboratory use.
To promote trouble free use of your oven and avoid damage
- Never operate the oven when it is empty except where recommended in the operation manual. Doing so may damage the oven.
- When using a browning dish or self heating material, always place a heat resistant insulator such as a porcelain plate under it to prevent damage to the turntable and turntable support due to heat stress. The preheating time specified in the dish’s instructions must not be exceeded.
- Do not use metal utensils, which reflect microwaves and may cause electrical arcing. Use only the turntable and the turntable support designed for this oven. Do not operate the oven without the turntable.
- Do not place anything on the outer cabinet during operation.
NOTE:
If you are unsure how to connect your oven, please consult an authorised, qualified electrician. Neither the manufacturer nor the dealer can accept any liability for damage to the oven or personal injury resulting from failure to observe the correct electrical connection procedure. Water vapours or drops may occasionally form on the oven walls or around the door seals and sealing surfaces. This is a normal occurrence and is not an indication of microwave leakage or a malfunction.
BUILT-IN KIT
No built-in kit is available for this oven.
This oven is designed to be used on a countertop only.
INSTALLATION
- Remove all packing materials from the inside of the oven cavity and remove any protective film found on the microwave oven cabinet surface. Check the oven carefully for any signs of damage.
- Place the oven on a secure, level surface, strong enough to take the oven weight, plus the heaviest item likely to be cooked in the oven. Do not place the oven in a cabinet.
- Select a level surface that provides enough open space for the intake and/or outlet vents. The rear surface of appliance shall be placed against a wall.
- A minimum space of 20cm is required between the oven and any adjacent walls.
- Leave a minimum space of 30cm above the oven.
- Do not remove the feet from the bottom of the oven.
- Blocking the intake and/or outlet openings can dam-age the oven.
- Place the oven as far away from radios and TV as possible. Operation of the microwave oven may cause interference to your radio or TV reception.
- The oven door may become hot during cooking. Place or mount the oven so that the bottom of the oven is 85cm or more above the floor. Keep children away from the door to prevent them burning themselves.
- Securely connect the plug of the oven to a standard earthed (grounded) household electrical outlet.
WARNING: Do not place the oven where heat, moisture or high humidity are generated, (for example, near or above a conventional oven) or near combustible materials (for ex-ample, curtains). Do not block or obstruct air vent openings. Do not place objects on top of the oven.
ELECTRICAL CONNECTION
- Do not allow water to come into contact with the power supply cord or plug.
- Insert the plug properly into the socket.
- Do not connect other appliances to the same socket using an adaptor plug.
- If the power supply cord is damaged, it must be replaced by a Sharp approved service facility or a similarly qualified person to avoid a hazard.
- When removing the plug from the socket always grip the plug, never the cord as this may damage the power sup-ply cord and the connections inside the plug.
- If the plug fitted to your oven is a rewireable type and in the event of the socket outlet in your home not being compatible with the plug supplied, remove the plug properly (do not cut off ).
- If the plug fitted to your oven is a nonreworkable type and in the event of the socket outlet in your home not being compatible with the plug supplied, cut-off the mains plug.
- Refit with a suitable type, observing the wiring code given in ‘To replace the mains plug’ on page GB-33.
WARNING: THIS APPLIANCE MUST BE EARTHED To wire an appropriate plug, follow the wiring code given in ‘To replace the mains plug’ on page GB-33.
HOW YOUR OVEN WORKS
Microwaves are energy waves, similar to those used for TV and radio signals.
Electrical energy is converted into micro-wave energy, which is directed into the middle bottom of the cavity via a wave-guide. Then the microwave stirrer distribute the microwave energy to every corner of the cavity evenly.
Microwaves cannot pass through metal, because of this the oven cavity is made of metal and there is a fine metal mesh on the door.
During cooking the microwaves bounce off the sides of the oven cavity at random.
Microwaves will pass through certain materials, such as glass and plastic, to heat the food. (See ‘Suitable Ovenware’ on page GB-28).
Water, sugar and fat in food absorb micro-waves which cause them to vibrate. This creates heat by friction, in the same way your hands get warm when you rub them together.
The outer areas of the food are heated by the microwave energy, then the heat moves to the centre by conduction, as it does in conventional cooking. It is important to turn, rearrange or stir food to ensure even heating.
Once cooking is complete, the oven automatically stops producing microwaves. Standing time is necessary after cooking, as it enables the heat to disperse equally throughout the food.

MICROWAVE POWER LEVELS
| Power Level | Press the
POWER LEVEL key |
Percentage |
| HIGH | X1 | P100 |
| X2 | P90 | |
| MEDIUM HIGH | X3 | P80 |
| X4 | P70 | |
| MEDIUM | X5 | P60 |
| X6 | P50 | |
| MEDIUM LOW (Defrost) |
X7 | P40 |
| X8 | P30 | |
| LOW (Defrost) | X9 | P20 |
| X10 | P10 |
IMPORTANT: The microwave power level will default to P100 unless you press the POWER LEVEL key
Generally the following recommendations apply:
- P100/90 – (HIGH output = 800/720W) used for fast cooking or reheating e.g. for casseroles, hot beverages, vegetables etc.
- P80/70 – (MEDIUM HIGH output = 640/560W) used for longer cooking of dense foods such as roast joints, meat loaf and plated meals, also for sensitive dishes such as sponge cakes. At this reduced setting, the food will cook evenly without over cooking at the sides.
- Your oven has 10 power levels, as shown.
- To change the power level for cooking, enter the required time and then press the POWER LEVEL key until the display indicates the desired level.
- Power level
The microwave power level is varied by the microwave energy switching on and off. When using power levels other than P100 you will be able to hear the micro-wave energy pulsing on and off as the food cooks or defrosts. - Check the power level
To check the microwave power level during cooking, press the POWER LEVEL key. As long as your finger is pressing the POWER LEVEL key the power level will be displayed. The oven continues to count down although the display will show the power level. - P60/50 – (MEDIUM output = 480/400W) for dense foods which require a long cooking time when cooked conventionally, eg. beef casserole, it is advisable to use this power set-ting to ensure the meat will be tender. P40/30 – (MEDIUM LOW output = 320/240W Defrost setting) to defrost, select this power setting, to ensure that the dish defrosts even-ly. This setting is also ideal for simmering rice, pasta, dumplings and cooking egg custard. P20/10 – (LOW output = 160/80W) For gent Ie defrosting, eg. cream gateaux or pastry.
BEFORE OPERATION
Plug in the oven.
- The oven display will show:
NOTE: Please note that this model does NOT have a clock function.
HOW TO OPERATE YOUR OVEN
Opening the door:
To open the oven door, push the door opening button.
Starting the oven:
Prepare and place food in a suitable container onto the turntable or place directly onto the turntable. Close the door and press the START/AUTO MINUTE key.
Stopping the oven:
If you want to stop the oven during cooking press the STOP/ CLEAR key once or open the oven door. If you want to cancel the cooking programme, press the STOP/CLEAR key twice.
Your oven enables you to cook and defrost food using the automatic programmes, or to cook and defrost food manually. Automatic cooking and defrosting allows you to cook and defrost using preset programmes where the timings have been calculated for you, e.g AUTO WEIGHT COOK,SPEED DE-FROST, AUTO WEIGHT DEFROST. Manual cooking and defrosting allows you to cook/defrost foods and weights which are not included in the automatic programmes. Following are examples of manual cooking and defrosting. For automatic cooking and defrosting refer to pages GB-19 – 22.
MANUAL COOKING
- Enter the cooking time and use microwave power levels P10 to P100 to cook (refer to page GB-16).
- Stir or turn the food, where possible, 2 – 3 times during cooking.
- After cooking, cover the food and leave to stand, where recommended.
Example: To cook for 2 minutes and 30 seconds on P70 microwave power.
- Input the power level by pressing the POWER LEVEL key 4 times for 70P.
- Enter the cooking time by pressing the 1 MIN key twice and then the 10 SEC key 3 times.
- Press the START/AUTO MINUTE key once to start cooking.

MANUAL DEFROSTING
- Enter the defrosting time and use microwave power levels P10 or P30 to defrost (refer to page GB-16).
- Stir or turn the food, where possible, 2 – 3 times during defrosting.
- After defrosting, cover the food in foil and leave to stand until thoroughly defrosted.
Example: To defrost for 10 minutes on P 30 microwave power.
- Input the power level by pressing the POWER LEVEL key 8 times.
- Enter the defrosting time by pressing the 10 MIN. key once.
- Press the START/ AUTO MINUTE key once to start defrosting.

NOTES:
- When the oven starts, the oven lamp will light and the turntable will rotate clockwise or anti- clockwise.
- Your oven can be programmed up to 99 minutes, 90 seconds (99.90).
- When the door is opened during cooking, the cooking time on the display stops automatically. The cooking time starts to count down again when the door is closed and the START/AUTO MINUTE key is pressed.
- If you wish to know the power level during cooking, press the POWER LEVEL key. As long as your finger is touching the key the power level will be displayed.
AUTO WEIGHT COOK/ DEFROST
AUTO WEIGHT COOK/DEFROST enables you to cook or defrost pre-programmed meals listed. Follow the example below for details on how to operate these functions.
AUTO WEIGHT COOK allows you to cook 3 popular menus.
- When cooking beef, press the AUTO WEIGHT COOK key x 1 COO1 will appear on the display.
- When cooking lamb. press the AUTO WEIGHT COOK key x2 COO2 will appear on the display.
- When cooking pork, press the AUTO WEIGHT COOK key x 3 COO3 will appear on the display.
Example 1: To cook beef weighing 1.2kg from chilled using AUTO WEIGHT COOK.
- Press the AUTO WEIGHT COOK key once.
- Enter the weight by pressing the WEIGHT keys until the desired weight is displayed.
- Press the START/AUTO MINUTE key once to start cooking.

Example 2: To defrost a Meat Joint weighing 1.2kg using AUTO WEIGHT DEFROST.
- Select the menu required by pressing the AUTO WEIGHT DEFROST key once.
- Enter the weight by pressing the WEIGHT keys until the desired weight is displayed.
- Press the START/AUTO MINUTE key once to start defrosting.

AUTO WEIGHT COOK CHART
WEIGHT RANGE:
- Food weight should be rounded up or down to the nearest 0.1 kg, for example, 0.65kg to 0.7kg or 0.34kg to 0.3kg.
- You are restricted to enter a weight within the range (see the following charts).
NOTES:- When action is required (example, to turn food over), the oven stops, the audible signals sound, the remaining cooking time and an indicator will flash on the display. To continue cooking, press the START/AUTO MINUTE key.
- The final temperature will vary according to the initial food temperature. Check food is pip-ing hot after cooking. If necessary, you can extend the cooking manually.
AUTO WEIGHT COOK
| MENU | WEIGHT RANGE | COOKING PROCEDURE | |
| Roast Beef |
0.1kg – 2.0kg | • Place meat in a flan dish on the turntable. • Turn meat over when the audible signal sounds. • After cooking, leave meat to stand wrapped in aluminium foil for 10 minutes. | |
| AUTO WEIGHT COOK | |||
| Roast Lamb |
0.1kg – 2.0kg | • Place meat in a flan dish on the turntable. • Turn meat over when the audible signal sounds . • After cooking, leave meat to stand wrapped in aluminium foil for 10 minutes. | |
| AUTO WEIGHT COOK | |||
| Roast Pork |
0.1kg – 2.0kg | • Place meat in a flan dish on the turntable . • Turn meat over when the audible signal sounds . • After cooking, leave meat to stand wrapped in aluminium foil for 10 minutes. | |
| AUTO WEIGHT COOK | |||


SPEED DEFROST
This function quickly defrosts food while enabling you to choose a suitable defrost period, depending on the food type. Follow the example below for details on how to operate this function.
Example: defrost the food for 10 minutes.
- Select the menu required by pressing the SPEED DEFROST key once.
- Enter the cooking time by pressing the 10 MIN key once.
- Press the START/AUTO MINUTE key start cooking.

NOTE: During the defrosting process the system will pause and bleep to remind you to turn the food over to ensure even defrosting. When this is complete, press START/AUTO MINUTE pad to resume defrosting.
AUTO COOK
AUTO COOK enables you to cook foods listed on the control panel and the chart on page GB-22. Follow the example below for details on how to operate this function.
Example: To cook 0.3kg rice using Auto Cook RICE PASTA.
- Select the menu required by pressing the RICE PASTA key once.
- Enter the weight by pressing the WEIGHT keys until the desired weight is displayed.
- Press the START/AUTO MINUTE key to start cooking.

AUTO COOK CHART
SELECTING MENU: You can select the Menu directly on the Key Sheet by pressing the relevant key.
Auto cook menus:
| Food | Note |
| Jacket Potato (each 230g) | 1. For beverage and potatoes, parameters on display are not weight but number of servings. 2. For Popcorn, touch POPCORN pad once to cook 100g pop- corn, touch START/AUTO MINUTE to start; if the default cooking time for 100g popcorn is not suitable, just touch POPCORN pad twice, and touch number pads to enter a suit- able cooking time, touch START/AUTO MINUTE to start. 3. For Rice Pasta and Frozen Meal, during cooking, the system will pause and sound beeps to remind user to take operation, then touch START/AUTO MINUTE to resume cooking. |
| Reheat tea/Coffee (200ml /cup) | |
| Rice Pasta (g) | |
| Popcorn (default, 100g) | |
| Frozen Vegetable (g) | |
| Pizza (g) | |
| Fresh Vegetable (g) | |
| Frozen Meal (g) |
WEIGHT RANGE:
- Food weight should be rounded up or down to the nearest 0.1 kg, for example, 0.65kg to 0.7kg or 0.34kg to 0.3kg.
NOTES:
- If there is a requirement to stir the food during the auto cook process the oven will stop and the audio signal will sound, at the same time the remaining cook time will show on the display. To continue cooking once the food has been stirred press the START/ AUTO MINUTE key.
- The final temperature will vary according to the initial food temperature. Check food is piping hot after cooking. If necessary, you can extend the cooking manually.
- The results when using auto cook depend on variances such as the shape and size of the food and your personal preference as regards cooking results. If you are not satisfied with the programmed result, please adjust the cooking time to match your requirement.
CONVENIENT FUNCTIONS
SEQUENCE COOKING
This function enables continued and uninterrupted operation for 2 different stages.
Example: To cook for: 5 minutes on P100 power (Stage 1) 16 minutes on P30 power (Stage 2)
STAGE 1
- Input the power level by pressing the POWER LEVEL key once.
- Enter the cooking time by pressing the 1 MIN key 5 times.

STAGE 2
- Input the power level by pressing the POWER LEVEL key 8 times.
- Enter the cooking time by pressing the 10 MIN key once and then the 1 MlN key 6 times.
- Press the START/AUTO MINUTE key once to start.

The oven will begin to cook for 5 minutes on P100 and then for 16 minutes on P30. NOTE: If P100 is selected as the final power level, it is not necessary to input the power level.
AUTO MINUTE:
AUTO MINUTE enables you:
- To cook on PI 00 microwave power in multiples of I minute.
- To extend the cooking times in multiples of 1 minute when using manual cook mode.
Example: To cook on P100 for 2 minutes, press the START/AUTO MINUTE key twice.
NOTE:
- The cooking time may be extended to a maximum of 99 minutes, 90 seconds.
LESS and MORE TIME
The LESS TIME and MORE TIME keys enable you to:
- Decrease or increase cooking/defrosting time whilst the oven is in use (manual cooking only).
TO USE LESS AND MORE WITH MANUAL COOKING
Press the LESS or MORE TIME key to decrease or increase the cooking or defrosting time in multiples of I minute whilst the oven is in use. The overall cooking time can be increased to a maximum of 99 minutes, 90 seconds.
Example: cook on P50 for 10 minutes and then decrease the cooking time by 2 minutes:
- Input the power level by pressing the POWER LEVEL key six times.
- Enter the cooking time by pressing the 10 MIN key once.
- Press the START/AUTO MINUTE key once to start cooking.
- Reduce the cooking time by pressing the LESS TIME key twice.
- Cooking time is reduced by 2 minutes and continues to count down, for example:


KITCHEN TIMER:
Use the KITCHEN TlMER as a minute timer or to monitor the standing time for cooked/ defrosted food.
Example: To set the timer for 5 minutes.
- Press the KITCHEN TIMER key once.
- Enter the desired time by pressing the 1 MIN key 5 times.
- Press the START/AUTO MINUTE key once to start.

The display will count down. When the display reaches zero, the audible signal will sound. You can enter any time up to 99 minutes, 90 seconds. To cancel the KITCHEN TIMER whilst counting down, simply press the STOP/CLEAR.
NOTE: The KITCHEN TIMER function cannot be used whilst cooking.
CHILD LOCK
Use to prevent unsupervised operation of the oven by children.
- To set the CHILD LOCK:
In the stand-by mode, press STOP/CLEAR button for 3 seconds. - To cancel the CHILD LOCK:
In the stand-by mode, press STOP/CLEAR button for 3 seconds.
MICROWAVE COOKING ADVICE
Microwaves cook food faster than conventional cooking. It is therefore essential that certain techniques are followed to ensure good results.
COOKING ADVICE NOTES:
- When heating food in plastic or paper containers, keep an eye on the oven due to the possibility of ignition.
- Ensure that the utensils are suitable for use in a microwave oven. (See “Suitable Cookware” on page GB-28).
- Do not place hot foods/utensils on a cold turntable or cold foods/utensils on a hot turntable.
- Always attend the oven when in use.
- Liquids and foods must not be heated in sealed containers or jars/ containers with Iids on, as pressure will build up inside and may cause the contain-er/jar to explode.
- Only use microwave popcorn within the recommended packaging (follow the manufacturers instructions). Never use oil unless specified by the manufacturer and never cook for longer than instructed.
WARNING:
Follow instructions in the SHARP operation manual at all times.
If you exceed recommended cooking times and use power levels that are too high, food may overheat, burn and in extreme circumstances, catch fire and damage the oven.
| Cooking Techniques | ||
| Arrange | Place the thickest parts of food towards the outside of the di sh. e.g. Chicken drumsticks. Foods that are placed towards the outside of the dish will receive more energy, so cook quicker, than those in the centre. |
|
| Cover | Certain foods benefit from being covered during microwave cooking, follow recommendations where given. Use vented microwave ding film or a suitable Iid. |
|
| Pierce | Foods with a shell, skin or membrane must be pierced in several places before cooking or reheating as steam will build up and may cause food to explode. e.g. Potatoes, Fish, Chicken, Sausages. |
|
| NOTE: Eggs in their shells and hard/ soft boiled eggs should not be heated in the microwave oven as they may explode, even after cooking has ended. | ||
| Stir, turn and rear- range | For even cooking it is essential to stir, turn and rearrange food during cooking. Always stir and rearrange from the outside towards the centre. | |
| Stand | Standing time is necessary after cooking as it enables the heat to disperse equally throughout the food. | |


| Food Characteristics | |
| Composition | Foods high in fat or sugar (e.g. Christmas pudding, mince pies) re- quire less heating time. Care should be taken as overheating can lead to fire. Bones in food conduct heat, making the food cook more quickly. Care must be taken so that the food is cooked evenly. |
| Density | Food density will affect the amount of cooking time needed. Light, porous foods, such as cakes or bread, cook more quickly than heavy, dense foods, such as roasts and casseroles. |
| Quantity | The number of microwaves in your oven remains the same regard- less of how much food is being cooked. The cooking time must be increased as the amount of food placed in the oven increases. e.g. Four potatoes will take longer to cook than two. |
| Size | Small foods and small pieces cook faster than large ones, as micro- waves can penetrate from all sides to the centre. For even cooking make all the pieces the same size. |
| Shape | Foods which are irregular in shape, such as chicken breasts or drumsticks, take longer to cook in the thicker parts. For even cooking, place the thickest parts to the outside of the dish where they will receive more energy. Round shapes cook more evenly than square shapes when micro- wave cooking. |
| Temperature of food | The initial temperature of food affects the amount of cooking time needed. Chilled foods will take longer to cook than food at room temperature. e.g. A cake made with chilled ingredients, (i.e. margarine) will take longer to cook than a cake made with ingredients at room temperature. The temperature of the container is not a true indication of the temperature of the food or drink. Cut into foods with fillings, for example jam doughnuts, to release heat or steam. |
Face & Hands: Always use oven gloves to remove food or cookware from the oven. Stand back when opening the oven door to allow heat or steam to disperse. When removing covers (such as cling film), opening roasting bags or popcorn packaging, direct steam away from face and hands.
Check the temperature of food and drink and stir before serving. Take special care when serving to babies, children or the elderly. The contents of feeding bottles and baby food jars are to be stirred or shaken and the temperature is to be checked before consumption to avoid burns.
SUITABLE COOKWARE
To cook/defrost food in a microwave oven, the microwave energy must be able to pass through the container to penetrate the food. Therefore it is important to choose suitable cookware.
Round/oval dishes are preferable to square/ oblong ones, as the food in the corners tends to overcook. A variety of cookware can be used as listed below.
| Cookware | Microwave Safe | Comments |
| Aluminium foil Foil containers | ✔ / ✘ | Small pieces of aluminium foil can be used to shield food from overheating. Keep foil at least 2cm from the oven walls, as arcing may occur. Foil containers are not recommended unless specified by the manufacturer, e.g. Microfoil ®, follow instructions carefully. |
| Browning dishes | ✔ | Always follow the manufacturers instructions. Do not exceed heating time given. Be very careful as these dishes become very hot. |
| China and ceramics | ✔ / ✘ | Porcelain, pottery, glazed earthenware and bone china are usually suitable, except for those with metallic decoration. |
| Glassware e.g. Pyrex® | ✔ | Care should be taken if using fine glassware as it can break or crack if heated suddenly. |
| Metal | ✘ | It is not recommended to use metal cookware as it will arc, which can lead to fire. |
| Plastic/Polystyrene e.g fast food contain- ers |
✔ | Care must be taken as some containers warp, melt or discolour at high temperatures. |
| Cling film | ✔ | It should not touch the food and must be pierced to let the steam escape. |
| Freezer/Roasting bags | ✔ | Must be pierced to let steam escape. Ensure bags are suitable for microwave use. Do not use plastic or metal ties, as they may melt or catch fire due to the metal ‘arcing’. |
| Paper – plates, cups and kitchen paper | ✔ | Only use for warming or to absorb moisture. Care must be taken as overheating may cause fire. |
| Straw and wooden containers | ✔ | Always attend the oven when using these materials as overheating may cause fire. |
| Recycled paper and newspaper | ✘ | May contain extracts of metal which will cause ‘arcing’ and may lead to fire. |
WARNING: When heating food in plastic or paper containers, monitor the oven due to the possibility of ignition.
DEFROSTING ADVICE
Defrosting food using your microwave oven is the quickest method of all.
It is a simple process but the following instructions are essential to ensure the food is thoroughly defrosted.
| Rearrange | Foods that are placed towards the outside of the dish will defrost quicker than foods in the centre. It is therefore essential that the food is rear- ranged up to 4 times during defrosting. Move closely packed pieces from the outside to the centre and rear- range over-lapping areas. This will ensure that all parts of the food defrosts evenly. |
| Separate | Foods may be stuck together when removed from the freezer. It is important to separate foods as soon as it is possible during defrosting. e.g. bacon rashers, chicken fillets. |
| Shield | Some areas of food being defrosted may become warm. To prevent them becoming warmer and starting to cook, these areas can be shielded with small pieces of foil, which reflect microwaves. e.g. legs and wings on a chicken. |
| Stand | Standing time is necessary to ensure food is thoroughly defrosted. Defrosting is not complete once the food is removed from the micro- wave oven. Food must stand, covered, for a length of time to ensure the centre has completely defrosted. |
| Turn over | It is essential that all foods are turned over at least 3 – 4 times during defrosting. This is important to ensure thorough defrosting. |
NOTES:
- Remove all packaging and wrapping before defrosting.
- To defrost food, use microwave power levels MEDIUM LOW or LOW.
REHEATING ADVICE
For the reheating of foods, follow the advice and guidelines below to ensure food is thoroughly reheated before serving.
| Plated meals | Remove any poultry or meat portions, reheat these sep
arately, see below. Place smaller items of food to the centre of the plate, larger and thicker foods to the edge. Cover with vented micro- wave cling film and reheat on MEDIUM, stir/ rearrange half- way through reheating. NOTE: Ensure the food is thoroughly reheated before serving. |
|
| Sliced meat | Cover with vented microwave ding film and reheat on ME- DIUM. Rearrange at least once to ensure even reheating. NOTE: Ensure the meat is thoroughly reheated before serving. | |
| Poultry por tions | Place thidest parts of the portions to the outside of the dish, cover with vented microwave cling film and reheat on MEDIUM HIGH. Turn over halfway through reheating. NOTE: Ensure the poultry is thoroughly reheated before serving. |
|
| Casseroles | Cover with vented microwave cling film or a suitable Iid and reheat on MEDIUM. Stir frequently to ensure even reheating. NOTE: Ensure the food is thoroughly reheated before serving. |


To achieve the best results when reheating, select a suitable microwave power level appropriate to the type of food. e.g.nA bowl of vegetables can be reheated using HIGH, while a lasagna which contains ingredients that cannot be stirred, should be reheated using MEDI UM.
NOTES:
- Remove food from foil or metal containers before reheating.
- Reheating times will be affected by the shape, depth, quantity and temperature of food together with the size, shape and material of the container.
Never heat Liquids in narrow-necked containers, as this could result in the contents erupting from the container and may cause burns.
- To avoid overheating and fire, special care must be taken when reheating foods with a high sugar or fat content, e.g. minee pies or Christmas pudding.
- Never heat oil or fat for deep frying as this may lead to overheating and fire.
- Canned potatoes should not be heated in the microwave oven, follow the manufacturer’s instructions on the can.
The contents of feeding bottles and baby food jars are to be stirred or shaken and the temperature is to be checked before consumption to avoid burns.
CLEANING & MAINTENANCE
OVEN INTERIOR
- It is important to clean the interior of your microwave oven after each use.
- To clean the oven interior, use a mild detergent solution, such as washing-up liquid, with warm water on a soft cloth.
- Food and liquid splashes will build-up on the oven walls and ceiling. If grease, fat and food debris is allowed to build-up in the oven interior it may overheat, smoke or even catch fire when next using the oven.
- Keep the waveguide cover clean at all times. The waveguide cover is constructed from a fragile material and should be cleaned with care (follow the cleaning instructions above). NOTE: Excessive soaking may cause disintegration of the waveguide cover.
The waveguide cover is a consumable part and without regular cleaning, will need to be replaced. - Food will release steam during cooking and cause condensation inside the oven and door. It is important to wipe the oven dry. A buildup of condensation will eventually lead to rust forming on the oven interior.
- Do not allow grease or dirt to build- up on the door seals or areas around the door. This may prevent the door from closing correctly and may cause a leakage of micro-waves (follow the cleaning instructions opposite).
- Ensure the turntable and roller stay are cleaned after every use with a mild washing-up liquid solution and dried. This will prevent the build- up of grease and food debris.
The turntable is dishwasher safe. - CLEAN THE OVEN AT REGULAR INTERVALSAND REMOVE ANY FOOD DEPOSITS. Failure to maintain the oven in a clean condition could lead to a deterioration of the surface that could adversely affect the life of the appliance and possibly result in a hazardous situation.
OUTER CABINET
- Wipe the outside of the microwave oven with a mild detergent solution, such as washing-up liquid, with warm water on a soft cloth.
- The control panel must be wiped clean and dried with the door open, therefore inactivating the oven.
NOTES:
- Never use spray cleaners, oven pads or abrasive scourers as these damage the surface of the oven.
- A steam cleaner should not be used.
- Take care not to let soapy water drip through the small holes in the oven walls and the cavity floor. Excess water spillage through these holes will cause damage to the oven interior.
TROUBLESHOOTING
If you think the oven is not working properly there are some simple checks you can carry out yourself before calling an engineer. This will help prevent unnecessary service calls if the fault is something simple. Follow this simple check below:
Place half a cup of water on the turntable and close the door. Select HIGH and programme the oven to cook for 1 minute.
- Does the oven lamp come on when it is cooking?
- Does the turntable rotate?
- Does the cooling fan work? (Check by placing your hand above the air vent openings.)
- After I minute does the audible signal sound?
- Is the water in the cup hot?
If you answer “NO” to any question first check that the oven is plugged in properly and the fuse has not blown. If there is no fault with either; check against the chart below.
NOTE:
If you cook food for more than the standard time (see chart below) using the same cooking mode, the oven’s safety mechanisms automatically activate.The microwave power level will be reduced.
| Cooking Mode | Standard Time |
| Microwave HIGH cooking | 20 Minutes |
WARNING:
Never adjust, repair or modify the oven yourself. It is hazardous for anyone other than a SHARP trained engineer to carry out servicing or repairs.
This is important as it may involve the removal of covers that provide protection against microwave energy.
- The door seal stops microwave leakage during oven operation, but does not form an airtight seal. It is normal to see drops of water, light or feel warm air around the oven door. Food with a high moisture content will release steam and cause condensation inside the door which may drip from the oven.
- Repairs and Modifications: Do not attempt to operate the oven if it is not working properly.
- Outer Cabinet & Lamp Access: Never remove the outer cabinet. This is very dangerous due to high voltage parts inside which must never be touched, as this could be fatal.
Your oven is not fitted with a lamp access cover. If the lamp fails, do not attempt to replace the lamp yourself, call a SHARP approved service facility.
| QUERY | ANSWER |
| Draught circulates around the door. | When the oven is working, air circulates within the cavity. The door does not form an airtight seal so air may escape from the door. |
| Condensation forms in the oven, and may drip from the door. | The oven cavity will normally be colder than the food being cooked, and so steam produced when cooking will condense on the colder surface. The amount of steam produced depends on the water content of the food being cooked. Some foods, such as potatoes have a high moisture content. Condensation trapped in the door glass should clear after a few hours. |
| Flashing or arcing from within the cavity when cooking. | Arcing will occur when a metallic object comes into close proximity to the oven cavity during cooking. This may possibly roughen the surface of the cavity, but would not otherwise damage the oven. |
| Arcing potatoes. | Ensure all “eyes” are removed and the potatoes have been pierced, place directly onto the turntable or in a heat resistant flan dish or similar. |
| The display is lit but the control panel will not work when pressed. | Check the door is closed properly. |
| Oven cooks too slowly. | Ensure correct power level has been selected. |
| Oven makes a noise. | The microwave energy pulses ON and OFF during cooking/defrosting. |
| Outer cabinet is hot. | The cabinet may become warm to the touch – keep children away. |
SPECIFICATIONS
| Model name: | R- 270 |
| AC Line Voltage | : Single phase 230-240V, 50Hz |
| Power Consumption: Microwave | : 1200W |
| Input Current: Microwave | : 5.2A |
| Output power: Microwave | : 800W (IEC 60705) |
| Heating Category | : E |
| Microwave Frequency | : 2450MHz* (Group 2/Class B) |
| Outside Dimensions (W ) x (H) x (D) mm | : 450 x 260 x 342 |
| Cavity Dimensions (W ) x (H) x (D)** mm | : 315 x 210 x 329 |
| Oven Capacity | : 20 litres** |
| Cooking Uniformity | : Turntable diameter 245mm |
| Weight | : Approx. 12 kg |
- This product fulfils the requirement of the European standard EN55011. In conformity with this standard, this product is classified as group 2 class B equipment. Group 2 means that the equipment intentionally generates radio-frequency energy in the form of electromagnetic radiation for the heat treatment of food.
Class B equipment means that the equipment is suitable to be used in domestic establishments. - Internal capacity is calculated by measuring maximum width, depth and height.
Actual capacity for holding food is less.
As part of a policy of continuous improvement, we reserve the right to alter design and specifications without notice.
No part of this publication may be reproduced, stored in a retrieval system or transmitted in any form, electronic, mechanical, photocopying, recording, translating or other means without prior permission from SHARP Vestel UK
The illustrations, technical information and data contained in this publication are, to our best knowledge, correct at the time of going to print. The right to change specifications, at any time, without notice, is reserved as a part of our policy of continuous development and improvement.
HEATING CATEGORY
Microwave output power e output power in in Watts (based on(based on intern international (IEC 60705) standard).
Latter repeater representing the resenting the oven heavens heating category..
| OVEN OUTPUT POWER | Less heating time required 600 700 800 900 1000 Watts More heating time required |
| OVEN OUTPUT CATEGORY | Less heating time required A B C D E More heating time required |
Food packs carry cooking instructions for heating categories A to E. Follow instructions for the letter corresponding to the oven’s heating category. The higher the output power and heating category of the oven the less heating time is required as shown opposite. The heating category (a letter A to E) developed by MAFF (Ministry of Agriculture, Fisheries and Food) with microwave oven and food manufacturers indicates the ability of the oven to heat small quantities of food (up to 500g [ I lb 2oz]). It does not represent the general performance of the oven.
Vestel UK
London, United Kingdom
www.sharphomeappliances.com/support