Philips GC363 Garment Steamer User Manual


GC360, GC361
GC362, GC363

User manual
GC363 Garment Steamer


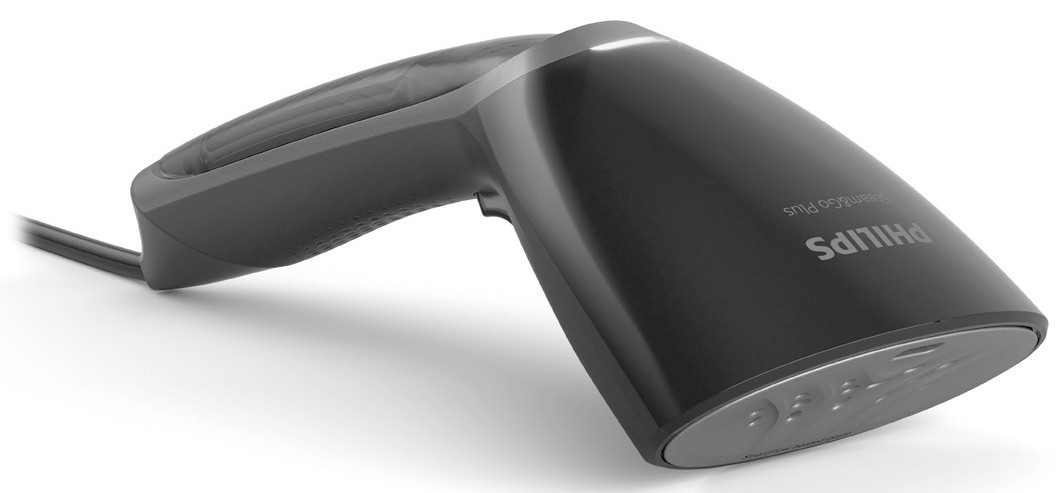
| 1. Steamer head 2. Steam ready light 3. Water tank 4. Power button 5. Power cord |
6. Brush 7. Heat-resistant bag (GC362, GC363) 8. Glove 9. Steam trigger button |

Do not use your bare hand as a supporting surface when you steam.
Pull the sides of the garment to stretch it.
Do not place the steamer head on the power cord after use.


You can dewrinkle garments more easily if you spread the laundry properly after you have washed it. Hang the garments on hangers to dry them with fewer wrinkles.

When you are steaming, press the steamer head against the garment and pull the sides of the garment with your other hand to stretch it.

For garments with buttons such as shirts, jackets and pants, close the first button to help straighten the fabric.
For shirt pockets, move the steamer head upwards while pressing against the fabric.
To steam sleeves, start from the shoulder area and move the steamer head downwards. Steam while you pull the sleeve diagonally down with the other hand.
For garment with collar, move the steamer horizontally along the collar.
Note: The appliance can be used for creating a natural look and for quick touch-ups. For garments with tough wrinkles and for a more formal look, it is recommended to use an iron in addition.

Keep the steamer head a slight distance away from dresses with frills, ruffles, ruching or sequins. Use only the steam to loosen the fabric. You can also steam from the inside.

Garment may be placed on a horizontal surface (e.g. ironing board, sofa, mattress) to make crisp pleats on sleeves and pants and better remove creases on difficult areas such as shirt collar or cuffs.

For more tips on how to steam different types of garments, please visit www.philips.com/garmentsteamers.

Your appliance has been designed to be used with tap water.
Warning: Do not add perfume, water from tumble dryer, vinegar, magnetically treated water (e.g., Aqua+), starch, descaling agents, ironing aids, chemically descaled water or other chemicals as they may cause water spitting, brown staining or damage to your appliance.


The ‘steam ready’ lights up when the steamer is plugged in and powered on to indicate that the steamer is heating up.
The steamer is ready to be used approximately after 45 seconds when the light goes off.
When steam is ready, direct the steam away for a few seconds before you begin your session, as the initial steam may contain water droplets.
Always keep the steam trigger pressed during steaming.
The steaming process can create small wet spots in the garment. The garment may also be slightly damp due to the steam.
After your session, leave your garment out to dry before you keep or wear it.


Put the glove on the hand you are using to hold a garment. The glove protects your hand against the steam from the steamer head.


The brush attachment improves steam penetration to achieve faster and better steaming result on thick and heavy garment such as coat and jacket. Brush is to be used together with steam by pressing the steam trigger and slowly moving the bristles along the garment.
Note: Always unplug the steamer before you attach or detach the brush attachment. Be careful, the steamer head may still be hot.


Always empty the water tank after use, to prevent scale build-up. Rinse the water tank to remove any deposits.
Wipe any deposits off the steamer head with a damp cloth and a non-abrasive liquid cleaning agent.
Warning: Do not use scouring pads, abrasive cleaning agents or aggressive liquids such as alcohol, petrol or acetone to clean the appliance.


| Problem | Possible cause | Solution |
| The steamer does not heat up. | The steamer is not plugged in properly or not switched on. | Check if the mains plug is inserted properly and its wall socket is working. Check if the steamer is switched on. |
| The steamer does not produce any steam. |
The steamer is not plugged in properly or not switched on. | Check if the mains plug is inserted properly and its wall socket is working. Check if the steamer is switched on. |
| The steamer has not heated up sufficiently. | Let the steamer heat up for 45 seconds (steam-ready lights up). The steamer is ready to be used when the light goes off. | |
| You have not pressed the steam trigger fully. |
Press the steam trigger fully for a few seconds. | |
| The water level in the water tank is too low. |
Unplug the steamer and refill the water tank. | |
| The water tank is not in place. | Insert the water tank properly. | |
| Water droplets drip from the steamer head. |
The steamer has not heated up sufficiently. | Let the steamer heat up for 45 seconds (steam-ready lights up). The steamer is ready to be used when the light goes off. |
| The steamer produces a pumping sound/ the handle vibrates. |
Water is pumped to the steamer head to be converted into steam. | This is normal. |
| Water inside the tank has all been used up. | Refill the water tank. | |
| Water leaks from the water tank. | Water tank filling door is not closed properly | Ensure that filling door is closed properly. |
| Steam leaves stains on the garment or impurities come out of the steamer head |
Apart from tap water, you have filled other liquids/additives or descaling agents into the water tank. |
Use only tap, demineralized or filtered water when filling up the water tank. |


© 2022 Philips Domestic Appliances Holding B.V. All rights reserved.
4239.001.0964.4 (16/02/2022)
