Epson C6000P Color Inkjet Label Printer User Manual
EPSON C6000P Color Inkjet LabelPrinter User Manual

The Roll to Roll system specifically designed for Epson C6000P color label printer can handle rolls up to 127mm (5″) media wide and having an outside diameter up to 250mm (10″). Both Unwinder and Rewinder are equipped with a fixed 3″ core holder. An external power supply 100/240VAC – 2.5A at 24V allows an electronic circuit to provide, through the tension arm, the speed and sense of rotation auto adjustment.
LABEL UNWINDER INSTALLATION
If you do not have the printer plate (JPL-6000P), place and align the unwinder behind the printer and than follow the instructions from STEP 3.
STEP 1 Place carefully the printer into the lock guides.
Do not tighten the knobs until the unwinder will be properly aligned to the printer.


STEP 3 Remove the additional support and the outer disk. Now load both roll of media and outer disk onto the core holder.
Tighten the core through the knob.

STEP 4 Install the additional support.

STEP 5 Keeping the media underneath the tension arm, turn on the unwinder and feed the media into the printer.
Please look at printer’s user manual and follow the detailed procedure on how to load the media into the printer.

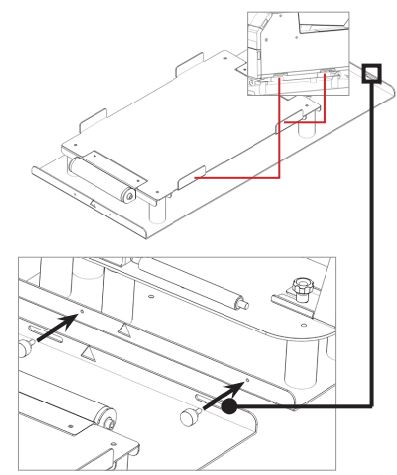
STEP 6 Once the media is loaded into the printer, slide left and right the unwinder to find the correct alignment between the two units and tighten the knobs.

Complete the roll to roll system with the Label Rewinder Installation
STEP 7 Behind the unwinder (A), place and screw the additional plate “B” (equipped with the rewinder).
Than screw the rewinder (C) to this plate extension.
Do not tighten the knobs until the rewinder will be properly aligned to the printer.

STEP 8 Pull the printed media underneath both printer and label unwinder.

STEP 9 Remove the additional support and the outer disk. Load the empty cardboard core onto the core holder.
Slide in the outer disk onto the core holder and keep it close to the media edge. Tighten the knob.

STEP 10 Keeping the printed media underneath the tension arm, stick the end on the cardboard core.
Install the additional support.
STEP 11 Once the media is loaded on the rewinder, slide left and right the rewinder to find the correct alignment between the two units and tighten the knobs.


LABEL REWINDER ONLY INSTALLATION

ATTENTION. The unit is equipped with an extension plate as default, for this configuration it is not required to be used.
If you do not have the printer plate (JPL-6000P), place and align the rewinder behind the printer and than follow the instructions from STEP 3.
STEP 1 Place carefully the printer into the lock guides.

STEP 3 Remove the additional support and the outer disk. Load the empty cardboard core onto the core holder. Slide in the outer disk onto the core holder and keep it close to the media edge.

STEP 4 Pull the printed media underneath the printer and under the tension arm.


STEP 6 Once the media is loaded into the printer, slide left and right the unwinder to find the correct alignment between the two units and tighten the knobs.

FUNCTIONING
Label rewinder
INCREASE SPEED Push this button to increase the rotation speed.
DECREASE SPEED Push this button to decrease the rotation speed.
LABEL FACE-OUT Turn the unit off. Keep pushed “FACE OUT” button and push “ON-OFF” until it beeps and the unit starts to rotate.
LABEL FACE-IN Turn the unit off. Keep pushed “FACE IN” button and push “ON-OFF” until it beeps and the unit starts to rotate.
LABEL REWINDER MODE Turn the unit off. Keep “ON-OFF” button pushed until both LEDs will be blinking, than push “Label Rewinder” button. Once the programming procedure will be completed, turn ON the unit and it is ready to work.
BACKING PAPER REWINDER Turn the unit off. Keep “ON-OFF” button pushed until both LEDs will be blinking, than push “Backing Paper Rewinder” button. Once the programming procedure will be completed, turn ON the unit and it is ready to work. Backing paper can be rewinded face out only.

Label unwinder
ON-OFF Push this button to turn On or Off the unit.
INCREASE SPEED Push this button to increase the rotation speed.
DECREASE SPEED Push this button to decrease the rotation speed.

Smart solutions for the labeling industry
Label rewinder, label unwinder, electronic label dispenser and more…
